User Manual
Page 2
... Main Unit 3 Control Panel Button Locations 4 General Operation...5-6 Turn Unit On/Off...5 Adjust Volume (VOL 5 Adjust Menu Options (SEL 5-6 Set the Clock (CLK)...6 Change the Source (SRC 6 Mute on/off...6 Loudness on/off...6 Preset EQ(Equalizer 6 USB Port...6 Release the detachable front panel 6 SD Card Slot...6 Hands-free Microphone 6 AUX input Connector 6 Reset Sytstem (Reset 6 Radio Operation...7 Switch Between USA area and Europe area Frequency 7 Change Bands (BAND 7 Manual Tuning 7 Auto Seek Tuning 7 To Store/Recall Preset Stations (1 - 6 7 Automatic Store Station / Preset...
... Main Unit 3 Control Panel Button Locations 4 General Operation...5-6 Turn Unit On/Off...5 Adjust Volume (VOL 5 Adjust Menu Options (SEL 5-6 Set the Clock (CLK)...6 Change the Source (SRC 6 Mute on/off...6 Loudness on/off...6 Preset EQ(Equalizer 6 USB Port...6 Release the detachable front panel 6 SD Card Slot...6 Hands-free Microphone 6 AUX input Connector 6 Reset Sytstem (Reset 6 Radio Operation...7 Switch Between USA area and Europe area Frequency 7 Change Bands (BAND 7 Manual Tuning 7 Auto Seek Tuning 7 To Store/Recall Preset Stations (1 - 6 7 Automatic Store Station / Preset...
User Manual
Page 3
... not touch the playing side • Before inserting a disc, wipe the disc outward from the disc slot, place the disc in direct sunlight for long periods of time when the motor is switched off. Refer all service to a qualified technician. • Some MP3/WMA files may not be lost and require reprogramming. • The unit is disconnected, discharged, or changed, the preset memory of...
... not touch the playing side • Before inserting a disc, wipe the disc outward from the disc slot, place the disc in direct sunlight for long periods of time when the motor is switched off. Refer all service to a qualified technician. • Some MP3/WMA files may not be lost and require reprogramming. • The unit is disconnected, discharged, or changed, the preset memory of...
User Manual
Page 4
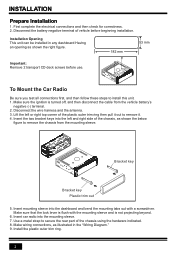
... sleeve. 7. Installation Opening This unit can be installed in the "Wiring Diagram." 9. Insert car radio into the dashboard and bend the mounting tabs out with the mounting sleeve and is not projecting beyond. 6. Disconnect the wire harness and the antenna. 3. Install the plastic outer trim ring. 2 Make sure the ignition is flush with a screwdriver. Use a metal strap to remove it out to secure the rear part of...
... sleeve. 7. Installation Opening This unit can be installed in the "Wiring Diagram." 9. Insert car radio into the dashboard and bend the mounting tabs out with the mounting sleeve and is not projecting beyond. 6. Disconnect the wire harness and the antenna. 3. Install the plastic outer trim ring. 2 Make sure the ignition is flush with a screwdriver. Use a metal strap to remove it out to secure the rear part of...
User Manual
Page 5
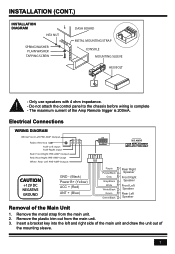
... MOUNTING STRAP CONSOLE MOUNTING SLEEVE HEX BOLT ! - Electrical Connections WIRING DIAGRAM White:Front Left PRE-AMP Output Radio Antenna AUX-Left input AUX-Right input Red: Front Right PRE-AMP Output Red: Rear Right PRE-AMP Outpt White: Rear Left PRE-AMP Output CAUTION +12V DC NEGATIVE GROUND GND - (Black) Power B+ (Yellow) ACC + (Red) ANT + (Blue) 15 15A Purple Purple/Black Gray Gray/Black White White/Black Green Green/Black Rear Right Speaker Front Right Speaker Front Left Speaker Rear Left Speaker Removal of the mounting sleeve. 3 The maximum current of...
... MOUNTING STRAP CONSOLE MOUNTING SLEEVE HEX BOLT ! - Electrical Connections WIRING DIAGRAM White:Front Left PRE-AMP Output Radio Antenna AUX-Left input AUX-Right input Red: Front Right PRE-AMP Output Red: Rear Right PRE-AMP Outpt White: Rear Left PRE-AMP Output CAUTION +12V DC NEGATIVE GROUND GND - (Black) Power B+ (Yellow) ACC + (Red) ANT + (Blue) 15 15A Purple Purple/Black Gray Gray/Black White White/Black Green Green/Black Rear Right Speaker Front Right Speaker Front Left Speaker Rear Left Speaker Removal of the mounting sleeve. 3 The maximum current of...

User Manual
Page 6
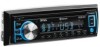
... up, next track, fast forward) button 13. RDM (random), Preset station 4 button 8. -10(previous 10 tracks), DIR- (previous folder), Preset station 5 button 9. +10(next 10 tracks), DIR+(next folder), Preset station 6 button 10. AUX IN (auxiliary input) jack 20. SEL (select/menu) button and VOL (volume) knob 3. IR remote sensor 17. INT (intro), Preset station 2 button 6. CLK (clock setting), MUTE button, (end call ) button 4. (pause/play), Preset station 1 button 5. Reset button 4 Disc slot 16. Hands-free Microphone 14. LCD Display 18. SD Card slot 22.
... up, next track, fast forward) button 13. RDM (random), Preset station 4 button 8. -10(previous 10 tracks), DIR- (previous folder), Preset station 5 button 9. +10(next 10 tracks), DIR+(next folder), Preset station 6 button 10. AUX IN (auxiliary input) jack 20. SEL (select/menu) button and VOL (volume) knob 3. IR remote sensor 17. INT (intro), Preset station 2 button 6. CLK (clock setting), MUTE button, (end call ) button 4. (pause/play), Preset station 1 button 5. Reset button 4 Disc slot 16. Hands-free Microphone 14. LCD Display 18. SD Card slot 22.
User Manual
Page 7
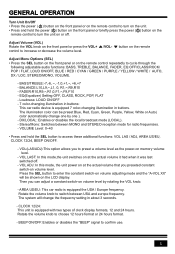
... STEREO reception mode for radio frequencies. - Then you to preset a volume level as the power-on memory volume level. - Rotate the volume knob to turn on the unit. • Press and hold the SEL button to choose 12 hours format or 24 hours format. - The illumination color can adjust a constant switch-on volume level by one ). - The system will be preset Blue, Red, Cyan, Green, Purple, Yellow, White or Auto( color automatically change the frequecny setting...
... STEREO reception mode for radio frequencies. - Then you to preset a volume level as the power-on memory volume level. - Rotate the volume knob to turn on the unit. • Press and hold the SEL button to choose 12 hours format or 24 hours format. - The illumination color can adjust a constant switch-on volume level by one ). - The system will be preset Blue, Red, Cyan, Green, Purple, Yellow, White or Auto( color automatically change the frequecny setting...
User Manual
Page 8
... button on the remote control to switch between EQ OFF, CLASS, ROCK, POP, FLAT. Press the CLK/MUTE button on the front panel or press the VOL+ /VOLadjust the selected item. Change the Source (SRC) Press the SRC button to toggle between RADIO, BT(Bluetooth), DISC(with a CD/MP3 disc inside the disc slot), USB(with USB device inserted), SD(with SD card inserted) and AUX-IN(auxiliary input) modes. Preset EQ (Equalizer...
... button on the remote control to switch between EQ OFF, CLASS, ROCK, POP, FLAT. Press the CLK/MUTE button on the front panel or press the VOL+ /VOLadjust the selected item. Change the Source (SRC) Press the SRC button to toggle between RADIO, BT(Bluetooth), DISC(with a CD/MP3 disc inside the disc slot), USB(with USB device inserted), SD(with SD card inserted) and AUX-IN(auxiliary input) modes. Preset EQ (Equalizer...
User Manual
Page 9
RADIO OPERATION Switch Between USA area and Europe area Frequency In radio mode, press the VOL button to enter the switch state of the US(USA) and EU(europe) frequency, then rotate it to switch between US(USA) and EU(europe) frequency. Change Bands (BAND) Press the BAND button to switch between the FM1, FM2, FM3, AM1 and AM2 bands. Each band stores up to six preset stations. Manual Tuning Press and hold the >>| or |>| or |>| or |>| or | The system will change the frequency setting in about 3 seconds.
RADIO OPERATION Switch Between USA area and Europe area Frequency In radio mode, press the VOL button to enter the switch state of the US(USA) and EU(europe) frequency, then rotate it to switch between US(USA) and EU(europe) frequency. Change Bands (BAND) Press the BAND button to switch between the FM1, FM2, FM3, AM1 and AM2 bands. Each band stores up to six preset stations. Manual Tuning Press and hold the >>| or |>| or |>| or |>| or | The system will change the frequency setting in about 3 seconds.
User Manual
Page 10
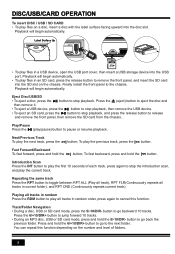
.... Eject Disc/USB/SD • To eject a disc, press the button to remove the front panel, and insert the SD card into the SD slot on a disc, insert a disc with the label surface facing upward into the USB port. Next/Previous Track To play the previous track, press the |>| button; Playback will begin automatically. • To play files in a USB device, open the USB port cover, then insert a USB storage device into...
.... Eject Disc/USB/SD • To eject a disc, press the button to remove the front panel, and insert the SD card into the SD slot on a disc, insert a disc with the label surface facing upward into the USB port. Next/Previous Track To play the previous track, press the |>| button; Playback will begin automatically. • To play files in a USB device, open the USB port cover, then insert a USB storage device into...
User Manual
Page 11
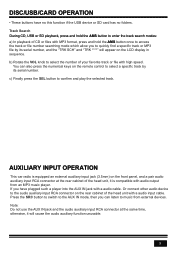
... SEL button to the audio auxiliary input RCA connector on the LCD display in sequence. You can listen to select the number of the head unit with a audio input cable. Or connect other audio device to confirm and play the selected track. DISC/USB/CARD OPERATION • These buttons have plugged such a player into the AUX IN jack with a audio cable. b) Rotate the VOL knob to music from an MP3 music player. Press the SRC button to switch to the AUX IN mode...
... SEL button to the audio auxiliary input RCA connector on the LCD display in sequence. You can listen to select the number of the head unit with a audio input cable. Or connect other audio device to confirm and play the selected track. DISC/USB/CARD OPERATION • These buttons have plugged such a player into the AUX IN jack with a audio cable. b) Rotate the VOL knob to music from an MP3 music player. Press the SRC button to switch to the AUX IN mode...
User Manual
Page 12
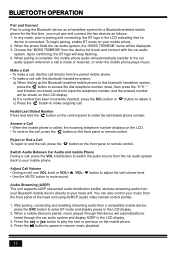
... telephone number displays on the LCD. • To receive the call . Choose the "BOSS 750BRGB" from the car audio system back to your mobile phone. 2. b) If a number has been incorrectly inputted, press the DEL button or button to mute sound. /VOL- Answer a Call • When the mobile phone is made or received, or when the mobile phone plays music. After pairing, connecting and enabling streaming audio from the front panel of the head unit using the Bluetooth device...
... telephone number displays on the LCD. • To receive the call . Choose the "BOSS 750BRGB" from the car audio system back to your mobile phone. 2. b) If a number has been incorrectly inputted, press the DEL button or button to mute sound. /VOL- Answer a Call • When the mobile phone is made or received, or when the mobile phone plays music. After pairing, connecting and enabling streaming audio from the front panel of the head unit using the Bluetooth device...
User Manual
Page 13
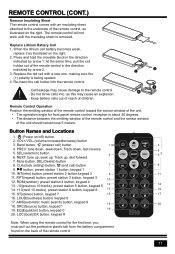
... ; CLK(clock setting) button, (end call ) button 1 3 4. button, preset station 1 button, keypad 1 10. Replace Lithium Battery Cell 1. When the lithium cell battery becomes weak, replace it as illustrated on the back of the remote control. 11 Keep battery cells out of reach of the remote control in the direction indicated by arrow 2. 3. Mute button, DEL(Delete) button 8. INT(intro) button, preset station 2 button,keypad 2 9 11 11. RPT(repeat) button, preset station 3 button, keypad 3 10 12. AMS(automatic music search) button, keypad...
... ; CLK(clock setting) button, (end call ) button 1 3 4. button, preset station 1 button, keypad 1 10. Replace Lithium Battery Cell 1. When the lithium cell battery becomes weak, replace it as illustrated on the back of the remote control. 11 Keep battery cells out of reach of the remote control in the direction indicated by arrow 2. 3. Mute button, DEL(Delete) button 8. INT(intro) button, preset station 2 button,keypad 2 9 11 11. RPT(repeat) button, preset station 3 button, keypad 3 10 12. AMS(automatic music search) button, keypad...

User Manual
Page 14
If you still have questions after going through the checklist, please consult your local customer service representative. Before going through this check list, refer the wiring and operating procedures. 12 TROUBLESHOOTING The following chart will help in solving most problems that may occur.
If you still have questions after going through the checklist, please consult your local customer service representative. Before going through this check list, refer the wiring and operating procedures. 12 TROUBLESHOOTING The following chart will help in solving most problems that may occur.


