User Manual
Page 2
WARNING 0#&"#1")#%23",%#)*+,#,4,)%5#)"#$6+1#"$#5"+,)'$%7# WARNING: !*%#6336$6)',#,*6//#1")#8%#%23",%&#)"#&$+33+19#"$#,3/6,*+190#61&#"8 0#,'(*#6,# =6,%,0#,*6//#1")#8%#3/6(%&#"1#)*%#6336$6)',7#>,#;+)*#614#%/%()$"1+(#3$"&'(),0#',%#(6$%#1")#)"#,3 1)"#614#36$)# ".#)*%#,4,)%57#?+ It will help you set up and operate your owner's guide for future reference. Please save your system properly and enjoy its advanced features. Français Español English SAFETY INFORMATION Please read this owner's guide Please take the time to follow this owner's guide carefully.
WARNING 0#&"#1")#%23",%#)*+,#,4,)%5#)"#$6+1#"$#5"+,)'$%7# WARNING: !*%#6336$6)',#,*6//#1")#8%#%23",%&#)"#&$+33+19#"$#,3/6,*+190#61&#"8 0#,'(*#6,# =6,%,0#,*6//#1")#8%#3/6(%&#"1#)*%#6336$6)',7#>,#;+)*#614#%/%()$"1+(#3$"&'(),0#',%#(6$%#1")#)"#,3 1)"#614#36$)# ".#)*%#,4,)%57#?+ It will help you set up and operate your owner's guide for future reference. Please save your system properly and enjoy its advanced features. Français Español English SAFETY INFORMATION Please read this owner's guide Please take the time to follow this owner's guide carefully.
User Manual
Page 3
... the ventilation openings. Corporation. Do not use this product near a swimming pool, or anywhere else that will not interfere with its ventilation openings. 8. ...owner's guide. 4. 5.22.3%#22 6 5. 7 00#+#&,(%*"#+%3#&"+%.+%8.)(&,+" - and as a bookcase or a cabinet that may keep air from flowing through its proper ventilation. system, such as directed by Bose ! Do not put the product in ! H+.&"-&%&'"%0.3"+%-.+$%@+.8%;")*4%3#2 overheating, put it from the wall outlet before using this product from ! English Español Français Important Safety Instructions...
... the ventilation openings. Corporation. Do not use this product near a swimming pool, or anywhere else that will not interfere with its ventilation openings. 8. ...owner's guide. 4. 5.22.3%#22 6 5. 7 00#+#&,(%*"#+%3#&"+%.+%8.)(&,+" - and as a bookcase or a cabinet that may keep air from flowing through its proper ventilation. system, such as directed by Bose ! Do not put the product in ! H+.&"-&%&'"%0.3"+%-.+$%@+.8%;")*4%3#2 overheating, put it from the wall outlet before using this product from ! English Español Français Important Safety Instructions...
User Manual
Page 5
... 9 Connecting the power cord 10 Connecting other sources 10 USING YOUR SPEAKER SYSTEM 11 Controlling the system 11 Balancing tone for the sound you keep your sales receipt together with this owner's guide. English Español Français CONTENTS GETTING STARTED 6 Congratulations on your choice 6 Unpacking the carton 6 SETUP AND CONNECTIONS 7 Placing your system 7 Positioning the Acoustimass® module 7 Positioning the speakers 8 Making connections 8 Connecting...
... 9 Connecting the power cord 10 Connecting other sources 10 USING YOUR SPEAKER SYSTEM 11 Controlling the system 11 Balancing tone for the sound you keep your sales receipt together with this owner's guide. English Español Français CONTENTS GETTING STARTED 6 Congratulations on your choice 6 Unpacking the carton 6 SETUP AND CONNECTIONS 7 Placing your system 7 Positioning the Acoustimass® module 7 Positioning the speakers 8 Making connections 8 Connecting...
User Manual
Page 6
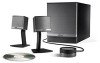
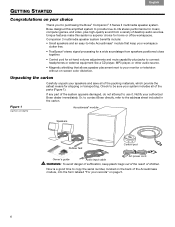
... feet Control pod AC power cord Owner's guide Audio input cable WARNING: !"#6="+&#&619%$#".#,'.."(6)+"10#-%%3#3/6,)+(#869 6 17 Now is a good time to -hide Acoustimass® module that allows speaker placement next to use it. module, into the form labeled "For your records" on -screen color distortion. without on page 5. 6 01&2 2 34!5 Companion 3 multimedia speaker system benefits include: • Small speakers and an easy-to copy the serial number...
... feet Control pod AC power cord Owner's guide Audio input cable WARNING: !"#6="+&#&619%$#".#,'.."(6)+"10#-%%3#3/6,)+(#869 6 17 Now is a good time to -hide Acoustimass® module that allows speaker placement next to use it. module, into the form labeled "For your records" on -screen color distortion. without on page 5. 6 01&2 2 34!5 Companion 3 multimedia speaker system benefits include: • Small speakers and an easy-to copy the serial number...
User Manual
Page 7
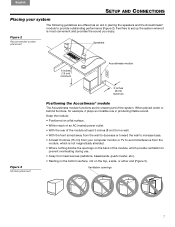
...shielded. • Where nothing blocks the openings on the back of the system. Ventilation openings 7 01&2 2 34!5 Feel free to set up the system where it plays an invisible role in placing the speakers and the Acoustimass® module to provide...rear of the module at least 3 inches (8 cm) from a wall. • With the front aimed away from the wall to decrease or toward the wall to increase bass. • At least 6 inches (15 cm) from your system The following guidelines are offered as the unseen part of the module, which provide ventilation to prevent overheating during use...
...shielded. • Where nothing blocks the openings on the back of the system. Ventilation openings 7 01&2 2 34!5 Feel free to set up the system where it plays an invisible role in placing the speakers and the Acoustimass® module to provide...rear of the module at least 3 inches (8 cm) from a wall. • With the front aimed away from the wall to decrease or toward the wall to increase bass. • At least 6 inches (15 cm) from your system The following guidelines are offered as the unseen part of the module, which provide ventilation to prevent overheating during use...
User Manual
Page 8
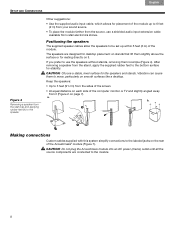
... distance on each side of the computer monitor or TV and slightly angled away from it . CAUTION: B*"",%#6#,)68/%0#/%=%/#,'$.6(%#."$#)*%#,3%6-%$,#61&#,)61&,7#C+8$6)+"1#(61#(6',%# )*%5#)"#5"=%0#36$)+('/6$/4#"1#,5"")*#,'$.6(%,#/+-%#6#&%,-)"37 Keep the speakers: • Up to use a shielded audio input extension cable available from retail electronics stores. Making connections Custom cables supplied with this system simplify connections to 6 feet ! (2 m) from your sound source. • To place the module farther...
... distance on each side of the computer monitor or TV and slightly angled away from it . CAUTION: B*"",%#6#,)68/%0#/%=%/#,'$.6(%#."$#)*%#,3%6-%$,#61&#,)61&,7#C+8$6)+"1#(61#(6',%# )*%5#)"#5"=%0#36$)+('/6$/4#"1#,5"")*#,'$.6(%,#/+-%#6#&%,-)"37 Keep the speakers: • Up to use a shielded audio input extension cable available from retail electronics stores. Making connections Custom cables supplied with this system simplify connections to 6 feet ! (2 m) from your sound source. • To place the module farther...
User Manual
Page 9
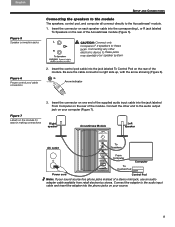
... the cable connector is right side up, with the arrow showing (Figure 6). To Speakers on your speaker system. Arrow indicator Figure 7 Labels on the rear of the module. Insert the control pod cable into the jack labeled To Control Pod on one end of the supplied audio input cable into the corresponding L or R jack labeled! Right speaker Acoustimass Module Left speaker AC outlet To Speakers From Computer To Control Pod Computer Power cord Control Pod Note...
... the cable connector is right side up, with the arrow showing (Figure 6). To Speakers on your speaker system. Arrow indicator Figure 7 Labels on the rear of the module. Insert the control pod cable into the jack labeled To Control Pod on one end of the supplied audio input cable into the corresponding L or R jack labeled! Right speaker Acoustimass Module Left speaker AC outlet To Speakers From Computer To Control Pod Computer Power cord Control Pod Note...

User Manual
Page 10
... control pod, the LED turns yellow to your system, plug the cable from the speakers. 10 01&2 2 34!5 Connecting other sources The control pod features two jacks: one for connection directly to another sound source and the other for use. Turn the power switch, located on the module. 2. Insert the small connector end of the Acoustimass module, to ON (|). This connection mutes the sound from the sound source output jack into the headphone jack...
... control pod, the LED turns yellow to your system, plug the cable from the speakers. 10 01&2 2 34!5 Connecting other sources The control pod features two jacks: one for connection directly to another sound source and the other for use. Turn the power switch, located on the module. 2. Insert the small connector end of the Acoustimass module, to ON (|). This connection mutes the sound from the sound source output jack into the headphone jack...
User Manual
Page 11
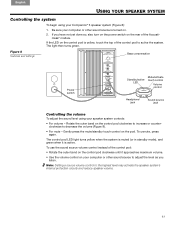
... until it is yellow, touch the top of the control pod to decrease the volume (Figure 8). • For mute - The light then turns green. Figure 8 Switches and settings Bass compensation Power switch Standby/active LED Mute/activate touch control Volume control Headphone jack Sound source jack Controlling the volume To adjust the sound level using your speaker system controls: • For volume - To use the sound source volume control instead of the Acoustimass® module. Rotate the outer band on...
... until it is yellow, touch the top of the control pod to decrease the volume (Figure 8). • For mute - The light then turns green. Figure 8 Switches and settings Bass compensation Power switch Standby/active LED Mute/activate touch control Volume control Headphone jack Sound source jack Controlling the volume To adjust the sound level using your speaker system controls: • For volume - To use the sound source volume control instead of the Acoustimass® module. Rotate the outer band on...
User Manual
Page 12
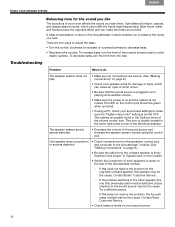
... volume using a PC, check your speaker wires for damage or frays, which can make sure the "Digital output only" setting is turned OFF. Troubleshooting Problem What to jacks on the rear of the Acoustimass module. - The speaker system sound! One speaker does not perform • Check connections from the speakers, control pod, or sounds distorted and computer to the Acoustimass® module. (See "Making connections" on page 8.) • Check your sound card settings to decrease bass...
... volume using a PC, check your speaker wires for damage or frays, which can make sure the "Digital output only" setting is turned OFF. Troubleshooting Problem What to jacks on the rear of the Acoustimass module. - The speaker system sound! One speaker does not perform • Check connections from the speakers, control pod, or sounds distorted and computer to the Acoustimass® module. (See "Making connections" on page 8.) • Check your sound card settings to decrease bass...
User Manual
Page 13
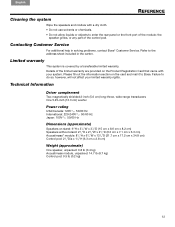
... section on stand: 6"H x 33/8"W x 31/4"D (15 cm x 8.6 cm x 8.2 cm) ! the speaker grilles, or any part of the module; Refer to enter the rear panel or the front port of the control pod. Control pod: 21/2"Dia x 11/8"H (6.3 cm x 2.8 cm) Weight (approximate) One speaker, unpacked: 0.8 lb (0.4 kg)! Failure to Bose. Technical Information Driver complement Two magnetically shielded 2-inch (5.0 cm) long-throw, wide-range...
... section on stand: 6"H x 33/8"W x 31/4"D (15 cm x 8.6 cm x 8.2 cm) ! the speaker grilles, or any part of the module; Refer to enter the rear panel or the front port of the control pod. Control pod: 21/2"Dia x 11/8"H (6.3 cm x 2.8 cm) Weight (approximate) One speaker, unpacked: 0.8 lb (0.4 kg)! Failure to Bose. Technical Information Driver complement Two magnetically shielded 2-inch (5.0 cm) long-throw, wide-range...


