User Manual
Page 5
... 6 Unpacking the carton 6 SETUP AND CONNECTIONS 7 Placing your system 7 Positioning the Acoustimass® module 7 Positioning the speakers 8 Making connections 8 Connecting the speakers to register your sales receipt together with this owner's guide. Now would be a good time to the module 9 Connecting... the power cord 10 Connecting other sources 10 USING YOUR SPEAKER SYSTEM 11 Controlling the system 11 Balancing tone for the sound you keep your product online at www.bose.com/register. 5 English Español Français CONTENTS GETTING STARTED...
... 6 Unpacking the carton 6 SETUP AND CONNECTIONS 7 Placing your system 7 Positioning the Acoustimass® module 7 Positioning the speakers 8 Making connections 8 Connecting the speakers to register your sales receipt together with this owner's guide. Now would be a good time to the module 9 Connecting... the power cord 10 Connecting other sources 10 USING YOUR SPEAKER SYSTEM 11 Controlling the system 11 Balancing tone for the sound you keep your product online at www.bose.com/register. 5 English Español Français CONTENTS GETTING STARTED...
User Manual
Page 6
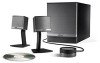
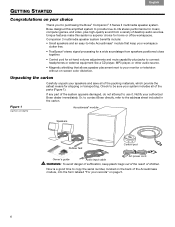
...-hand volume adjustments and mute capability plus high-quality sound from speakers positioned close together. • Control pod for purchasing the Bose®!Companion® 3 Series II multimedia speaker system. Unpacking the carton Carefully unpack your authorized Bose dealer immediately. Figure 1 Carton contents Acoustimass® module Speakers Rubber feet Control pod AC power cord Owner's guide Audio input...
...-hand volume adjustments and mute capability plus high-quality sound from speakers positioned close together. • Control pod for purchasing the Bose®!Companion® 3 Series II multimedia speaker system. Unpacking the carton Carefully unpack your authorized Bose dealer immediately. Figure 1 Carton contents Acoustimass® module Speakers Rubber feet Control pod AC power cord Owner's guide Audio input...
User Manual
Page 7
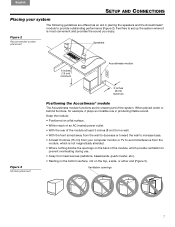
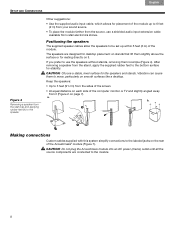
...(radiators, baseboards, quartz heater, etc.). • Resting on the bottom surface, not on the back of the system. Figure 2 Recommended system placement Speakers Figure 3 Module placement 6 inches (15 cm) minimum Acoustimass module 3 inches (8 cm) minimum Positioning the Acoustimass® module The Acoustimass module functions ...top, a side, or either end (Figure 3). Feel free to set up the system where it plays an invisible role in placing the speakers and the Acoustimass® module to increase bass. • At least 6 inches (15 cm) from your system The following guidelines are...
...(radiators, baseboards, quartz heater, etc.). • Resting on the bottom surface, not on the back of the system. Figure 2 Recommended system placement Speakers Figure 3 Module placement 6 inches (15 cm) minimum Acoustimass module 3 inches (8 cm) minimum Positioning the Acoustimass® module The Acoustimass module functions ...top, a side, or either end (Figure 3). Feel free to set up the system where it plays an invisible role in placing the speakers and the Acoustimass® module to increase bass. • At least 6 inches (15 cm) from your system The following guidelines are...
User Manual
Page 8
...(Figure 4). CAUTION: D"#1")#3/'9#)*%#>("',)+56,,#5"&'/%#+1)"#61#>B#3";%$#E56+1,F#"')/%)#'1)+/#6 53"1%1),#6$%#("11 5"&'/%7 8 01&2 2 34!5 module. After removing a speaker from the stand, apply the supplied rubber feet to the labeled jacks on page 7). a. b. CAUTION: B*"",%#6#,)68/%0#/%=%/#,'$.6(%#."$#)*%#,3%6-%$,#61&#,)61...&,7#C+8$6)+"1#(61#(6',%# )*%5#)"#5"=%0#36$)+('/6$/4#"1#,5"")*#,'$.6(%,#/+-%#6#&%,-)"37 Keep the speakers: • Up to 3 feet (91 cm) from the sides of the screen. • At...
...(Figure 4). CAUTION: D"#1")#3/'9#)*%#>("',)+56,,#5"&'/%#+1)"#61#>B#3";%$#E56+1,F#"')/%)#'1)+/#6 53"1%1),#6$%#("11 5"&'/%7 8 01&2 2 34!5 module. After removing a speaker from the stand, apply the supplied rubber feet to the labeled jacks on page 7). a. b. CAUTION: B*"",%#6#,)68/%0#/%=%/#,'$.6(%#."$#)*%#,3%6-%$,#61&#,)61...&,7#C+8$6)+"1#(61#(6',%# )*%5#)"#5"=%0#36$)+('/6$/4#"1#,5"")*#,'$.6(%,#/+-%#6#&%,-)"37 Keep the speakers: • Up to 3 feet (91 cm) from the sides of the screen. • At...
User Manual
Page 9
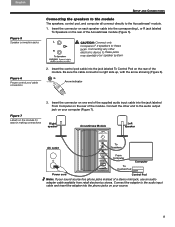
...Speakers on your speaker system. Be sure the cable connector is right side up, with the arrow showing (Figure 6). Connect the other electronic device to the audio output jack on the rear of the! Arrow indicator Figure 7 Labels on the rear of the Acoustimass module (Figure 5). Right speaker Acoustimass Module Left speaker... AC outlet To Speakers From Computer ... CONNECTIONS Figure 5 Speaker connection jacks Connecting the speakers to the module The speakers, control pod, ... Computer on each speaker cable into the jack...
...Speakers on your speaker system. Be sure the cable connector is right side up, with the arrow showing (Figure 6). Connect the other electronic device to the audio output jack on the rear of the! Arrow indicator Figure 7 Labels on the rear of the Acoustimass module (Figure 5). Right speaker Acoustimass Module Left speaker... AC outlet To Speakers From Computer ... CONNECTIONS Figure 5 Speaker connection jacks Connecting the speakers to the module The speakers, control pod, ... Computer on each speaker cable into the jack...

User Manual
Page 10
.... Turn the power switch, located on the control pod. On the control pod, the LED turns yellow to your system, plug the cable from the speakers. 10 01&2 2 34!5 Français Español English SETUP AND CONNECTIONS Connecting the power cord Plugging in and turning on and is the...
.... Turn the power switch, located on the control pod. On the control pod, the LED turns yellow to your system, plug the cable from the speakers. 10 01&2 2 34!5 Français Español English SETUP AND CONNECTIONS Connecting the power cord Plugging in and turning on and is the...
User Manual
Page 11
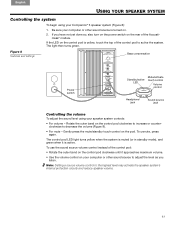
...Acoustimass® module. To unmute, press again. English Español Français USING YOUR SPEAKER SYSTEM Controlling the system To begin using your Companion® 3 speaker system (Figure 8): 1. If the LED on the control pod clockwise to increase or counterclockwise to the... highest level may activate the speaker system's internal protection circuity and reduce speaker volume. 11 01&2 2 34!5 The ...
...Acoustimass® module. To unmute, press again. English Español Français USING YOUR SPEAKER SYSTEM Controlling the system To begin using your Companion® 3 speaker system (Figure 8): 1. If the LED on the control pod clockwise to increase or counterclockwise to the... highest level may activate the speaker system's internal protection circuity and reduce speaker volume. 11 01&2 2 34!5 The ...
User Manual
Page 12
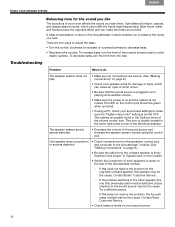
...plugged in the Options menu of the volume control icon. seems distorted • Decrease the volume of the module toward a wall or other speaker (the one that the sound source is typically found in and ! Upholstered furniture, carpets, and drapes absorb sound, which can muffle the...34!5 playing at an audible volume. • Make sure the power is not muted. originally unheard speaker, this does not resolve the problem, the Acoustimass module may be the cause. Contact Bose Customer Service. • Check balance levels on and the system is on your sound card settings ...
...plugged in the Options menu of the volume control icon. seems distorted • Decrease the volume of the module toward a wall or other speaker (the one that the sound source is typically found in and ! Upholstered furniture, carpets, and drapes absorb sound, which can muffle the...34!5 playing at an audible volume. • Make sure the power is not muted. originally unheard speaker, this does not resolve the problem, the Acoustimass module may be the cause. Contact Bose Customer Service. • Check balance levels on and the system is on your sound card settings ...
User Manual
Page 13
...; module: 81/2"H x 63/4"W x 133/4"D (21.7 cm x 17.2 cm x 34.8 cm)! Japan: 100V 50/60 Hz Dimensions (approximate) Speakers on the Product Registration Card that came with a dry cloth. • Do not use solvents or chemicals. • Do not allow liquids or objects... to Bose. Technical Information Driver complement Two magnetically shielded 2-inch (5.0 cm) long-throw, wide-range transducers! Control pod: 21/2"Dia x 11/8"H (6.3 cm x 2.8 cm) Weight (approximate) One speaker, unpacked: 0.8 lb (0.4 kg)! the speaker grilles, or any part of the module;
...; module: 81/2"H x 63/4"W x 133/4"D (21.7 cm x 17.2 cm x 34.8 cm)! Japan: 100V 50/60 Hz Dimensions (approximate) Speakers on the Product Registration Card that came with a dry cloth. • Do not use solvents or chemicals. • Do not allow liquids or objects... to Bose. Technical Information Driver complement Two magnetically shielded 2-inch (5.0 cm) long-throw, wide-range transducers! Control pod: 21/2"Dia x 11/8"H (6.3 cm x 2.8 cm) Weight (approximate) One speaker, unpacked: 0.8 lb (0.4 kg)! the speaker grilles, or any part of the module;


