User Manual
Page 5
... CONTENTS GETTING STARTED 6 Congratulations on your choice 6 Unpacking the carton 6 SETUP AND CONNECTIONS 7 Placing your system 7 Positioning the Acoustimass® module 7 Positioning the speakers 8 Making connections 8 Connecting the speakers to register your records The system serial number is located on the bottom of the Acoustimass module. Serial number Dealer name Dealer phone...12 Troubleshooting 12 REFERENCE 13 Cleaning the system 13 Contacting Customer Service 13 Limited warranty 13 Technical Information 13 For your product online at www.bose.com/register. 5
... CONTENTS GETTING STARTED 6 Congratulations on your choice 6 Unpacking the carton 6 SETUP AND CONNECTIONS 7 Placing your system 7 Positioning the Acoustimass® module 7 Positioning the speakers 8 Making connections 8 Connecting the speakers to register your records The system serial number is located on the bottom of the Acoustimass module. Serial number Dealer name Dealer phone...12 Troubleshooting 12 REFERENCE 13 Cleaning the system 13 Contacting Customer Service 13 Limited warranty 13 Technical Information 13 For your product online at www.bose.com/register. 5
User Manual
Page 6
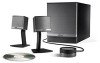
...keep your monitor or television ! Or, to contact Bose directly, refer to -hide Acoustimass® module that allows speaker placement next to use it. Companion 3 multimedia speaker system benefits include: • Small speakers and an easy-to the address sheet included in the... free. • TrueSpace® stereo signal processing for a wide soundstage from speakers positioned close together. • Control pod for purchasing the Bose®!Companion® 3 Series II multimedia speaker system. Check to connect! Français Español English GETTING STARTED ...
...keep your monitor or television ! Or, to contact Bose directly, refer to -hide Acoustimass® module that allows speaker placement next to use it. Companion 3 multimedia speaker system benefits include: • Small speakers and an easy-to the address sheet included in the... free. • TrueSpace® stereo signal processing for a wide soundstage from speakers positioned close together. • Control pod for purchasing the Bose®!Companion® 3 Series II multimedia speaker system. Check to connect! Français Español English GETTING STARTED ...
User Manual
Page 7
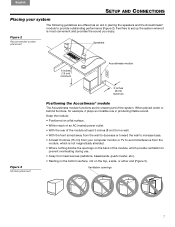
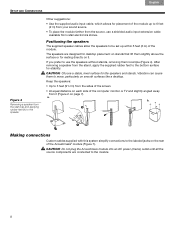
... 6 inches (15 cm) from your system The following guidelines are offered as the unseen part of the system. Figure 2 Recommended system placement Speakers Figure 3 Module placement 6 inches (15 cm) minimum Acoustimass module 3 inches (8 cm) minimum Positioning the Acoustimass® module The Acoustimass module...on the back of the module, which provide ventilation to set up the system where it plays an invisible role in placing the speakers and the Acoustimass® module to provide outstanding performance (Figure 2). Ventilation openings 7 01&2 2 34!5 English Español...
... 6 inches (15 cm) from your system The following guidelines are offered as the unseen part of the system. Figure 2 Recommended system placement Speakers Figure 3 Module placement 6 inches (15 cm) minimum Acoustimass module 3 inches (8 cm) minimum Positioning the Acoustimass® module The Acoustimass module...on the back of the module, which provide ventilation to set up the system where it plays an invisible role in placing the speakers and the Acoustimass® module to provide outstanding performance (Figure 2). Ventilation openings 7 01&2 2 34!5 English Español...
User Manual
Page 8
... you prefer to 3 feet (91 cm) from the sides of the screen. • At equal distance on page 7). a. module. The speakers are designed for desktop placement on the rear of the Acoustimass® module (Figure 7). CAUTION: D"#1")#3/'9#)*%#>("',)+56,,#5"&'/%#+1)"#61#>B#3";%$#E56+1,F#"')/%)#'1)+/#6 53"1%1),#6$%#("11 5"&'/%7 8 01... stability. Français Español English SETUP AND CONNECTIONS Figure 4 Removing a speaker from the stand (a) and applying rubber feet (b) to the speaker Other suggestions: • Use the supplied audio input cable, which allows for placement of...
... you prefer to 3 feet (91 cm) from the sides of the screen. • At equal distance on page 7). a. module. The speakers are designed for desktop placement on the rear of the Acoustimass® module (Figure 7). CAUTION: D"#1")#3/'9#)*%#>("',)+56,,#5"&'/%#+1)"#61#>B#3";%$#E56+1,F#"')/%)#'1)+/#6 53"1%1),#6$%#("11 5"&'/%7 8 01... stability. Français Español English SETUP AND CONNECTIONS Figure 4 Removing a speaker from the stand (a) and applying rubber feet (b) to the speaker Other suggestions: • Use the supplied audio input cable, which allows for placement of...
User Manual
Page 9
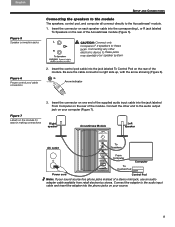
English Español Français SETUP AND CONNECTIONS Figure 5 Speaker connection jacks Connecting the speakers to the module The speakers, control pod, and computer all connect directly to these jacks may damage your computer (Figure 7). CAUTION: Connect only Companion® 3 speakers to the Acoustimass® module. 1. Connect the other electronic device to the audio...
English Español Français SETUP AND CONNECTIONS Figure 5 Speaker connection jacks Connecting the speakers to the module The speakers, control pod, and computer all connect directly to these jacks may damage your computer (Figure 7). CAUTION: Connect only Companion® 3 speakers to the Acoustimass® module. 1. Connect the other electronic device to the audio...

User Manual
Page 10
... into the input jack ( ) on the control pod. Insert the small connector end of the Acoustimass module, to your system, plug the cable from the speakers. 10 01&2 2 34!5 Connecting other sources The control pod features two jacks: one for connection directly to another sound source and the other for use...
... into the input jack ( ) on the control pod. Insert the small connector end of the Acoustimass module, to your system, plug the cable from the speakers. 10 01&2 2 34!5 Connecting other sources The control pod features two jacks: one for connection directly to another sound source and the other for use...
User Manual
Page 11
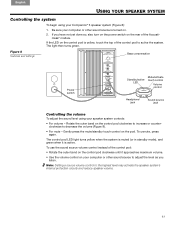
..., press again. Note: Setting a source volume control to active the system. English Español Français USING YOUR SPEAKER SYSTEM Controlling the system To begin using your Companion® 3 speaker system (Figure 8): 1. Gently press the mute/standby touch control on the control pod clockwise to increase or counterclockwise to decrease the...
..., press again. Note: Setting a source volume control to active the system. English Español Français USING YOUR SPEAKER SYSTEM Controlling the system To begin using your Companion® 3 speaker system (Figure 8): 1. Gently press the mute/standby touch control on the control pod clockwise to increase or counterclockwise to decrease the...
User Manual
Page 12
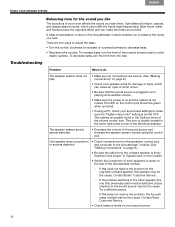
...: • Turn the control clockwise to increase or counterclockwise to balance the tones you hear. If this speaker may be green when unmuted. • If using the control pod. Contact Bose Customer Service. • Check balance levels on the rear of the Windows desktop. Upholstered furniture, carpets,... the wall. This icon is firmly inserted in the proper To Speaker jack on the sound source may be the cause. Contact Bose® Customer Service. - Français Español English USING YOUR SPEAKER SYSTEM Balancing tone for the sound you like The acoustics of the...
...: • Turn the control clockwise to increase or counterclockwise to balance the tones you hear. If this speaker may be green when unmuted. • If using the control pod. Contact Bose Customer Service. • Check balance levels on the rear of the Windows desktop. Upholstered furniture, carpets,... the wall. This icon is firmly inserted in the proper To Speaker jack on the sound source may be the cause. Contact Bose® Customer Service. - Français Español English USING YOUR SPEAKER SYSTEM Balancing tone for the sound you like The acoustics of the...
User Manual
Page 13
... (6.7 kg)! Please fill out the information section on the card and mail it to the address sheet included in solving problems, contact Bose® Customer Service. Technical Information Driver complement Two magnetically shielded 2-inch (5.0 cm) long-throw, wide-range transducers! Control pod: 0.5... lb (0.2 kg) 13 01&2 2 34!5 Control pod: 21/2"Dia x 11/8"H (6.3 cm x 2.8 cm) Weight (approximate) One speaker, unpacked: 0.8 lb (0.4 kg)! Details of the limited warranty are provided on stand: 6"H x 33/8"W x 31/4"D (15 cm x 8.6 cm x 8.2 cm) ! Japan...
... (6.7 kg)! Please fill out the information section on the card and mail it to the address sheet included in solving problems, contact Bose® Customer Service. Technical Information Driver complement Two magnetically shielded 2-inch (5.0 cm) long-throw, wide-range transducers! Control pod: 0.5... lb (0.2 kg) 13 01&2 2 34!5 Control pod: 21/2"Dia x 11/8"H (6.3 cm x 2.8 cm) Weight (approximate) One speaker, unpacked: 0.8 lb (0.4 kg)! Details of the limited warranty are provided on stand: 6"H x 33/8"W x 31/4"D (15 cm x 8.6 cm x 8.2 cm) ! Japan...


