Owners Manual
Page 2
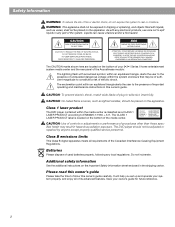
... triangle, alerts the user to spill liquids in hazardous radiation exposure. The CAUTION marks shown here are located on the bottom of your 3•2•1 Series II home entertainment system media center and the rear panel of the Acoustimass module: The lightning flash with any electronic products, use care not to the...
... triangle, alerts the user to spill liquids in hazardous radiation exposure. The CAUTION marks shown here are located on the bottom of your 3•2•1 Series II home entertainment system media center and the rear panel of the Acoustimass module: The lightning flash with any electronic products, use care not to the...
Owners Manual
Page 3
... discs 5 Check for region code compatibility 5 MP3 compatibility 5 Glossary of terms 6 Limited warranty 7 For your records 7 System Setup 8 Unpacking 8 Selecting locations for your 3•2•1 Series II system components 9 Placing the media center 9 Placing the speakers 10 Placing the Acoustimass® module 11 Making system connections 12 Connecting the Acoustimass module to...
... discs 5 Check for region code compatibility 5 MP3 compatibility 5 Glossary of terms 6 Limited warranty 7 For your records 7 System Setup 8 Unpacking 8 Selecting locations for your 3•2•1 Series II system components 9 Placing the media center 9 Placing the speakers 10 Placing the Acoustimass® module 11 Making system connections 12 Connecting the Acoustimass module to...
Owners Manual
Page 5
... effort to where the player and disc are sold. These numbers are allocated according to set up, so you for purchasing the Bose® 3•2•1 Series II or 3•2•1 GS Series II DVD home entertainment system, which must also match the DVD discs. Introduction Before you begin Thank you can play the following criteria...
... effort to where the player and disc are sold. These numbers are allocated according to set up, so you for purchasing the Bose® 3•2•1 Series II or 3•2•1 GS Series II DVD home entertainment system, which must also match the DVD discs. Introduction Before you begin Thank you can play the following criteria...

Owners Manual
Page 7
... media center and the rear of the DVD contents, which may include more than composite video since it to Bose. Title - Details of serial data communications. Model: 3•2•1 Series II 3•2•1 GS Series II Check one Media center serial number Acoustimass module serial number Dealer name Dealer phone Purchase date We suggest you keep...
... media center and the rear of the DVD contents, which may include more than composite video since it to Bose. Title - Details of serial data communications. Model: 3•2•1 Series II 3•2•1 GS Series II Check one Media center serial number Acoustimass module serial number Dealer name Dealer phone Purchase date We suggest you keep...
Owners Manual
Page 8
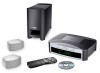
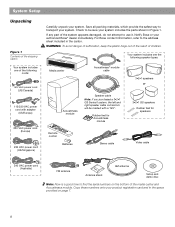
... attempt to find the serial numbers on page 7. 8 Notify Bose or your system. Your system includes one of the following speaker types: Media center Acoustimass® module cable 3•2•1 speakers or Acoustimass module Speaker cable Note: If you purchased a 3•2•1 GS Series II system, the left and right speaker cable connectors will...
... attempt to find the serial numbers on page 7. 8 Notify Bose or your system. Your system includes one of the following speaker types: Media center Acoustimass® module cable 3•2•1 speakers or Acoustimass module Speaker cable Note: If you purchased a 3•2•1 GS Series II system, the left and right speaker cable connectors will...
Owners Manual
Page 9
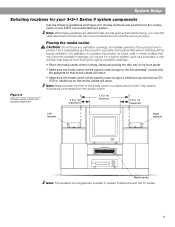
... the media center will be placed close enough to additional source devices (TV, VCR or cable box) so that the front of your 3•2•1 Series II system components Use the following guidelines and Figure 2 to choose locations and positions for your 3•2•1 home entertainment system. Note: While these guidelines are...
... the media center will be placed close enough to additional source devices (TV, VCR or cable box) so that the front of your 3•2•1 Series II system components Use the following guidelines and Figure 2 to choose locations and positions for your 3•2•1 home entertainment system. Note: While these guidelines are...

Owners Manual
Page 13
Figure 8 Separating left and right speaker cable connectors will be marked with a "GS". Note: If you purchased a 3•2•1 GS Series II system, the left and right speaker cords System Setup 2. Plug the RIGHT speaker cable into the rear jack of the speaker cable, separate the left ...
Figure 8 Separating left and right speaker cable connectors will be marked with a "GS". Note: If you purchased a 3•2•1 GS Series II system, the left and right speaker cords System Setup 2. Plug the RIGHT speaker cable into the rear jack of the speaker cable, separate the left ...

Owners Manual
Page 18
... combination TV/VCR units may not work with 3•2•1 Series II home entertainment systems. Please refer to your TV/VCR owner's manual for information. • A stereo VCR is not labeled Stereo or Hi-fi, you must also use S-video to connect your Bose dealer or a local electronics retailer. • Insert one audio...
... combination TV/VCR units may not work with 3•2•1 Series II home entertainment systems. Please refer to your TV/VCR owner's manual for information. • A stereo VCR is not labeled Stereo or Hi-fi, you must also use S-video to connect your Bose dealer or a local electronics retailer. • Insert one audio...

Owners Manual
Page 20
... center digital audio input jacks Connecting digital audio devices Some audio devices may feature a digital audio output for connecting external devices to the 3•2•1 Series II system. Only a DTS bitstream from an external audio device. Optical digital audio input Coaxial digital audio inputs Connecting your cable/satellite box, TV, and VCR...
... center digital audio input jacks Connecting digital audio devices Some audio devices may feature a digital audio output for connecting external devices to the 3•2•1 Series II system. Only a DTS bitstream from an external audio device. Optical digital audio input Coaxial digital audio inputs Connecting your cable/satellite box, TV, and VCR...
Owners Manual
Page 21
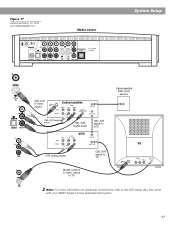
Figure 17 Advanced setup: TV, VCR and cable/satellite box Media center System Setup CBL-SAT S-video output Cable/satellite Cable/satellite (CBL-SAT) service CBL-SAT analog audio CBL-SAT digital audio VCR CBL-SAT signal to VCR TV VCR analog audio CBL-SAT signal to TV Media center's S-video output to TV Note: For more information on advanced connections, refer to the DVD setup disc that came with your 3•2•1 Series II home entertainment system. 21
Figure 17 Advanced setup: TV, VCR and cable/satellite box Media center System Setup CBL-SAT S-video output Cable/satellite Cable/satellite (CBL-SAT) service CBL-SAT analog audio CBL-SAT digital audio VCR CBL-SAT signal to VCR TV VCR analog audio CBL-SAT signal to TV Media center's S-video output to TV Note: For more information on advanced connections, refer to the DVD setup disc that came with your 3•2•1 Series II home entertainment system. 21
Owners Manual
Page 34
... the system remote or on any component connected to turn off automatically after 1 to 90 minutes of the system. Use the 3•2•1 Series II or 3•2•1 GS Series II system remote to any source. Note: The sleep timer will not turn your system off the TV or other sources Turn on the media... to raise or lower the volume of listening to get started: • Pressing TV, CBL-SAT, or AUX on the 3•2•1 or 3•2•1 GS system remote turns on the component front panel. Press and hold the 0 button on page 39.
... the system remote or on any component connected to turn off automatically after 1 to 90 minutes of the system. Use the 3•2•1 Series II or 3•2•1 GS Series II system remote to any source. Note: The sleep timer will not turn your system off the TV or other sources Turn on the media... to raise or lower the volume of listening to get started: • Pressing TV, CBL-SAT, or AUX on the 3•2•1 or 3•2•1 GS system remote turns on the component front panel. Press and hold the 0 button on page 39.

Owners Manual
Page 48
... System Option Display Brightness Display Language Optical Source Tuner Spacing Bose link Room Code* Restore Factory Defaults Settings Description 4 [default] 1 (darkest) to factory defaults. ** Appears only when a Bose® link source is connected to selected region standard. ... set to a Bose® link source. Digital signal received via optical cable. Yes Reverts system settings back to 4 (brightest) Media center display lights with a mid-range brightness. B [default], C, D, E, F, G, H, I, J, K, Assigns a room code to your 3•2•1 Series II system when L, ...
... System Option Display Brightness Display Language Optical Source Tuner Spacing Bose link Room Code* Restore Factory Defaults Settings Description 4 [default] 1 (darkest) to factory defaults. ** Appears only when a Bose® link source is connected to selected region standard. ... set to a Bose® link source. Digital signal received via optical cable. Yes Reverts system settings back to 4 (brightest) Media center display lights with a mid-range brightness. B [default], C, D, E, F, G, H, I, J, K, Assigns a room code to your 3•2•1 Series II system when L, ...

Owners Manual
Page 53
... batteries AA batteries (IEC R6) Accessories Figure 35 Speaker accessories Battery compartment cover The Bose® 3•2•1 Series II and 3•2•1 GS Series II system shelf speakers are compatible with Bose mounting accessories, including the UB-20 wall brackets, UFS-20 floor stands and UTS-20...battery compartment cover back into place. Be sure to order the mounting brackets, stands, or cable adapters, contact your Bose dealer or Bose Corporation directly. UB-20 Wall Bracket US-T20 Table Stand UFS-20 Floor Stand 53 Maintaining Your System Replacing the remote...
... batteries AA batteries (IEC R6) Accessories Figure 35 Speaker accessories Battery compartment cover The Bose® 3•2•1 Series II and 3•2•1 GS Series II system shelf speakers are compatible with Bose mounting accessories, including the UB-20 wall brackets, UFS-20 floor stands and UTS-20...battery compartment cover back into place. Be sure to order the mounting brackets, stands, or cable adapters, contact your Bose dealer or Bose Corporation directly. UB-20 Wall Bracket US-T20 Table Stand UFS-20 Floor Stand 53 Maintaining Your System Replacing the remote...


