User Manual
Page 2
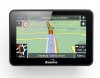
... longer than by viewing the GPS Receiver. Keep your sales (till) receipt, which is weak. For the first time of use the unit, you'll need to transport the unit. Charging via the USB cable will find ·GPS navigation device ·Car mounting kit ·In-car charger ·USB cable ·User guide ·Stylus Keep the packaging materials in a safe place in areas where the satellite signal is your Binatone Navigation System In the...
... longer than by viewing the GPS Receiver. Keep your sales (till) receipt, which is weak. For the first time of use the unit, you'll need to transport the unit. Charging via the USB cable will find ·GPS navigation device ·Car mounting kit ·In-car charger ·USB cable ·User guide ·Stylus Keep the packaging materials in a safe place in areas where the satellite signal is your Binatone Navigation System In the...

User Manual
Page 3
... provides location and timing information around the globe. Never modify the settings or program you come into contact with due care and attention. When mounting the PND in this unit must be recycled or disposed of any electrical medical equipment. Do not pierce or break the battery casing. The GPS is essential that you Binatone Personal Navigation Device (PND). Do not operate...
... provides location and timing information around the globe. Never modify the settings or program you come into contact with due care and attention. When mounting the PND in this unit must be recycled or disposed of any electrical medical equipment. Do not pierce or break the battery casing. The GPS is essential that you Binatone Personal Navigation Device (PND). Do not operate...
User Manual
Page 4
CONTENTS CONTENTS Important 02 In the Box 02 Safety 03 The Global Positioning System 03 Using Your PND in the Car 03 Prohibited Areas 03 Battery 03 Contents 04 Quick Start Guide 07 Position of the Controls 07 Charging the Battery 08 SD Memory Card 08 Car Adaptor 08 Turning the Sat Nav Unit On/Off 09 Turning the Sat Nav Unit Off (Sleep Mode 09 System Reset 09 Windscreen Holder Installation 10 Getting Started 11 Starting Up 11 Settings 12 Multi-Media 13 Picture Viewer 13 Document Viewer 14 GPS Receiver 15 Additional maps and upgrades 15 4
CONTENTS CONTENTS Important 02 In the Box 02 Safety 03 The Global Positioning System 03 Using Your PND in the Car 03 Prohibited Areas 03 Battery 03 Contents 04 Quick Start Guide 07 Position of the Controls 07 Charging the Battery 08 SD Memory Card 08 Car Adaptor 08 Turning the Sat Nav Unit On/Off 09 Turning the Sat Nav Unit Off (Sleep Mode 09 System Reset 09 Windscreen Holder Installation 10 Getting Started 11 Starting Up 11 Settings 12 Multi-Media 13 Picture Viewer 13 Document Viewer 14 GPS Receiver 15 Additional maps and upgrades 15 4
User Manual
Page 5
... Sign Post 28 7.4 Voice Guidance 28 7.5 Auto Zoom 29 7.6 Simulation Speed 29 8. Settings 29 8.1 Language 29 8.2 Safety Alert 30 8.3 Trace Record 30 8.4 Address Book 31 8.4.1 Add an Entry 31 8.4.2 Edit an Entry 32 8.4.3 Delete an Entry 32 8.5 Day/Night Mode 33 8.6 Set Home Address 33 8.7 GPS Status 33 8.8 Miles/Kilometre 34 8.9 About 34 8.10 Time Zone 34 5 Navigational Map Screens 17 3.1 Free Navigation 18 3.2 Route Navigation 19 4. Getting Started...
... Sign Post 28 7.4 Voice Guidance 28 7.5 Auto Zoom 29 7.6 Simulation Speed 29 8. Settings 29 8.1 Language 29 8.2 Safety Alert 30 8.3 Trace Record 30 8.4 Address Book 31 8.4.1 Add an Entry 31 8.4.2 Edit an Entry 32 8.4.3 Delete an Entry 32 8.5 Day/Night Mode 33 8.6 Set Home Address 33 8.7 GPS Status 33 8.8 Miles/Kilometre 34 8.9 About 34 8.10 Time Zone 34 5 Navigational Map Screens 17 3.1 Free Navigation 18 3.2 Route Navigation 19 4. Getting Started...
User Manual
Page 6
... 10. Route Navigation Menu 37 10.1 Route Plan 38 10.2 Detour 38 10.3 Cancel Route 38 10.4 Go to 38 10.5 Route Information 39 10.6 Map Options 39 10.7 Settings 39 Frequently asked questions 40 The map contains an error / POI's are missing 40 I am experiencing problems getting a GPS fix 40 Where can I get technical support 40 Where can I get additional maps and guides 40 Guarantee and service 41 Technical Specifications 42...
... 10. Route Navigation Menu 37 10.1 Route Plan 38 10.2 Detour 38 10.3 Cancel Route 38 10.4 Go to 38 10.5 Route Information 39 10.6 Map Options 39 10.7 Settings 39 Frequently asked questions 40 The map contains an error / POI's are missing 40 I am experiencing problems getting a GPS fix 40 Where can I get technical support 40 Where can I get additional maps and guides 40 Guarantee and service 41 Technical Specifications 42...
User Manual
Page 7
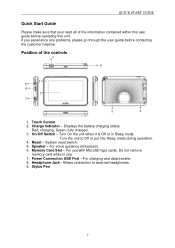
... reset switch. 5. Power Connection USB Port - Position of the information contained within this unit. Red; Turn On the unit when it is Off or in use with MicroSD type cards. Memory Card Slot - Do not remove memory card while in Sleep mode. Stylus Pen 7 On/Off Switch - Reset - For charging and data transfer. 8. Headphone Jack- If you experience any problems, please go through the user guide before operating this user guide before contacting the customer helpline. Displays the battery charging...
... reset switch. 5. Power Connection USB Port - Position of the information contained within this unit. Red; Turn On the unit when it is Off or in use with MicroSD type cards. Memory Card Slot - Do not remove memory card while in Sleep mode. Stylus Pen 7 On/Off Switch - Reset - For charging and data transfer. 8. Headphone Jack- If you experience any problems, please go through the user guide before operating this user guide before contacting the customer helpline. Displays the battery charging...
User Manual
Page 12
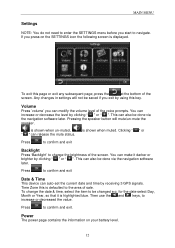
... change the brightness of the screen. To exit this is highlighted blue. Pressing the speaker button will not be changed e.g. Clicking " " or Press to confirm and exit Backlight Press 'Backlight' to change the date & time, select the item to confirm and exit Date & Time This device can also be done via the navigation software later. Press to be saved if you exit by receiving 3 GPS signals. Then use...
... change the brightness of the screen. To exit this is highlighted blue. Pressing the speaker button will not be changed e.g. Clicking " " or Press to confirm and exit Backlight Press 'Backlight' to change the date & time, select the item to confirm and exit Date & Time This device can also be done via the navigation software later. Press to be saved if you exit by receiving 3 GPS signals. Then use...
User Manual
Page 13
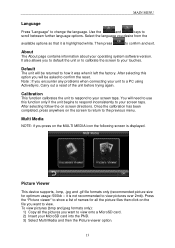
... the file you encounter any problems when connecting your screen taps. Select the language you want to the previous menu. To view pictures (bmp and jpeg formats only): 1) Copy all the picture files then click on the MULTI MEDIA icon the following screen is not recommended to your unit to change the language. Press the "Picture viewer" to your operating system software version...
... the file you encounter any problems when connecting your screen taps. Select the language you want to the previous menu. To view pictures (bmp and jpeg formats only): 1) Copy all the picture files then click on the MULTI MEDIA icon the following screen is not recommended to your unit to change the language. Press the "Picture viewer" to your operating system software version...
User Manual
Page 15
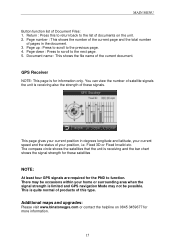
... satellites that the unit is receiving also the strength of satellite signals the unit is receiving and the bar chart shows the signal strength for the PND to the list of your home or surrounding area when the signal strength is limited and GPS navigation Mode may be possible. Page down : Press to scroll to the previous page. 4. You can view the number of these satellites...
... satellites that the unit is receiving also the strength of satellite signals the unit is receiving and the bar chart shows the signal strength for the PND to the list of your home or surrounding area when the signal strength is limited and GPS navigation Mode may be possible. Page down : Press to scroll to the previous page. 4. You can view the number of these satellites...
User Manual
Page 16
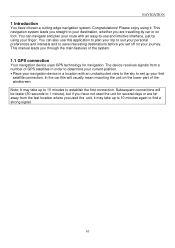
... unobstructed view to the sky to 1 minute), but if you have chosen a cutting-edge navigation system. Subsequent connections will usually mean mounting the unit on your finger. Please enjoy using your journey. NAVIGATION 1 Introduction You have not used the unit for navigation. This manual leads you through the main features of GPS satellites in order to determine your current position. • Place your navigation device in a location...
... unobstructed view to the sky to 1 minute), but if you have chosen a cutting-edge navigation system. Subsequent connections will usually mean mounting the unit on your finger. Please enjoy using your journey. NAVIGATION 1 Introduction You have not used the unit for navigation. This manual leads you through the main features of GPS satellites in order to determine your current position. • Place your navigation device in a location...
User Manual
Page 20
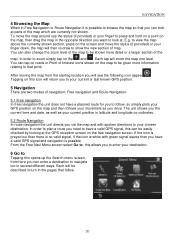
... your GPS position on the map and then follows your finger to press and hold on a point on the map, then drag the map in the opposite direction you want to look at parts of the map which are two modes of Interest icons shown on roads or Point of navigation; Free navigation and Route Navigation. 5.1 Free navigation In free navigation the unit does not have a valid GPS signal and navigation is...
... your GPS position on the map and then follows your finger to press and hold on a point on the map, then drag the map in the opposite direction you want to look at parts of the map which are two modes of Interest icons shown on roads or Point of navigation; Free navigation and Route Navigation. 5.1 Free navigation In free navigation the unit does not have a valid GPS signal and navigation is...
User Manual
Page 24
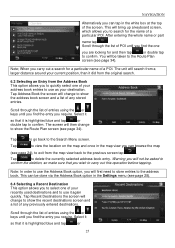
... a particular city. As with POI near Current Position you will be entered as the destination. The screen will need to confirm. You also have the option of selecting a point from the map view back to confirm. You will be taken directly to exactly pin point your location. NAVIGATION entering the whole name or part name tap Scroll through the list of...
... a particular city. As with POI near Current Position you will be entered as the destination. The screen will need to confirm. You also have the option of selecting a point from the map view back to confirm. You will be taken directly to exactly pin point your location. NAVIGATION entering the whole name or part name tap Scroll through the list of...
User Manual
Page 25
...quickly. The screen will bring up a keyboard screen, which allows you to quickly select one of any previously entered destinations. Warning you can be asked to confirm the deletion, so make sure that you to delete the currently selected address book entry. Tap to view the location on the map and once in the Settings menu...the map view you will first need to store entries to the previous screen tap . Tap Recent Destinations the screen will change to show the Route Plan screen (see page 34). Tap to select one of any stored entries. This can browse the map (see...
...quickly. The screen will bring up a keyboard screen, which allows you to quickly select one of any previously entered destinations. Warning you can be asked to confirm the deletion, so make sure that you to delete the currently selected address book entry. Tap to view the location on the map and once in the Settings menu...the map view you will first need to store entries to the previous screen tap . Tap Recent Destinations the screen will change to show the Route Plan screen (see page 34). Tap to select one of any stored entries. This can browse the map (see...
User Manual
Page 26
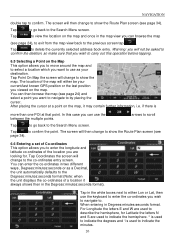
... entry. Tap Coordinates the screen will then change to show the Route Plan screen (see page 24) and select a point you to enter the longitude and latitude co-ordinates of the map will change to the co-ordinates entry screen. if there is used to show the map. arrows to scroll Tap to go back to by placing the cursor. NAVIGATION double tap to...
... entry. Tap Coordinates the screen will then change to show the Route Plan screen (see page 24) and select a point you to enter the longitude and latitude co-ordinates of the map will change to the co-ordinates entry screen. if there is used to show the map. arrows to scroll Tap to go back to by placing the cursor. NAVIGATION double tap to...

User Manual
Page 27
...:seconds and Decimal formats. Heading Up - NAVIGATION When entering in the Settings menu (see page 28). 7 Map Options Allows you to set the map preferences to show the Route Plan screen (see page 34). Use the . The option with + and -, where North and East are + and South and West are navigating. The N, S, W and E keys are travelling, while the position icon will be fixed at the...
...:seconds and Decimal formats. Heading Up - NAVIGATION When entering in the Settings menu (see page 28). 7 Map Options Allows you to set the map preferences to show the Route Plan screen (see page 34). Use the . The option with + and -, where North and East are + and South and West are navigating. The N, S, W and E keys are travelling, while the position icon will be fixed at the...
User Manual
Page 30
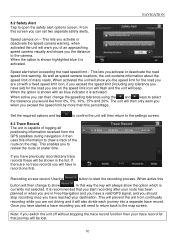
... speed camera locations, the unit contains information about the speed limit of logging all positioning information received from the GPS satellites during navigation. When the option is shown with a fixed speed limit icon, if you the distance to the map screen. Set the required options and tap to start recording after your trace record for the road you of the route on the map. Recording a trace record: Use the button...
... speed camera locations, the unit contains information about the speed limit of logging all positioning information received from the GPS satellites during navigation. When the option is shown with a fixed speed limit icon, if you the distance to the map screen. Set the required options and tap to start recording after your trace record for the road you of the route on the map. Recording a trace record: Use the button...

User Manual
Page 33
... able to add a location from any time of these two times the unit will be set your current position in either or to make your selection. This screen shows you information about your address. 8.7 GPS Status When tapped the screen will be found but the unit is between 1:00 till 12:00PM. Each satellite will change to the GPS status screen, Note; Use the and buttons to select...
... able to add a location from any time of these two times the unit will be set your current position in either or to make your selection. This screen shows you information about your address. 8.7 GPS Status When tapped the screen will be found but the unit is between 1:00 till 12:00PM. Each satellite will change to the GPS status screen, Note; Use the and buttons to select...
User Manual
Page 35
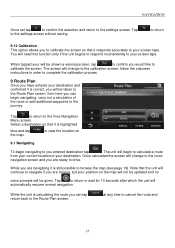
... page 19). follow the onscreen instructions in order to complete the calibration process. 9 Route Plan Once you have entered your position on 9.1 Navigating To begin navigating, carry out a simulation of the route or add additional waypoints to the calibration screen; Note that the unit will be given. Tap to return or wait for 10 seconds after which the unit will change to the journey. While...
... page 19). follow the onscreen instructions in order to complete the calibration process. 9 Route Plan Once you have entered your position on 9.1 Navigating To begin navigating, carry out a simulation of the route or add additional waypoints to the calibration screen; Note that the unit will be given. Tap to return or wait for 10 seconds after which the unit will change to the journey. While...
User Manual
Page 39
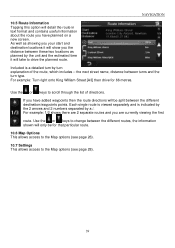
... allows access to the Map options (see page 28). 39 Use the or keys to change between the different routes, the information shown will only be split between turns and the turn explanation of directions. NAVIGATION 10.5 Route Information Tapping this option will detail the route in text format and contains useful information about the route you have added waypoints then the route directions will be for...
... allows access to the Map options (see page 28). 39 Use the or keys to change between the different routes, the information shown will only be split between turns and the turn explanation of directions. NAVIGATION 10.5 Route Information Tapping this option will detail the route in text format and contains useful information about the route you have added waypoints then the route directions will be for...
User Manual
Page 40
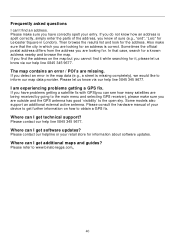
... help line 0845 345 9677. Some models also support an additional external active antenna. Please let us know via our help line 0845 345 9677. Please refer to inform our map data provider. Frequently asked questions I am experiencing problems getting a satellite fix with GPS(you can see how many satellites are being received by going to the main menu and selecting GPS receiver), please make sure that case...
... help line 0845 345 9677. Some models also support an additional external active antenna. Please let us know via our help line 0845 345 9677. Please refer to inform our map data provider. Frequently asked questions I am experiencing problems getting a satellite fix with GPS(you can see how many satellites are being received by going to the main menu and selecting GPS receiver), please make sure that case...


