
User Guide
Page 2
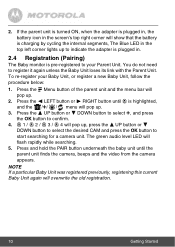
... for purchasing the Motorola Video Baby Monitor. Please read the Safety Instructions on page 6 before you for warranty coverage. Got everything? • Parent unit • Camera unit(s) • Rechargeable Ni-MH battery pack • Power adapter for the Parent unit • Power adapter(s) for your new Motorola Baby Monitor! to work... sales receipt to another room or you can use the baby monitor, we recommend you insert and fully charge the battery in Europe Email: motorola-mbp@tdm.de This User's Guide provides you with power adapter units. Thank you install the units.
... for purchasing the Motorola Video Baby Monitor. Please read the Safety Instructions on page 6 before you for warranty coverage. Got everything? • Parent unit • Camera unit(s) • Rechargeable Ni-MH battery pack • Power adapter for the Parent unit • Power adapter(s) for your new Motorola Baby Monitor! to work... sales receipt to another room or you can use the baby monitor, we recommend you insert and fully charge the battery in Europe Email: motorola-mbp@tdm.de This User's Guide provides you with power adapter units. Thank you install the units.
User Guide
Page 4
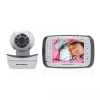
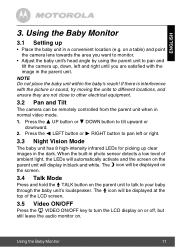
Camera Lens 3. Power Adapter Socket 9. ON/OFF Switch 8. Infrared LEDs 4. Microphone 6. Speaker 7. Power LED 5. Antenna 10. Pair Key 11. Temperature Sensor Important guidelines for installing your ...
Camera Lens 3. Power Adapter Socket 9. ON/OFF Switch 8. Infrared LEDs 4. Microphone 6. Speaker 7. Power LED 5. Antenna 10. Pair Key 11. Temperature Sensor Important guidelines for installing your ...
User Guide
Page 5
... of The Device (environment 16 6. Parent Unit Menu Options 13 4.1 Volume 13 4.2 Brightness 13 4.3 Lullaby 13 4.4 Zoom 13 4.5 Alarm 14 4.6 Camera Control 14 4.6.1 Add (pair) a camera 14 4.6.2 View a camera 14 4.6.3 Delete a camera 15 4.6.4 Scan the cameras 15 4.7 Temperature 15 5. General Information 20 Table of contents 5 Help 18 8. Getting Started 8 2.1 Baby Unit Power Supply 8 2.2 Parent Unit...
... of The Device (environment 16 6. Parent Unit Menu Options 13 4.1 Volume 13 4.2 Brightness 13 4.3 Lullaby 13 4.4 Zoom 13 4.5 Alarm 14 4.6 Camera Control 14 4.6.1 Add (pair) a camera 14 4.6.2 View a camera 14 4.6.3 Delete a camera 15 4.6.4 Scan the cameras 15 4.7 Temperature 15 5. General Information 20 Table of contents 5 Help 18 8. Getting Started 8 2.1 Baby Unit Power Supply 8 2.2 Parent Unit...
User Guide
Page 6
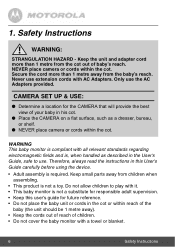
... will provide the best view of your baby in his cot. ● Place the CAMERA on a flat surface, such as described in the cot or within the cot. NEVER place camera or cords within reach of the baby (the unit should be 1 metre away). • Keep the cords out of reach of... children when assembling. • This product is , when handled as a dresser, bureau, or shelf. ● NEVER place camera or cords within the cot. Do not allow children to use the AC Adapters provided. CAMERA SET UP & USE: ● Determine a location for future reference. • Do not place the baby unit or cords...
... will provide the best view of your baby in his cot. ● Place the CAMERA on a flat surface, such as described in the cot or within the cot. NEVER place camera or cords within reach of the baby (the unit should be 1 metre away). • Keep the cords out of reach of... children when assembling. • This product is , when handled as a dresser, bureau, or shelf. ● NEVER place camera or cords within the cot. Do not allow children to use the AC Adapters provided. CAMERA SET UP & USE: ● Determine a location for future reference. • Do not place the baby unit or cords...
User Guide
Page 10
.... C 1 / C 2 / C 3 / C 4 will pop up . 3. 2. Press the < LEFT button or > RIGHT button until the parent unit finds the camera, beeps and the video from the camera appears. Press the + UP button or - If the parent unit is turned ON, when the adapter is plugged in, the battery icon in the screen's ...
.... C 1 / C 2 / C 3 / C 4 will pop up . 3. 2. Press the < LEFT button or > RIGHT button until the parent unit finds the camera, beeps and the video from the camera appears. Press the + UP button or - If the parent unit is turned ON, when the adapter is plugged in, the battery icon in the screen's ...
User Guide
Page 11
...in a convenient location (e.g. on the parent unit will automatically activate and the screen on a table) and point the camera lens towards the area you are not close to pan and tilt the camera up clear images in the parent unit. Press the < LEFT button or > RIGHT button to pan left or right... until you want to monitor. • Adjust the baby unit's head angle by using the parent unit to other electrical equipment. 3.2 Pan and Tilt The camera can be displayed at the top of ambient light, the LEDs will display in black and white. ENGLISH 3. Press the + UP button or - When the...
...in a convenient location (e.g. on the parent unit will automatically activate and the screen on a table) and point the camera lens towards the area you are not close to pan and tilt the camera up clear images in the parent unit. Press the < LEFT button or > RIGHT button to pan left or right... until you want to monitor. • Adjust the baby unit's head angle by using the parent unit to other electrical equipment. 3.2 Pan and Tilt The camera can be displayed at the top of ambient light, the LEDs will display in black and white. ENGLISH 3. Press the + UP button or - When the...

User Guide
Page 13
... button and the menu bar will pop up . 2. DOWN button to select the desired volume level from the 5 lullabies available, or press to the normal camera view with the lullaby playing or off, as selected. Press the + UP button or - Press the < LEFT button or > RIGHT button until Z is highlighted. 3. Press...
... button and the menu bar will pop up . 2. DOWN button to select the desired volume level from the 5 lullabies available, or press to the normal camera view with the lullaby playing or off, as selected. Press the + UP button or - Press the < LEFT button or > RIGHT button until Z is highlighted. 3. Press...

User Guide
Page 14
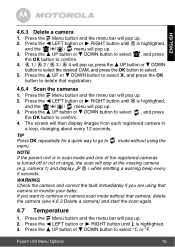
... to select desired CAM, and press the OK button to confirm. 4. Press the < LEFT button or > RIGHT button until the parent unit finds the camera, beeps and the camera picture appears. Press and hold the PAIR button under the baby unit until A is highlighted, and the /+/ / menu will pop up . 2. C 1 / C 2 ...< LEFT button or > RIGHT button until C is highlighted. 3. DOWN button to select +, and press the OK button to view the picture from that camera. TIP Press OK repeatedly for about 45 seconds after every 6, 4 or 2 hour period, and the alarm icon will pop up . 3. Press the ...
... to select desired CAM, and press the OK button to confirm. 4. Press the < LEFT button or > RIGHT button until the parent unit finds the camera, beeps and the camera picture appears. Press and hold the PAIR button under the baby unit until A is highlighted, and the /+/ / menu will pop up . 2. C 1 / C 2 ...< LEFT button or > RIGHT button until C is highlighted. 3. DOWN button to select +, and press the OK button to view the picture from that camera. TIP Press OK repeatedly for about 45 seconds after every 6, 4 or 2 hour period, and the alarm icon will pop up . 3. Press the ...
User Guide
Page 15
... the desired CAM, and press the OK button to menu. DOWN button to select X, and press the OK button to continue in camera scan mode without using that camera to select °C or °F. Press the + UP button or - If you are using the NOTE If the parent unit ...is in a loop, changing about every 12 seconds. Press the + UP button or - WARNING Check the camera and correct the fault immediately if you want to delete that camera, delete the camera (see 4.6.3 Delete a camera) and start the scan again. 4.7 Temperature 1. Press the M Menu button and the menu bar will pop ...
... the desired CAM, and press the OK button to menu. DOWN button to select X, and press the OK button to continue in camera scan mode without using that camera to select °C or °F. Press the + UP button or - If you are using the NOTE If the parent unit ...is in a loop, changing about every 12 seconds. Press the + UP button or - WARNING Check the camera and correct the fault immediately if you want to delete that camera, delete the camera (see 4.6.3 Delete a camera) and start the scan again. 4.7 Temperature 1. Press the M Menu button and the menu bar will pop ...
User Guide
Page 18
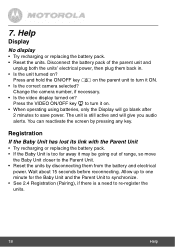
Press the VIDEO ON/OFF key V to re-register the units. 18 Help Wait about 15 seconds before reconnecting. Change the camera number, if necessary. • Is the video display turned on . • When operating using batteries, only the Display will give you audio alerts. You can ... battery pack. • Reset the units. Press and hold the ON/OFF key P on the parent unit to turn it ON. • Is the correct camera selected? The unit is still active and will go blank after 2 minutes to the Parent Unit. • Reset the units by pressing any key.
Press the VIDEO ON/OFF key V to re-register the units. 18 Help Wait about 15 seconds before reconnecting. Change the camera number, if necessary. • Is the video display turned on . • When operating using batteries, only the Display will give you audio alerts. You can ... battery pack. • Reset the units. Press and hold the ON/OFF key P on the parent unit to turn it ON. • Is the correct camera selected? The unit is still active and will go blank after 2 minutes to the Parent Unit. • Reset the units by pressing any key.


