User Guide
Page 1
USER'S GUIDE Models: MBP43, MBP43/2, MBP43/3, MBP43/4 Digital Video Baby Monitor USER'S GUIDE The features described in user's guide are subject to modifications without prior notice.
USER'S GUIDE Models: MBP43, MBP43/2, MBP43/3, MBP43/4 Digital Video Baby Monitor USER'S GUIDE The features described in user's guide are subject to modifications without prior notice.

User Guide
Page 2
... the Parent unit • Power adapter(s) for purchasing the Motorola Video Baby Monitor. Before you can monitor your product. Please read the Safety Instructions on page 6 before you can use the baby monitor, we recommend you insert and fully charge the battery in the parent unit, so that it continues to work if you disconnect it from your older children in Europe Email: motorola-mbp@tdm.de This User's Guide...
... the Parent unit • Power adapter(s) for purchasing the Motorola Video Baby Monitor. Before you can monitor your product. Please read the Safety Instructions on page 6 before you can use the baby monitor, we recommend you insert and fully charge the battery in the parent unit, so that it continues to work if you disconnect it from your older children in Europe Email: motorola-mbp@tdm.de This User's Guide...
User Guide
Page 3
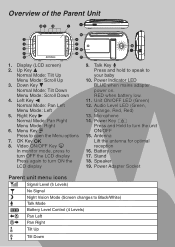
... the LCD display 9. Power Adapter Socket Parent unit menu icons 1 Signal Level (5 Levels) B N T C C No Signal Night Vision Mode (Screen changes to your baby 10. Talk Key T Press and hold to speak to Black/White) Talk Mode Battery Level Control (4 Levels) Pan Left Pan Right C Tilt Up C Tilt Down Audio Level LED (Green, Orange, Red, Red) 13. Menu Key...
... the LCD display 9. Power Adapter Socket Parent unit menu icons 1 Signal Level (5 Levels) B N T C C No Signal Night Vision Mode (Screen changes to your baby 10. Talk Key T Press and hold to speak to Black/White) Talk Mode Battery Level Control (4 Levels) Pan Left Pan Right C Tilt Up C Tilt Down Audio Level LED (Green, Orange, Red, Red) 13. Menu Key...
User Guide
Page 4
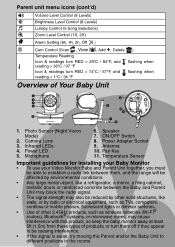
.../OFF Switch 8. Camera Lens 3. Power Adapter Socket 9. Temperature Sensor Important guidelines for installing your Baby Monitor • To use your Video Monitor Baby and Parent Unit together, you must be able to different positions in the rooms. Photo Sensor (Night Vision Mode) 2. Infrared LEDs 4. Pair Key 11. Microphone 6. Parent unit menu icons (cont'd) * Volume Level Control (8 Levels) & Brightness Level Control (8 Levels) m Lullaby Control (5 Song...
.../OFF Switch 8. Camera Lens 3. Power Adapter Socket 9. Temperature Sensor Important guidelines for installing your Baby Monitor • To use your Video Monitor Baby and Parent Unit together, you must be able to different positions in the rooms. Photo Sensor (Night Vision Mode) 2. Infrared LEDs 4. Pair Key 11. Microphone 6. Parent unit menu icons (cont'd) * Volume Level Control (8 Levels) & Brightness Level Control (8 Levels) m Lullaby Control (5 Song...
User Guide
Page 5
...the Baby Monitor 11 3.1 Setting up 11 3.2 Pan and Tilt 11 3.3 Night Vision Mode 11 3.4 Talk Mode 11 3.5 Video ON/OFF 11 3.6 Temperature Display 12 4. Parent Unit ...Menu Options 13 4.1 Volume 13 4.2 Brightness 13 4.3 Lullaby 13 4.4 Zoom 13 4.5 Alarm 14 4.6 Camera Control 14 4.6.1 Add (pair) a camera 14 4.6.2 View a camera 14 4.6.3 Delete a camera 15 4.6.4 Scan the cameras 15 4.7 Temperature 15 5. Help 18 8. Getting Started 8 2.1 Baby Unit Power Supply 8 2.2 Parent Unit Battery Installation 8 2.3 Parent Unit Power...
...the Baby Monitor 11 3.1 Setting up 11 3.2 Pan and Tilt 11 3.3 Night Vision Mode 11 3.4 Talk Mode 11 3.5 Video ON/OFF 11 3.6 Temperature Display 12 4. Parent Unit ...Menu Options 13 4.1 Volume 13 4.2 Brightness 13 4.3 Lullaby 13 4.4 Zoom 13 4.5 Alarm 14 4.6 Camera Control 14 4.6.1 Add (pair) a camera 14 4.6.2 View a camera 14 4.6.3 Delete a camera 15 4.6.4 Scan the cameras 15 4.7 Temperature 15 5. Help 18 8. Getting Started 8 2.1 Baby Unit Power Supply 8 2.2 Parent Unit Battery Installation 8 2.3 Parent Unit Power...
User Guide
Page 6
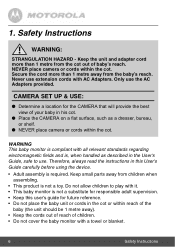
... the baby monitor with it. • This baby monitor is compliant with AC Adapters. Secure the cord more than 1 metre away from the baby's reach. Only use . WARNING This baby monitor is not a substitute for responsible adult supervision. • Keep this User's Guide carefully before using the device. • Adult assembly is not a toy. Safety Instructions WARNING: STRANGULATION HAZARD - Keep small parts away...
... the baby monitor with it. • This baby monitor is compliant with AC Adapters. Secure the cord more than 1 metre away from the baby's reach. Only use . WARNING This baby monitor is not a substitute for responsible adult supervision. • Keep this User's Guide carefully before using the device. • Adult assembly is not a toy. Safety Instructions WARNING: STRANGULATION HAZARD - Keep small parts away...
User Guide
Page 7
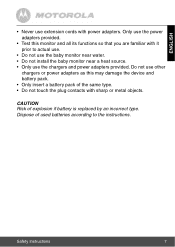
... the baby monitor near water. • Do not install the baby monitor near a heat source. • Only use the chargers and power adapters provided. Do not use other chargers or power adapters as this monitor and all its functions so that you are familiar with it prior to the instructions. Safety Instructions 7 Only use the power adapters provided. • Test this may damage the device and battery...
... the baby monitor near water. • Do not install the baby monitor near a heat source. • Only use the chargers and power adapters provided. Do not use other chargers or power adapters as this monitor and all its functions so that you are familiar with it prior to the instructions. Safety Instructions 7 Only use the power adapters provided. • Test this may damage the device and battery...
User Guide
Page 8
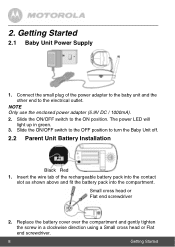
... the ON position. The power LED will light up in a clockwise direction using a Small cross head or Flat end screwdriver. 8 Getting Started Small cross head or Flat end screwdriver 2. Slide the ON/OFF switch to turn the Baby Unit off. 2.2 Parent Unit Battery Installation Black Red 1. Insert the wire tab of the power adapter to the baby unit and the other end to...
... the ON position. The power LED will light up in a clockwise direction using a Small cross head or Flat end screwdriver. 8 Getting Started Small cross head or Flat end screwdriver 2. Slide the ON/OFF switch to turn the Baby Unit off. 2.2 Parent Unit Battery Installation Black Red 1. Insert the wire tab of the power adapter to the baby unit and the other end to...
User Guide
Page 9
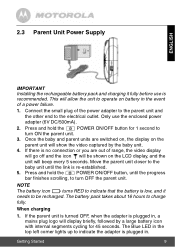
... IMPORTANT Installing the rechargeable battery pack and charging it needs to be shown on battery in the event of the power adapter to the parent unit and the other end to charge fully. This will beep every 5 seconds. Once the baby and parent units are out of range, the video display will go off and the icon will be recharged. When charging 1. NOTE The battery icon turns RED...
... IMPORTANT Installing the rechargeable battery pack and charging it needs to be shown on battery in the event of the power adapter to the parent unit and the other end to charge fully. This will beep every 5 seconds. Once the baby and parent units are out of range, the video display will go off and the icon will be recharged. When charging 1. NOTE The battery icon turns RED...
User Guide
Page 10
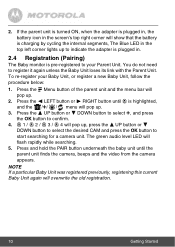
... until the parent unit finds the camera, beeps and the video from the camera appears. The green audio level LED will overwrite the old registration. 10 Getting Started If the parent unit is turned ON, when the adapter is plugged in, the battery icon in ...battery is charging by cycling the internal segments, The Blue LED in . 2.4 Registration (Pairing) The Baby monitor is plugged in the top left corner lights up . 3. DOWN button to select the desired CAM and press the OK button to register it again unless the Baby Unit loses its link with the Parent Unit. NOTE If a particular Baby Unit...
... until the parent unit finds the camera, beeps and the video from the camera appears. The green audio level LED will overwrite the old registration. 10 Getting Started If the parent unit is turned ON, when the adapter is plugged in, the battery icon in ...battery is charging by cycling the internal segments, The Blue LED in . 2.4 Registration (Pairing) The Baby monitor is plugged in the top left corner lights up . 3. DOWN button to select the desired CAM and press the OK button to register it again unless the Baby Unit loses its link with the Parent Unit. NOTE If a particular Baby Unit...
User Guide
Page 11
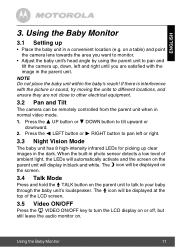
... the baby unit in normal video mode. 1. Using the Baby Monitor 11 Press the + UP button or - When the built-in black and white. on . NOTE Do not place the baby unit within the baby's reach! The T icon will display in photo sensor detects a low level of ambient light, the LEDs will automatically activate and the screen on the parent unit will...
... the baby unit in normal video mode. 1. Using the Baby Monitor 11 Press the + UP button or - When the built-in black and white. on . NOTE Do not place the baby unit within the baby's reach! The T icon will display in photo sensor detects a low level of ambient light, the LEDs will automatically activate and the screen on the parent unit will...
User Guide
Page 12
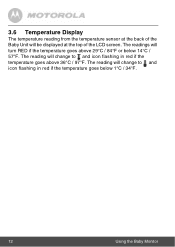
The reading will turn RED if the temperature goes above 36°C / 97°F. 3.6 Temperature Display The temperature reading from the temperature sensor at the back of the LCD screen. The readings will change to and icon flashing in red if the temperature goes below 14°C / 57°F. The reading will be displayed at the top of the Baby Unit will change to and icon flashing in red if the temperature goes above 29°C / 84°F or below 1°C / 34°F. 12 Using the Baby Monitor
The reading will turn RED if the temperature goes above 36°C / 97°F. 3.6 Temperature Display The temperature reading from the temperature sensor at the back of the LCD screen. The readings will change to and icon flashing in red if the temperature goes below 14°C / 57°F. The reading will be displayed at the top of the Baby Unit will change to and icon flashing in red if the temperature goes above 29°C / 84°F or below 1°C / 34°F. 12 Using the Baby Monitor
User Guide
Page 17
...not covered by the warranty. • Keep your baby monitor. ENGLISH 6. Never use cleaning agents or abrasive solvents. Cleaning and care • Do not clean any part of reliability for assistance. contact Customer Service for your baby monitor away from hot, humid areas or strong sunlight, ...and don't let it get wet. • Every effort has been made to repair it yourself -- Cleaning 17 Cleaning Clean baby monitor with a slightly ...
...not covered by the warranty. • Keep your baby monitor. ENGLISH 6. Never use cleaning agents or abrasive solvents. Cleaning and care • Do not clean any part of reliability for assistance. contact Customer Service for your baby monitor away from hot, humid areas or strong sunlight, ...and don't let it get wet. • Every effort has been made to repair it yourself -- Cleaning 17 Cleaning Clean baby monitor with a slightly ...
User Guide
Page 18
... the VIDEO ON/OFF key V to turn it on the parent unit to turn it may be going out of the parent unit and unplug both the units' electrical power, then plug them from the battery and electrical power. 7. Help Display No display • Try recharging or replacing the battery pack. • Reset the units. Disconnect the battery pack of range, so move the Baby Unit...
... the VIDEO ON/OFF key V to turn it on the parent unit to turn it may be going out of the parent unit and unplug both the units' electrical power, then plug them from the battery and electrical power. 7. Help Display No display • Try recharging or replacing the battery pack. • Reset the units. Disconnect the battery pack of range, so move the Baby Unit...
User Guide
Page 20
...motorola-mbp@tdm.de To order a replacement battery pack, contact customer service. Who is not transferable. BINATONE or its authorised distributor at its option and within a commercially reasonable time, will BINATONE do? 8. Contact Customer Service...or parts. 20 General Information This Warranty extends only to this Motorola branded product ("Product") or certified accessory ("Accessory") sold for the period outlined below , BINATONE warrants...no charge repair or replace any Products or Accessories that this Warranty. What Does this User's Guide or the Quick Start Guide. 2.
...motorola-mbp@tdm.de To order a replacement battery pack, contact customer service. Who is not transferable. BINATONE or its authorised distributor at its option and within a commercially reasonable time, will BINATONE do? 8. Contact Customer Service...or parts. 20 General Information This Warranty extends only to this Motorola branded product ("Product") or certified accessory ("Accessory") sold for the period outlined below , BINATONE warrants...no charge repair or replace any Products or Accessories that this Warranty. What Does this User's Guide or the Quick Start Guide. 2.
User Guide
Page 22
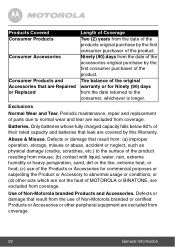
...or (d) other peripheral equipment are excluded from coverage. 22 General Information Batteries. Use of MOTOROLA or BINATONE, are excluded from coverage. Exclusions Normal Wear and Tear. Only batteries whose fully charged capacity falls below 80% of Non-Motorola branded or certified Products or Accessories or other acts which are covered by...(90) days from the use of the product. Defects or damage that leak are not the fault of Non-Motorola branded Products and Accessories. Periodic maintenance, repair and replacement of parts due to abnormal usage or conditions;
...or (d) other peripheral equipment are excluded from coverage. 22 General Information Batteries. Use of MOTOROLA or BINATONE, are excluded from coverage. Exclusions Normal Wear and Tear. Only batteries whose fully charged capacity falls below 80% of Non-Motorola branded or certified Products or Accessories or other acts which are covered by...(90) days from the use of the product. Defects or damage that leak are not the fault of Non-Motorola branded Products and Accessories. Periodic maintenance, repair and replacement of parts due to abnormal usage or conditions;
User Guide
Page 23
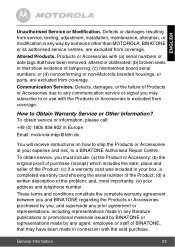
... was included in Europe Email: motorola-mbp@tdm.de You will receive instructions on how to ship the Products or Accessories at your address and telephone number. Defects, damages, or the failure of tampering; (c) mismatched board serial numbers; Communication Services. General Information 23 Altered Products. Defects or damages resulting from service, testing, adjustment, installation, maintenance, alteration, or modification...
... was included in Europe Email: motorola-mbp@tdm.de You will receive instructions on how to ship the Products or Accessories at your address and telephone number. Defects, damages, or the failure of tampering; (c) mismatched board serial numbers; Communication Services. General Information 23 Altered Products. Defects or damages resulting from service, testing, adjustment, installation, maintenance, alteration, or modification...
User Guide
Page 24
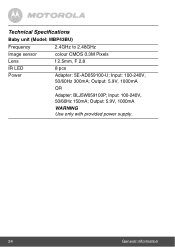
Input: 100-240V, 50/60Hz 150mA; Output: 5.9V, 1000mA WARNING Use only with provided power supply. 24 General Information Output: 5.9V, 1000mA OR Adapter: BLJ5W059100P; Technical Specifications Baby unit (Model: MBP43BU) Frequency 2.4GHz to 2.48GHz Image sensor colour CMOS 0.3M Pixels Lens f 2.5mm, F 2.8 IR LED 8 pcs Power Adapter: 5E-AD059100-U; Input: 100-240V, 50/60Hz 300mA;
Input: 100-240V, 50/60Hz 150mA; Output: 5.9V, 1000mA WARNING Use only with provided power supply. 24 General Information Output: 5.9V, 1000mA OR Adapter: BLJ5W059100P; Technical Specifications Baby unit (Model: MBP43BU) Frequency 2.4GHz to 2.48GHz Image sensor colour CMOS 0.3M Pixels Lens f 2.5mm, F 2.8 IR LED 8 pcs Power Adapter: 5E-AD059100-U; Input: 100-240V, 50/60Hz 300mA;
User Guide
Page 25
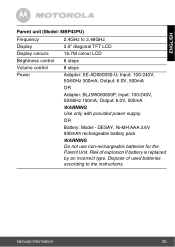
... 8 steps Volume control 8 steps Power Adapter: 5E-AD060050-U; General Information 25 Output: 6.0V, 500mA WARNING Use only with provided power supply. Input: 100-240V, 50/60Hz 150mA; ENGLISH Parent unit (Model: MBP43PU) Frequency 2.4GHz to the instructions. DESAY, Ni-MH AAA 3.6V 900mAh rechargeable battery pack WARNING Do not use non-rechargeable batteries for the Parent Unit. Output: 6.0V, 500mA OR...
... 8 steps Volume control 8 steps Power Adapter: 5E-AD060050-U; General Information 25 Output: 6.0V, 500mA WARNING Use only with provided power supply. Input: 100-240V, 50/60Hz 150mA; ENGLISH Parent unit (Model: MBP43PU) Frequency 2.4GHz to the instructions. DESAY, Ni-MH AAA 3.6V 900mAh rechargeable battery pack WARNING Do not use non-rechargeable batteries for the Parent Unit. Output: 6.0V, 500mA OR...
User Guide
Page 26
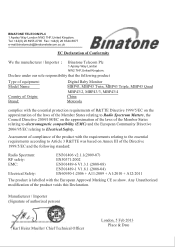
...(Signature of the Directive 1999/5/EC and the following product Type of equipment: Model Name: Country of Origin: Brand: Digital Baby Monitor MBP43, MBP43 Twin, MBP43 Triple, MBP43 Quad MBP43/2, MBP43/3, MBP43/4 China Motorola complies with the European Approval Marking CE as show. Declare under our sole ...requirements of R&TTE Directive 1999/5/EC on the approximation of the laws of Conformity We the manufacturer / Importer : Binatone Telecom Plc 1 Apsley Way London NW2 7HF,United Kingdom. Tel: +44(0) 20 8955 2700 Fax: +44(0) 20 8344 8877 e-mail:[email protected] ...
...(Signature of the Directive 1999/5/EC and the following product Type of equipment: Model Name: Country of Origin: Brand: Digital Baby Monitor MBP43, MBP43 Twin, MBP43 Triple, MBP43 Quad MBP43/2, MBP43/3, MBP43/4 China Motorola complies with the European Approval Marking CE as show. Declare under our sole ...requirements of R&TTE Directive 1999/5/EC on the approximation of the laws of Conformity We the manufacturer / Importer : Binatone Telecom Plc 1 Apsley Way London NW2 7HF,United Kingdom. Tel: +44(0) 20 8955 2700 Fax: +44(0) 20 8344 8877 e-mail:[email protected] ...


