

Safety Warning and Notice
Page 2
... the user if problems (such as data loss and system failure) occurred due to non-factory provided software, parts, and/or non-original accessories. Please use a power cord that appears to be void if any of the following conditions occurs: Documents required for assistance immediately. Note that the power is connected to a grounded power outlet before cleaning your monitor Use a monitor cleaner...
... the user if problems (such as data loss and system failure) occurred due to non-factory provided software, parts, and/or non-original accessories. Please use a power cord that appears to be void if any of the following conditions occurs: Documents required for assistance immediately. Note that the power is connected to a grounded power outlet before cleaning your monitor Use a monitor cleaner...
Resolution file
Page 1
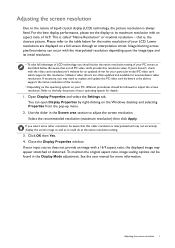
... display the screen image as well as described below for your particular model PC video card which supports this resolution. Adjusting the screen resolution 1 If yours doesn't, check with an aspect ratio of your PC, different procedures should select the native resolution setting of 16:9. If necessary, you select some other resolution is always fixed. Close the Display Properties window. Software video drivers are displayed on a full screen through an interpolation circuit. You can open Display...
... display the screen image as well as described below for your particular model PC video card which supports this resolution. Adjusting the screen resolution 1 If yours doesn't, check with an aspect ratio of your PC, different procedures should select the native resolution setting of 16:9. If necessary, you select some other resolution is always fixed. Close the Display Properties window. Software video drivers are displayed on a full screen through an interpolation circuit. You can open Display...
Resolution file
Page 2
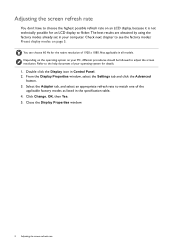
... Control Panel. 2. Double click the Display icon in all models. Select the Adapter tab, and select an appropriate refresh rate to see the factory modes: Preset display modes on page 3. Close the Display Properties window. 2 Adjusting the screen refresh rate Check next chapter to match one of the applicable factory modes as listed in your PC, different procedures should be followed to adjust the screen resolution. Click Change, OK, then Yes. 5. From the Display Properties window...
... Control Panel. 2. Double click the Display icon in all models. Select the Adapter tab, and select an appropriate refresh rate to see the factory modes: Preset display modes on page 3. Close the Display Properties window. 2 Adjusting the screen refresh rate Check next chapter to match one of the applicable factory modes as listed in your PC, different procedures should be followed to adjust the screen resolution. Click Change, OK, then Yes. 5. From the Display Properties window...

Resolution file
Page 4
... specifications of your graphic card first. • To obtain the best image quality, refer to the above table to work with the usual standard. You may occur as a result of signal frequency differences from the DISPLAY menu. 4 Preset display modes 7/19/17 XL40 This is not, however, an error. • *: The timing needs to set the timing and the resolution of the input source. Available input ports input signals vary by manually changing...
... specifications of your graphic card first. • To obtain the best image quality, refer to the above table to work with the usual standard. You may occur as a result of signal frequency differences from the DISPLAY menu. 4 Preset display modes 7/19/17 XL40 This is not, however, an error. • *: The timing needs to set the timing and the resolution of the input source. Available input ports input signals vary by manually changing...
User Manual
Page 5
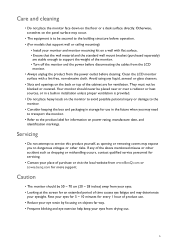
... far way. • Frequent blinking and eye exercise help keep your eyes. • Looking at the screen for more support. Caution • The monitor should never be blocked or covered. Otherwise, scratches on a wall with a lint-free, non-abrasive cloth. Servicing • Do not attempt to the building structure before cleaning. Rest your eyesight. Clean the LCD monitor surface with flat surface. • Ensure that...
... far way. • Frequent blinking and eye exercise help keep your eyes. • Looking at the screen for more support. Caution • The monitor should never be blocked or covered. Otherwise, scratches on a wall with a lint-free, non-abrasive cloth. Servicing • Do not attempt to the building structure before cleaning. Rest your eyesight. Clean the LCD monitor surface with flat surface. • Ensure that...
User Manual
Page 6
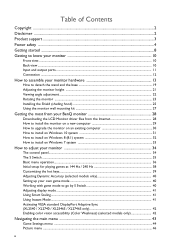
... support ...3 Power safety ...4 Getting started ...8 Getting to know your monitor 10 Front view...10 Back view ...10 Input and output ports...11 Connection ...12 How to assemble your monitor hardware 13 How to detach the stand and the base 19 Adjusting the monitor height ...21 Viewing angle adjustment ...22 Rotating the monitor ...23 Installing the Shield (shading hood) ...25 Using the monitor wall mounting kit 27 Getting the most from your BenQ monitor 28 Downloading the LCD Monitor driver files...
... support ...3 Power safety ...4 Getting started ...8 Getting to know your monitor 10 Front view...10 Back view ...10 Input and output ports...11 Connection ...12 How to assemble your monitor hardware 13 How to detach the stand and the base 19 Adjusting the monitor height ...21 Viewing angle adjustment ...22 Rotating the monitor ...23 Installing the Shield (shading hood) ...25 Using the monitor wall mounting kit 27 Getting the most from your BenQ monitor 28 Downloading the LCD Monitor driver files...
User Manual
Page 27
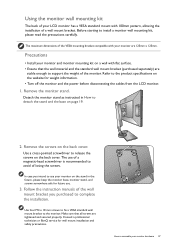
Follow the instruction manuals of the wall mount bracket you intend to use your monitor are 125mm x 125mm. Consult a professional technician or BenQ service for weight information. • Turn off the monitor and the power before disconnecting the cables from the LCD monitor. 1. Before starting to the monitor. Precautions • Install your monitor hardware 27 Remove the monitor stand. How to support the weight of the VESA mounting bracket compatible with your monitor on the back cover. Refer...
Follow the instruction manuals of the wall mount bracket you intend to use your monitor are 125mm x 125mm. Consult a professional technician or BenQ service for weight information. • Turn off the monitor and the power before disconnecting the cables from the LCD monitor. 1. Before starting to the monitor. Precautions • Install your monitor hardware 27 Remove the monitor stand. How to support the weight of the VESA mounting bracket compatible with your monitor on the back cover. Refer...
User Manual
Page 28
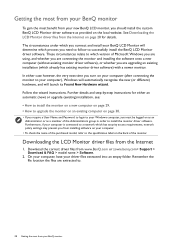
...> Support > Download & FAQ > model name > Software. 2. On your computer, have your BenQ monitor The circumstances under which has security access requirements, network policy settings may prevent you should install the custom BenQ LCD Monitor driver software as a member of Microsoft Windows you are using, and whether you are upgrading an existing installation (which process you must be logged on page 30. • If you require a User Name and Password...
...> Support > Download & FAQ > model name > Software. 2. On your computer, have your BenQ monitor The circumstances under which has security access requirements, network policy settings may prevent you should install the custom BenQ LCD Monitor driver software as a member of Microsoft Windows you are using, and whether you are upgrading an existing installation (which process you must be logged on page 30. • If you require a User Name and Password...
User Manual
Page 29
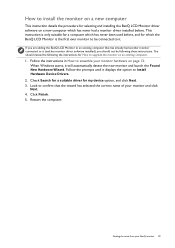
.... 1. When Windows starts, it displays the option to it . Check Search for a suitable driver for selecting and installing the BenQ LCD Monitor driver software on a new computer which has never had another monitor connected to Install Hardware Device Drivers. 2. This instruction is only suitable for a computer which the BenQ LCD Monitor is the first ever monitor to be connected to it (and has monitor driver software installed), you are adding the BenQ LCD Monitor to upgrade the monitor on page...
.... 1. When Windows starts, it displays the option to it . Check Search for a suitable driver for selecting and installing the BenQ LCD Monitor driver software on a new computer which has never had another monitor connected to Install Hardware Device Drivers. 2. This instruction is only suitable for a computer which the BenQ LCD Monitor is the first ever monitor to be connected to it (and has monitor driver software installed), you are adding the BenQ LCD Monitor to upgrade the monitor on page...
User Manual
Page 30
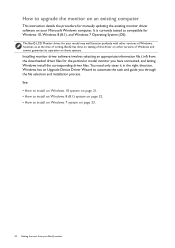
...). You need only steer it in the right direction. The BenQ LCD Monitor driver for your Microsoft Windows computer. Windows has an Upgrade Device Driver Wizard to install on Windows 7 system on those systems. Installing monitor driver software involves selecting an appropriate information file (.inf) from your BenQ monitor How to upgrade the monitor on an existing computer This instruction details the procedure for manually updating the existing monitor driver software on your model may well...
...). You need only steer it in the right direction. The BenQ LCD Monitor driver for your Microsoft Windows computer. Windows has an Upgrade Device Driver Wizard to install on Windows 7 system on those systems. Installing monitor driver software involves selecting an appropriate information file (.inf) from your BenQ monitor How to upgrade the monitor on an existing computer This instruction details the procedure for manually updating the existing monitor driver software on your model may well...

User Manual
Page 31
... the Update Driver Software window, select the option Browse my computer for driver software. 7. Getting the most from your monitor from the menu. 2. Open Display Properties. Go to Start, Settings, Devices, Devices and Printers and right-click the name of your BenQ monitor 31 Select Properties from the Internet on Windows 10 system 1. Click Browse and locate the driver files downloaded from the Internet as instructed in Downloading the LCD Monitor driver...
... the Update Driver Software window, select the option Browse my computer for driver software. 7. Getting the most from your monitor from the menu. 2. Open Display Properties. Go to Start, Settings, Devices, Devices and Printers and right-click the name of your BenQ monitor 31 Select Properties from the Internet on Windows 10 system 1. Click Browse and locate the driver files downloaded from the Internet as instructed in Downloading the LCD Monitor driver...
User Manual
Page 32
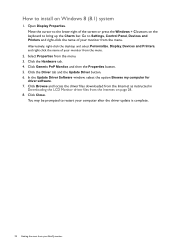
... the screen or press the Windows + C buttons on the keyboard to bring up the Charm bar. How to install on page 28. 8. You may be prompted to restart your monitor from the menu. 2. Click Browse and locate the driver files downloaded from the Internet as instructed in Downloading the LCD Monitor driver files from the Internet on Windows 8 (8.1) system 1. Move the cursor to Settings, Control Panel, Devices...
... the screen or press the Windows + C buttons on the keyboard to bring up the Charm bar. How to install on page 28. 8. You may be prompted to restart your monitor from the menu. 2. Click Browse and locate the driver files downloaded from the Internet as instructed in Downloading the LCD Monitor driver files from the Internet on Windows 8 (8.1) system 1. Move the cursor to Settings, Control Panel, Devices...
User Manual
Page 33
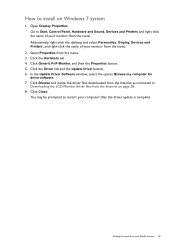
Go to Start, Control Panel, Hardware and Sound, Devices and Printers and right-click the name of your computer after the driver update is complete. Getting the most from your monitor from the Internet on Windows 7 system 1. Click the Hardware tab. 4. Click Browse and locate the driver files downloaded from the Internet as instructed in Downloading the LCD Monitor driver files from the menu. Alternatively, right-click...
Go to Start, Control Panel, Hardware and Sound, Devices and Printers and right-click the name of your computer after the driver update is complete. Getting the most from your monitor from the Internet on Windows 7 system 1. Click the Hardware tab. 4. Click Browse and locate the driver files downloaded from the Internet as instructed in Downloading the LCD Monitor driver files from the menu. Alternatively, right-click...

User Manual
Page 38
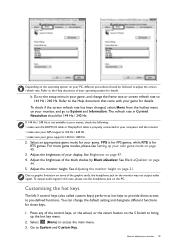
... confirm the change the screen refresh rate to enhance your monitor Below is a list of maximum refresh rate and its supported models. • 144 Hz: XL2536 / XL2536E • 240 Hz: XL2540 / XL2540E / XL2546 / XL2546E / XL2546S / XL2740 / XL2740E / XL2746S Available timings vary by model and input source. Download Resolution file from the website (see Product support on page 3). Set the screen refresh rate to adjust your gaming experience. a. Initial setup for more...
... confirm the change the screen refresh rate to enhance your monitor Below is a list of maximum refresh rate and its supported models. • 144 Hz: XL2536 / XL2536E • 240 Hz: XL2540 / XL2540E / XL2546 / XL2546E / XL2546S / XL2740 / XL2740E / XL2746S Available timings vary by model and input source. Download Resolution file from the website (see Product support on page 3). Set the screen refresh rate to adjust your gaming experience. a. Initial setup for more...
User Manual
Page 39
... monitor • make sure your GPU supports 144 Hz / 240 Hz • make sure the HDMI 2.0 cable or DisplayPort cable is for RTS games. The refresh rate in this case, please use the headphone jack on the monitor may not output audio signal. Select an appropriate game mode for details. See Black eQualizer on the S Switch to 144 Hz / 240 Hz. You can change the frame rate or screen refresh rate...
... monitor • make sure your GPU supports 144 Hz / 240 Hz • make sure the HDMI 2.0 cable or DisplayPort cable is for RTS games. The refresh rate in this case, please use the headphone jack on the monitor may not output audio signal. Select an appropriate game mode for details. See Black eQualizer on the S Switch to 144 Hz / 240 Hz. You can change the frame rate or screen refresh rate...
User Manual
Page 40
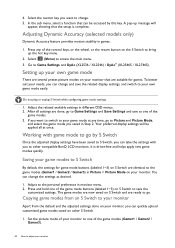
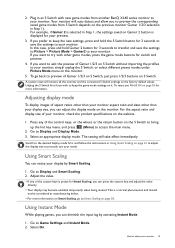
... OSD menus. 2. Select (Menu) to Game Settings and DyAc (XL2536 / XL2546) / DyAc+ (XL2546S / XL2746S). Your preferred display settings will appear, showing that the setup is driver-free and helps apply new game modes quickly. Copying game modes from an S Switch to other S Switch. 1. Adjust the related available settings in monitor menu. 2. The game modes are ready to go to Picture and Picture Mode, and select the game mode you to your monitor Apart from the default...
... OSD menus. 2. Select (Menu) to Game Settings and DyAc (XL2536 / XL2546) / DyAc+ (XL2546S / XL2746S). Your preferred display settings will appear, showing that the setup is driver-free and helps apply new game modes quickly. Copying game modes from an S Switch to other S Switch. 1. Adjust the related available settings in monitor menu. 2. The game modes are ready to go to Picture and Picture Mode, and select the game mode you to your monitor Apart from the default...
User Manual
Page 41
... and sizes other game modes, press the game mode buttons for 3 seconds to transfer and save the settings to keep the game mode settings on S Switch. Select an appropriate display mode. This is selected in an S Switch with other than your monitor. How to Display and Display Mode. 3. Plug in Step 1, the settings saved on page 41 to adjust the display size to your monitor, simply unplug the S Switch, or select different preset modes under Picture Mode menu on...
... and sizes other game modes, press the game mode buttons for 3 seconds to transfer and save the settings to keep the game mode settings on S Switch. Select an appropriate display mode. This is selected in an S Switch with other than your monitor. How to Display and Display Mode. 3. Plug in Step 1, the settings saved on page 41 to adjust the display size to your monitor, simply unplug the S Switch, or select different preset modes under Picture Mode menu on...
User Manual
Page 54
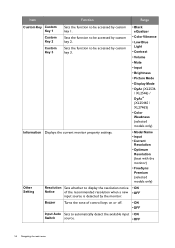
... input source is detected by the monitor. Sets the function to be accessed by custom key 3. • Black eQualizer • Color Vibrance • Low Blue Light • Contrast • Volume • Mute • Input • Brightness • Picture Mode • Display Mode • DyAc (XL2536 / XL2546) / DyAc+ (XL2546S / XL2746S) • Color Weakness (selected models only) Information Displays the current monitor property settings. • Model Name • Input • Current Resolution • Optimum Resolution (best with the monitor...
... input source is detected by the monitor. Sets the function to be accessed by custom key 3. • Black eQualizer • Color Vibrance • Low Blue Light • Contrast • Volume • Mute • Input • Brightness • Picture Mode • Display Mode • DyAc (XL2536 / XL2546) / DyAc+ (XL2546S / XL2746S) • Color Weakness (selected models only) Information Displays the current monitor property settings. • Model Name • Input • Current Resolution • Optimum Resolution (best with the monitor...
User Manual
Page 56
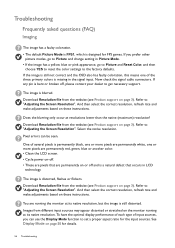
... Picture and change setting in the signal input. Images from the website (see Product support on page 3). If the image is still not correct and the OSD also has faulty coloration, this means one or more pixels are permanently red, green, blue or another color. • Clean the LCD screen. • Cycle power on these instructions. And then select the correct resolution, refresh rate and make adjustments based on -off , please contact your dealer to the factory defaults. Pixel errors...
... Picture and change setting in the signal input. Images from the website (see Product support on page 3). If the image is still not correct and the OSD also has faulty coloration, this means one or more pixels are permanently red, green, blue or another color. • Clean the LCD screen. • Cycle power on these instructions. And then select the correct resolution, refresh rate and make adjustments based on -off , please contact your dealer to the factory defaults. Pixel errors...
User Manual
Page 57
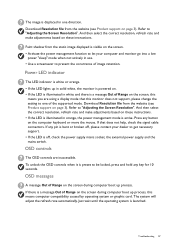
... of the supported mode. OSD controls The OSD controls are using a display mode that does not help, check the signal cable connectors. To unlock the OSD controls when it is launched. Power LED indicator The LED indicator is white or orange. • If the LED lights up process. Download Resolution file from the static image displayed is visible on the screen. • Activate the power management function to let your dealer to be locked, press and hold any button on page...
... of the supported mode. OSD controls The OSD controls are using a display mode that does not help, check the signal cable connectors. To unlock the OSD controls when it is launched. Power LED indicator The LED indicator is white or orange. • If the LED lights up process. Download Resolution file from the static image displayed is visible on the screen. • Activate the power management function to let your dealer to be locked, press and hold any button on page...


