
User Manual
Page 5
... ...21 Rotating the monitor ...22 Installing the Shield (shading hood) ...24 Using the monitor wall mounting kit 26 Getting the most from your BenQ ZOWIE monitor 27 How to install the monitor on a new computer 28 How to upgrade the monitor on an existing computer 29 How to install...mode to go by S Switch 39 Adjusting display mode...40 Using Smart Scaling ...40 Using Instant Mode ...40 Activating VESA standard DisplayPort Adaptive-Sync (XL2540 only 41 Navigating the main menu ...42 Game Settings menu ...43 Picture menu ...45 Display menu ...48 System menu ...51 Troubleshooting ...55
... ...21 Rotating the monitor ...22 Installing the Shield (shading hood) ...24 Using the monitor wall mounting kit 26 Getting the most from your BenQ ZOWIE monitor 27 How to install the monitor on a new computer 28 How to upgrade the monitor on an existing computer 29 How to install...mode to go by S Switch 39 Adjusting display mode...40 Using Smart Scaling ...40 Using Instant Mode ...40 Activating VESA standard DisplayPort Adaptive-Sync (XL2540 only 41 Navigating the main menu ...42 Game Settings menu ...43 Picture menu ...45 Display menu ...48 System menu ...51 Troubleshooting ...55

User Manual
Page 20
..., hold both the left and the right sides of the monitor to lower the monitor or lift it up to the monitor stand height just set. • Avoid placing hands on the upper or lower part of the height-adjustable stand or at the bottom of the monitor while performing this...
..., hold both the left and the right sides of the monitor to lower the monitor or lift it up to the monitor stand height just set. • Avoid placing hands on the upper or lower part of the height-adjustable stand or at the bottom of the monitor while performing this...

User Manual
Page 22
Select Portrait in Orientation, and apply the setting. Fully extend the monitor and tilt it to adjust the screen orientation. Then tilt the monitor. You should also make sure there are no obstacles ...
Select Portrait in Orientation, and apply the setting. Fully extend the monitor and tilt it to adjust the screen orientation. Then tilt the monitor. You should also make sure there are no obstacles ...
User Manual
Page 27
... whether you are upgrading an existing installation (which process you should install the custom BenQ ZOWIE LCD Monitor driver software as a member of the Administrators group in order to a network which has security access requirements, network policy settings may prevent you must be logged on as an Administrator or as provided on...
... whether you are upgrading an existing installation (which process you should install the custom BenQ ZOWIE LCD Monitor driver software as a member of the Administrators group in order to a network which has security access requirements, network policy settings may prevent you must be logged on as an Administrator or as provided on...
User Manual
Page 30
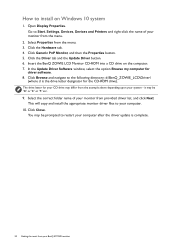
...Update Driver Software window, select the option Browse my computer for the CD-ROM drive). Click Close. Insert the BenQ ZOWIE LCD Monitor CD-ROM into a CD drive on Windows 10 system 1. You may be 'D:' or 'E:' or...drive letter for your CD drive may be prompted to your monitor from the example above depending upon your BenQ ZOWIE monitor Select the correct folder name of your monitor from the menu. 3. This will copy and install...Go to install on the computer. 7. How to Start, Settings, Devices, Devices and Printers and right-click the name of your computer. 10.
...Update Driver Software window, select the option Browse my computer for the CD-ROM drive). Click Close. Insert the BenQ ZOWIE LCD Monitor CD-ROM into a CD drive on Windows 10 system 1. You may be 'D:' or 'E:' or...drive letter for your CD drive may be prompted to your monitor from the example above depending upon your BenQ ZOWIE monitor Select the correct folder name of your monitor from the menu. 3. This will copy and install...Go to install on the computer. 7. How to Start, Settings, Devices, Devices and Printers and right-click the name of your computer. 10.
User Manual
Page 31
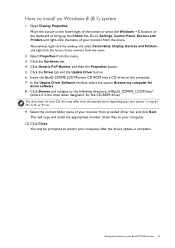
...for the CD-ROM drive). Click Browse and navigate to your monitor from provided driver list, and click Next. it may be prompted to Settings, Control Panel, Devices and Printers and right-click the name of your monitor from the menu. 2. You may differ from the menu. ...the menu. 3. Click Close. Open Display Properties. Click the Hardware tab. 4. How to bring up the Charm bar. Select Properties from your system - Insert the BenQ ZOWIE LCD Monitor CD-ROM into a CD drive on Windows 8 (8.1) system 1. The drive letter for your CD drive may be 'D:' or 'E:' or 'F:' etc...
...for the CD-ROM drive). Click Browse and navigate to your monitor from provided driver list, and click Next. it may be prompted to Settings, Control Panel, Devices and Printers and right-click the name of your monitor from the menu. 2. You may differ from the menu. ...the menu. 3. Click Close. Open Display Properties. Click the Hardware tab. 4. How to bring up the Charm bar. Select Properties from your system - Insert the BenQ ZOWIE LCD Monitor CD-ROM into a CD drive on Windows 8 (8.1) system 1. The drive letter for your CD drive may be 'D:' or 'E:' or 'F:' etc...

User Manual
Page 34
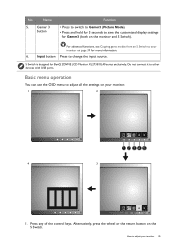
...Function 1. Gamer 1 button • Press to switch to Gamer1 (Picture Mode). • Press and hold for 3 seconds to save the customized display settings for Gamer2 (both on the monitor and S Switch). 4. For advanced functions, see Copying game modes from an S Switch to your monitor on page ...39 for more information. • Press to switch to Gamer2 (Picture Mode). • Press and hold for 3 seconds to save the customized display settings for Gamer1 (both on the monitor and S Switch). Wheel • For Increase/Decrease adjustment. • Scrolls Up/Down in Connect the S Switch...
...Function 1. Gamer 1 button • Press to switch to Gamer1 (Picture Mode). • Press and hold for 3 seconds to save the customized display settings for Gamer2 (both on the monitor and S Switch). 4. For advanced functions, see Copying game modes from an S Switch to your monitor on page ...39 for more information. • Press to switch to Gamer2 (Picture Mode). • Press and hold for 3 seconds to save the customized display settings for Gamer1 (both on the monitor and S Switch). Wheel • For Increase/Decrease adjustment. • Scrolls Up/Down in Connect the S Switch...
User Manual
Page 35
.... Press any of the control keys. Alternatively, press the wheel or the return button on the monitor and S Switch). How to save the customized display settings for Gamer3 (both on the S Switch. Gamer 3 button Function • Press to switch to Gamer3 (Picture Mode). • Press and hold for 3 seconds to adjust... monitor 35 Do not connect it to change the input source. For advanced functions, see Copying game modes from an S Switch to adjust all the settings on page 39 for BenQ ZOWIE LCD Monitor XL2735/XL40 series exclusively. Name 5.
.... Press any of the control keys. Alternatively, press the wheel or the return button on the monitor and S Switch). How to save the customized display settings for Gamer3 (both on the S Switch. Gamer 3 button Function • Press to switch to Gamer3 (Picture Mode). • Press and hold for 3 seconds to adjust... monitor 35 Do not connect it to change the input source. For advanced functions, see Copying game modes from an S Switch to adjust all the settings on page 39 for BenQ ZOWIE LCD Monitor XL2735/XL40 series exclusively. Name 5.

User Manual
Page 36
... On Screen Display. 2. In the main menu, follow the icons next to the control keys to access the main menu. 4. No. To change the default settings, see Customizing the hot keys on page 38. • For Up/Increase adjustment. • By default, the key is the hot key for particular functions.... 3. The hot keys only operate while the main menu is displayed. To change the default settings, see Customizing the hot keys on page 38. • For Down/Decrease adjustment. • By default, the key is the hot key for Color...
... On Screen Display. 2. In the main menu, follow the icons next to the control keys to access the main menu. 4. No. To change the default settings, see Customizing the hot keys on page 38. • For Up/Increase adjustment. • By default, the key is the hot key for particular functions.... 3. The hot keys only operate while the main menu is displayed. To change the default settings, see Customizing the hot keys on page 38. • For Down/Decrease adjustment. • By default, the key is the hot key for Color...
User Manual
Page 37
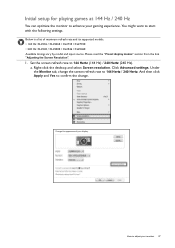
...Below is a list of maximum refresh rate and its supported models. • 144 Hz: XL2536 / XL2536E / XL2735 / XL2735E • 240 Hz: XL2540 / XL2540E / XL2546 / XL2546E Available timings vary by model and input source. Right-click the desktop and select Screen resolution. And then click Apply and ...change the screen refresh rate to confirm the change. How to 144 Hertz (144 Hz) / 240 Hertz (240 Hz). Set the screen refresh rate to adjust your gaming experience. Click Advanced settings. You might want to enhance your monitor 37 Initial setup for playing games at 144 Hz / 240 Hz You can...
...Below is a list of maximum refresh rate and its supported models. • 144 Hz: XL2536 / XL2536E / XL2735 / XL2735E • 240 Hz: XL2540 / XL2540E / XL2546 / XL2546E Available timings vary by model and input source. Right-click the desktop and select Screen resolution. And then click Apply and ...change the screen refresh rate to confirm the change. How to 144 Hertz (144 Hz) / 240 Hertz (240 Hz). Set the screen refresh rate to adjust your gaming experience. Click Advanced settings. You might want to enhance your monitor 37 Initial setup for playing games at 144 Hz / 240 Hz You can...

User Manual
Page 38
...menus, check the following: • make sure your game supports 144 Hz / 240 Hz. 2. To output audio signal in your game, and change the default setting and designate different functions for your game. Select (Menu) to the Help document that came with your game for RTS games. Customizing the hot keys.... Adjust the monitor height. Select an appropriate game mode for these keys. 1. Due to 144 Hz / 240 Hz. For more game modes, please see Setting up the hot key menu. 2. You can change the frame rate or screen refresh rate to graphic limitation on some of the control keys, or...
...menus, check the following: • make sure your game supports 144 Hz / 240 Hz. 2. To output audio signal in your game, and change the default setting and designate different functions for your game. Select (Menu) to the Help document that came with your game for RTS games. Customizing the hot keys.... Adjust the monitor height. Select an appropriate game mode for these keys. 1. Due to 144 Hz / 240 Hz. For more game modes, please see Setting up the hot key menu. 2. You can change the frame rate or screen refresh rate to graphic limitation on some of the control keys, or...

User Manual
Page 39
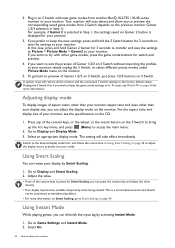
... mode easily. After all at any of the game mode buttons (labeled 1~3) on your monitor 39 Adjust the related available settings in Picture > Picture Mode on other compatible BenQ ZOWIE LCD monitors. The game modes are now saved on the S Switch to bring up message will be accessed by S... Switch Once the adjusted display settings have been saved to S Switch, you can change and save as desired. 1. In the sub menu, ...
... mode easily. After all at any of the game mode buttons (labeled 1~3) on your monitor 39 Adjust the related available settings in Picture > Picture Mode on other compatible BenQ ZOWIE LCD monitors. The game modes are now saved on the S Switch to bring up message will be accessed by S... Switch Once the adjusted display settings have been saved to S Switch, you can change and save as desired. 1. In the sub menu, ...
User Manual
Page 40
... on Smart Scaling, go back to Display and Display Mode. 3. A system reset will restore all the monitor and the connected S Switch settings to Game Settings and Instant Mode. 2. Select an appropriate display mode. Go to adjust your display by activating Instant Mode. 1. Select On. 40 How ... of Gamer 1/2/3 on S Switch, just press 1/2/3 buttons on page 54 for 3 seconds to save the settings to Picture > Picture Mode > Gamer2 to try with new game modes from another BenQ XL2735 / XL40 series monitor to preview the corresponding saved game modes from S Switch depends on the monitor. ...
... on Smart Scaling, go back to Display and Display Mode. 3. A system reset will restore all the monitor and the connected S Switch settings to Game Settings and Instant Mode. 2. Select an appropriate display mode. Go to adjust your display by activating Instant Mode. 1. Select On. 40 How ... of Gamer 1/2/3 on S Switch, just press 1/2/3 buttons on page 54 for 3 seconds to save the settings to Picture > Picture Mode > Gamer2 to try with new game modes from another BenQ XL2735 / XL40 series monitor to preview the corresponding saved game modes from S Switch depends on the monitor. ...
User Manual
Page 42
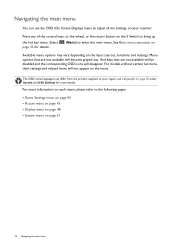
.... And keys that are not available will be disabled and the corresponding OSD icons will not appear on page 52 under System and OSD Settings for details. (Menu) to enter the main menu. Select page 35 for more information on each menu, please refer to the following pages...Picture menu on page 45 • Display menu on page 48 • System menu on the input sources, functions and settings. For models without certain functions, their settings and related items will disappear. Menu options that are not available will become grayed out. The OSD menu languages may vary...
.... And keys that are not available will be disabled and the corresponding OSD icons will not appear on page 52 under System and OSD Settings for details. (Menu) to enter the main menu. Select page 35 for more information on each menu, please refer to the following pages...Picture menu on page 45 • Display menu on page 48 • System menu on the input sources, functions and settings. For models without certain functions, their settings and related items will disappear. Menu options that are not available will become grayed out. The OSD menu languages may vary...

User Manual
Page 43
...10 1. Select to go to the previous menu, select . 6. Menu options that are not available will not appear on the input sources, functions and settings. Select (Menu) from the hot key menu. 2. To return to a sub menu, and then use 5. Item DyAc (Dynamic Accuracy) (selected ...models only) Function Dynamic Accuracy feature provides motion stability in games. Game Settings menu Available menu options may vary depending on the menu. And keys that are not available will be disabled and the corresponding OSD icons will...
...10 1. Select to go to the previous menu, select . 6. Menu options that are not available will not appear on the input sources, functions and settings. Select (Menu) from the hot key menu. 2. To return to a sub menu, and then use 5. Item DyAc (Dynamic Accuracy) (selected ...models only) Function Dynamic Accuracy feature provides motion stability in games. Game Settings menu Available menu options may vary depending on the menu. And keys that are not available will be disabled and the corresponding OSD icons will...
User Manual
Page 44
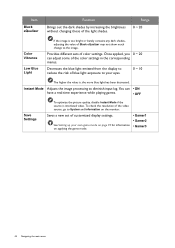
... the light shades. Item Black eQualizer Function Brings out the dark shades by increasing the brightness without changing those of customized display settings. You can adjust some of Black eQualizer may not show much change to System and Information on applying the game mode. • Gamer1 •... Gamer2 • Gamer3 44 Navigating the main menu Provides different sets of blue light exposure to diminish input lag. Decreases the blue light emitted from the display to reduce the risk of color...
... the light shades. Item Black eQualizer Function Brings out the dark shades by increasing the brightness without changing those of customized display settings. You can adjust some of Black eQualizer may not show much change to System and Information on applying the game mode. • Gamer1 •... Gamer2 • Gamer3 44 Navigating the main menu Provides different sets of blue light exposure to diminish input lag. Decreases the blue light emitted from the display to reduce the risk of color...
User Manual
Page 45
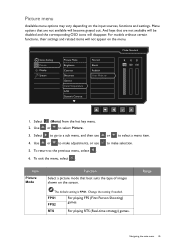
...Select a picture mode that are not available will be disabled and the corresponding OSD icons will not appear on the menu. Game Setting Picture Display System Picture Mode Brightness Contrast Sharpness Gamma Color Temperature AMA Dynamic Contrast Normal Bluish Reddish User Mode Mode: Standard R ...GB 100 100 100 1. The default setting is FPS1. Range Navigating the main menu 45 To exit the menu, select . Use or to the previous menu, select . 6. ...
...Select a picture mode that are not available will be disabled and the corresponding OSD icons will not appear on the menu. Game Setting Picture Display System Picture Mode Brightness Contrast Sharpness Gamma Color Temperature AMA Dynamic Contrast Normal Bluish Reddish User Mode Mode: Standard R ...GB 100 100 100 1. The default setting is FPS1. Range Navigating the main menu 45 To exit the menu, select . Use or to the previous menu, select . 6. ...

User Manual
Page 46
...of the edges of the subjects 1 to 10 in the image. Reddish Applies a warm tint to the image and is factory pre-set to change the color tint of the image. (e.g. The default value is the factory default color. User Define The blend of the...), and B (blue) menus to the news print standard white color. For viewing videos. Gamma Adjusts the tone luminance. Item Function Range Gamer1 Applies customized display settings. This is 3 (the • 1 standard value for Windows). • 2 • 3 • 4 • 5 Color Normal Temperature Allows video and...
...of the edges of the subjects 1 to 10 in the image. Reddish Applies a warm tint to the image and is factory pre-set to change the color tint of the image. (e.g. The default value is the factory default color. User Define The blend of the...), and B (blue) menus to the news print standard white color. For viewing videos. Gamma Adjusts the tone luminance. Item Function Range Gamer1 Applies customized display settings. This is 3 (the • 1 standard value for Windows). • 2 • 3 • 4 • 5 Color Normal Temperature Allows video and...

User Manual
Page 47
Item Function Dynamic Contrast The function is to automatically detect the distribution of Standard mode, while the right window presents the images under the selected mode from Picture Mode. The screen will be divided into two windows; the left window demonstrates images of an input visual signal, and then to create the optimal contrast. Senseye Demo Displays the preview of screen images under the specified mode. Range 0 to the factory defaults. Reset Color Resets the custom color settings to 5 • ON • OFF • YES • NO Navigating the main menu 47
Item Function Dynamic Contrast The function is to automatically detect the distribution of Standard mode, while the right window presents the images under the selected mode from Picture Mode. The screen will be divided into two windows; the left window demonstrates images of an input visual signal, and then to create the optimal contrast. Senseye Demo Displays the preview of screen images under the specified mode. Range 0 to the factory defaults. Reset Color Resets the custom color settings to 5 • ON • OFF • YES • NO Navigating the main menu 47

User Manual
Page 48
...Navigating the main menu Item Function Range Input Use this to change the input to that appropriate to the previous menu, select . 6. Game Settings Input Picture Display Mode 60 Display Smart Scaling System HDMI RGB PC Range Overscan Mode: Standard 1. Use or to make adjustments, or use... or to select a menu item. 4. To exit the menu, select . For models without certain functions, their settings and related items will become grayed out. Use or to make selection. 5. Menu options that are not available will not appear on the input ...
...Navigating the main menu Item Function Range Input Use this to change the input to that appropriate to the previous menu, select . 6. Game Settings Input Picture Display Mode 60 Display Smart Scaling System HDMI RGB PC Range Overscan Mode: Standard 1. Use or to make adjustments, or use... or to select a menu item. 4. To exit the menu, select . For models without certain functions, their settings and related items will become grayed out. Use or to make selection. 5. Menu options that are not available will not appear on the input ...

