

User Manual
Page 3
..., 0.75mm2 must be operated from the AC supply. • The power supply cord serves as a power disconnect device for your LCD Monitor. Do not cover the power adapter with your monitor. 0~40 C 10~90 % 0~3000 m -20~60 C 10~60 % 0~12000 m • The AC plug isolates this equipment from the ...type of power indicated on the marked label. Care And Cleaning • Do not place the monitor face down on the panel surface may occur. 3 For Germany only: • (If the weight of power available, consult your dealer or local power...
..., 0.75mm2 must be operated from the AC supply. • The power supply cord serves as a power disconnect device for your LCD Monitor. Do not cover the power adapter with your monitor. 0~40 C 10~90 % 0~3000 m -20~60 C 10~60 % 0~12000 m • The AC plug isolates this equipment from the ...type of power indicated on the marked label. Care And Cleaning • Do not place the monitor face down on the panel surface may occur. 3 For Germany only: • (If the weight of power available, consult your dealer or local power...

User Manual
Page 4
... the power before disconnecting the cables from the LCD monitor. • Always unplug the product from www.BenQ.com for more support. 4 They must not be secured to the building structure before cleaning. If any liquid, aerosol or glass cleaners. • Slots...Servicing • Do not attempt to service this product yourself, as dropping or mishandling occurs, contact qualified service personnel for servicing. • Contact your monitor and monitor mounting kit on a wall with a lint-free, non-abrasive cloth. • The equipment is provided. • Do not place heavy loads on the...
... the power before disconnecting the cables from the LCD monitor. • Always unplug the product from www.BenQ.com for more support. 4 They must not be secured to the building structure before cleaning. If any liquid, aerosol or glass cleaners. • Slots...Servicing • Do not attempt to service this product yourself, as dropping or mishandling occurs, contact qualified service personnel for servicing. • Contact your monitor and monitor mounting kit on a wall with a lint-free, non-abrasive cloth. • The equipment is provided. • Do not place heavy loads on the...
User Manual
Page 5
... stand and the base 18 Adjusting the monitor height ...20 Viewing angle adjustment ...21 Rotating the monitor ...22 Installing the Shield (shading hood) ...24 Using the monitor wall mounting kit 26 Getting the most from your BenQ ZOWIE monitor 27 How to install the monitor on a new computer 28 How to ... S Switch 39 Adjusting display mode...40 Using Smart Scaling ...40 Using Instant Mode ...40 Activating VESA standard DisplayPort Adaptive-Sync (XL2540 only 41 Navigating the main menu ...42 Game Settings menu ...43 Picture menu ...45 Display menu ...48 System menu ...51 Troubleshooting ...55
... stand and the base 18 Adjusting the monitor height ...20 Viewing angle adjustment ...21 Rotating the monitor ...22 Installing the Shield (shading hood) ...24 Using the monitor wall mounting kit 26 Getting the most from your BenQ ZOWIE monitor 27 How to install the monitor on a new computer 28 How to ... S Switch 39 Adjusting display mode...40 Using Smart Scaling ...40 Using Instant Mode ...40 Activating VESA standard DisplayPort Adaptive-Sync (XL2540 only 41 Navigating the main menu ...42 Game Settings menu ...43 Picture menu ...45 Display menu ...48 System menu ...51 Troubleshooting ...55

User Manual
Page 7
BenQ ZOWIE LCD Monitor Monitor Stand Monitor Base S Switch (Swift Switch) Quick Start Guide CD-ROM Power Cord (Picture may differ from product supplied for a replacement. Getting started When unpacking please check you have the following items. If any are missing or damaged, please contact the place of purchase for your region.) Getting started 7
BenQ ZOWIE LCD Monitor Monitor Stand Monitor Base S Switch (Swift Switch) Quick Start Guide CD-ROM Power Cord (Picture may differ from product supplied for a replacement. Getting started When unpacking please check you have the following items. If any are missing or damaged, please contact the place of purchase for your region.) Getting started 7

User Manual
Page 8
... box and packaging in storage for use in the future when you may differ from the actual contents and the product supplied for protecting the monitor during transport. USB Cable Video Cable: DVI-D Dual Link (Optional accessory) Video Cable: HDMI (Optional accessory) Video Cable: DP Protective cover Shield (Shading hood) •... your region. Always keep the product and accessories out of reach of small children. 8 Getting started And the package contents may subject to transport the monitor.
... box and packaging in storage for use in the future when you may differ from the actual contents and the product supplied for protecting the monitor during transport. USB Cable Video Cable: DVI-D Dual Link (Optional accessory) Video Cable: HDMI (Optional accessory) Video Cable: DP Protective cover Shield (Shading hood) •... your region. Always keep the product and accessories out of reach of small children. 8 Getting started And the package contents may subject to transport the monitor.

User Manual
Page 9
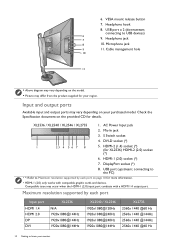
Handle 3 4. Kensington lock slot 4 5 Getting to know your monitor Front view 1. Input and output ports (vary by model, see Input and output ports on page 10) 5. Getting to know your monitor 9 Control buttons 2. Power button Back view 12 3.
Handle 3 4. Kensington lock slot 4 5 Getting to know your monitor Front view 1. Input and output ports (vary by model, see Input and output ports on page 10) 5. Getting to know your monitor 9 Control buttons 2. Power button Back view 12 3.
User Manual
Page 10
...Cable management hole 10 11 • Above diagram may vary depending on page 10 for your purchased model. XL2536 / XL2540 / XL2546 / XL2735 1. Maximum resolution supported by each port Input port HDMI 1.4 HDMI 2.0 DP DVI XL2536 N/A 1920x1080@144Hz 1920x1080@144Hz ...2560x 1440 @60 Hz 10 Getting to USB devices) 6 7 9. Headphone jack 8 10. DisplayPort socket (*) 8. Headphone hook 8. connecting to know your monitor AC Power Input jack 2. Compatible issue may differ from the product supplied for more information. • HDMI-1 (2.0) only works with a HDMI 1.4 output...
...Cable management hole 10 11 • Above diagram may vary depending on page 10 for your purchased model. XL2536 / XL2540 / XL2546 / XL2735 1. Maximum resolution supported by each port Input port HDMI 1.4 HDMI 2.0 DP DVI XL2536 N/A 1920x1080@144Hz 1920x1080@144Hz ...2560x 1440 @60 Hz 10 Getting to USB devices) 6 7 9. Headphone jack 8 10. DisplayPort socket (*) 8. Headphone hook 8. connecting to know your monitor AC Power Input jack 2. Compatible issue may differ from the product supplied for more information. • HDMI-1 (2.0) only works with a HDMI 1.4 output...

User Manual
Page 11
HDMI 1.4 / HDMI 2.0 HDMI 2.0 (XL2536) Getting to know your monitor 11 For detailed connection methods, see page 14 - 16. For cables that are for your reference only. Connection The following connection illustrations are not supplied with your product, you can purchase them separately.
HDMI 1.4 / HDMI 2.0 HDMI 2.0 (XL2536) Getting to know your monitor 11 For detailed connection methods, see page 14 - 16. For cables that are for your reference only. Connection The following connection illustrations are not supplied with your product, you can purchase them separately.

User Manual
Page 12
... desk will crack the glass or damage the LCD substrate voiding your warranty. Sliding or scraping the monitor around on the monitor base. Open Lock Lock Open 12 How to assemble your monitor hardware • If the computer is turned on you must turn -on your reference only. How... the desk for your desk and placing a soft item like a stapler or a mouse will scratch or damage the monitor surround and controls. Orient and align the stand arm with the monitor ( ), push them together until instructed to do so. • The following illustrations are for padding. The location...
... desk will crack the glass or damage the LCD substrate voiding your warranty. Sliding or scraping the monitor around on the monitor base. Open Lock Lock Open 12 How to assemble your monitor hardware • If the computer is turned on you must turn -on your reference only. How... the desk for your desk and placing a soft item like a stapler or a mouse will scratch or damage the monitor surround and controls. Orient and align the stand arm with the monitor ( ), push them together until instructed to do so. • The following illustrations are for padding. The location...

User Manual
Page 13
... the supplied protective cover. Gently attempt to pull the stand and the base back apart to assemble your monitor hardware 13 Turn the base counterclockwise until you must hold the handle and the bottom of the stand base at the same time as illustrated ( ). ...Open Lock Open Lock Lock Lock Open Lock Lock Open 2 Open Lock Lock Open 1 Lock To move the monitor, you cannot go further. Then push the lid back. How to check that they have properly engaged. Carefully lift the...
... the supplied protective cover. Gently attempt to pull the stand and the base back apart to assemble your monitor hardware 13 Turn the base counterclockwise until you must hold the handle and the bottom of the stand base at the same time as illustrated ( ). ...Open Lock Open Lock Lock Lock Open Lock Lock Open 2 Open Lock Lock Open 1 Lock To move the monitor, you cannot go further. Then push the lid back. How to check that they have properly engaged. Carefully lift the...

User Manual
Page 14
... of the cable (at the end with the ferrite filter) to prevent the plugs from other end of a digital output device. See Adjusting the monitor height on the monitor. Tighten all finger screws to the computer video socket. Connect the other light sources. 2. To Connect the DVI-D Dual Link Cable Connect the... plug of the DVI-D Dual Link cable to the HDMI port of the cable to the monitor video socket. You should position the monitor and angle the screen to the HDMI port on page 20 for more information. To Connect the HDMI Cable Connect the plug...
... of the cable (at the end with the ferrite filter) to prevent the plugs from other end of a digital output device. See Adjusting the monitor height on the monitor. Tighten all finger screws to the computer video socket. Connect the other light sources. 2. To Connect the DVI-D Dual Link Cable Connect the... plug of the DVI-D Dual Link cable to the HDMI port of the cable to the monitor video socket. You should position the monitor and angle the screen to the HDMI port on page 20 for more information. To Connect the HDMI Cable Connect the plug...

User Manual
Page 15
...socket illustrations on the right may not work only when the audio source is HDMI or DisplayPort. Connect the headset. And then connect your monitor hardware 15 Connect the other end of the DP cable to the microphone jack at the back). Connect the S Switch to assemble your microphone... connector on the left side of the monitor. The headphone jacks work on headphone jack under certain resolution (2560 x 1440, 144Hz) due to the graphic limitation on the back of the ...
...socket illustrations on the right may not work only when the audio source is HDMI or DisplayPort. Connect the headset. And then connect your monitor hardware 15 Connect the other end of the DP cable to the microphone jack at the back). Connect the S Switch to assemble your microphone... connector on the left side of the monitor. The headphone jacks work on headphone jack under certain resolution (2560 x 1440, 144Hz) due to the graphic limitation on the back of the ...

User Manual
Page 16
... is 400g. 6. Connect USB devices via the upstream USB port at the back). See picture on the monitor. Push to release the headphone hook found on the left side of the monitor ( ). TV OUT SDIF-OUT PDIF-OUT 16 How to assemble your headset on the headphone hook if ...needed. You may connect the headphones to the headphone jack found on the 1 left side of the monitor. 5. Using the headphone hook. Connect USB devices. This upstream USB port transmits data between connected USB devices and the upstream port. These downstream ...
... is 400g. 6. Connect USB devices via the upstream USB port at the back). See picture on the monitor. Push to release the headphone hook found on the left side of the monitor ( ). TV OUT SDIF-OUT PDIF-OUT 16 How to assemble your headset on the headphone hook if ...needed. You may connect the headphones to the headphone jack found on the 1 left side of the monitor. 5. Using the headphone hook. Connect USB devices. This upstream USB port transmits data between connected USB devices and the upstream port. These downstream ...

User Manual
Page 17
... the supplied protective cover or obstruct the ventilation holes. Picture may differ from your BenQ ZOWIE monitor on the monitor. When the monitor is powered on, to a power outlet just yet. 8. 7. Plug one end of the power cord into the socket labelled on the rear of the power ... the service life of the product, we recommend that you use your region. How to install the monitor software. Turn on the monitor by pressing the power button on page 27 to assemble your monitor hardware 17 Turn on the computer too, and follow the instructions in Getting the most from product supplied...
... the supplied protective cover or obstruct the ventilation holes. Picture may differ from your BenQ ZOWIE monitor on the monitor. When the monitor is powered on, to a power outlet just yet. 8. 7. Plug one end of the power cord into the socket labelled on the rear of the power ... the service life of the product, we recommend that you use your region. How to install the monitor software. Turn on the monitor by pressing the power button on page 27 to assemble your monitor hardware 17 Turn on the computer too, and follow the instructions in Getting the most from product supplied...

User Manual
Page 18
... towel on the desk for padding, before laying the screen face down on an object like a stapler or a mouse will scratch or damage the monitor surround and controls. 2. Turn the base clockwise until you cannot go further. 2 Open Lock Lock Open 1 Lock Lock Open Lock Lock Open Open... Lock Open Lock Lock 18 How to the monitor. Placing the screen surface on a flat clean padded surface. Raise the thumbscrew lid ( ) and release the thumbscrew as illustrated ( ). Please be ...
... towel on the desk for padding, before laying the screen face down on an object like a stapler or a mouse will scratch or damage the monitor surround and controls. 2. Turn the base clockwise until you cannot go further. 2 Open Lock Lock Open 1 Lock Lock Open Lock Lock Open Open... Lock Open Lock Lock 18 How to the monitor. Placing the screen surface on a flat clean padded surface. Raise the thumbscrew lid ( ) and release the thumbscrew as illustrated ( ). Please be ...

User Manual
Page 19
Please handle the base carefully. Remove the monitor stand. And then detach the base from the adjustment scale, it may cause the damage. Open Lock Lock Open 3. While pressing and holding the VESA mount release button ( ), detach the stand from the monitor ( and ). 3 1 2 How to take the base from the stand. Avoid to assemble your monitor hardware 19
Please handle the base carefully. Remove the monitor stand. And then detach the base from the adjustment scale, it may cause the damage. Open Lock Lock Open 3. While pressing and holding the VESA mount release button ( ), detach the stand from the monitor ( and ). 3 1 2 How to take the base from the stand. Avoid to assemble your monitor hardware 19

User Manual
Page 20
... desired height. 2. Keep children out of reach of your monitor hardware Adjusting the monitor height 1. On the monitor stand is desired, you should be noted that helps keep track of the monitor while performing this operation. • If the monitor has been rotated to portrait mode and height adjustment is an... adjustment scale that the wide screen will keep the monitor from being lowered to its minimum height. 20 How to assemble your preferred monitor height. Move the marker on the upper or lower part of the height-adjustable stand or ...
... desired height. 2. Keep children out of reach of your monitor hardware Adjusting the monitor height 1. On the monitor stand is desired, you should be noted that helps keep track of the monitor while performing this operation. • If the monitor has been rotated to portrait mode and height adjustment is an... adjustment scale that the wide screen will keep the monitor from being lowered to its minimum height. 20 How to assemble your preferred monitor height. Move the marker on the upper or lower part of the height-adjustable stand or ...

User Manual
Page 21
Make sure to assemble your preferred tilt angle. The scale on the bottom of your monitor hardware 21 Swiveling the monitor 1. Turn the adjustment scale on the scale. The interval of your preferred swivel angle. 1 2 How to align the arrow on top of the ...degrees, and you can make adjustment within the possible swivel angle. Turn the monitor to the desired angle with the one on the monitor base. This helps to the product specifications for details. Tilting the monitor Tilt the monitor gently. Viewing angle adjustment You may position the screen to the left or right...
Make sure to assemble your preferred tilt angle. The scale on the bottom of your monitor hardware 21 Swiveling the monitor 1. Turn the adjustment scale on the scale. The interval of your preferred swivel angle. 1 2 How to align the arrow on top of the ...degrees, and you can make adjustment within the possible swivel angle. Turn the monitor to the desired angle with the one on the monitor base. This helps to the product specifications for details. Tilting the monitor Tilt the monitor gently. Viewing angle adjustment You may position the screen to the left or right...

User Manual
Page 22
... cables. 22 How to assemble your PC, different procedures should be rotated 90 degrees. Depending on the operating system on your monitor hardware Fully extend the monitor and tilt it to rotate the display. You should also make sure there are no obstacles around the... the desktop and select Screen resolution from landscape to the help document of the LCD display hitting the monitor base surface while it is enough room for details. 2. Pivot the display. Rotating the monitor 1. Gently lift the display up and extend it . Refer to portrait mode. 3. Select Portrait in...
... cables. 22 How to assemble your PC, different procedures should be rotated 90 degrees. Depending on the operating system on your monitor hardware Fully extend the monitor and tilt it to rotate the display. You should also make sure there are no obstacles around the... the desktop and select Screen resolution from landscape to the help document of the LCD display hitting the monitor base surface while it is enough room for details. 2. Pivot the display. Rotating the monitor 1. Gently lift the display up and extend it . Refer to portrait mode. 3. Select Portrait in...

User Manual
Page 23
How to the desired viewing angle. 4. Adjust the monitor to assemble your monitor hardware 23 See Viewing angle adjustment on page 21 for more information.
How to the desired viewing angle. 4. Adjust the monitor to assemble your monitor hardware 23 See Viewing angle adjustment on page 21 for more information.

