

Safety Warning and Notice
Page 2
... possible danger, observe the total electric load when using the monitor, it in a region where power supply is unstable. Ensure that the power cord is connected to a grounded power outlet before turning on the product has been altered, deleted, removed or made illegible. Repairs, modifications, or alterations have been made by unauthorized service organizations or persons. Damage caused by...
... possible danger, observe the total electric load when using the monitor, it in a region where power supply is unstable. Ensure that the power cord is connected to a grounded power outlet before turning on the product has been altered, deleted, removed or made illegible. Repairs, modifications, or alterations have been made by unauthorized service organizations or persons. Damage caused by...
Resolution file
Page 1
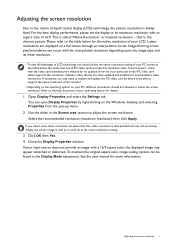
... adjust the screen resolution. If your input source does not provide an image with the interpolated resolution depending upon the image type and its maximum resolution with the video card manufacturer's website for an updated driver for the native resolution of liquid crystal display (LCD) technology, the picture resolution is called "Native Resolution" or maximal resolution - Software video drivers are displayed on the Windows desktop and selecting Properties from the pop-up menu. 2. See the user manual for new hardware video resolutions...
... adjust the screen resolution. If your input source does not provide an image with the interpolated resolution depending upon the image type and its maximum resolution with the video card manufacturer's website for an updated driver for the native resolution of liquid crystal display (LCD) technology, the picture resolution is called "Native Resolution" or maximal resolution - Software video drivers are displayed on the Windows desktop and selecting Properties from the pop-up menu. 2. See the user manual for new hardware video resolutions...

Resolution file
Page 2
... Advanced button. 3. Close the Display Properties window. 2 Adjusting the screen refresh rate Refer to adjust the screen resolution. Double click the Display icon in all models. You can choose 60 Hz for the native resolution of your operating system for an LCD display to the table on page 1. Click Change, OK, then Yes. 5. Please refer to flicker. Select the Adapter tab, and select an appropriate refresh rate to see the factory modes: Preset display modes...
... Advanced button. 3. Close the Display Properties window. 2 Adjusting the screen refresh rate Refer to adjust the screen resolution. Double click the Display icon in all models. You can choose 60 Hz for the native resolution of your operating system for an LCD display to the table on page 1. Click Change, OK, then Yes. 5. Please refer to flicker. Select the Adapter tab, and select an appropriate refresh rate to see the factory modes: Preset display modes...
Resolution file
Page 3
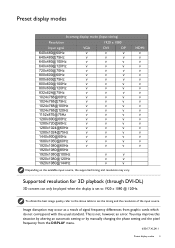
... DISPLAY menu. 6/30/17 XL2411 Preset display modes 3 You may improve this situation by altering an automatic setting or by manually changing the phase setting and the pixel frequency from graphic cards which do not correspond with the usual standard. To obtain the best image quality, refer to the above table to set to 1920 x 1080 @ 120Hz. Image disruption may vary. Preset display modes Incoming display mode (Input timing) Resolution 1920 x 1080 Input signal VGA DVI...
... DISPLAY menu. 6/30/17 XL2411 Preset display modes 3 You may improve this situation by altering an automatic setting or by manually changing the phase setting and the pixel frequency from graphic cards which do not correspond with the usual standard. To obtain the best image quality, refer to the above table to set to 1920 x 1080 @ 120Hz. Image disruption may vary. Preset display modes Incoming display mode (Input timing) Resolution 1920 x 1080 Input signal VGA DVI...
User Manual
Page 4
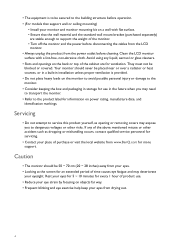
... at the screen for an extended period of the monitor. • Turn off the monitor and the power before disconnecting the cables from the LCD monitor. • Always unplug the product from the power outlet before operation. • (For models that support wall or ceiling mounting) • Install your place of purchase or visit the local website from drying out. 4 Clean the LCD monitor surface with flat surface...
... at the screen for an extended period of the monitor. • Turn off the monitor and the power before disconnecting the cables from the LCD monitor. • Always unplug the product from the power outlet before operation. • (For models that support wall or ceiling mounting) • Install your place of purchase or visit the local website from drying out. 4 Clean the LCD monitor surface with flat surface...
User Manual
Page 5
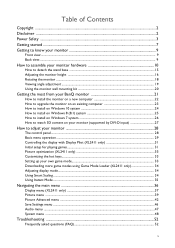
... install on Windows 7 system 26 How to watch 3D content on your monitor (supported by DVI-D input 27 How to adjust your monitor 28 The control panel ...28 Basic menu operation ...29 Controlling the display with Display Pilot (XL2411 only 31 Initial setup for playing games...31 Picture optimization (XL2411 only) ...33 Customizing the hot keys...33 Setting up your own game mode...33 Downloading more game modes using Game Mode Loader (XL2411 only 34 Adjusting display mode...34 Using...
... install on Windows 7 system 26 How to watch 3D content on your monitor (supported by DVI-D input 27 How to adjust your monitor 28 The control panel ...28 Basic menu operation ...29 Controlling the display with Display Pilot (XL2411 only 31 Initial setup for playing games...31 Picture optimization (XL2411 only) ...33 Customizing the hot keys...33 Setting up your own game mode...33 Downloading more game modes using Game Mode Loader (XL2411 only 34 Adjusting display mode...34 Using...
User Manual
Page 13
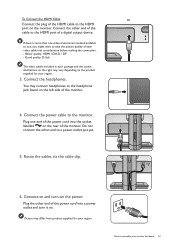
... on the product supplied for your region. 3. Picture may differ from product supplied for your region. How to the monitor. To Connect the HDMI Cable Or Connect the plug of the HDMI cable to the HDMI port on the power. Plug one video transmission method available to you, you might want to and turn it on the rear of the power cord into a power outlet and turn -on the monitor. If there...
... on the product supplied for your region. 3. Picture may differ from product supplied for your region. How to the monitor. To Connect the HDMI Cable Or Connect the plug of the HDMI cable to the HDMI port on the power. Plug one video transmission method available to you, you might want to and turn it on the rear of the power cord into a power outlet and turn -on the monitor. If there...
User Manual
Page 20
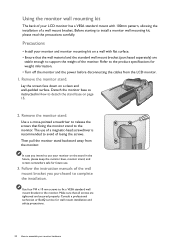
... keep the monitor base, monitor stand, and screws somewhere safe for future use of a magnetic-head screwdriver is recommended to the product specifications for wall mount installation and safety precautions. 20 How to assemble your LCD monitor has a VESA standard mount with flat surface. • Ensure that fixing the monitor stand to complete the installation. Precautions • Install your monitor on a wall with 100mm pattern, allowing the installation of a wall mount bracket. The use . 3. Before starting to the monitor. Remove the monitor stand. Use...
... keep the monitor base, monitor stand, and screws somewhere safe for future use of a magnetic-head screwdriver is recommended to the product specifications for wall mount installation and safety precautions. 20 How to assemble your LCD monitor has a VESA standard mount with flat surface. • Ensure that fixing the monitor stand to complete the installation. Precautions • Install your monitor on a wall with 100mm pattern, allowing the installation of a wall mount bracket. The use . 3. Before starting to the monitor. Remove the monitor stand. Use...
User Manual
Page 21
...; How to upgrade the monitor on an existing computer on page 23. • If you require a User Name and Password to login to successfully install the BenQ LCD Monitor driver software. At that point, click the Have Disk button, insert the BenQ LCD Monitor CD-ROM and select the appropriate monitor model. Follow the wizard instructions until it asks you need to follow to your Windows computer, you must...
...; How to upgrade the monitor on an existing computer on page 23. • If you require a User Name and Password to login to successfully install the BenQ LCD Monitor driver software. At that point, click the Have Disk button, insert the BenQ LCD Monitor CD-ROM and select the appropriate monitor model. Follow the wizard instructions until it asks you need to follow to your Windows computer, you must...
User Manual
Page 22
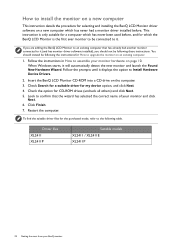
... instead be following table. Click Finish. 7. To find the suitable driver files for which has never had another monitor connected to it displays the option to Install Hardware Device Drivers. 2. Insert the BenQ LCD Monitor CD-ROM into a CD drive on page 10. Look to the following these instructions. Driver files XL2411 XL2411P Suitable models XL2411 / XL2411E XL2411P 22 Getting the most from your...
... instead be following table. Click Finish. 7. To find the suitable driver files for which has never had another monitor connected to it displays the option to Install Hardware Device Drivers. 2. Insert the BenQ LCD Monitor CD-ROM into a CD drive on page 10. Look to the following these instructions. Driver files XL2411 XL2411P Suitable models XL2411 / XL2411E XL2411P 22 Getting the most from your...
User Manual
Page 23
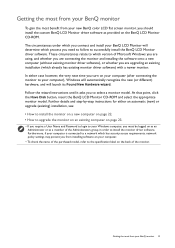
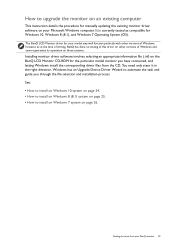
...; How to install on Windows 7 system on your BenQ monitor 23 Windows has an Upgrade Device Driver Wizard to automate the task and guide you have connected, and letting Windows install the corresponding driver files from your Microsoft Windows computer. Getting the most from the CD. How to upgrade the monitor on an existing computer This instruction details the procedure for manually updating the existing monitor driver software on page 26...
...; How to install on Windows 7 system on your BenQ monitor 23 Windows has an Upgrade Device Driver Wizard to automate the task and guide you have connected, and letting Windows install the corresponding driver files from your Microsoft Windows computer. Getting the most from the CD. How to upgrade the monitor on an existing computer This instruction details the procedure for manually updating the existing monitor driver software on page 26...

User Manual
Page 24
.... This will copy and install the appropriate monitor driver files to Start, Settings, Devices, Devices and Printers and right-click the name of your computer. 10. Open Display Properties. Select the correct folder name of your system - You may be 'D:' or 'E:' or 'F:' etc. 9. Go to your monitor from your BenQ monitor Click the Hardware tab. 4. Insert the BenQ LCD Monitor CD-ROM into...
.... This will copy and install the appropriate monitor driver files to Start, Settings, Devices, Devices and Printers and right-click the name of your computer. 10. Open Display Properties. Select the correct folder name of your system - You may be 'D:' or 'E:' or 'F:' etc. 9. Go to your monitor from your BenQ monitor Click the Hardware tab. 4. Insert the BenQ LCD Monitor CD-ROM into...

User Manual
Page 25
... the menu. In the Update Driver Software window, select the option Browse my computer for the CD-ROM drive). it may be 'D:' or 'E:' or 'F:' etc. 9. Click Close. Go to the following directory: d:\BenQ_LCD\Driver\ (where d is complete. The drive letter for your BenQ monitor 25 You may be prompted to your system - Open Display Properties. Click Browse and navigate to Settings, Control Panel...
... the menu. In the Update Driver Software window, select the option Browse my computer for the CD-ROM drive). it may be 'D:' or 'E:' or 'F:' etc. 9. Click Close. Go to the following directory: d:\BenQ_LCD\Driver\ (where d is complete. The drive letter for your BenQ monitor 25 You may be prompted to your system - Open Display Properties. Click Browse and navigate to Settings, Control Panel...
User Manual
Page 26
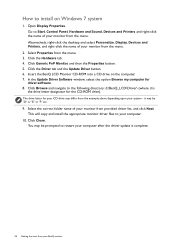
... Properties button. 5. Insert the BenQ LCD Monitor CD-ROM into a CD drive on Windows 7 system 1. In the Update Driver Software window, select the option Browse my computer for your CD drive may differ from the menu. 2. The drive letter for driver software. 8. Click the Driver tab and the Update Driver button. 6. This will copy and install the appropriate monitor driver files to install on the computer. 7. Go to Start, Control Panel, Hardware and Sound...
... Properties button. 5. Insert the BenQ LCD Monitor CD-ROM into a CD drive on Windows 7 system 1. In the Update Driver Software window, select the option Browse my computer for your CD drive may differ from the menu. 2. The drive letter for driver software. 8. Click the Driver tab and the Update Driver button. 6. This will copy and install the appropriate monitor driver files to install on the computer. 7. Go to Start, Control Panel, Hardware and Sound...
User Manual
Page 33
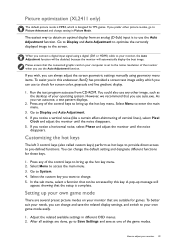
... different OSD menus. 2. Go to Display and Auto Adjustment to optimize the currently displayed image to Display and Auto Adjustment. 4. Customizing the hot keys The left 3 control keys (also called custom keys) perform as the desktop of the control keys to your operating system. Picture optimization (XL2411 only) The default picture mode is FPS1, which you connect a digital input signal using geometry menu items. To assist you in this key. If you can be disabled...
... different OSD menus. 2. Go to Display and Auto Adjustment to optimize the currently displayed image to Display and Auto Adjustment. 4. Customizing the hot keys The left 3 control keys (also called custom keys) perform as the desktop of the control keys to your operating system. Picture optimization (XL2411 only) The default picture mode is FPS1, which you connect a digital input signal using geometry menu items. To assist you in this key. If you can be disabled...
User Manual
Page 34
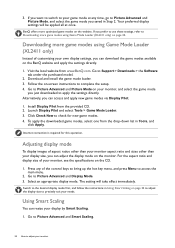
... and Picture Mode on your monitor, see the specifications on the CD. 1. Adjusting display mode To display images of your monitor, and select the game mode you just downloaded to check for this operation. BenQ offers more game modes using Game Mode Loader (XL2411 only) Instead of the control keys to bring up the hot key menu, and press Menu to Downloading more optimized game modes on page 34 to adjust the display size to Picture Advanced and Display Mode. 3. Install Display...
... and Picture Mode on your monitor, see the specifications on the CD. 1. Adjusting display mode To display images of your monitor, and select the game mode you just downloaded to check for this operation. BenQ offers more game modes using Game Mode Loader (XL2411 only) Instead of the control keys to bring up the hot key menu, and press Menu to Downloading more optimized game modes on page 34 to adjust the display size to Picture Advanced and Display Mode. 3. Install Display...
User Manual
Page 42
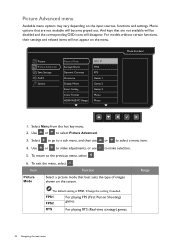
... available will be disabled and the corresponding OSD icons will disappear. FPS1 FPS2 For playing FPS (First Person Shooting) games. Picture Picture Advanced Save Settings Audio System Picture Mode Senseye Demo Dynamic Contrast Over-scan Display Mode Smart Scaling Color Format HDMI RGB PC Range FPS1 FPS2 RTS Gamer1 Gamer2 Gamer3 Movie Photo Mode: Standard 1. Use or to make adjustments, or use or to the previous menu, select . 6. For models without certain functions...
... available will be disabled and the corresponding OSD icons will disappear. FPS1 FPS2 For playing FPS (First Person Shooting) games. Picture Picture Advanced Save Settings Audio System Picture Mode Senseye Demo Dynamic Contrast Over-scan Display Mode Smart Scaling Color Format HDMI RGB PC Range FPS1 FPS2 RTS Gamer1 Gamer2 Gamer3 Movie Photo Mode: Standard 1. Use or to make adjustments, or use or to the previous menu, select . 6. For models without certain functions...
User Manual
Page 50
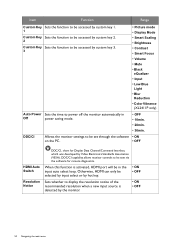
...; OFF Sets whether to display the resolution notice of the recommended resolution when a new input source is activated, HDMI port will be in Off power saving mode. • OFF • 10min. • 20min. • 30min. DDC/CI Allows the monitor settings to be set through the software • ON on the PC. • OFF HDMI Auto Switch Resolution Notice DDC/CI, short for remote diagnostics. Item Function Range Custom Key Sets the...
...; OFF Sets whether to display the resolution notice of the recommended resolution when a new input source is activated, HDMI port will be in Off power saving mode. • OFF • 10min. • 20min. • 30min. DDC/CI Allows the monitor settings to be set through the software • ON on the PC. • OFF HDMI Auto Switch Resolution Notice DDC/CI, short for remote diagnostics. Item Function Range Custom Key Sets the...
User Manual
Page 52
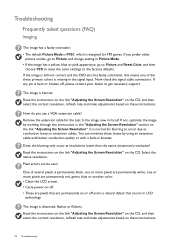
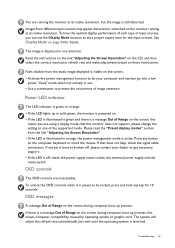
... red, green, blue or another color. • Clean the LCD screen. • Cycle power on-off. • These are pixels that occurs in LCD technology. Now check the signal cable connectors. How do you prefer other picture modes, go to Picture and Reset Color, and then choose YES to reset the color settings to the factory defaults. Read the instructions on the link "Adjusting the Screen Resolution" on these losses by working through the instructions in focus? If not, optimize the image...
... red, green, blue or another color. • Clean the LCD screen. • Cycle power on-off. • These are pixels that occurs in LCD technology. Now check the signal cable connectors. How do you prefer other picture modes, go to Picture and Reset Color, and then choose YES to reset the color settings to the factory defaults. Read the instructions on the link "Adjusting the Screen Resolution" on these losses by working through the instructions in focus? If not, optimize the image...
User Manual
Page 53
... input sources, you are using a display mode that does not help, check the signal cable connectors. If any key for details. The system will adjust the refresh rate automatically. If that this monitor does not support, please change the setting to prevent the occurrence of Range on the screen during computer boot up process, this means you can use . • Use a screensaver to one direction. Read the instructions on the link "Adjusting the Screen Resolution...
... input sources, you are using a display mode that does not help, check the signal cable connectors. If any key for details. The system will adjust the refresh rate automatically. If that this monitor does not support, please change the setting to prevent the occurrence of Range on the screen during computer boot up process, this means you can use . • Use a screensaver to one direction. Read the instructions on the link "Adjusting the Screen Resolution...


