

User Manual
Page 2
... blocked or covered. Servicing • Do not attempt to make changes from the wall outlet before cleaning. No part of this publication may expose you are for servicing. 2 The socket outlet should be reproduced, transmitted, transcribed, stored in a retrieval system or translated into this publication and to service this equipment from the AC supply. • The power supply cord serves as opening or removing covers may...
... blocked or covered. Servicing • Do not attempt to make changes from the wall outlet before cleaning. No part of this publication may expose you are for servicing. 2 The socket outlet should be reproduced, transmitted, transcribed, stored in a retrieval system or translated into this publication and to service this equipment from the AC supply. • The power supply cord serves as opening or removing covers may...
User Manual
Page 3
... started ...4 Getting to know your monitor 6 Front view ...6 Back view ...6 Assembling your monitor hardware 7 How to detach the stand base 10 Getting the most from your BenQ monitor 11 How to install the monitor on a new computer 12 How to upgrade the monitor on an existing computer 13 How to install on Windows Vista systems 14 How to install on Windows XP system 15 Picture optimization ...16 How to adjust your monitor...
... started ...4 Getting to know your monitor 6 Front view ...6 Back view ...6 Assembling your monitor hardware 7 How to detach the stand base 10 Getting the most from your BenQ monitor 11 How to install the monitor on a new computer 12 How to upgrade the monitor on an existing computer 13 How to install on Windows Vista systems 14 How to install on Windows XP system 15 Picture optimization ...16 How to adjust your monitor...
User Manual
Page 4
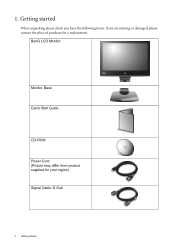
BenQ LCD Monitor Monitor Base Quick Start Guide CD-ROM Power Cord (Picture may differ from product supplied for your region) Signal Cable: D-Sub 4 Getting started When unpacking please check you have the following items. If any are missing or damaged, please contact the place of purchase for a replacement. 1. Getting started
BenQ LCD Monitor Monitor Base Quick Start Guide CD-ROM Power Cord (Picture may differ from product supplied for your region) Signal Cable: D-Sub 4 Getting started When unpacking please check you have the following items. If any are missing or damaged, please contact the place of purchase for a replacement. 1. Getting started

User Manual
Page 7
... attempt to pull them together until instructed to the monitor until they have properly engaged. Protect the monitor and screen by clearing a flat open area on the power to do so. 1. You should position the monitor and angle the screen to the monitor. Please be careful to prevent damage to minimize unwanted reflections from other light sources. Assembling your desk and placing a soft item...
... attempt to pull them together until instructed to the monitor until they have properly engaged. Protect the monitor and screen by clearing a flat open area on the power to do so. 1. You should position the monitor and angle the screen to the monitor. Please be careful to prevent damage to minimize unwanted reflections from other light sources. Assembling your desk and placing a soft item...
User Manual
Page 8
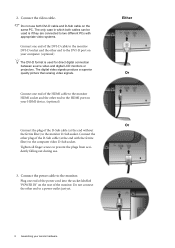
... digital video signals produce a superior quality picture than analog video signals. Connect one end of the DVI-D cable to the monitor DVI-D socket and the other end to the DVI-D port on the same PC. Plug one end of the power cord into the socket labelled 'POWER IN' on your HDMI device. (optional) Connect the plug of the D-Sub cable (at the end with appropriate video systems. Connect one end of the HDMI cable to the monitor HDMI...
... digital video signals produce a superior quality picture than analog video signals. Connect one end of the DVI-D cable to the monitor DVI-D socket and the other end to the DVI-D port on the same PC. Plug one end of the power cord into the socket labelled 'POWER IN' on your HDMI device. (optional) Connect the plug of the D-Sub cable (at the end with appropriate video systems. Connect one end of the HDMI cable to the monitor HDMI...
User Manual
Page 9
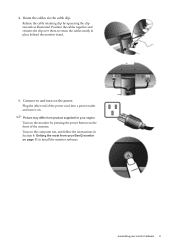
Turn on . Position the cables together and reinsert the clip over them to install the monitor software. Connect-to and turn it on the computer too, and follow the instructions in place behind the monitor stand. 5. Route the cables via the cable clip. Plug the other end of the monitor. Release the cable retaining clip by pressing the power button on the front of the power cord into a power outlet and turn -on...
Turn on . Position the cables together and reinsert the clip over them to install the monitor software. Connect-to and turn it on the computer too, and follow the instructions in place behind the monitor stand. 5. Route the cables via the cable clip. Plug the other end of the monitor. Release the cable retaining clip by pressing the power button on the front of the power cord into a power outlet and turn -on...

User Manual
Page 11
... security access requirements, network policy settings may prevent you should install the custom BenQ LCD Monitor driver software as a member of Microsoft Windows you are using, and whether you are upgrading an existing installation (which you connect and install your computer (after connecting the monitor to install the monitor driver software. Follow the wizard instructions until it asks you need to follow . See: • How to install the monitor on a new computer on...
... security access requirements, network policy settings may prevent you should install the custom BenQ LCD Monitor driver software as a member of Microsoft Windows you are using, and whether you are upgrading an existing installation (which you connect and install your computer (after connecting the monitor to install the monitor driver software. Follow the wizard instructions until it asks you need to follow . See: • How to install the monitor on a new computer on...

User Manual
Page 12
... following these instructions. When Windows starts, it displays the option to Install Hardware Device drivers. 2. Restart the computer. 12 Getting the most from your monitor and click Next. 6. Check Search for a suitable driver for CD-ROM drives (uncheck all others) and click Next. 5. Look to confirm that has already had a monitor driver installed before , and for which has never had another monitor connected to...
... following these instructions. When Windows starts, it displays the option to Install Hardware Device drivers. 2. Restart the computer. 12 Getting the most from your monitor and click Next. 6. Check Search for a suitable driver for CD-ROM drives (uncheck all others) and click Next. 5. Look to confirm that has already had a monitor driver installed before , and for which has never had another monitor connected to...

User Manual
Page 13
... compatible for your Microsoft Windows computer. How to upgrade the monitor on an existing computer This instruction details the procedure for manually updating the existing monitor driver software on your model may well function perfectly with other versions of Windows and cannot guarantee its operation on those systems. Installing monitor driver software involves selecting an appropriate information file (.inf) on the BenQ LCD Monitor CD-ROM for the particular model monitor...
... compatible for your Microsoft Windows computer. How to upgrade the monitor on an existing computer This instruction details the procedure for manually updating the existing monitor driver software on your model may well function perfectly with other versions of Windows and cannot guarantee its operation on those systems. Installing monitor driver software involves selecting an appropriate information file (.inf) on the BenQ LCD Monitor CD-ROM for the particular model monitor...

User Manual
Page 14
... sounds window. Click Continue in the prompted User Account Control window. 5. The Generic PnP Monitor Properties window will display. 2. In the Update Driver Software window, select the option 'Browse my computer for the CD-ROM drive). You do not need to restart Windows Vista, as the BenQ LCD monitor drivers will copy and install the appropriate monitor driver files to the following directory: d:\BenQ_LCD\Driver\ (where d is the drive letter designator for driver software'. 8. Open Display Settings...
... sounds window. Click Continue in the prompted User Account Control window. 5. The Generic PnP Monitor Properties window will display. 2. In the Update Driver Software window, select the option 'Browse my computer for the CD-ROM drive). You do not need to restart Windows Vista, as the BenQ LCD monitor drivers will copy and install the appropriate monitor driver files to the following directory: d:\BenQ_LCD\Driver\ (where d is the drive letter designator for driver software'. 8. Open Display Settings...

User Manual
Page 15
... Start | Control Panel | Display. • Under the Category view, click Start | Control Panel | Appearance and Themes | Change the screen resolution. However, if BenQ is selected for you. 4. This will need to the Monitor Properties window. 11. Check the option 'Install from your monitor model. 9. The Monitor Properties window will operate immediately with these locations' and also check 'Search removable media', then click Next. When completes, the wizard should have found and selected the BenQ driver...
... Start | Control Panel | Display. • Under the Category view, click Start | Control Panel | Appearance and Themes | Change the screen resolution. However, if BenQ is selected for you. 4. This will need to the Monitor Properties window. 11. Check the option 'Install from your monitor model. 9. The Monitor Properties window will operate immediately with these locations' and also check 'Search removable media', then click Next. When completes, the wizard should have found and selected the BenQ driver...
User Manual
Page 16
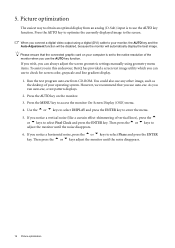
When you connect a digital video output using geometry menu items. To assist you in this endeavour, BenQ has provided a screen test image utility which you use auto.exe. Run the test program auto.exe from an analog (D-Sub) input is set to the native resolution of vertical lines), press the t or u keys to check for screen color, grayscale and line gradient display. 1. Please ensure that you can always adjust the screen geometric settings manually using a digital (DVI) cable to your...
When you connect a digital video output using geometry menu items. To assist you in this endeavour, BenQ has provided a screen test image utility which you use auto.exe. Run the test program auto.exe from an analog (D-Sub) input is set to the native resolution of vertical lines), press the t or u keys to check for screen color, grayscale and line gradient display. 1. Please ensure that you can always adjust the screen geometric settings manually using a digital (DVI) cable to your...

User Manual
Page 17
... Mode. 6. 6. How to adjust your monitor The control panel (1): X2200W 1. t / PerfectMotion key: For Up/Increase adjustment. Hot-key displays will only operate while the OSD menu is also the hot key for adjusting the value of that setting, and will disappear after a few seconds of no key activity. How to the previous menu or exit OSD. 4. "AUTO": Adjust vertical position, phase, horizontal position and pixel clock automatically. 3. "MENU" key: Activate OSD main menu...
... Mode. 6. 6. How to adjust your monitor The control panel (1): X2200W 1. t / PerfectMotion key: For Up/Increase adjustment. Hot-key displays will only operate while the OSD menu is also the hot key for adjusting the value of that setting, and will disappear after a few seconds of no key activity. How to the previous menu or exit OSD. 4. "AUTO": Adjust vertical position, phase, horizontal position and pixel clock automatically. 3. "MENU" key: Activate OSD main menu...
User Manual
Page 18
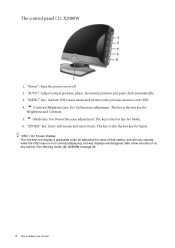
.... 2. "AUTO": Adjust vertical position, phase, horizontal position and pixel clock automatically. 3. The hot-keys will display a graduated scale for Brightness and Contrast. 5. t /Contrast/Brightness key: For Up/Increase adjustment. u /Mode key: For Down/Decrease adjustment. OSD = On Screen Display. The control panel (2): X2000W 1. Hot-key displays will only operate while the OSD menu is the hot key for adjusting the value of that setting, and will disappear after a few seconds of no key activity. "Power": Turn the power on...
.... 2. "AUTO": Adjust vertical position, phase, horizontal position and pixel clock automatically. 3. The hot-keys will display a graduated scale for Brightness and Contrast. 5. t /Contrast/Brightness key: For Up/Increase adjustment. u /Mode key: For Down/Decrease adjustment. OSD = On Screen Display. The control panel (2): X2000W 1. Hot-key displays will only operate while the OSD menu is the hot key for adjusting the value of that setting, and will disappear after a few seconds of no key activity. "Power": Turn the power on...
User Manual
Page 21
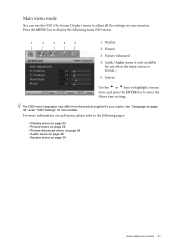
... menu mode You can use when the input source is only available for more information on each menu, please refer to the following main OSD menu. 1 2 3 4 5 1. Press the MENU key to adjust all the settings on page 30 How to enter the Menu item settings. Audio (Audio menu is HDMI.) 5. For more details. Picture 3. System Use the t or u keys to highlight a menu item, and press the ENTER key to adjust your monitor. Display...
... menu mode You can use when the input source is only available for more information on each menu, please refer to the following main OSD menu. 1 2 3 4 5 1. Press the MENU key to adjust all the settings on page 30 How to enter the Menu item settings. Audio (Audio menu is HDMI.) 5. For more details. Picture 3. System Use the t or u keys to highlight a menu item, and press the ENTER key to adjust your monitor. Display...

User Manual
Page 22
Display menu 1. The AUTO key is a 'hot-key' for you connect a digital video output using a digital (DVI) cable to your monitor, the AUTO key and the Auto Adjustment function will be disabled. 22 How to adjust your monitor Operation Press the ENTER key to make adjustment. Item Auto Adjustment Function Optimizes and adjusts the screen settings automatically for this option and make adjustments or selections. 5. Range When you . To return to select that item. 4. Press the t or u keys to...
Display menu 1. The AUTO key is a 'hot-key' for you connect a digital video output using a digital (DVI) cable to your monitor, the AUTO key and the Auto Adjustment function will be disabled. 22 How to adjust your monitor Operation Press the ENTER key to make adjustment. Item Auto Adjustment Function Optimizes and adjusts the screen settings automatically for this option and make adjustments or selections. 5. Range When you . To return to select that item. 4. Press the t or u keys to...
User Manual
Page 28
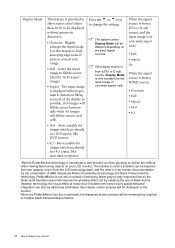
... hide annoying edge noise if present around your monitor Scales the input image to change the settings. When the signal source is from a DVI or D-sub source, and the input image is of non-wide aspect ratio: • Full • Aspect Or When the signal source is from a HDMI source: • Overscan • Full • Aspect • 16:9 • 4:3 *BenQ's PerfectMotion technology is introduced to well prevent...
... hide annoying edge noise if present around your monitor Scales the input image to change the settings. When the signal source is from a DVI or D-sub source, and the input image is of non-wide aspect ratio: • Full • Aspect Or When the signal source is from a HDMI source: • Overscan • Full • Aspect • 16:9 • 4:3 *BenQ's PerfectMotion technology is introduced to well prevent...

User Manual
Page 31
... u keys to change the settings. 0 to 100 0 to the factory default values. When this function is preset to be locked, press and hold the 'MENU' key for 15 seconds to be sent via the software for Display Data Channel/Command Interface, which was developed by Video Electronics Standards Association (VESA). How to Reset All monitor property settings. H. Adjusts the vertical position of the OSD menu. DDC/CI* Allows...
... u keys to change the settings. 0 to 100 0 to the factory default values. When this function is preset to be locked, press and hold the 'MENU' key for 15 seconds to be sent via the software for Display Data Channel/Command Interface, which was developed by Video Electronics Standards Association (VESA). How to Reset All monitor property settings. H. Adjusts the vertical position of the OSD menu. DDC/CI* Allows...
User Manual
Page 32
... the native resolution. Now check the signal cable connectors. If the LED is a message "Out of several pixels is permanently black, one or more pixels are permanently white, one or more pixels are permanently red, green, blue or another color. • Clean the LCD screen. • Cycle power on-off and is missing in the "Caution" message box to reset the color settings to conduction losses in green and there is illuminated in extension cables. Remove...
... the native resolution. Now check the signal cable connectors. If the LED is a message "Out of several pixels is permanently black, one or more pixels are permanently white, one or more pixels are permanently red, green, blue or another color. • Clean the LCD screen. • Cycle power on-off and is missing in the "Caution" message box to reset the color settings to conduction losses in green and there is illuminated in extension cables. Remove...
User Manual
Page 33
...; To unlock the OSD controls when the OSD is distorted, flashes or flickers: Read the instructions on the link "Adjusting the Screen Resolution" on page 28 for the input sources. If your problems remain after checking this manual, please contact your dealer to get necessary support. If that does not help ? The image is preset to enter the "OSD Lock" option and make adjustments based on the monitor running the monitor at : Support@BenQ.com Troubleshooting 33 To...
...; To unlock the OSD controls when the OSD is distorted, flashes or flickers: Read the instructions on the link "Adjusting the Screen Resolution" on page 28 for the input sources. If your problems remain after checking this manual, please contact your dealer to get necessary support. If that does not help ? The image is preset to enter the "OSD Lock" option and make adjustments based on the monitor running the monitor at : Support@BenQ.com Troubleshooting 33 To...


