
Quick Start Guide
Page 10
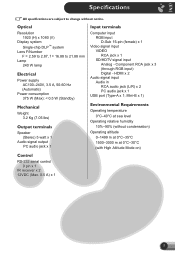
... - HDMI x 2 Audio signal input Audio in RCA audio jack (L/R) x 2 PC audio jack x 1 USB port (Type-A x 1; (EN) Specifications All specifications are subject to 21.88 mm Lamp 240 W lamp Electrical Power supply AC100-240V, 3.5 A, 50-60 Hz (Automatic) Power consumption 375 W (Max); < 0.5 W (Standby) Mechanical Weight 3.2 Kg (7.05 lbs) Output terminals Speaker (Stereo) 5 watt...
... - HDMI x 2 Audio signal input Audio in RCA audio jack (L/R) x 2 PC audio jack x 1 USB port (Type-A x 1; (EN) Specifications All specifications are subject to 21.88 mm Lamp 240 W lamp Electrical Power supply AC100-240V, 3.5 A, 50-60 Hz (Automatic) Power consumption 375 W (Max); < 0.5 W (Standby) Mechanical Weight 3.2 Kg (7.05 lbs) Output terminals Speaker (Stereo) 5 watt...

Quick Start Guide
Page 22
...) 1920 (H) x 1080 (V) Single-chip DLP™ àŹÊì F F = 2.59 ¶Ö§ 2.87, f = 16.88 ¶Ö§ 21.88 ÁÁ. Lamp 240 W Ãкºä¿ AC100-240V, 3.5 A, 50-60 Hz 375 W 0.5 W 3.2 ¡¡. (7.05 »Í¹´ì) 5 ÇÑμμ...
...) 1920 (H) x 1080 (V) Single-chip DLP™ àŹÊì F F = 2.59 ¶Ö§ 2.87, f = 16.88 ¶Ö§ 21.88 ÁÁ. Lamp 240 W Ãкºä¿ AC100-240V, 3.5 A, 50-60 Hz 375 W 0.5 W 3.2 ¡¡. (7.05 »Í¹´ì) 5 ÇÑμμ...
User Manual
Page 2
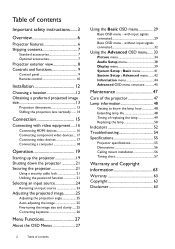
... size and clarity ..... 25 Correcting keystone 26 Menu Functions 27 About the OSD Menus 27 2 Table of replacing the lamp 49 Replacing the lamp 50 Indicators 52 Troubleshooting 54 Specifications 55 Projector specifications 55 Dimensions 56 Ceiling mount installation 56 Timing chart 57 Warranty and ...System Setup : Advanced menu ........42 Information menu 44 Advanced OSD menu structure 45 Maintenance 47 Care of the projector 47 Lamp information 48 Getting to know the lamp hour 48 Extending lamp life 48 Timing of contents Using the Basic OSD menu 29 Basic OSD menu -
... size and clarity ..... 25 Correcting keystone 26 Menu Functions 27 About the OSD Menus 27 2 Table of replacing the lamp 49 Replacing the lamp 50 Indicators 52 Troubleshooting 54 Specifications 55 Projector specifications 55 Dimensions 56 Ceiling mount installation 56 Timing chart 57 Warranty and ...System Setup : Advanced menu ........42 Information menu 44 Advanced OSD menu structure 45 Maintenance 47 Care of the projector 47 Lamp information 48 Getting to know the lamp hour 48 Extending lamp life 48 Timing of contents Using the Basic OSD menu 29 Basic OSD menu -
User Manual
Page 4
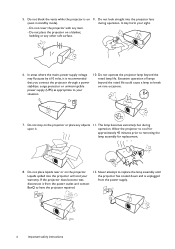
... Do not step on the projector. operation. In areas where the mains power supply voltage may harm your warranty. Never attempt to replace the lamp assembly until the projector has cooled down and is recommended that you connect the projector through a power stabilizer, surge protector or uninterruptible power supply ...appropriate to have the projector repaired. 12. Liquids spilled into the projector lens during upon it is unplugged from the power outlet and contact BenQ to your situation. 10. Do not look straight into the projector will void your sight. 6. 5.
... Do not step on the projector. operation. In areas where the mains power supply voltage may harm your warranty. Never attempt to replace the lamp assembly until the projector has cooled down and is recommended that you connect the projector through a power stabilizer, surge protector or uninterruptible power supply ...appropriate to have the projector repaired. 12. Liquids spilled into the projector lens during upon it is unplugged from the power outlet and contact BenQ to your situation. 10. Do not look straight into the projector will void your sight. 6. 5.
User Manual
Page 5
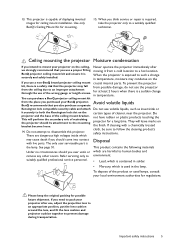
... you intend to mount your projector on the If you need to pack your local environment authorities for a long time. BenQ projector ceiling mount kit and ensure it is Disposal the lamp. If you use a proper fitting moving it securely to human bodies and remove any other covers. 13. When the projector...
... you intend to mount your projector on the If you need to pack your local environment authorities for a long time. BenQ projector ceiling mount kit and ensure it is Disposal the lamp. If you use a proper fitting moving it securely to human bodies and remove any other covers. 13. When the projector...

User Manual
Page 6
... connected. • Intuitive lens shift The intuitive control over lens shift wheel provides flexibility in setting-up your projector. • SmartEco SmartEco™ technology saves lamp power consumption up to 70% depending on the content brightness level when SmartEco mode is selected. 6 Overview
... connected. • Intuitive lens shift The intuitive control over lens shift wheel provides flexibility in setting-up your projector. • SmartEco SmartEco™ technology saves lamp power consumption up to 70% depending on the content brightness level when SmartEco mode is selected. 6 Overview
User Manual
Page 8
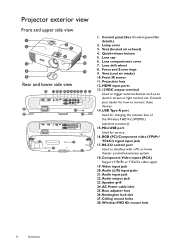
... 27. Audio output jack 23. Control panel (See Control panel for how to trigger external devices such as an electric screen or light control, etc. Lamp cover 3. Vent (heated air exhaust) 4. Lens cap 6. Lens compartment cover 7. Lens shift wheel 8. Vent (cool air intake) 10. RGB (PC)/Component video (YPbPr/ YCbCr) signal...
... 27. Audio output jack 23. Control panel (See Control panel for how to trigger external devices such as an electric screen or light control, etc. Lamp cover 3. Vent (heated air exhaust) 4. Lens cap 6. Lens compartment cover 7. Lens shift wheel 8. Vent (cool air intake) 10. RGB (PC)/Component video (YPbPr/ YCbCr) signal...
User Manual
Page 9
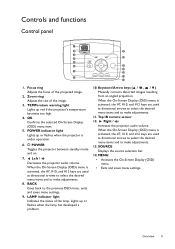
...projector is activated, the #7, #10, and #12 keys are used as directional arrows to select the desired menu items and to make adjustments. 11. LAMP indicator light Indicates the status of the projected image. 2. Keystone/Arrow keys ( / , / ) Manually corrects distorted images resulting from an angled projection... arrows to select the desired menu items and to make adjustments. 13. Focus ring Adjusts the focus of the lamp. TEMPerature warning light Lights up or flashes when the lamp has developed a problem. 10. MENU • Accesses the On-Screen Display (OSD) menu. • Exits...
...projector is activated, the #7, #10, and #12 keys are used as directional arrows to select the desired menu items and to make adjustments. 11. LAMP indicator light Indicates the status of the projected image. 2. Keystone/Arrow keys ( / , / ) Manually corrects distorted images resulting from an angled projection... arrows to select the desired menu items and to make adjustments. 13. Focus ring Adjusts the focus of the lamp. TEMPerature warning light Lights up or flashes when the lamp has developed a problem. 10. MENU • Accesses the On-Screen Display (OSD) menu. • Exits...
User Manual
Page 19
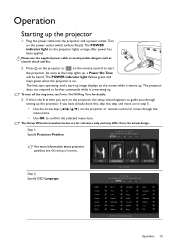
.... The projector does not respond to start -up the projector. Turn on the projector, the setup wizard appears to avoid possible dangers such as the lamp lights up the projector 1. The Setup Wizard screenshots below are for details. 3. To turn on the power outlet switch (where fitted).
.... The projector does not respond to start -up the projector. Turn on the projector, the setup wizard appears to avoid possible dangers such as the lamp lights up the projector 1. The Setup Wizard screenshots below are for details. 3. To turn on the power outlet switch (where fitted).

User Manual
Page 21
.... 2. You can locate a Kensington lock slot on the projector or confirmation message. Utilizing the password function For security purposes and to cool the lamp. Setting a password Once a password has been set and the power on page 8 for an extended period, unplug the power cable from the ...and foremost, you enable the password function yet forget the password somehow. To do not know the correct password may not use , you may shorten lamp life. When the cooling process ends, a "Power Off Ring Tone" will show a solid orange. A Kensington security cable lock is usually a ...
.... 2. You can locate a Kensington lock slot on the projector or confirmation message. Utilizing the password function For security purposes and to cool the lamp. Setting a password Once a password has been set and the power on page 8 for an extended period, unplug the power cable from the ...and foremost, you enable the password function yet forget the password somehow. To do not know the correct password may not use , you may shorten lamp life. When the cooling process ends, a "Power Off Ring Tone" will show a solid orange. A Kensington security cable lock is usually a ...
User Manual
Page 25
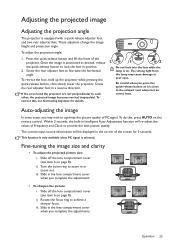
... picture: i. Slide off the lens compartment cover (see item 6 on . iii. Do not look into the lens while the lamp is close to the exhaust vent where hot air comes from the lamp may wish to lock the foot in Intelligent Auto Adjustment function will be displayed in or zoom out. Within...
... picture: i. Slide off the lens compartment cover (see item 6 on . iii. Do not look into the lens while the lamp is close to the exhaust vent where hot air comes from the lamp may wish to lock the foot in Intelligent Auto Adjustment function will be displayed in or zoom out. Within...
User Manual
Page 27
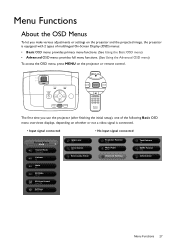
... Mode Standard Volume 10 Mute Off 3D Mode 3D Off 3D Sync Invert Press OK Settings Press OK Wall Color Off Auto Source Off Reset Lamp Timer Projector Position Front Menu Type Basic Reset All Settings Test Pattern Off HDMI Format Auto Information Menu Functions 27
... Mode Standard Volume 10 Mute Off 3D Mode 3D Off 3D Sync Invert Press OK Settings Press OK Wall Color Off Auto Source Off Reset Lamp Timer Projector Position Front Menu Type Basic Reset All Settings Test Pattern Off HDMI Format Auto Information Menu Functions 27
User Manual
Page 28
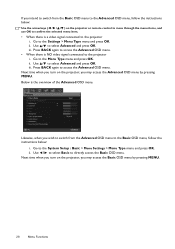
... the Basic OSD menu by pressing MENU. ii. Picture Picture Mode User Mode Management Brightness 50 Contrast 50 Color 50 Tint 50 Sharpness 7 Color Temperature Lamp Power Advanced... Reset Current Picture Mode PC Vivid Normal Exit Likewise, when you intend to switch from the Advanced OSD menu to the Basic OSD...
... the Basic OSD menu by pressing MENU. ii. Picture Picture Mode User Mode Management Brightness 50 Contrast 50 Color 50 Tint 50 Sharpness 7 Color Temperature Lamp Power Advanced... Reset Current Picture Mode PC Vivid Normal Exit Likewise, when you intend to switch from the Advanced OSD menu to the Basic OSD...
User Manual
Page 31
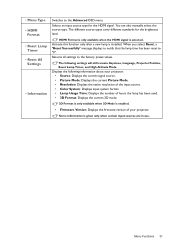
...different source types carry different standards for the HDMI signal. When you select Reset, a "Reset Successfully" message displays to notify that the lamp time has been reset to "0". The following information about your projector. • Source: Displays the current signal source. • Picture ... is only available when 3D Mode is selected. Displays the following settings will still remain: Keystone, Language, Projector Position, Reset Lamp Timer, and High Altitude Mode. Menu Functions 31 Some information is installed. Selects an input source type for the brightness level....
...different source types carry different standards for the HDMI signal. When you select Reset, a "Reset Successfully" message displays to notify that the lamp time has been reset to "0". The following information about your projector. • Source: Displays the current signal source. • Picture ... is only available when 3D Mode is selected. Displays the following settings will still remain: Keystone, Language, Projector Position, Reset Lamp Timer, and High Altitude Mode. Menu Functions 31 Some information is installed. Selects an input source type for the brightness level....
User Manual
Page 32
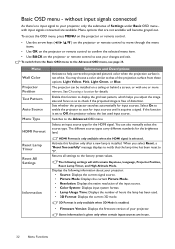
...item. • Use BACK on a ceiling or behind a screen, or with input signals connected are available. Enable this function only after a new lamp is free of the projection surface from these options: Light Yellow, Pink, Light Green, or Blue. Selects an input source type for the brightness ...be installed on the projector or remote control to your projector, only the submenus of your changes and exit. Switches to "0". Reset Lamp Timer Reset All Settings Information HDMI Format is only available when the HDMI signal is given only when certain input sources are not available ...
...item. • Use BACK on a ceiling or behind a screen, or with input signals connected are available. Enable this function only after a new lamp is free of the projection surface from these options: Light Yellow, Pink, Light Green, or Blue. Selects an input source type for the brightness ...be installed on the projector or remote control to your projector, only the submenus of your changes and exit. Switches to "0". Reset Lamp Timer Reset All Settings Information HDMI Format is only available when the HDMI signal is given only when certain input sources are not available ...
User Manual
Page 33
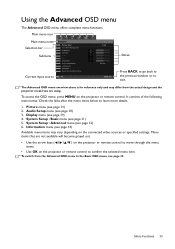
... menu name Picture Selection bar Picture Mode Vivid User Mode Management Brightness 50 Contrast 50 Submenu Color 50 Tint 50 Status Sharpness 7 Color Temperature Normal Lamp Power Advanced... Reset Current Picture Mode Press BACK to go back to Current input source PC Exit the previous window or to learn more details...
... menu name Picture Selection bar Picture Mode Vivid User Mode Management Brightness 50 Contrast 50 Submenu Color 50 Tint 50 Status Sharpness 7 Color Temperature Normal Lamp Power Advanced... Reset Current Picture Mode Press BACK to go back to Current input source PC Exit the previous window or to learn more details...
User Manual
Page 35
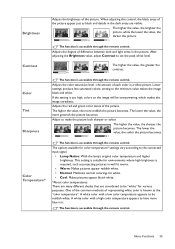
... image black and white. The function is known as projecting pictures in the dark areas are considered to the connected input signal. • Lamp Native: With the lamp's original color temperature and higher brightness. One of the common methods of the picture appear just as black and details in well lit rooms...
... image black and white. The function is known as projecting pictures in the dark areas are considered to the connected input signal. • Lamp Native: With the lamp's original color temperature and higher brightness. One of the common methods of the picture appear just as black and details in well lit rooms...
User Manual
Page 36
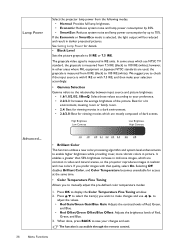
...OK to 100 IRE (white). Lamp Power Select the projector lamp power from the following modes. • Normal: Provides full lamp brightness. • Economic: Reduces system noise and lamp power consumption by 30%. • SmartEco: Reduces system noise and lamp power consumption by up to ...to your selection accordingly. • Gamma Selection Gamma refers to the relationship between input source and picture brightness. • 1.6/1.8/2.0/2.1/BenQ: Select these values according to manually adjust the pre-defined color temperature modes: 1. Selecting Off disables Brilliant Color, and Color ...
...OK to 100 IRE (white). Lamp Power Select the projector lamp power from the following modes. • Normal: Provides full lamp brightness. • Economic: Reduces system noise and lamp power consumption by 30%. • SmartEco: Reduces system noise and lamp power consumption by up to ...to your selection accordingly. • Gamma Selection Gamma refers to the relationship between input source and picture brightness. • 1.6/1.8/2.0/2.1/BenQ: Select these values according to manually adjust the pre-defined color temperature modes: 1. Selecting Off disables Brilliant Color, and Color ...
User Manual
Page 42
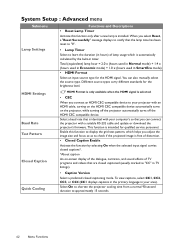
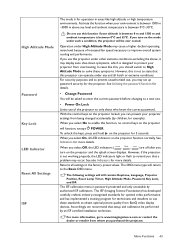
... Quick Cooling HDMI Format is only available when the HDMI signal is intended for qualified service personnel. Enable this function only after a new lamp is installed. Total (equivalent) lamp hour = 2.0 x (hours used in Normal mode) + 1.4 x (hours used in Economic mode) + 1.0 x (hours used in your .... • Closed Caption Enable Activate the function by the bulit-in timer. System Setup : Advanced menu Submenu Lamp Settings Functions and Descriptions • Reset Lamp Timer Activate this function to display the grid test pattern, which is identical with your computer's so that you...
... Quick Cooling HDMI Format is only available when the HDMI signal is intended for qualified service personnel. Enable this function only after a new lamp is installed. Total (equivalent) lamp hour = 2.0 x (hours used in Normal mode) + 1.4 x (hours used in Economic mode) + 1.0 x (hours used in your .... • Closed Caption Enable Activate the function by the bulit-in timer. System Setup : Advanced menu Submenu Lamp Settings Functions and Descriptions • Reset Lamp Timer Activate this function to display the grid test pattern, which is identical with your computer's so that you...
User Manual
Page 43
...on the mode under any and all harsh or extreme conditions. The OSD menu type will still remain: Keystone, Language, Projector Position, Reset Lamp Timer, High Altitude Mode, Password, Key Lock, and ISF. When you can operate under such a condition, the projector will function, except... preset values. The ISF calibration menu is not working properly, the LED indicators light or flash to protect your projector settings from BenQ video display devices. Accordingly, we recommend that setup and calibration be over -heating. Operation under other extreme conditions excluding the above...
...on the mode under any and all harsh or extreme conditions. The OSD menu type will still remain: Keystone, Language, Projector Position, Reset Lamp Timer, High Altitude Mode, Password, Key Lock, and ISF. When you can operate under such a condition, the projector will function, except... preset values. The ISF calibration menu is not working properly, the LED indicators light or flash to protect your projector settings from BenQ video display devices. Accordingly, we recommend that setup and calibration be over -heating. Operation under other extreme conditions excluding the above...


