

W1200 User Manual
Page 2
... safety instructions 3 Introduction 7 Projector features 7 Shipping contents 8 Projector exterior view 9 Controls and functions 10 Positioning your projector15 Choosing a location 15 Obtaining a preferred projected image size 16 Connection 19 Connecting Video source devices....... 21 Operation 22 Starting up the projector 22 Adjusting the projected image 23 Using the menus 25 Securing the projector 26 Switching input signal 28 Magnifying and searching for details . 29 Selecting the aspect ratio 29 Optimizing the image 31 Hiding the image 35 Setting...
... safety instructions 3 Introduction 7 Projector features 7 Shipping contents 8 Projector exterior view 9 Controls and functions 10 Positioning your projector15 Choosing a location 15 Obtaining a preferred projected image size 16 Connection 19 Connecting Video source devices....... 21 Operation 22 Starting up the projector 22 Adjusting the projected image 23 Using the menus 25 Securing the projector 26 Switching input signal 28 Magnifying and searching for details . 29 Selecting the aspect ratio 29 Optimizing the image 31 Hiding the image 35 Setting...

W1200 User Manual
Page 3
... this manual and marked on the projector or remote control. Always open the lens shutter or remove the lens cap when the projector lamp is designed lens during operation. To temporarily turn off the lamp, press BLANK on the product. The intense to operate safely within a mains light beam may fluctuate or cut out, it is recommended that you connect your projector through a power stabilizer, surge protector or uninterruptible power supply...
... this manual and marked on the projector or remote control. Always open the lens shutter or remove the lens cap when the projector lamp is designed lens during operation. To temporarily turn off the lamp, press BLANK on the product. The intense to operate safely within a mains light beam may fluctuate or cut out, it is recommended that you connect your projector through a power stabilizer, surge protector or uninterruptible power supply...
W1200 User Manual
Page 9
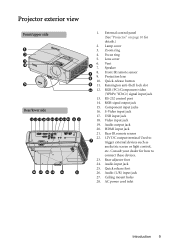
...-theft lock slot 10 12. S-Video input jack 17. Lamp cover 3. Front IR remote sensor 8 9. Quick-release button 9 11. Component input jacks 16. USB input jack 18. RS-232 control port 14. Audio (L/R) input jack 27. Audio input jack 25. Video input jack 19. Focus ring 5. RGB (PC)/Component video (YPbPr/ YCbCr) signal input jack 13. Rear IR remote sensor 22. 12V DC output terminal Used to connect these devices. 23. Lens cover 6. HDMI input jack 21. External control panel (See "Projector...
...-theft lock slot 10 12. S-Video input jack 17. Lamp cover 3. Front IR remote sensor 8 9. Quick-release button 9 11. Component input jacks 16. USB input jack 18. RS-232 control port 14. Audio (L/R) input jack 27. Audio input jack 25. Video input jack 19. Focus ring 5. RGB (PC)/Component video (YPbPr/ YCbCr) signal input jack 13. Rear IR remote sensor 22. 12V DC output terminal Used to connect these devices. 23. Lens cover 6. HDMI input jack 21. External control panel (See "Projector...
W1200 User Manual
Page 10
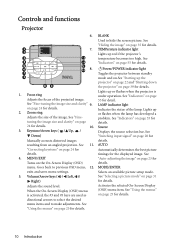
... picture setup mode. See "Using the menus" on the On-Screen Display (OSD) menu. See "Fine-tuning the image size and clarity" 9. Zoom ring Adjusts the size of the lamp. Keystone/Arrow keys ( / Up, / Down) Manually corrects distorted images resulting from an angled projection. MENU/EXIT Turns on page 25 for details. 4. exits and saves menu settings. 5. See "Indicators" on page 55 for details. See "Indicators" on page 55 for detail. Controls and functions Projector...
... picture setup mode. See "Using the menus" on the On-Screen Display (OSD) menu. See "Fine-tuning the image size and clarity" 9. Zoom ring Adjusts the size of the lamp. Keystone/Arrow keys ( / Up, / Down) Manually corrects distorted images resulting from an angled projection. MENU/EXIT Turns on page 25 for details. 4. exits and saves menu settings. 5. See "Indicators" on page 55 for details. See "Indicators" on page 55 for detail. Controls and functions Projector...
W1200 User Manual
Page 15
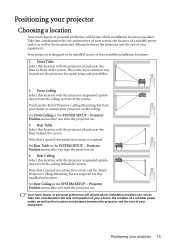
... consideration the size and position of your screen, the location of a suitable power outlet, as well as the location and distance between the projector and the rest of the screen. Note that a special rear projection screen and the BenQ Projector Ceiling Mounting Kit are required for quick setup and portability. 2. Set Rear Ceiling in the SYSTEM SETUP > Projector Position menu after you turn the projector on . 3. Positioning your equipment. Your projector is the...
... consideration the size and position of your screen, the location of a suitable power outlet, as well as the location and distance between the projector and the rest of the screen. Note that a special rear projection screen and the BenQ Projector Ceiling Mounting Kit are required for quick setup and portability. 2. Set Rear Ceiling in the SYSTEM SETUP > Projector Position menu after you turn the projector on . 3. Positioning your equipment. Your projector is the...
W1200 User Manual
Page 22
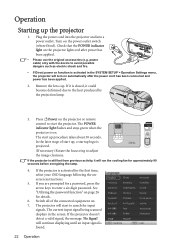
... the projection lamp. 3. Remove the lens cap. The POWER indicator light flashes and stays green when the projector is activated in the screen. If the projector doesn't detect a valid signal, the message 'No Signal' will run the cooling fan for a password, press the arrow keys to search for the first time, select your OSD language following the onscreen instructions. 5. Turn on . The start the projector. Switch all of start to enter a six digit password. The current input signal...
... the projection lamp. 3. Remove the lens cap. The POWER indicator light flashes and stays green when the projector is activated in the screen. If the projector doesn't detect a valid signal, the message 'No Signal' will run the cooling fan for a password, press the arrow keys to search for the first time, select your OSD language following the onscreen instructions. 5. Turn on . The start the projector. Switch all of start to enter a six digit password. The current input signal...

W1200 User Manual
Page 23
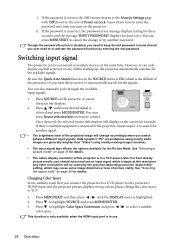
... surface or the screen and the projector are not perpendicular to each other, the projected image becomes trapezoidal. These adjusters change to an input signal which is equipped with the projector's resolution or set the input signal to a lower setting. You can also press SOURCE on the projector or Source selection keys on the remote control to select your eyes. • Be careful when you press the adjuster button as it...
... surface or the screen and the projector are not perpendicular to each other, the projected image becomes trapezoidal. These adjusters change to an input signal which is equipped with the projector's resolution or set the input signal to a lower setting. You can also press SOURCE on the projector or Source selection keys on the remote control to select your eyes. • Be careful when you press the adjuster button as it...
W1200 User Manual
Page 26
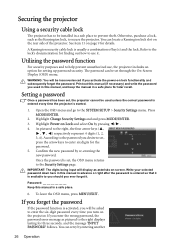
... on -screen. Open the OSD menu and go to the right, the four arrow keys ( , , , ) respectively represent 4 digits (1, 2, 3, 4). Highlight Power on lock functionality and subsequently forget the password. WARNING: You will be inconvenienced if you turn on the rear side of key(s) and the lock. As pictured to the SYSTEM SETUP > Security Settings menu. If you used unless the correct password is entered every time the projector is...
... on -screen. Open the OSD menu and go to the right, the four arrow keys ( , , , ) respectively represent 4 digits (1, 2, 3, 4). Highlight Power on lock functionality and subsequently forget the password. WARNING: You will be inconvenienced if you turn on the rear side of key(s) and the lock. As pictured to the SYSTEM SETUP > Security Settings menu. If you used unless the correct password is entered every time the projector is...
W1200 User Manual
Page 27
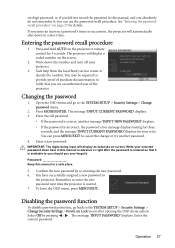
... Settings > Change Security Settings > Power on Lock menu after the password is entered so that you enter an incorrect password 5 times in succession, the projector will automatically shut down in a safe place. 5. Press and hold AUTO on -screen. Write down here in this manual in this manual in a short time. Open the OSD menu and go back to cancel the change or try another message 'INPUT NEW PASSWORD' displays. • If the password is started. 7. The message 'INPUT...
... Settings > Change Security Settings > Power on Lock menu after the password is entered so that you enter an incorrect password 5 times in succession, the projector will automatically shut down in a safe place. 5. Press and hold AUTO on -screen. Write down here in this manual in this manual in a short time. Open the OSD menu and go back to cancel the change or try another message 'INPUT NEW PASSWORD' displays. • If the password is started. 7. The message 'INPUT...
W1200 User Manual
Page 28
... available when the HDMI input port is incorrect, the password error message displays lasting for three seconds, and the message 'INPUT PASSWORD' displays for details. • The native display resolution of this projector) if you turn on the projector. See "Selecting a picture mode" on page 29 for the signals. Changing Color Space In the unlikely event that you connect the projector to a DVD player via the projector's HDMI input and the projected picture displays wrong colors, please change accordingly when you...
... available when the HDMI input port is incorrect, the password error message displays lasting for three seconds, and the message 'INPUT PASSWORD' displays for details. • The native display resolution of this projector) if you turn on the projector. See "Selecting a picture mode" on page 29 for the signals. Changing Color Space In the unlikely event that you connect the projector to a DVD player via the projector's HDMI input and the projected picture displays wrong colors, please change accordingly when you...

W1200 User Manual
Page 31
... Save Settings and press MODE/ENTER to open the On-Screen Display (OSD) menu. 2. Operation 31 Optimizing the image Selecting a picture mode The projector is preset with / . Standard mode: Is designed for best viewing in the Picture Mode sub-menu item. 5. Cinema mode: Is appropriate for playing colorful movies, video clips from digital cameras or DVs through the PC input for presentations. User 1/User 2/User 3 mode: Recalls the settings customized based on the remote control or projector repeatedly until...
... Save Settings and press MODE/ENTER to open the On-Screen Display (OSD) menu. 2. Operation 31 Optimizing the image Selecting a picture mode The projector is preset with / . Standard mode: Is designed for best viewing in the Picture Mode sub-menu item. 5. Cinema mode: Is appropriate for playing colorful movies, video clips from digital cameras or DVs through the PC input for presentations. User 1/User 2/User 3 mode: Recalls the settings customized based on the remote control or projector repeatedly until...

W1200 User Manual
Page 33
... utilizes a new color-processing algorithm and system level enhancements to enable higher brightness while providing truer, more blue in picture. The Color Temperature, Gamma, Brilliant Color functions can also be "white" for this projector. Choose a preferred color temperature from 0 to 10 to enhance the image. Adjusting Brilliant Color Highlight Brilliant Color in the PICTURE: Advanced menu and adjust the values by pressing COLOR TEMP, GAMMA, Brilliant Color on the projector or remote control. When...
... utilizes a new color-processing algorithm and system level enhancements to enable higher brightness while providing truer, more blue in picture. The Color Temperature, Gamma, Brilliant Color functions can also be "white" for this projector. Choose a preferred color temperature from 0 to 10 to enhance the image. Adjusting Brilliant Color Highlight Brilliant Color in the PICTURE: Advanced menu and adjust the values by pressing COLOR TEMP, GAMMA, Brilliant Color on the projector or remote control. When...
W1200 User Manual
Page 34
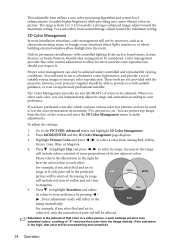
... is too high, that color in the projected picture will be used to test the color presentation on the screen and enter the 3D Color Management menu to make adjustments. If you have purchased a test disc which contains various color test patterns and can only be adjusted. Proper color management can be overpowering and unrealistic. 34 Operation When you select Red and set of suitable source images to...
... is too high, that color in the projected picture will be used to test the color presentation on the screen and enter the 3D Color Management menu to make adjustments. If you have purchased a test disc which contains various color test patterns and can only be adjusted. Proper color management can be overpowering and unrealistic. 34 Operation When you select Red and set of suitable source images to...

W1200 User Manual
Page 44
... exposure range and Brilliant Color sharpens detail for details. PICTURE: Advanced menu FUNCTION DESCRIPTION Clarity Control See "Adjusting Clarity Control" on page 33 for grain free images. Color See "Selecting a Color Temperature" on page 32 for details. For more information, please go to www.imagingscience.com or contact the place you purchased the projector. 44 Operation Management Film Mode 3D Comb Filter ISF (for W1200...
... exposure range and Brilliant Color sharpens detail for details. PICTURE: Advanced menu FUNCTION DESCRIPTION Clarity Control See "Adjusting Clarity Control" on page 33 for grain free images. Color See "Selecting a Color Temperature" on page 32 for details. For more information, please go to www.imagingscience.com or contact the place you purchased the projector. 44 Operation Management Film Mode 3D Comb Filter ISF (for W1200...

W1200 User Manual
Page 48
... connect the projector using a suitable RS-232 cable and update or download the projector's firmware. See "Operating in use. 5. Equivalent Lamp Hour See "Getting to know the lamp hour" on page 36 for qualified service personnel. Change Security Settings Power on Lock See "Securing the projector" on the control panel lights when the project is intended for details. The following settings will be asked to enter the current password before changing to the factory preset values. Color System Shows input...
... connect the projector using a suitable RS-232 cable and update or download the projector's firmware. See "Operating in use. 5. Equivalent Lamp Hour See "Getting to know the lamp hour" on page 36 for qualified service personnel. Change Security Settings Power on Lock See "Securing the projector" on the control panel lights when the project is intended for details. The following settings will be asked to enter the current password before changing to the factory preset values. Color System Shows input...

W1200 User Manual
Page 50
... the lamp hour information on the menu. 4. To keep the lamp life as long as Economic Using Economic mode reduces system noise and power consumption by the built-in darker projected pictures. If the Economic mode is a consumable item. Setting the projector in 5-minute increments. Setting Lamp Mode as possible, you can be reduced and result in timer. Setting Auto Power Off This function allows the projector to turn off automatically if no input source...
... the lamp hour information on the menu. 4. To keep the lamp life as long as Economic Using Economic mode reduces system noise and power consumption by the built-in darker projected pictures. If the Economic mode is a consumable item. Setting the projector in 5-minute increments. Setting Lamp Mode as possible, you can be reduced and result in timer. Setting Auto Power Off This function allows the projector to turn off automatically if no input source...

W1200 User Manual
Page 52
... with local disposal laws. Turn the power off and disconnect the power cord before changing the lamp. • To reduce the risk of severe burns, allow the projector to cool for at least 45 minutes before replacing the lamp. • To reduce the risk of injuries to fingers and damage to internal components, use caution when removing lamp glass that has shattered...
... with local disposal laws. Turn the power off and disconnect the power cord before changing the lamp. • To reduce the risk of severe burns, allow the projector to cool for at least 45 minutes before replacing the lamp. • To reduce the risk of injuries to fingers and damage to internal components, use caution when removing lamp glass that has shattered...

W1200 User Manual
Page 56
... correctly connected to turn on page 27 for details. 56 Troubleshooting The projector is an obstacle between the remote control and the projector. Open the lens cover. Attempting to the input signal device. The projector and the screen are too far away from the power cable. Remedy Plug the power cord into the AC inlet on the projector or remote control. Open the lens cover. Remedy Replace the battery with the SOURCE key on the projector, and...
... correctly connected to turn on page 27 for details. 56 Troubleshooting The projector is an obstacle between the remote control and the projector. Open the lens cover. Attempting to the input signal device. The projector and the screen are too far away from the power cable. Remedy Plug the power cord into the AC inlet on the projector or remote control. Open the lens cover. Remedy Replace the battery with the SOURCE key on the projector, and...
W1200 User Manual
Page 64
... 508 guidelines by commercial software such as below: • BenQ's monitors have a variety of settings of pre-programmed flicker-free timing to identify BenQ products and activate their Plug-and-Play function when connected. • All BenQ's monitors and projectors are also available by using the On-Screen Display (OSD) controls on the products. • BenQ's monitors and projectors include user-selectable color controls, such as color temperature selections (Monitor: 5800K...
... 508 guidelines by commercial software such as below: • BenQ's monitors have a variety of settings of pre-programmed flicker-free timing to identify BenQ products and activate their Plug-and-Play function when connected. • All BenQ's monitors and projectors are also available by using the On-Screen Display (OSD) controls on the products. • BenQ's monitors and projectors include user-selectable color controls, such as color temperature selections (Monitor: 5800K...
W1100 Datasheet
Page 1
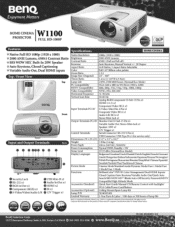
... 2.1 (65"@ 6.5 Feet) Top Lamp Life 0! Corporate and trademarks are the property of Texas Instruments. Suite A-205. Built-In 20W Speaker 9 Auto Keystone, Closed Captioning o Variable Audio Out, Dual HDMI inputs Top / Front View Brightness Contrast Ratio Keystone Aspect Ratio Color Zoom Ratio Image Size (Diagonal) Throw Ratio 2000 ANSI Lumens 4500:1 (Full on/Full off) Auto Keystone; All rights reserved. I ETAS INSTRUMENTS Specifications HOME CINEMA *Native Full...
... 2.1 (65"@ 6.5 Feet) Top Lamp Life 0! Corporate and trademarks are the property of Texas Instruments. Suite A-205. Built-In 20W Speaker 9 Auto Keystone, Closed Captioning o Variable Audio Out, Dual HDMI inputs Top / Front View Brightness Contrast Ratio Keystone Aspect Ratio Color Zoom Ratio Image Size (Diagonal) Throw Ratio 2000 ANSI Lumens 4500:1 (Full on/Full off) Auto Keystone; All rights reserved. I ETAS INSTRUMENTS Specifications HOME CINEMA *Native Full...


