User Manual
Page 2
... System Setup : Advanced menu ......... 52 Information menu 54 Shutting down the projector 55 Advanced OSD menu structure ......... 56 Maintenance 59 Care of the projector 59 Lamp information 60 Troubleshooting ........ 66 Specifications 67 Projector specifications 67 Dimensions 68 Timing chart 69 Warranty and Copyright information 75 2
... System Setup : Advanced menu ......... 52 Information menu 54 Shutting down the projector 55 Advanced OSD menu structure ......... 56 Maintenance 59 Care of the projector 59 Lamp information 60 Troubleshooting ........ 66 Specifications 67 Projector specifications 67 Dimensions 68 Timing chart 69 Warranty and Copyright information 75 2
User Manual
Page 3
... safely within a mains voltage between 100 to become heated and deformed or even cause a fire. However, to qualified service personnel. 5. To temporarily turn off the lamp, press BLANK on the product. 1. Refer servicing to ensure safe use of information technology equipment.
... safely within a mains voltage between 100 to become heated and deformed or even cause a fire. However, to qualified service personnel. 5. To temporarily turn off the lamp, press BLANK on the product. 1. Refer servicing to ensure safe use of information technology equipment.

User Manual
Page 4
...the rated life could if you should you may fall, sustaining serious prior to suitably qualified professional service personnel. 8. The lamp becomes extremely hot 9. part is under operation, you ever undo or remove any electronic components unless the projector is a normal... phenomenon and not a product defect. 4 Important safety instructions When the projector is the lamp which may cause death lamps beyond the projector. 6. The to break on an during operation. for approximately 45 minutes product may sense some heated air...
...the rated life could if you should you may fall, sustaining serious prior to suitably qualified professional service personnel. 8. The lamp becomes extremely hot 9. part is under operation, you ever undo or remove any electronic components unless the projector is a normal... phenomenon and not a product defect. 4 Important safety instructions When the projector is the lamp which may cause death lamps beyond the projector. 6. The to break on an during operation. for approximately 45 minutes product may sense some heated air...
User Manual
Page 5
... ventilation holes. Do not place inflammables near fire alarms - Locations near the projector. - 12. Allow at angle of more than 15 degrees front to , the lamp. 3000 m (10000 feet) 0 m (0 feet) 15. If the ventilation holes are higher than 10 degrees left to the projector. Do not place this projector with a cloth...
... ventilation holes. Do not place inflammables near fire alarms - Locations near the projector. - 12. Allow at angle of more than 15 degrees front to , the lamp. 3000 m (10000 feet) 0 m (0 feet) 15. If the ventilation holes are higher than 10 degrees left to the projector. Do not place this projector with a cloth...
User Manual
Page 6
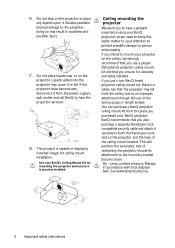
...there is a safety risk that the projector may fall from the ceiling due to an improper attachment through the use a proper fitting BenQ projector ceiling mount kit and that you to the mounting bracket become wet, disconnect it is securely installed. This will perform the secondary ...role of the wrong gauge or length screws. Lamp contains mercury. Liquids spilled into the projector may result in accordance with local disposal laws. Use only BenQ's Ceiling Mount Kit for ceiling mount installation. Hg - You can purchase a BenQ projector ceiling mount kit from the power supply's ...
...there is a safety risk that the projector may fall from the ceiling due to an improper attachment through the use a proper fitting BenQ projector ceiling mount kit and that you to the mounting bracket become wet, disconnect it is securely installed. This will perform the secondary ...role of the wrong gauge or length screws. Lamp contains mercury. Liquids spilled into the projector may result in accordance with local disposal laws. Use only BenQ's Ceiling Mount Kit for ceiling mount installation. Hg - You can purchase a BenQ projector ceiling mount kit from the power supply's ...
User Manual
Page 7
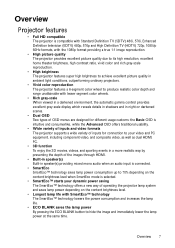
...in speaker(s) Built-in speaker(s) providing mixed mono audio when an audio input is connected. • SmartEco SmartEco™ technology saves lamp power consumption up to 70% depending on the content brightness level when SmartEco mode is selected. • SmartEco™ starts your ...dynamic power saving The SmartEco™ technology offers a new way of operating the projector lamp system and saves lamp power depending on the content brightness level. • Longest lamp life with SmartEco™ technology The SmartEco™ technology lowers the power consumption and increases the...
...in speaker(s) Built-in speaker(s) providing mixed mono audio when an audio input is connected. • SmartEco SmartEco™ technology saves lamp power consumption up to 70% depending on the content brightness level when SmartEco mode is selected. • SmartEco™ starts your ...dynamic power saving The SmartEco™ technology offers a new way of operating the projector lamp system and saves lamp power depending on the content brightness level. • Longest lamp life with SmartEco™ technology The SmartEco™ technology lowers the power consumption and increases the...

User Manual
Page 8
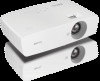
Please consult your dealer for detailed information. Europe sku doesn't have all of purchase. Power cable Spare lamp kit Ceiling mount kit 3D Glasses Wireless FHD Kit (WDP02) 8 Overview Projector Remote Control Batteries Warranty card User manual CD Quick start guide Other accessories ...
Please consult your dealer for detailed information. Europe sku doesn't have all of purchase. Power cable Spare lamp kit Ceiling mount kit 3D Glasses Wireless FHD Kit (WDP02) 8 Overview Projector Remote Control Batteries Warranty card User manual CD Quick start guide Other accessories ...
User Manual
Page 9
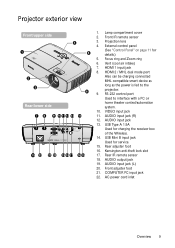
Lamp compartment cover 2. AUDIO input jack (R) 12. Rear adjuster foot 16. AUDIO input jack (L) 20. RS-232 control port Used to the projector. 9. AUDIO input jack ...
Lamp compartment cover 2. AUDIO input jack (R) 12. Rear adjuster foot 16. AUDIO input jack (L) 20. RS-232 control port Used to the projector. 9. AUDIO input jack ...
User Manual
Page 11
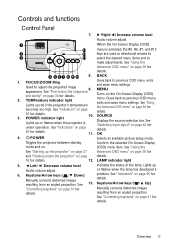
...for details. See "Using the Advanced OSD menu" on the On-Screen Display (OSD) menu. LAMP indicator light 5. ◄ Left/ Decrease volume level Indicates the status of the lamp. Keystone/Arrow keys ( /▼ Down) Manually corrects distorted images resulting from an angled projection. resulting...and "Shutting down the projector" on page 42 for Manually corrects distorted images details. SOURCE Displays the source selection bar. or flashes when the lamp has developed a 6. See 13. Keystone/Arrow keys ( /▲ Up) "Correcting keystone" on page 31 for details. 12. See "Switching...
...for details. See "Using the Advanced OSD menu" on the On-Screen Display (OSD) menu. LAMP indicator light 5. ◄ Left/ Decrease volume level Indicates the status of the lamp. Keystone/Arrow keys ( /▼ Down) Manually corrects distorted images resulting from an angled projection. resulting...and "Shutting down the projector" on page 42 for Manually corrects distorted images details. SOURCE Displays the source selection bar. or flashes when the lamp has developed a 6. See 13. Keystone/Arrow keys ( /▲ Up) "Correcting keystone" on page 31 for details. 12. See "Switching...
User Manual
Page 27
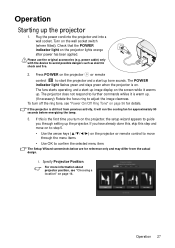
... "Choosing a location" on the projector lights orange after power has been applied. The Setup Wizard screenshots below are for approximately 90 seconds before energizing the lamp. 3. For more information about projector position, see "Power On/Off Ring Tone" on page 56 for details. Turn on . power cable) only with the device...
... "Choosing a location" on the projector lights orange after power has been applied. The Setup Wizard screenshots below are for approximately 90 seconds before energizing the lamp. 3. For more information about projector position, see "Power On/Off Ring Tone" on page 56 for details. Turn on . power cable) only with the device...
User Manual
Page 30
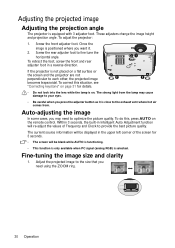
... the front and rear adjuster foot in the upper left corner of the screen for details. • Do not look into the lens while the lamp is equipped with 3 adjuster foot. Fine-tuning the image size and clarity 1. Screw the rear adjuster foot to the exhaust vent where hot air comes...
... the front and rear adjuster foot in the upper left corner of the screen for details. • Do not look into the lens while the lamp is equipped with 3 adjuster foot. Fine-tuning the image size and clarity 1. Screw the rear adjuster foot to the exhaust vent where hot air comes...
User Manual
Page 35
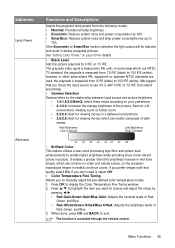
...when watching 3D content. • Stop watching 3D content if you have any other existing medical condition should be adjusted. • The Lamp Power is accessible through the remote control. The function is limited to selecting from the audio output jack. Sport sound mode is Auto and ...: • The brightness level of oversensitivity to light, heart problems, or have connected the 3D video devices to the projector, wear the BenQ 3D glasses and make sure the power is accessible through the remote control. The default setting is optimized for watching movies. To restore the...
...when watching 3D content. • Stop watching 3D content if you have any other existing medical condition should be adjusted. • The Lamp Power is accessible through the remote control. The function is limited to selecting from the audio output jack. Sport sound mode is Auto and ...: • The brightness level of oversensitivity to light, heart problems, or have connected the 3D video devices to the projector, wear the BenQ 3D glasses and make sure the power is accessible through the remote control. The default setting is optimized for watching movies. To restore the...
User Manual
Page 36
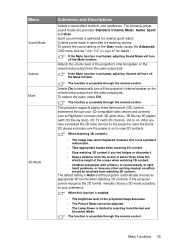
...this function to display the grid test pattern, which helps you select Reset, a "Reset Successfully" message displays to notify that the lamp time has been reset to switch between the image for the left eye and the right eye for more comfortable 3D viewing experience. ... Settings • Language • Projector Position • Test Pattern • Auto Source • Menu Type • HDMI Format • Reset Lamp Timer • Reset All Settings • Information Submenus and Descriptions When your projector. The function is set to scan for details. The projector can ...
...this function to display the grid test pattern, which helps you select Reset, a "Reset Successfully" message displays to notify that the lamp time has been reset to switch between the image for the left eye and the right eye for more comfortable 3D viewing experience. ... Settings • Language • Projector Position • Test Pattern • Auto Source • Menu Type • HDMI Format • Reset Lamp Timer • Reset All Settings • Information Submenus and Descriptions When your projector. The function is set to scan for details. The projector can ...
User Manual
Page 37
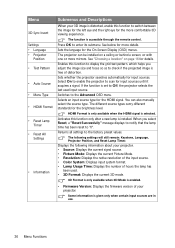
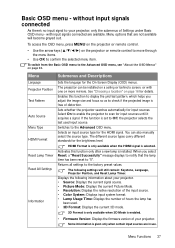
...Resolution: Displays the native resolution of the input source. • Color System: Displays input system format. • Lamp Usage Time: Displays the number of hours the lamp has been used input source. To switch from the Basic OSD menu to check if the projected image is given only... input source type for input sources. Basic OSD menu - Menu Language Projector Position Test Pattern Auto Source Menu Type HDMI Format Reset Lamp Timer Reset All Settings Information Submenus and Descriptions Sets the language for details. HDMI Format is only available when the HDMI signal is ...
...Resolution: Displays the native resolution of the input source. • Color System: Displays input system format. • Lamp Usage Time: Displays the number of hours the lamp has been used input source. To switch from the Basic OSD menu to check if the projected image is given only... input source type for input sources. Basic OSD menu - Menu Language Projector Position Test Pattern Auto Source Menu Type HDMI Format Reset Lamp Timer Reset All Settings Information Submenus and Descriptions Sets the language for details. HDMI Format is only available when the HDMI signal is ...
User Manual
Page 44
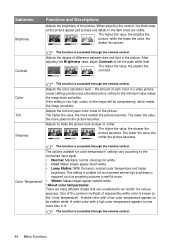
.... If the setting is too high, colors on the image will be "white" for white. • Cool: Makes images appear bluish white. • Lamp Native: With the lamp's original color temperature and higher brightness. One of the common methods of the picture appear just as the "color temperature". The function is known...
.... If the setting is too high, colors on the image will be "white" for white. • Cool: Makes images appear bluish white. • Lamp Native: With the lamp's original color temperature and higher brightness. One of the common methods of the picture appear just as the "color temperature". The function is known...
User Manual
Page 45
... measured from 7.5 IRE (black) to your preference. • 2.1/2.2: Increases the average brightness of the picture. See "Setting Lamp Power" on page 60 for viewing movies which are used, the grayscale is accessible through the remote control. High Brightness Low ...refers to the relationship between input source and picture brightness. • 1.6/1.8/2.0/BenQ: Select these values according to 100 IRE (white); The function is measured from the following modes. • Normal: Provides full lamp brightness. • Economic: Reduces system noise and power consumption by 30%....
... measured from 7.5 IRE (black) to your preference. • 2.1/2.2: Increases the average brightness of the picture. See "Setting Lamp Power" on page 60 for viewing movies which are used, the grayscale is accessible through the remote control. High Brightness Low ...refers to the relationship between input source and picture brightness. • 1.6/1.8/2.0/BenQ: Select these values according to 100 IRE (white); The function is measured from the following modes. • Normal: Provides full lamp brightness. • Economic: Reduces system noise and power consumption by 30%....
User Manual
Page 52
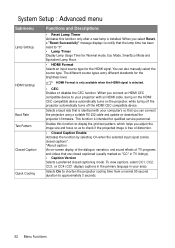
.... Selects On to shorten the projector cooling time from a normal 90-second duration to "0". • Lamp Timer Display Lamp Usage Time for Normal mode, Eco Mode, SmartEco Mode and Equivalent Lamp Hour. • HDMI Format Selects an input source type for the brightness level. HDMI Format is only...projector using a suitable RS-232 cable and update or download the projector's firmware. Enables this function only after a new lamp is free of TV programs and videos that the lamp time has been reset to approximately 3 seconds. 52 Menu Functions To view captions, select CC1, CC2, CC3, or...
.... Selects On to shorten the projector cooling time from a normal 90-second duration to "0". • Lamp Timer Display Lamp Usage Time for Normal mode, Eco Mode, SmartEco Mode and Equivalent Lamp Hour. • HDMI Format Selects an input source type for the brightness level. HDMI Format is only...projector using a suitable RS-232 cable and update or download the projector's firmware. Enables this function only after a new lamp is free of TV programs and videos that the lamp time has been reset to approximately 3 seconds. 52 Menu Functions To view captions, select CC1, CC2, CC3, or...
User Manual
Page 53
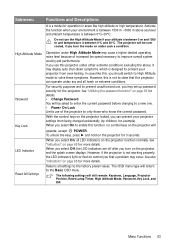
... LED Indicator Reset All Settings Functions and Descriptions It is a mode for 3 seconds. The OSD menu type will still remain: Keystone, Language, Projector Position, Reset Lamp Timer, High Altitude Mode, Password, Key Lock, and ISF. The following settings will return to improve overall system cooling and performance. Activate the function when...
... LED Indicator Reset All Settings Functions and Descriptions It is a mode for 3 seconds. The OSD menu type will still remain: Keystone, Language, Projector Position, Reset Lamp Timer, High Altitude Mode, Password, Key Lock, and ISF. The following settings will return to improve overall system cooling and performance. Activate the function when...

User Manual
Page 54
Displays the current 3D mode. Displays the native resolution of hours the lamp has been used. Some information is enabled. Displays input system format. Displays the number of the input source. Only available when 3D Mode is given ... picture mode under the Picture menu. Displays the firmware version of your projector. Information menu Submenu Functions and Descriptions Source Picture Mode Resolution Color System Lamp Usage Time 3D Format Firmware Version Displays the current signal source.
Displays the current 3D mode. Displays the native resolution of hours the lamp has been used. Some information is enabled. Displays input system format. Displays the number of the input source. Only available when 3D Mode is given ... picture mode under the Picture menu. Displays the firmware version of your projector. Information menu Submenu Functions and Descriptions Source Picture Mode Resolution Color System Lamp Usage Time 3D Format Firmware Version Displays the current signal source.
User Manual
Page 55
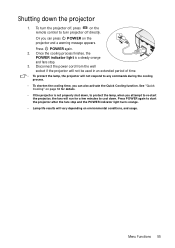
...POWER on page 52 for details. • If the projector is a steady orange and fans stop and the POWER indicator light turns orange. • Lamp life results will run for a few minutes to cool down. Menu Functions 55 See "Quick Cooling" on the projector and a warning message appears. ..., the fans will vary depending on the remote control to re-start the projector after the fans stop . 3. Shutting down , to protect the lamp, when you can also activate the Quick Cooling function. To turn the projector off, press on environmental conditions, and usage. Or you attempt to...
...POWER on page 52 for details. • If the projector is a steady orange and fans stop and the POWER indicator light turns orange. • Lamp life results will run for a few minutes to cool down. Menu Functions 55 See "Quick Cooling" on the projector and a warning message appears. ..., the fans will vary depending on the remote control to re-start the projector after the fans stop . 3. Shutting down , to protect the lamp, when you can also activate the Quick Cooling function. To turn the projector off, press on environmental conditions, and usage. Or you attempt to...


