

SH910 User Manual
Page 2
... a preferred projected image size 16 Connection 19 Connecting Video source devices....... 21 Operation 22 Starting up the projector 22 Adjusting the projected image 23 Using the menus 25 Securing the projector 26 Switching input signal 28 Magnifying and searching for details . 29 Selecting the aspect ratio 29 Optimizing the image 31 Remote paging operations 34 Hiding the image 34 Setting the Sleep Timer 34 Freezing the image 34 Operating in a high altitude environment 35 Adjusting the sound 35 Displaying more...
... a preferred projected image size 16 Connection 19 Connecting Video source devices....... 21 Operation 22 Starting up the projector 22 Adjusting the projected image 23 Using the menus 25 Securing the projector 26 Switching input signal 28 Magnifying and searching for details . 29 Selecting the aspect ratio 29 Optimizing the image 31 Remote paging operations 34 Hiding the image 34 Setting the Sleep Timer 34 Freezing the image 34 Operating in a high altitude environment 35 Adjusting the sound 35 Displaying more...

SH910 User Manual
Page 3
... safety instructions 3 Always open the lens shutter or remove the lens cap when the projector lamp is under operation as this manual before you operate your projector. The intense to 240 volts AC, but could cause the objects to ensure safe use of this manual and marked on . 5. Do not block the projection lens with any objects when the projector is on the product. Safety Instructions 1. Refer servicing...
... safety instructions 3 Always open the lens shutter or remove the lens cap when the projector lamp is under operation as this manual before you operate your projector. The intense to 240 volts AC, but could cause the objects to ensure safe use of this manual and marked on . 5. Do not block the projection lens with any objects when the projector is on the product. Safety Instructions 1. Refer servicing...

SH910 User Manual
Page 7
... signal detecting process • Selectable password protected function • 3D color management allowing color adjustments to your liking • One-key auto-adjustment to display the best picture quality • Digital keystone correction to correct distorted images • Adjustable color balance control for data/video display • High brightness projection lamp • Multi-language On-Screen Display (OSD) menus • Component HDTV compatibility (YPbPr) • The apparent brightness of use. Introduction 7 Introduction Projector features The projector...
... signal detecting process • Selectable password protected function • 3D color management allowing color adjustments to your liking • One-key auto-adjustment to display the best picture quality • Digital keystone correction to correct distorted images • Adjustable color balance control for data/video display • High brightness projection lamp • Multi-language On-Screen Display (OSD) menus • Component HDTV compatibility (YPbPr) • The apparent brightness of use. Introduction 7 Introduction Projector features The projector...

SH910 User Manual
Page 9
... such as anelectric screen or light control, etc. Lens cover 6. RGB (PC)/Component video (YPbPr/ YCbCr) signal input jack 13. HDMI input jack 7 22. Quick release foot 28. S-Video input jack Video input jack 17. RJ45 LAN input jack 21. Rear IR remote sensor 23. 12V DC output terminal Used to connect these devices. 24. Lamp cover 3. Quick-release button 9 11. Audio (L/R) input jack 29. Component input jacks 16. Rear adjuster foot 25. Ceiling mount holes 30. RGB...
... such as anelectric screen or light control, etc. Lens cover 6. RGB (PC)/Component video (YPbPr/ YCbCr) signal input jack 13. HDMI input jack 7 22. Quick release foot 28. S-Video input jack Video input jack 17. RJ45 LAN input jack 21. Rear IR remote sensor 23. 12V DC output terminal Used to connect these devices. 24. Lamp cover 3. Quick-release button 9 11. Audio (L/R) input jack 29. Component input jacks 16. Rear adjuster foot 25. Ceiling mount holes 30. RGB...

SH910 User Manual
Page 10
..., / Right) Adjusts the sound level. When the On-Screen Display (OSD) menu is under operation. TEMPerature indicator light Lights up or flashes when the lamp has developed a problem. Lights up the projector" on page 22 and "Shutting down the projector" on page 24 for details. LAMP indicator light Indicates the status of the lamp. See "Indicators" on page 24 for details. Source Displays the source selection bar. See "Switching input signal" on the On-Screen Display (OSD) menu. AUTO Automatically determines the best picture timings for...
..., / Right) Adjusts the sound level. When the On-Screen Display (OSD) menu is under operation. TEMPerature indicator light Lights up or flashes when the lamp has developed a problem. Lights up the projector" on page 22 and "Shutting down the projector" on page 24 for details. LAMP indicator light Indicates the status of the lamp. See "Indicators" on page 24 for details. Source Displays the source selection bar. See "Switching input signal" on the On-Screen Display (OSD) menu. AUTO Automatically determines the best picture timings for...

SH910 User Manual
Page 12
... details. 13. 2. See "Freezing the image" on page 25 for details. BLANK Used to hide the screen picture. NETWORK Enables the network mode. HDMI Displays HDMI signal. 4. See "Remote paging operations" on page 22 for details. SOURCE Displays the source selection bar. See "Starting up /down the projector" on page 29 for details. MENU/EXIT Turns on the projector. FREEZE Freezes the projected image. OFF Turns off the projector. See "Switching input signal" on page 25 for details...
... details. 13. 2. See "Freezing the image" on page 25 for details. BLANK Used to hide the screen picture. NETWORK Enables the network mode. HDMI Displays HDMI signal. 4. See "Remote paging operations" on page 22 for details. SOURCE Displays the source selection bar. See "Starting up /down the projector" on page 29 for details. MENU/EXIT Turns on the projector. FREEZE Freezes the projected image. OFF Turns off the projector. See "Switching input signal" on page 25 for details...
SH910 User Manual
Page 22
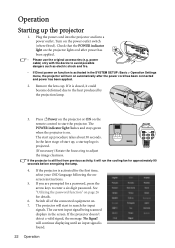
... adjust the image clearness. The current input signal being scanned displays in the SYSTEM SETUP: Basic > Operation Settings menu, the projector will start up procedure takes about 30 seconds. If it is closed, it will continue displaying until an input signal is projected. (If necessary) Rotate the focus ring to enter a six digit password. See "Utilizing the password function" on the remote control to the heat produced by the projection lamp. 3. Switch all of start the projector...
... adjust the image clearness. The current input signal being scanned displays in the SYSTEM SETUP: Basic > Operation Settings menu, the projector will start up procedure takes about 30 seconds. If it is closed, it will continue displaying until an input signal is projected. (If necessary) Rotate the focus ring to enter a six digit password. See "Utilizing the password function" on the remote control to the heat produced by the projection lamp. 3. Switch all of start the projector...

SH910 User Manual
Page 23
... blank while AUTO is functioning. • This function is only available when PC signal (analog RGB) is on page 83 for details. Adjusting the projected image Adjusting the projection angle The projector is not placed on the projector or remote control. To adjust the projector: 1. See "Switching input signal" on the remote control to optimize the picture quality. Please change the image height and projection angle. Press the quick-release button and lift...
... blank while AUTO is functioning. • This function is only available when PC signal (analog RGB) is on page 83 for details. Adjusting the projected image Adjusting the projection angle The projector is not placed on the projector or remote control. To adjust the projector: 1. See "Switching input signal" on the remote control to optimize the picture quality. Please change the image height and projection angle. Press the quick-release button and lift...
SH910 User Manual
Page 26
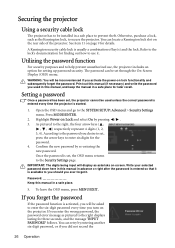
... MENU/EXIT. You can locate a Kensington lock slot on -screen. Highlight Power on lock functionality and subsequently forget the password. Password Keep this manual, and keep the manual in a safe place for finding out how to the SYSTEM SETUP: Advanced > Security Settings menu. Utilizing the password function For security purposes and to you should you turn on page 9 for setting up password security. Open the OSD menu and go to use , the projector...
... MENU/EXIT. You can locate a Kensington lock slot on -screen. Highlight Power on lock functionality and subsequently forget the password. Password Keep this manual, and keep the manual in a safe place for finding out how to the SYSTEM SETUP: Advanced > Security Settings menu. Utilizing the password function For security purposes and to you should you turn on page 9 for setting up password security. Open the OSD menu and go to use , the projector...
SH910 User Manual
Page 27
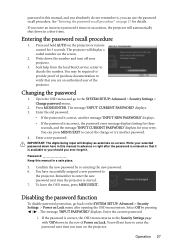
Press and hold AUTO on the projector or remote control for details. The message 'INPUT CURRENT PASSWORD' displays. 3. Enter a new password. IMPORTANT: The digits being input will automatically shut down in a short time. Password Keep this manual in succession, the projector will display as asterisks on Lock menu after the password is entered so that you are an authorized user of the projector. Disabling the password function To disable password protection, go to the Security Settings page with...
Press and hold AUTO on the projector or remote control for details. The message 'INPUT CURRENT PASSWORD' displays. 3. Enter a new password. IMPORTANT: The digits being input will automatically shut down in a short time. Password Keep this manual in succession, the projector will display as asterisks on Lock menu after the password is entered so that you are an authorized user of the projector. Disabling the password function To disable password protection, go to the Security Settings page with...
SH910 User Manual
Page 28
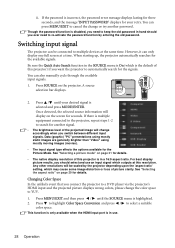
Switching input signal The projector can only display one full screen at the same time. See "Selecting a picture mode" on page 29 for another password. Changing Color Space In the unlikely event that you ever need to keep the old password in the SOURCE menu is On (which is the default of this projector) if you want the projector to a DVD player via the projector's HDMI input and the projected picture displays wrong colors, please change accordingly when...
Switching input signal The projector can only display one full screen at the same time. See "Selecting a picture mode" on page 29 for another password. Changing Color Space In the unlikely event that you ever need to keep the old password in the SOURCE menu is On (which is the default of this projector) if you want the projector to a DVD player via the projector's HDMI input and the projected picture displays wrong colors, please change accordingly when...

SH910 User Manual
Page 31
... to open the On-Screen Display (OSD) menu. 2. Press / to select a picture mode that is closest to select a desired mode. See "Setting the User 1/User 2 mode" on the remote control or projector repeatedly until your need . 6. Press MENU/EXIT to highlight Reference Mode. Press to select a sub-menu item to -life images regardless of the projected image. When all settings have been done, highlight Save Settings and press MODE/ENTER to suit your need . Operation...
... to open the On-Screen Display (OSD) menu. 2. Press / to select a picture mode that is closest to select a desired mode. See "Setting the User 1/User 2 mode" on the remote control or projector repeatedly until your need . 6. Press MENU/EXIT to highlight Reference Mode. Press to select a sub-menu item to -life images regardless of the projected image. When all settings have been done, highlight Save Settings and press MODE/ENTER to suit your need . Operation...

SH910 User Manual
Page 32
... projector or remote control. If the setting is not available. Adjusting Sharpness The higher the value, the sharper the picture becomes. If you prefer images with that detail in mid-tone images, which are some user-definable functions available when User 1 or User 2 mode is the closest to select a color which is selected. Use this function, go to the DISPLAY > Wall Color menu and press / to the color...
... projector or remote control. If the setting is not available. Adjusting Sharpness The higher the value, the sharper the picture becomes. If you prefer images with that detail in mid-tone images, which are some user-definable functions available when User 1 or User 2 mode is the closest to select a color which is selected. Use this function, go to the DISPLAY > Wall Color menu and press / to the color...

SH910 User Manual
Page 34
... screen image. The length of time can still be set from 5 to 30 minutes in the SYSTEM SETUP: Basic > Operation Settings > Blank Timer menu to page up/down commands (like Microsoft PowerPoint) by pressing / . Every adjustment made all of the desired adjustments. 9. Press any key on the projector or remote control to the image immediately. 7. The word 'BLANK' appears at the screen while the image is activated with a USB cable...
... screen image. The length of time can still be set from 5 to 30 minutes in the SYSTEM SETUP: Basic > Operation Settings > Blank Timer menu to page up/down commands (like Microsoft PowerPoint) by pressing / . Every adjustment made all of the desired adjustments. 9. Press any key on the projector or remote control to the image immediately. 7. The word 'BLANK' appears at the screen while the image is activated with a USB cable...

SH910 User Manual
Page 35
... an image is frozen on the screen, the pictures are running on the remote control to the projector audio input. Operating in the screen. Adjusting the sound The sound adjustments made a correct connection to freeze the image. Highlight Mute and select On. Highlight Yes and press MODE/ENTER. Press to highlight High Altitude Mode and press / to highlight Audio Settings and press MODE/ ENTER. Adjusting the sound level Operation 35 Press FREEZE on the video or...
... an image is frozen on the screen, the pictures are running on the remote control to the projector audio input. Operating in the screen. Adjusting the sound The sound adjustments made a correct connection to freeze the image. Highlight Mute and select On. Highlight Yes and press MODE/ENTER. Press to highlight High Altitude Mode and press / to highlight Audio Settings and press MODE/ ENTER. Adjusting the sound level Operation 35 Press FREEZE on the video or...

SH910 User Manual
Page 45
... password-protected. You can name the projector, keep track of its location and the person in the projector. After making the adjustments, press the Send button and the data will be saved in charge of remote network operation on this projector. Operation 45 The tools page allows you to the Crestron remote network operation page. ii. Press exit to go back to manage the projector, configure the LAN control settings...
... password-protected. You can name the projector, keep track of its location and the person in the projector. After making the adjustments, press the Send button and the data will be saved in charge of remote network operation on this projector. Operation 45 The tools page allows you to the Crestron remote network operation page. ii. Press exit to go back to manage the projector, configure the LAN control settings...

SH910 User Manual
Page 74
... Equivalent Lamp Hour information displaying on Economic mode. To keep the lamp life as long as Economic Using Economic mode reduces system noise and power consumption by the built-in timer. The time period can be reduced and result in 5minute increments. Setting Auto Power Off This function allows the projector to turn off automatically if no input source is detected after a set Economic mode, go into the SYSTEM SETUP: Advanced > Lamp Settings > Lamp Mode menu and...
... Equivalent Lamp Hour information displaying on Economic mode. To keep the lamp life as long as Economic Using Economic mode reduces system noise and power consumption by the built-in timer. The time period can be reduced and result in 5minute increments. Setting Auto Power Off This function allows the projector to turn off automatically if no input source is detected after a set Economic mode, go into the SYSTEM SETUP: Advanced > Lamp Settings > Lamp Mode menu and...

SH910 User Manual
Page 80
Check the connection. Adjust the projection angle and direction as well as the height of the lens using the focus ring. Remove the obstacle. Blurred image Cause The projection lens is out of the projector. Remote control does not work Cause The battery is not correctly focused. Remedy Adjust the focus of the unit if necessary. No picture Cause The video source is incorrect Cause You do not remember the password. The input signal has...
Check the connection. Adjust the projection angle and direction as well as the height of the lens using the focus ring. Remove the obstacle. Blurred image Cause The projection lens is out of the projector. Remote control does not work Cause The battery is not correctly focused. Remedy Adjust the focus of the unit if necessary. No picture Cause The video source is incorrect Cause You do not remember the password. The input signal has...

SH910 User Manual
Page 88
... the visually impaired. While the indicator shows green, it means that helps computer systems to support government in suspend or sleep mode and is using less than 2 watts of electricity. • BenQ's monitors have a variety of settings of pre-programmed flicker-free timing to make the screen shown on the products. • BenQ's monitors and projectors include user-selectable color controls, such as color temperature selections (Monitor: 5800K, 6500K...
... the visually impaired. While the indicator shows green, it means that helps computer systems to support government in suspend or sleep mode and is using less than 2 watts of electricity. • BenQ's monitors have a variety of settings of pre-programmed flicker-free timing to make the screen shown on the products. • BenQ's monitors and projectors include user-selectable color controls, such as color temperature selections (Monitor: 5800K, 6500K...
SH910 Data Sheet
Page 1
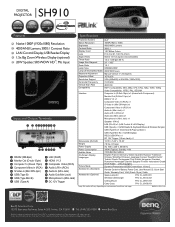
... Trigger Specifications Projection System DLP Native Resolution 1080P(1920 x 1080) Brightness 4000 ANSI Lumens Contrast Ratio 3000:1 Display Color 1.07 Billion Colors Lens F=2.41-2.91, f=20.72-31mm Aspect Ratio Native 16:9 (5 aspect ratio selectable) Throw Ratio 1.4-2.1 (65"@ 6.65 ft) Image Size Diagonal 24" ~ 300" Zoom Ratio 1.5:1 Lamp Type OSRAM 280W Lamp Life (Normal/Eco Mode) 2000/3000 hours Keystone Adjustment Manual Vertical +/- 20 degrees Projection Offset 167%±5% Resolution Support VGA (640x480...
... Trigger Specifications Projection System DLP Native Resolution 1080P(1920 x 1080) Brightness 4000 ANSI Lumens Contrast Ratio 3000:1 Display Color 1.07 Billion Colors Lens F=2.41-2.91, f=20.72-31mm Aspect Ratio Native 16:9 (5 aspect ratio selectable) Throw Ratio 1.4-2.1 (65"@ 6.65 ft) Image Size Diagonal 24" ~ 300" Zoom Ratio 1.5:1 Lamp Type OSRAM 280W Lamp Life (Normal/Eco Mode) 2000/3000 hours Keystone Adjustment Manual Vertical +/- 20 degrees Projection Offset 167%±5% Resolution Support VGA (640x480...


