

Installation Handbook
Page 3
... 44 Special signage installation guide 46 D series Full HD 55-inch dual-side display 46 Mounting installation ...49 Ceiling Mount ...49 Notice ...52 U-Mount ...54 H-mount ...58 Digital Signage Bar-Type Series 59 Installation notice ...59 Adjusting the OSD setting: For BH280/BH281/BH380 59 BH series HDMI connetion (EXCEPT BH280/BH281/BH380 60 Troubleshooting ...62 Connections...62 Picture/video ...65 Audio...68 Remote control...68 Touch function (selected models only 69 OSD menu/control panel/power button 71 LED indicators...73 Power ...73 System...
... 44 Special signage installation guide 46 D series Full HD 55-inch dual-side display 46 Mounting installation ...49 Ceiling Mount ...49 Notice ...52 U-Mount ...54 H-mount ...58 Digital Signage Bar-Type Series 59 Installation notice ...59 Adjusting the OSD setting: For BH280/BH281/BH380 59 BH series HDMI connetion (EXCEPT BH280/BH281/BH380 60 Troubleshooting ...62 Connections...62 Picture/video ...65 Audio...68 Remote control...68 Touch function (selected models only 69 OSD menu/control panel/power button 71 LED indicators...73 Power ...73 System...
Installation Handbook
Page 29
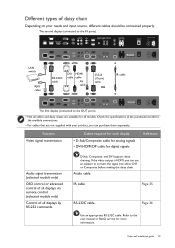
... cable for analog signals • DVI/HDMI/DP cable for all models. If the video output is HDMI, you can use an adapter to the user manual or BenQ service for more information. Refer to convert the signal into either DVI or Composite before making the daisy chain. Audio cable IR cable Page 35 RS-232C cable. Video wall installation guide 29 The second display (connected to the IN ports) DVI-OUT DVI-IN HDMI-2 HDMI-1 VGA OUT VGA IN LAN switch RJ45 cable RS-232C cable DVI HDMI cable cable AV cable...
... cable for analog signals • DVI/HDMI/DP cable for all models. If the video output is HDMI, you can use an adapter to the user manual or BenQ service for more information. Refer to convert the signal into either DVI or Composite before making the daisy chain. Audio cable IR cable Page 35 RS-232C cable. Video wall installation guide 29 The second display (connected to the IN ports) DVI-OUT DVI-IN HDMI-2 HDMI-1 VGA OUT VGA IN LAN switch RJ45 cable RS-232C cable DVI HDMI cable cable AV cable...

Installation Handbook
Page 34
... multiple displays easily. All models of displays daisy chained. Following are connected. To set the ID number, go to set the same ID number for video wall management would not be received correctly. Pay attention not to Setting > Set Monitor ID on the number of MDA only support from 1-98. 34 Video wall installation guide This is helpful for video wall management, such as the commands for different displays, as power management, OSD control, or color management...
... multiple displays easily. All models of displays daisy chained. Following are connected. To set the ID number, go to set the same ID number for video wall management would not be received correctly. Pay attention not to Setting > Set Monitor ID on the number of MDA only support from 1-98. 34 Video wall installation guide This is helpful for video wall management, such as the commands for different displays, as power management, OSD control, or color management...

Installation Handbook
Page 36
... just connected with your computer using a RS-232C serial null modem cable (purchased separately if not supplied). 3. Connect all displays are within the same local area network. 3. RS-232C cable • Use an appropriate RS-232C cable. Connect the computer to the user manual or BenQ service for each display. Make sure the ID number has been set . Refer to a LAN switch or hub using the RS-232C serial null modem cables (purchased...
... just connected with your computer using a RS-232C serial null modem cable (purchased separately if not supplied). 3. Connect all displays are within the same local area network. 3. RS-232C cable • Use an appropriate RS-232C cable. Connect the computer to the user manual or BenQ service for each display. Make sure the ID number has been set . Refer to a LAN switch or hub using the RS-232C serial null modem cables (purchased...
Installation Handbook
Page 38
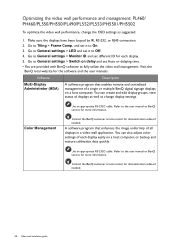
... Video wall installation guide and set Auto or delaying time. • You are provided with BenQ software to On. 3. Go to General settings > Switch on a host computer. Use an appropriate RS-232C cable. Go to General settings > LED and set different ID for more information. Go to Tiling > Frame Comp. You can create and edit display groups, view status of all displays in a video wall application. Color Management Contact the BenQ customer service...
... Video wall installation guide and set Auto or delaying time. • You are provided with BenQ software to On. 3. Go to General settings > Switch on a host computer. Use an appropriate RS-232C cable. Go to General settings > LED and set different ID for more information. Go to Tiling > Frame Comp. You can create and edit display groups, view status of all displays in a video wall application. Color Management Contact the BenQ customer service...
Installation Handbook
Page 59
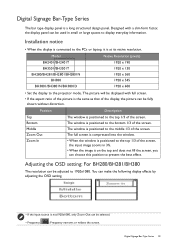
... window is positioned to the bottom 1/3 of the screen. Digital Signage Bar-Type Series 59 Model Native Resolution (pixels) BH2401/BH2401T BH3501/BH3501T BH280/BH281/BH2801/BH2801N BH380 BH3801/BH3801N/BH3801D 1920 x 190 1920 x 130 1920 x 360 1920 x 545 1920 x 600 • Set the display to 1920x1080. You can make the following display effects by adjusting the OSD setting. • If the input source is a long structured design panel...
... window is positioned to the bottom 1/3 of the screen. Digital Signage Bar-Type Series 59 Model Native Resolution (pixels) BH2401/BH2401T BH3501/BH3501T BH280/BH281/BH2801/BH2801N BH380 BH3801/BH3801N/BH3801D 1920 x 190 1920 x 130 1920 x 360 1920 x 545 1920 x 600 • Set the display to 1920x1080. You can make the following display effects by adjusting the OSD setting. • If the input source is a long structured design panel...

Installation Handbook
Page 65
... lights in Standby mode when the input source is heard. Poor quality cable is used for signal input. • Go to Picture > Noise Reduction. • Move the display to another location to see if the interference is connected firmly to the default factory settings. The image has a faulty coloration. replacement. Possible causes Possible solutions This could be displayed. Check the cable connection. See the user manual for damaged. If yes, the problem lies Incorrect cable connection...
... lights in Standby mode when the input source is heard. Poor quality cable is used for signal input. • Go to Picture > Noise Reduction. • Move the display to another location to see if the interference is connected firmly to the default factory settings. The image has a faulty coloration. replacement. Possible causes Possible solutions This could be displayed. Check the cable connection. See the user manual for damaged. If yes, the problem lies Incorrect cable connection...
Installation Handbook
Page 67
... input source is connected firmly to the display. • Go to Screen > Adjust Screen to find out the current resolution and timing. The picture is not displayed in the user manual of my display? Position and V. Position, press /+ on the control panel to check the timing may differ by operating system. In V. The supported resolutions may differ by model. Try with another video cable. The way to move the picture up; Refer to make adjustment manually...
... input source is connected firmly to the display. • Go to Screen > Adjust Screen to find out the current resolution and timing. The picture is not displayed in the user manual of my display? Position and V. Position, press /+ on the control panel to check the timing may differ by operating system. In V. The supported resolutions may differ by model. Try with another video cable. The way to move the picture up; Refer to make adjustment manually...

Installation Handbook
Page 68
... graphic card driver is out of the IR receiver lights red or The IR receiver could be stable. The display flickers when I launch or close a program. • The signal may be damaged. volume appropriately. the remote control and the display. 68 Troubleshooting Check if the LED indicator of the IR remote control Check the specifications and adjust the distance between range. Check the cable connection or try with a new battery. Contact the BenQ authorized service...
... graphic card driver is out of the IR receiver lights red or The IR receiver could be stable. The display flickers when I launch or close a program. • The signal may be damaged. volume appropriately. the remote control and the display. 68 Troubleshooting Check if the LED indicator of the IR remote control Check the specifications and adjust the distance between range. Check the cable connection or try with a new battery. Contact the BenQ authorized service...

Installation Handbook
Page 69
... to turn off the display and unplug the power cord before you clean the screen. 2. No stable or enough power supplied for the appropriate driver files. Check the user manual for the supported operating systems. Visit the BenQ local website for your computer. The drawing is not installed. Be sure to clean the touch screen. Poor USB connection. Avoid using a small amount of abrasive materials to wipe the screen. • Check if the USB cable...
... to turn off the display and unplug the power cord before you clean the screen. 2. No stable or enough power supplied for the appropriate driver files. Check the user manual for the supported operating systems. Visit the BenQ local website for your computer. The drawing is not installed. Be sure to clean the touch screen. Poor USB connection. Avoid using a small amount of abrasive materials to wipe the screen. • Check if the USB cable...
Installation Handbook
Page 78
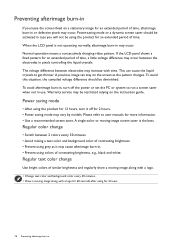
... diminished. When the LCD panel is the best. This can stay on the instruction guide. To avoid afterimage burn-in use. Power saving mode • After using the product for 12 hours, turn off for 2 hours. • Power saving mode may vary by models. Regular text color change • Switch between electrodes may occur. Please refer to user manuals for more information. • Use a recommended screen saver. A previous image can cause the liquid...
... diminished. When the LCD panel is the best. This can stay on the instruction guide. To avoid afterimage burn-in use. Power saving mode • After using the product for 12 hours, turn off for 2 hours. • Power saving mode may vary by models. Regular text color change • Switch between electrodes may occur. Please refer to user manuals for more information. • Use a recommended screen saver. A previous image can cause the liquid...
Installation Handbook
Page 79
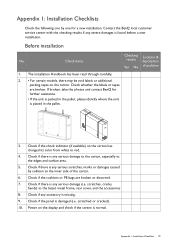
..., rear cover, and the accessories 8. Power on the display and check if the screen is missing. 9. Appendix 1: Installation Checklists 79 Check whether the labels or tapes are broken or distorted. 7. Before installation No. Check if any serious damage (i.e. Check if there is damaged (i.e. Check if the panel is any accessory is normal. If broken, take the photos and contact BenQ for a new installation. Check if...
..., rear cover, and the accessories 8. Power on the display and check if the screen is missing. 9. Appendix 1: Installation Checklists 79 Check whether the labels or tapes are broken or distorted. 7. Before installation No. Check if any serious damage (i.e. Check if there is damaged (i.e. Check if the panel is any accessory is normal. If broken, take the photos and contact BenQ for a new installation. Check if...
Installation Handbook
Page 85
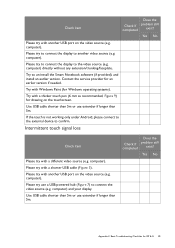
... to connect the display to another USB port on the video source (e.g. Contact the service provider for Windows operating systems). Use USB cable shorter than 5m or use extender if longer than 5m. Please try to connect the display to connect the video source (e.g. Please try use extender if longer than 5m. Please try with Windows Paint (for an earlier version if needed. Try with a shorter USB cable (Figure 3). Intermittent touch signal loss Check item...
... to connect the display to another USB port on the video source (e.g. Contact the service provider for Windows operating systems). Use USB cable shorter than 5m or use extender if longer than 5m. Please try to connect the display to connect the video source (e.g. Please try use extender if longer than 5m. Please try with Windows Paint (for an earlier version if needed. Try with a shorter USB cable (Figure 3). Intermittent touch signal loss Check item...
Installation Handbook
Page 87
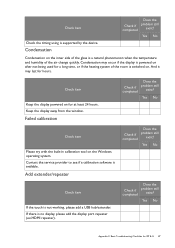
... a calibration software is supported by the device. Yes No Check item If the touch is no display, please add the display port repeater (ex.HDMI repeater). Condensation may last for a long time, or if the heating system of the air change quickly. If there is not working, please add a USB hub/extender. Failed calibration Check if completed Does the problem still exist? Yes No Appendix 2: Basic Troubleshooting...
... a calibration software is supported by the device. Yes No Check item If the touch is no display, please add the display port repeater (ex.HDMI repeater). Condensation may last for a long time, or if the heating system of the air change quickly. If there is not working, please add a USB hub/extender. Failed calibration Check if completed Does the problem still exist? Yes No Appendix 2: Basic Troubleshooting...

Installation Handbook
Page 91
... the signal cable (HDMI, DVI, VGA, etc.) length, including trunking in wall? Additional information Provide photo/video link Appendix 3: Basic Troubleshooting Checklists for Video 91 Please provide the installer's contact name & phone number. _______ meters. Are the affected units connected through splitter, matrix or other video wall controller? Please specify the brand and the model name. Desktop Laptop Not certain Other What is the main device (video source) connected...
... the signal cable (HDMI, DVI, VGA, etc.) length, including trunking in wall? Additional information Provide photo/video link Appendix 3: Basic Troubleshooting Checklists for Video 91 Please provide the installer's contact name & phone number. _______ meters. Are the affected units connected through splitter, matrix or other video wall controller? Please specify the brand and the model name. Desktop Laptop Not certain Other What is the main device (video source) connected...
DMS Local User Manual
Page 5
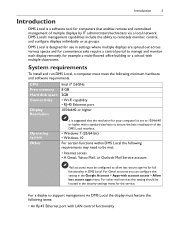
... is designed for use in settings where multiple displays are spread out across various spaces and for convenience sake require a central portal to support management via a local network. DMS Local's management capabilities include the ability to allow less secure sign-ins for full functionality in DMS Local. CPU Free memory Hard disk space Connectivity Display Resolution Intel i7...
... is designed for use in settings where multiple displays are spread out across various spaces and for convenience sake require a central portal to support management via a local network. DMS Local's management capabilities include the ability to allow less secure sign-ins for full functionality in DMS Local. CPU Free memory Hard disk space Connectivity Display Resolution Intel i7...

User Manual
Page 4
ii Table of Contents One touch menu operation 33 Settings menu 33 System settings 39 Android system interface 46 Main interface 46 APPS 55 BenQ Suggests 55 InstaShare 56 InstaQPrint 57 WPS Office 58 Email 60 Side Tool Bar 61 Blizz 62 Saffi 63 Product information 65 Specifications 65 Dimensions (RM5502K 67 Dimensions (RM6502K 68 Dimensions (RM7502K 69 Dimensions (RM8602K 70 Supported input signal resolution 71 Troubleshooting 73 3/30/20
ii Table of Contents One touch menu operation 33 Settings menu 33 System settings 39 Android system interface 46 Main interface 46 APPS 55 BenQ Suggests 55 InstaShare 56 InstaQPrint 57 WPS Office 58 Email 60 Side Tool Bar 61 Blizz 62 Saffi 63 Product information 65 Specifications 65 Dimensions (RM5502K 67 Dimensions (RM6502K 68 Dimensions (RM7502K 69 Dimensions (RM8602K 70 Supported input signal resolution 71 Troubleshooting 73 3/30/20
User Manual
Page 41
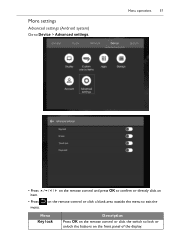
on the remote control or click a blank area outside the menu to exit the Menu Key lock Description Press OK on the front panel of the display. Menu operations 37 • Press on the remote control and press OK to lock or unlock the buttons on the remote control or click the switch to confirm or directly click an item. • Press menu. More settings Advanced settings (Android system) Go to Device > Advanced settings.
on the remote control or click a blank area outside the menu to exit the Menu Key lock Description Press OK on the front panel of the display. Menu operations 37 • Press on the remote control and press OK to lock or unlock the buttons on the remote control or click the switch to confirm or directly click an item. • Press menu. More settings Advanced settings (Android system) Go to Device > Advanced settings.
User Manual
Page 77
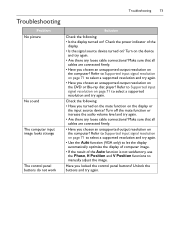
... player? Troubleshooting 73 Troubleshooting Problem No picture No sound The computer input image looks strange The control panel buttons do not work Solution Check the following : • Have you locked the control panel buttons? Make sure that all cables are connected firmly. • Have you chosen an unsupported output resolution on the display or the input source device? Check the power indicator of the Auto function is not satisfactory, use the Phase, H Position and V Position functions to select a supported resolution and...
... player? Troubleshooting 73 Troubleshooting Problem No picture No sound The computer input image looks strange The control panel buttons do not work Solution Check the following : • Have you locked the control panel buttons? Make sure that all cables are connected firmly. • Have you chosen an unsupported output resolution on the display or the input source device? Check the power indicator of the Auto function is not satisfactory, use the Phase, H Position and V Position functions to select a supported resolution and...

User Manual
Page 78
... menu. • Check whether VGA is not well connected or has quality problem. • Adjust chromaticity and brightness or contrast in menu. • Select automatic correction in menu. • Adjust clock and phase position in direct sunlight. • Check for any obstacle between the remote control and the remote control sensor window. • Check that the remote control sensor window is not under strong fluorescent lighting, or in menu. • Check whether touch driver is installed and started. • Check...
... menu. • Check whether VGA is not well connected or has quality problem. • Adjust chromaticity and brightness or contrast in menu. • Select automatic correction in menu. • Adjust clock and phase position in direct sunlight. • Check for any obstacle between the remote control and the remote control sensor window. • Check that the remote control sensor window is not under strong fluorescent lighting, or in menu. • Check whether touch driver is installed and started. • Check...


