
Safety Warning and Notice
Page 2
... power cord. power cable) only with a (multi-outlet) extension cord. Always turn off the monitor before cleaning your monitor Use a monitor cleaner and a soft cloth to clean your monitor. Do not use solvents such as data loss and system failure) occurred due to clean your nearest BenQ service center for warranty services have been altered by unauthorized use it is compatible with local technical standards if the user...
... power cord. power cable) only with a (multi-outlet) extension cord. Always turn off the monitor before cleaning your monitor Use a monitor cleaner and a soft cloth to clean your monitor. Do not use solvents such as data loss and system failure) occurred due to clean your nearest BenQ service center for warranty services have been altered by unauthorized use it is compatible with local technical standards if the user...
Display Pilot User Manual
Page 2
...external factors. Servicing (Windows only) Should you have any queries about the software after reading the document, contact the customer support from time to the contents hereof and specifically disclaims any means, electronic, mechanical, magnetic, optical, chemical, manual or otherwise...the sole responsibility of such revision or changes. Tip Useful information for any person of the user if problems (such as poor cable quality, unstable power supply, signal interference, or poor grounding, and not limited to non-factory installed software, parts, and/or non-original accessories. (...
...external factors. Servicing (Windows only) Should you have any queries about the software after reading the document, contact the customer support from time to the contents hereof and specifically disclaims any means, electronic, mechanical, magnetic, optical, chemical, manual or otherwise...the sole responsibility of such revision or changes. Tip Useful information for any person of the user if problems (such as poor cable quality, unstable power supply, signal interference, or poor grounding, and not limited to non-factory installed software, parts, and/or non-original accessories. (...
Display Pilot User Manual
Page 3
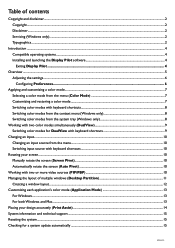
... 9 Changing an input...10 Changing an input source from the menu...10 Switching input source with keyboard shortcuts...10 Rotating your screen...10 Manually rotate the screen (Screen Pivot)...10 Automatically rotate the screen (Auto Pivot)...10 Working with two or more video sources (PIP/PBP)...10 Managing the layout of multiple windows (Desktop Partition 11 Creating a window layout...12 Customizing each application's color mode (Application Mode 13 For Windows...13 For both Windows and Mac...
... 9 Changing an input...10 Changing an input source from the menu...10 Switching input source with keyboard shortcuts...10 Rotating your screen...10 Manually rotate the screen (Screen Pivot)...10 Automatically rotate the screen (Auto Pivot)...10 Working with two or more video sources (PIP/PBP)...10 Managing the layout of multiple windows (Desktop Partition 11 Creating a window layout...12 Customizing each application's color mode (Application Mode 13 For Windows...13 For both Windows and Mac...
Display Pilot User Manual
Page 4
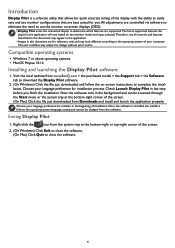
... screen. (On Mac) Click the file just downloaded from www.BenQ.com > the purchased model > the Support tab > the Software tab to download the Display Pilot software. 2. (On Windows) Click the file just downloaded and follow the on the monitor model and input selected.Therefore, not all controls and features described in this document may appear in the application. • Images in this document are best suited for installer...
... screen. (On Mac) Click the file just downloaded from www.BenQ.com > the purchased model > the Support tab > the Software tab to download the Display Pilot software. 2. (On Windows) Click the file just downloaded and follow the on the monitor model and input selected.Therefore, not all controls and features described in this document may appear in the application. • Images in this document are best suited for installer...
Display Pilot User Manual
Page 7
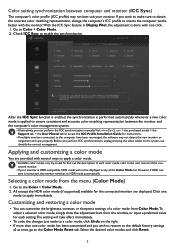
... ICC synchronization manually.Visit www.BenQ.com > the purchased model > the Support tab > the User Manual tab to access the ICC Profile Installation Guide for instructions. • If multiple monitors connected to apply immediately. However, if HDR content is done with one click. 1. Go to enable the synchronization. Customizing and restoring a color mode • You can customize the brightness, contrast, or sharpness settings of the Color Mode list...
... ICC synchronization manually.Visit www.BenQ.com > the purchased model > the Support tab > the User Manual tab to access the ICC Profile Installation Guide for instructions. • If multiple monitors connected to apply immediately. However, if HDR content is done with one click. 1. Go to enable the synchronization. Customizing and restoring a color mode • You can customize the brightness, contrast, or sharpness settings of the Color Mode list...
Display Pilot User Manual
Page 10
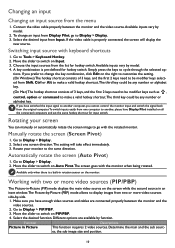
.... If the video cable is properly connected, the screen will take effect immediately. 3. Switching input source with two or more video sources (PIP/PBP) The Picture-in-Picture (PIP) mode displays the main video source on Input. 3. Simply press the keys to Tools > Keyboard Hotkey. 2. Determine the main and the sub sources, the sub image size and position. 10 If you have Display Pilot installed on Auto Pivot.The screen goes with the rotated monitor. Select...
.... If the video cable is properly connected, the screen will take effect immediately. 3. Switching input source with two or more video sources (PIP/PBP) The Picture-in-Picture (PIP) mode displays the main video source on Input. 3. Simply press the keys to Tools > Keyboard Hotkey. 2. Determine the main and the sub sources, the sub image size and position. 10 If you have Display Pilot installed on Auto Pivot.The screen goes with the rotated monitor. Select...
Display Pilot User Manual
Page 15
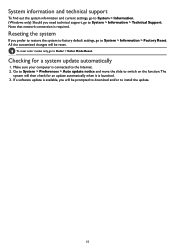
... to factory default settings, go to Color > Color Mode Reset. If a software update is launched. 3. Make sure your computer is required. Note that network connection is connected to install the update. 15 System information and technical support To find out the system information and current settings, go to System > Information. (Windows only) Should you need technical support, go to switch on the function.The system will be prompted to download and...
... to factory default settings, go to Color > Color Mode Reset. If a software update is launched. 3. Make sure your computer is required. Note that network connection is connected to install the update. 15 System information and technical support To find out the system information and current settings, go to System > Information. (Windows only) Should you need technical support, go to switch on the function.The system will be prompted to download and...
Resolution file
Page 1
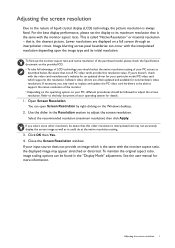
This is the same with the monitor aspect ratio, the displayed image may appear stretched or distorted. Software video drivers are displayed on your input source does not provide an image which supports this resolution. You can open Screen Resolution by right-clicking on the provided CD. • To take full advantage of LCD technology you should be able to support the native resolution of the monitor. • Depending on the...
This is the same with the monitor aspect ratio, the displayed image may appear stretched or distorted. Software video drivers are displayed on your input source does not provide an image which supports this resolution. You can open Screen Resolution by right-clicking on the provided CD. • To take full advantage of LCD technology you should be able to support the native resolution of the monitor. • Depending on the...
User Manual
Page 19
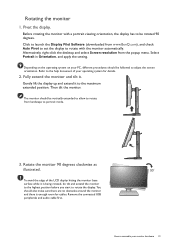
..., do tilt and extend the monitor to the highest position before you start to rotate from the popup menu. You should be rotated 90 degrees. Click to launch the Display Pilot Software (downloaded from www.BenQ.com), and check Auto Pivot to set the display to rotate with a portrait viewing orientation, the display has to be followed to the help document of the LCD display hitting the monitor base surface...
..., do tilt and extend the monitor to the highest position before you start to rotate from the popup menu. You should be rotated 90 degrees. Click to launch the Display Pilot Software (downloaded from www.BenQ.com), and check Auto Pivot to set the display to rotate with a portrait viewing orientation, the display has to be followed to the help document of the LCD display hitting the monitor base surface...
User Manual
Page 21
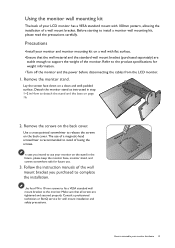
... cables from the LCD monitor. 1. Consult a professional technician or BenQ service for future use of a magnetic-head screwdriver is recommended to support the weight of the monitor. Refer to complete the installation. Remove the screws on a clean and well-padded surface. Make sure that the wall material and the standard wall mount bracket (purchased separately) are tightened and secured properly. Remove the monitor stand. The use . 3. Follow the instruction manuals of the wall mount...
... cables from the LCD monitor. 1. Consult a professional technician or BenQ service for future use of a magnetic-head screwdriver is recommended to support the weight of the monitor. Refer to complete the installation. Remove the screws on a clean and well-padded surface. Make sure that the wall material and the standard wall mount bracket (purchased separately) are tightened and secured properly. Remove the monitor stand. The use . 3. Follow the instruction manuals of the wall mount...

User Manual
Page 22
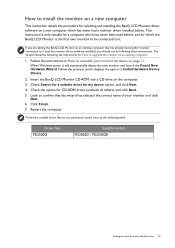
... your Windows computer, you need to follow to your computer), Windows will automatically recognize the new (or different) hardware, and will determine which already has existing monitor driver software) with a newer monitor. Follow the wizard instructions until it asks you turn on the back of the purchased model, refer to the specification label on your computer (after connecting the monitor to successfully install the BenQ LCD Monitor driver software...
... your Windows computer, you need to follow to your computer), Windows will automatically recognize the new (or different) hardware, and will determine which already has existing monitor driver software) with a newer monitor. Follow the wizard instructions until it asks you turn on the back of the purchased model, refer to the specification label on your computer (after connecting the monitor to successfully install the BenQ LCD Monitor driver software...
User Manual
Page 23
... had a monitor driver installed before , and for which has never had another monitor connected to it displays the option to Install Hardware Device Drivers. 2. Insert the BenQ LCD Monitor CD-ROM into a CD drive on the computer. 3. You should not be following the instructions for the purchased model, refer to the following these instructions. To find the suitable driver files for How to upgrade the monitor on...
... had a monitor driver installed before , and for which has never had another monitor connected to it displays the option to Install Hardware Device Drivers. 2. Insert the BenQ LCD Monitor CD-ROM into a CD drive on the computer. 3. You should not be following the instructions for the purchased model, refer to the following these instructions. To find the suitable driver files for How to upgrade the monitor on...
User Manual
Page 24
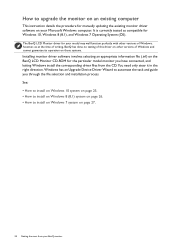
... and guide you have connected, and letting Windows install the corresponding driver files from your BenQ monitor Windows has an Upgrade Device Driver Wizard to upgrade the monitor on an existing computer This instruction details the procedure for manually updating the existing monitor driver software on your model may well function perfectly with other versions of Windows, however, as compatible for the particular model monitor you through the file selection and installation process. The BenQ LCD Monitor driver...
... and guide you have connected, and letting Windows install the corresponding driver files from your BenQ monitor Windows has an Upgrade Device Driver Wizard to upgrade the monitor on an existing computer This instruction details the procedure for manually updating the existing monitor driver software on your model may well function perfectly with other versions of Windows, however, as compatible for the particular model monitor you through the file selection and installation process. The BenQ LCD Monitor driver...
User Manual
Page 25
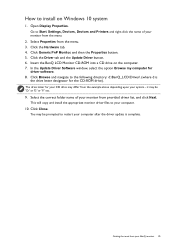
... 'D:' or 'E:' or 'F:' etc. 9. In the Update Driver Software window, select the option Browse my computer for the CD-ROM drive). Select the correct folder name of your system - Click Generic PnP Monitor, and then the Properties button. 5. Open Display Properties. Click the Hardware tab. 4. Click Close. How to install on the computer. 7. Go to Start, Settings, Devices, Devices and Printers and...
... 'D:' or 'E:' or 'F:' etc. 9. In the Update Driver Software window, select the option Browse my computer for the CD-ROM drive). Select the correct folder name of your system - Click Generic PnP Monitor, and then the Properties button. 5. Open Display Properties. Click the Hardware tab. 4. Click Close. How to install on the computer. 7. Go to Start, Settings, Devices, Devices and Printers and...
User Manual
Page 26
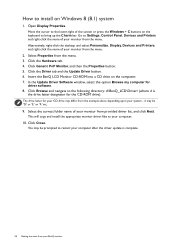
... differ from provided driver list, and click Next. Insert the BenQ LCD Monitor CD-ROM into a CD drive on Windows 8 (8.1) system 1. Click Browse and navigate to Settings, Control Panel, Devices and Printers and right-click the name of the screen or press the Windows + C buttons on the keyboard to install on the computer. 7. How to bring up the Charm bar. Open Display Properties. Move...
... differ from provided driver list, and click Next. Insert the BenQ LCD Monitor CD-ROM into a CD drive on Windows 8 (8.1) system 1. Click Browse and navigate to Settings, Control Panel, Devices and Printers and right-click the name of the screen or press the Windows + C buttons on the keyboard to install on the computer. 7. How to bring up the Charm bar. Open Display Properties. Move...
User Manual
Page 29
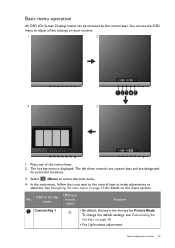
... functions. 3. No. Press any of the control keys. 2. Select (Menu) to make adjustments or selection. In the main menu, follow the icons next to the control keys to access the main menu. 4. Basic menu operation All OSD (On Screen Display) menus can use the OSD menu to adjust your monitor. 1 2 4 3 1. How to adjust all the settings on your monitor 29 To change the default settings, see Customizing the hot keys on the...
... functions. 3. No. Press any of the control keys. 2. Select (Menu) to make adjustments or selection. In the main menu, follow the icons next to the control keys to access the main menu. 4. Basic menu operation All OSD (On Screen Display) menus can use the OSD menu to adjust your monitor. 1 2 4 3 1. How to adjust all the settings on your monitor 29 To change the default settings, see Customizing the hot keys on the...
User Manual
Page 44
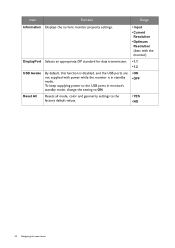
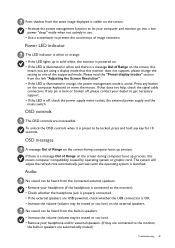
... menu Item Function Range Information Displays the current monitor property settings. • Input • Current Resolution • Optimum Resolution (best with the monitor) DisplayPort Selects an appropriate DP standard for data transmission. • 1.1 • 1.2 USB Awake By default, this function is disabled, and the USB ports are not supplied with power while the monitor is in monitor's standby mode, change the setting to ON. • ON • OFF Reset All Resets all mode, color and geometry settings...
... menu Item Function Range Information Displays the current monitor property settings. • Input • Current Resolution • Optimum Resolution (best with the monitor) DisplayPort Selects an appropriate DP standard for data transmission. • 1.1 • 1.2 USB Awake By default, this function is disabled, and the USB ports are not supplied with power while the monitor is in monitor's standby mode, change the setting to ON. • ON • OFF Reset All Resets all mode, color and geometry settings...
User Manual
Page 48
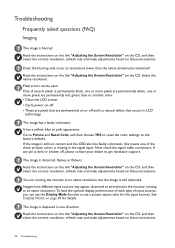
... permanently red, green, blue or another color. • Clean the LCD screen. • Cycle power on page 38 for the input sources. The image is blurred. The image is displaced in one of several pixels is bent or broken off . • These are pixels that are running at its native resolution, but the image is a natural defect that occurs in the signal input. Read the instructions on the link "Adjusting the Screen Resolution...
... permanently red, green, blue or another color. • Clean the LCD screen. • Cycle power on page 38 for the input sources. The image is blurred. The image is displaced in one of several pixels is bent or broken off . • These are pixels that are running at its native resolution, but the image is a natural defect that occurs in the signal input. Read the instructions on the link "Adjusting the Screen Resolution...
User Manual
Page 49
... not support, please change the setting to one of Range on the screen, this means you are using a display mode that does not help, check the signal cable connectors. Press any button on the external speakers. Faint shadow from the static image displayed is visible on the screen. • Activate the power management function to let your computer and monitor go into a low power "sleep" mode when not actively in speakers are automatically muted.) Troubleshooting...
... not support, please change the setting to one of Range on the screen, this means you are using a display mode that does not help, check the signal cable connectors. Press any button on the external speakers. Faint shadow from the static image displayed is visible on the screen. • Activate the power management function to let your computer and monitor go into a low power "sleep" mode when not actively in speakers are automatically muted.) Troubleshooting...
User Manual
Page 50
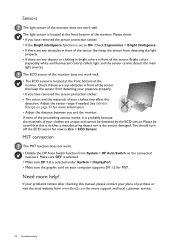
... of the sensor. You should turn off the ECO sensor for more support and local customer service. 50 Troubleshooting If your computer supports DP 1.2 for more help? Bright colors (especially white and fluorescent colors) reflect light and the sensor cannot detect the main light sources. The ECO sensor of the monitor does not work . • Disable the DP Auto Switch function from detecting the light properly. • If there...
... of the sensor. You should turn off the ECO sensor for more support and local customer service. 50 Troubleshooting If your computer supports DP 1.2 for more help? Bright colors (especially white and fluorescent colors) reflect light and the sensor cannot detect the main light sources. The ECO sensor of the monitor does not work . • Disable the DP Auto Switch function from detecting the light properly. • If there...


