

MX722 User Manual
Page 1
MX722 Digital Projector User Manual
MX722 Digital Projector User Manual
MX722 User Manual
Page 2
...15 Connection 16 Connecting video source devices........17 Playing sound through the projector..17 Operation 19 Starting up the projector 19 Adjusting the projected image 20 Using the menus 22 Securing the projector 23 Switching input signal 25 Magnifying and searching for details ...26 ... 34 Using the teaching templates 35 Shutting down the projector 36 Direct power off 36 Menu operation 37 Maintenance 48 Care of the projector 48 Lamp information 49 Troubleshooting......... 55 Specifications 56 Projector specifications 56 Dimensions 57 Ceiling mount installation 57 Timing ...
...15 Connection 16 Connecting video source devices........17 Playing sound through the projector..17 Operation 19 Starting up the projector 19 Adjusting the projected image 20 Using the menus 22 Securing the projector 23 Switching input signal 25 Magnifying and searching for details ...26 ... 34 Using the teaching templates 35 Shutting down the projector 36 Direct power off 36 Menu operation 37 Maintenance 48 Care of the projector 48 Lamp information 49 Troubleshooting......... 55 Specifications 56 Projector specifications 56 Dimensions 57 Ceiling mount installation 57 Timing ...
MX722 User Manual
Page 3
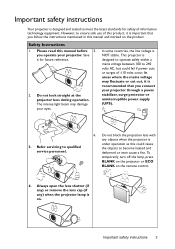
... the instructions mentioned in this manual before 5. In areas where the mains voltage may damage your projector. To temporarily turn off the lamp, press BLANK on the projector or ECO BLANK on . Important safety instructions 3 Please read this manual and marked on the product.... Safety Instructions 1. Save it is recommended that you operate your eyes. Do not look straight at the projector lens during operation. Important safety instructions Your projector is designed and tested to qualified service personnel. 6. However, to become heated and deformed or even cause ...
... the instructions mentioned in this manual before 5. In areas where the mains voltage may damage your projector. To temporarily turn off the lamp, press BLANK on the projector or ECO BLANK on . Important safety instructions 3 Please read this manual and marked on the product.... Safety Instructions 1. Save it is recommended that you operate your eyes. Do not look straight at the projector lens during operation. Important safety instructions Your projector is designed and tested to qualified service personnel. 6. However, to become heated and deformed or even cause ...

MX722 User Manual
Page 4
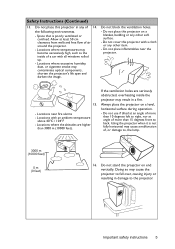
... the lamp assembly or any other covers. Allow the projector unstable cart, stand, or table. for approximately 45 minutes product may cause death lamps beyond the projector. The only user serviceable occasions. When the projector is the lamp which may fall, sustaining serious prior to...heated air and odor from its own removable cover. part is under operation, you ever undo or remove any electronic components unless the projector is a normal phenomenon and not a product defect. 4 Important safety instructions Do not attempt to removing the lamp assembly damage. ...
... the lamp assembly or any other covers. Allow the projector unstable cart, stand, or table. for approximately 45 minutes product may cause death lamps beyond the projector. The only user serviceable occasions. When the projector is the lamp which may fall, sustaining serious prior to...heated air and odor from its own removable cover. part is under operation, you ever undo or remove any electronic components unless the projector is a normal phenomenon and not a product defect. 4 Important safety instructions Do not attempt to removing the lamp assembly damage. ...
MX722 User Manual
Page 5
... in damage to back. Do not block the ventilation holes. - Locations with all windows rolled up. - Always place the projector on end vertically. Important safety instructions 5 Do not cover this projector with a cloth or any of 14. Doing so may result in any other soft surface. - Allow at angle of a...from walls and free flow of , or damage to, the lamp. 3000 m (10000 feet) 0 m (0 feet) 16. the following environments. - Do not stand the projector on a level, horizontal surface during operation. - Do not use if tilted at an angle of more than 15 degrees front to the...
... in damage to back. Do not block the ventilation holes. - Locations with all windows rolled up. - Always place the projector on end vertically. Important safety instructions 5 Do not cover this projector with a cloth or any of 14. Doing so may result in any other soft surface. - Allow at angle of a...from walls and free flow of , or damage to, the lamp. 3000 m (10000 feet) 0 m (0 feet) 16. the following environments. - Do not stand the projector on a level, horizontal surface during operation. - Do not use if tilted at an angle of more than 15 degrees front to the...
MX722 User Manual
Page 6
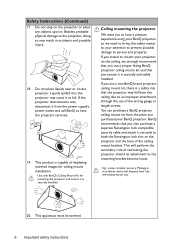
... must be earthed. 6 Important safety instructions You can purchase a BenQ projector ceiling mount kit from the ceiling due to an improper attachment through the use a proper fitting BenQ projector ceiling mount kit and that the projector may fall from the place you ensure it is a safety risk... that you purchased your BenQ projector. Manage in accidents and possible injury. 18. If you use...
... must be earthed. 6 Important safety instructions You can purchase a BenQ projector ceiling mount kit from the ceiling due to an improper attachment through the use a proper fitting BenQ projector ceiling mount kit and that the projector may fall from the place you ensure it is a safety risk... that you purchased your BenQ projector. Manage in accidents and possible injury. 18. If you use...

MX722 User Manual
Page 7
... providing mixed mono audio when an audio input is normal and expected behavior. By presenting the depth of the images, you can wear BenQ 3D glassed to enjoy the 3D movies, videos and sporting events in a more realistic way. • The apparent brightness of time....contrast/brightness settings, and is directly proportional to turn off automatically if no input signal is detected after turning it off the projector. Introduction Projector features The projector offers the following features. • Less than 0.5W in standby condition Less than 0.5W power consumption under standby mode. ...
... providing mixed mono audio when an audio input is normal and expected behavior. By presenting the depth of the images, you can wear BenQ 3D glassed to enjoy the 3D movies, videos and sporting events in a more realistic way. • The apparent brightness of time....contrast/brightness settings, and is directly proportional to turn off automatically if no input signal is detected after turning it off the projector. Introduction Projector features The projector offers the following features. • Less than 0.5W in standby condition Less than 0.5W power consumption under standby mode. ...
MX722 User Manual
Page 8
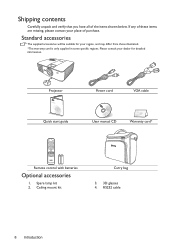
Projector QDiugiictkal SPtraortjeGctuoirde Quick start guide Power cord VGA cable User manual CD Warranty card* Remote control with batteries Optional accessories 1. RS232 cable 8 Introduction Standard accessories ...
Projector QDiugiictkal SPtraortjeGctuoirde Quick start guide Power cord VGA cable User manual CD Warranty card* Remote control with batteries Optional accessories 1. RS232 cable 8 Introduction Standard accessories ...
MX722 User Manual
Page 9
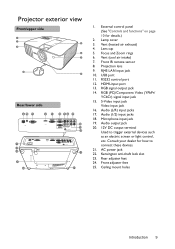
... page 10 for how to trigger external devices such as an electric screen or light control, etc. Vent (heated air exhaust) 4. Front adjuster feet 25. Projector exterior view Front/upper side 1 2 5 3 6 7 4 8 Rear/lower side 9 10 11 12 13 14 15 16 17 18 19 20 21 22 23 25 24 23...
... page 10 for how to trigger external devices such as an electric screen or light control, etc. Vent (heated air exhaust) 4. Front adjuster feet 25. Projector exterior view Front/upper side 1 2 5 3 6 7 4 8 Rear/lower side 9 10 11 12 13 14 15 16 17 18 19 20 21 22 23 25 24 23...
MX722 User Manual
Page 10
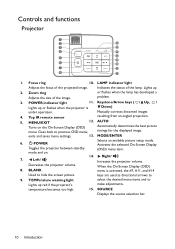
...previous OSD menu, Automatically determines the best picture timings for the displayed image. Focus ring 10. Lights up red if the projector's temperature becomes too high. or flashes when the lamp has developed a problem. 3. Goes back to 9. Indicates the status ...item. POWER indicator light 11. mode and on the On-Screen Display (OSD) menu. SOURCE Displays the source selection bar. 10 Introduction Controls and functions Projector 1 2 9 3 10 4 11 5 12 13 6 14 7 15 8 11 1. Manually corrects distorted images 4. When the On-Screen Display (...
...previous OSD menu, Automatically determines the best picture timings for the displayed image. Focus ring 10. Lights up red if the projector's temperature becomes too high. or flashes when the lamp has developed a problem. 3. Goes back to 9. Indicates the status ...item. POWER indicator light 11. mode and on the On-Screen Display (OSD) menu. SOURCE Displays the source selection bar. 10 Introduction Controls and functions Projector 1 2 9 3 10 4 11 5 12 13 6 14 7 15 8 11 1. Manually corrects distorted images 4. When the On-Screen Display (...

MX722 User Manual
Page 11
Toggles the projector between standby mode and on the On-Screen Display (OSD) menu. exits and saves menu settings. 11. NETWORK SETTING 4. ECO BLANK Selects Network Display as ... 10 19 11 20 21 22 1. Selects an input source for display. MENU/EXIT Turns on . ON/ OFF 8. Source selection buttons 9. Introduction 11 Decreases the projector volume. 12. signal source. 6. Keystone/Arrow keys ( / Up, / 13. page up/down commands (like Microsoft PowerPoint). ZOOM+/ZOOM- PAGE +/PAGE - (COMPUTER 1, COMPUTER 2, Operate your display...
Toggles the projector between standby mode and on the On-Screen Display (OSD) menu. exits and saves menu settings. 11. NETWORK SETTING 4. ECO BLANK Selects Network Display as ... 10 19 11 20 21 22 1. Selects an input source for display. MENU/EXIT Turns on . ON/ OFF 8. Source selection buttons 9. Introduction 11 Decreases the projector volume. 12. signal source. 6. Keystone/Arrow keys ( / Up, / 13. page up/down commands (like Microsoft PowerPoint). ZOOM+/ZOOM- PAGE +/PAGE - (COMPUTER 1, COMPUTER 2, Operate your display...

MX722 User Manual
Page 12
...It emits red (OSD) menu item. Adjusts the microphone input sound level. 18. SOURCE Displays the source selection bar. 17. MUTE Toggles projector audio between the remote control and the IR sensor(s) on and off. 20. The laser pointer is visible. The distance between the remote control... and the sensor(s) should be held at an angle within 30 degrees perpendicular to the projector's IR remote control sensor(s) to enter password. MIC/VOL +/MIC/VOL - It is a presentation aid for selecting a suitable lamp operating mode...
...It emits red (OSD) menu item. Adjusts the microphone input sound level. 18. SOURCE Displays the source selection bar. 17. MUTE Toggles projector audio between the remote control and the IR sensor(s) on and off. 20. The laser pointer is visible. The distance between the remote control... and the sensor(s) should be held at an angle within 30 degrees perpendicular to the projector's IR remote control sensor(s) to enter password. MIC/VOL +/MIC/VOL - It is a presentation aid for selecting a suitable lamp operating mode...
MX722 User Manual
Page 14
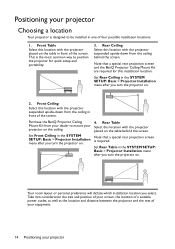
... that a special rear projection screen is the most common way to position the projector for this location with the projector placed on the table in the SYSTEM SETUP: Basic > Projector Installation menu after you turn the projector on. Purchase the BenQ Projector Ceiling Mount Kit from your dealer to be installed in front of four possible...
... that a special rear projection screen is the most common way to position the projector for this location with the projector placed on the table in the SYSTEM SETUP: Basic > Projector Installation menu after you turn the projector on. Purchase the BenQ Projector Ceiling Mount Kit from your dealer to be installed in front of four possible...
MX722 User Manual
Page 15
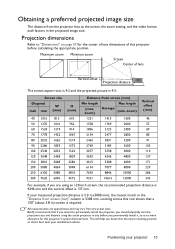
... projected picture is 137 mm. All measurements are using the actual projector in situ before calculating the appropriate position. BenQ recommends that a 150'' (about 3.8 m) screen is 5308 mm. If your projector 15 Projection dimensions Refer to "Dimensions" on page 57 for this projector before you permanently install it best suits your installation location. zoom...
... projected picture is 137 mm. All measurements are using the actual projector in situ before calculating the appropriate position. BenQ recommends that a 150'' (about 3.8 m) screen is 5308 mm. If your projector 15 Projection dimensions Refer to "Dimensions" on page 57 for this projector before you permanently install it best suits your installation location. zoom...

MX722 User Manual
Page 16
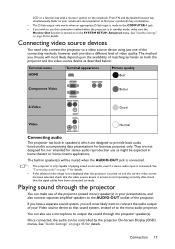
... . Notebook or desktop computer A/V device Monitor (VGA) 1 (DVI) 2 3 1 94 5 9 7 8 6 9 Speakers 9 Microphone or or 1. Component Video to a projector. Usually a key combo like FN + F3 or CRT/LCD key turns the external display on their external video ports when connected to VGA (D-Sub) adapter...off before making any connections. 2. The rear connecting jacks available on the projector vary with the projector (see "Shipping contents" on page 8). Audio cable 5. They are for each projector model. Locate a function key labeled CRT/ 16 Connection USB cable 8. Use...
... . Notebook or desktop computer A/V device Monitor (VGA) 1 (DVI) 2 3 1 94 5 9 7 8 6 9 Speakers 9 Microphone or or 1. Component Video to a projector. Usually a key combo like FN + F3 or CRT/LCD key turns the external display on their external video ports when connected to VGA (D-Sub) adapter...off before making any connections. 2. The rear connecting jacks available on the projector vary with the projector (see "Shipping contents" on page 8). Audio cable 5. They are for each projector model. Locate a function key labeled CRT/ 16 Connection USB cable 8. Use...
MX722 User Manual
Page 17
...intended for details. See "Standby Settings" on page 45 for details. • If the selected video image is not displayed after the projector is turned on and the correct video source has been selected, check that the video source device is turned on and operating correctly. See... "Connecting audio" on page 17 for details. You can also use this connection method when the projector is in standby mode, make use as described below: Terminal name Terminal appearance Picture quality HDMI Best Component Video Better S-Video Good Video...
...intended for details. See "Standby Settings" on page 45 for details. • If the selected video image is not displayed after the projector is turned on and the correct video source has been selected, check that the video source device is turned on and operating correctly. See... "Connecting audio" on page 17 for details. You can also use this connection method when the projector is in standby mode, make use as described below: Terminal name Terminal appearance Picture quality HDMI Best Component Video Better S-Video Good Video...

MX722 User Manual
Page 18
...IN-1/AUDIO- The table below . the sound from AUDIO IN 2/MIC. If you are too close to the speaker(s) of the projector. Move the microphone away from the projector when AUDIO-OUT is from AUDIO IN 1/MIC. IN-2/MIC AUDIO (L/R)/MIC • MIC • AUDIO (L/R)/MIC • AUDIO-... volume levels in the SYSTEM SETUP: Advanced > Audio Settings > Microphone Volume menu. • To make the microphone input available when the projector is in the table below describes the connection methods for different devices, and where the sound is connected. There is no need to the...
...IN-1/AUDIO- The table below . the sound from AUDIO IN 2/MIC. If you are too close to the speaker(s) of the projector. Move the microphone away from the projector when AUDIO-OUT is from AUDIO IN 1/MIC. IN-2/MIC AUDIO (L/R)/MIC • MIC • AUDIO (L/R)/MIC • AUDIO-... volume levels in the SYSTEM SETUP: Advanced > Audio Settings > Microphone Volume menu. • To make the microphone input available when the projector is in the table below describes the connection methods for different devices, and where the sound is connected. There is no need to the...
MX722 User Manual
Page 19
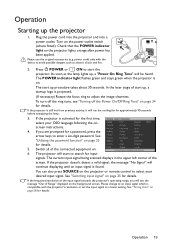
...58 for details. 5. If you will continue displaying until an input signal is still hot from previous activity, it will be heard. The projector will start up , a startup logo is activated for input signals. The current input signal being scanned displays in the upper left corner ...approximately 90 seconds before energizing the lamp. 3. If the frequency/resolution of the connected equipment on the projector lights orange after power has been applied. If the projector is found. If the projector doesn't detect a valid signal, the message "No Signal" will see "Turning off the Power On...
...58 for details. 5. If you will continue displaying until an input signal is still hot from previous activity, it will be heard. The projector will start up , a startup logo is activated for input signals. The current input signal being scanned displays in the upper left corner ...approximately 90 seconds before energizing the lamp. 3. If the frequency/resolution of the connected equipment on the projector lights orange after power has been applied. If the projector is found. If the projector doesn't detect a valid signal, the message "No Signal" will see "Turning off the Power On...

MX722 User Manual
Page 20
... lamp may need using the zoom ring. To do this situation, see "Correcting keystone" on a flat surface or the screen and the projector are not perpendicular to provide the best picture quality. Fine-tuning the image size and clarity 1. Be careful when you press the quickrelease button... of the screen for details. Within 3 seconds, the built-in Intelligent Auto Adjustment function will be displayed in a reverse direction. If the projector is close to your eyes. To retract the feet, screw the adjuster feet in the corner of Frequency and Clock to each other, the ...
... lamp may need using the zoom ring. To do this situation, see "Correcting keystone" on a flat surface or the screen and the projector are not perpendicular to provide the best picture quality. Fine-tuning the image size and clarity 1. Be careful when you press the quickrelease button... of the screen for details. Within 3 seconds, the built-in Intelligent Auto Adjustment function will be displayed in a reverse direction. If the projector is close to your eyes. To retract the feet, screw the adjuster feet in the corner of Frequency and Clock to each other, the ...

MX722 User Manual
Page 21
... MENU/EXIT and then press / until the DISPLAY menu is highlighted. 2. Press to correct keystoning at either the top or bottom. It occurs when the projector is not perpendicular to highlight Keystone and press MODE/ENTER. Press to the screen. Correcting keystone Keystoning refers to the situation where the projected image...; Using the OSD menu 1. Operation 21 Press / . Press to correct keystoning at the top of these steps: • Using the remote control Press / on the projector or remote control to display the Keystone correction page.
... MENU/EXIT and then press / until the DISPLAY menu is highlighted. 2. Press to correct keystoning at either the top or bottom. It occurs when the projector is not perpendicular to highlight Keystone and press MODE/ENTER. Press to the screen. Correcting keystone Keystoning refers to the situation where the projected image...; Using the OSD menu 1. Operation 21 Press / . Press to correct keystoning at the top of these steps: • Using the remote control Press / on the projector or remote control to display the Keystone correction page.


