

User Manual
Page 2
... 38 Using the teaching templates 39 Shutting down the projector 40 Direct power off 40 Menu operation 41 Maintenance 51 Care of the projector 51 Lamp information 52 Troubleshooting 58 Specifications 59 Projector specifications 59 Dimensions 60 Ceiling mount installation 60 Timing chart 61 Warranty and Copyright information 65
... 38 Using the teaching templates 39 Shutting down the projector 40 Direct power off 40 Menu operation 41 Maintenance 51 Care of the projector 51 Lamp information 52 Troubleshooting 58 Specifications 59 Projector specifications 59 Dimensions 60 Ceiling mount installation 60 Timing chart 61 Warranty and Copyright information 65
User Manual
Page 3
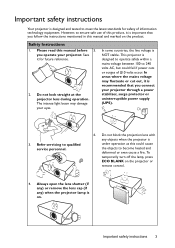
...but could cause the objects to become heated and deformed or even cause a fire. This projector is NOT stable. To temporarily turn off the lamp, press ECO BLANK on . you operate your eyes. The intense light beam may fluctuate or cut out, it for safety of information technology ...projector through a power stabilizer, surge protector or uninterruptible power supply (UPS). 3. Do not block the projection lens with any ) when the projector lamp is under operation as this manual and marked on the product. However, to ensure safe use of ±10 volts occur. In areas where ...
...but could cause the objects to become heated and deformed or even cause a fire. This projector is NOT stable. To temporarily turn off the lamp, press ECO BLANK on . you operate your eyes. The intense light beam may fluctuate or cut out, it for safety of information technology ...projector through a power stabilizer, surge protector or uninterruptible power supply (UPS). 3. Do not block the projection lens with any ) when the projector lamp is under operation as this manual and marked on the product. However, to ensure safe use of ±10 volts occur. In areas where ...

User Manual
Page 4
... parts. Refer servicing only to break on an during operation. There are dangerous high rated lamp life. Never replace the lamp assembly or any other covers. Safety Instructions (Continued) 7. The lamp becomes extremely hot 10. The only user serviceable occasions. part is under operation, you ever...cart, stand, or table. Do not operate lamps beyond the rated life could if you should you may cause death lamps beyond the projector. Do not attempt to removing the lamp assembly damage. When the projector is the lamp which may sense some heated air and odor ...
... parts. Refer servicing only to break on an during operation. There are dangerous high rated lamp life. Never replace the lamp assembly or any other covers. Safety Instructions (Continued) 7. The lamp becomes extremely hot 10. The only user serviceable occasions. part is under operation, you ever...cart, stand, or table. Do not operate lamps beyond the rated life could if you should you may cause death lamps beyond the projector. Do not attempt to removing the lamp assembly damage. When the projector is the lamp which may sense some heated air and odor ...

User Manual
Page 5
...;F - Important safety instructions 5 Do not place this projector in a fire. the following environments. - If the ventilation holes are higher than 15 degrees front to , the lamp. 3000 m (10000 feet) 0 m (0 feet) 16. Safety Instructions (Continued) 13. Do not place this projector on a blanket, bedding or any of air around the projector. - Space...
...;F - Important safety instructions 5 Do not place this projector in a fire. the following environments. - If the ventilation holes are higher than 15 degrees front to , the lamp. 3000 m (10000 feet) 0 m (0 feet) 16. Safety Instructions (Continued) 13. Do not place this projector on a blanket, bedding or any of air around the projector. - Space...
User Manual
Page 6
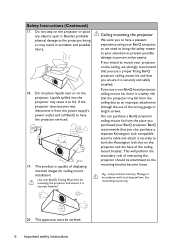
... projector ceiling mount kit, there is a safety risk that you ensure it from the power supply's power outlet and call BenQ to have a pleasant experience using your BenQ projector. This will perform the secondary role of displaying inverted images for mounting the projector and ensure it to the mounting bracket become wet... does become loose. Safety Instructions (Continued) 17. Ceiling mounting the projector We want you also purchase a separate Kensington lock compatible security cable and attach it . BenQ recommends that you to person and property. Lamp contains mercury.
... projector ceiling mount kit, there is a safety risk that you ensure it from the power supply's power outlet and call BenQ to have a pleasant experience using your BenQ projector. This will perform the secondary role of displaying inverted images for mounting the projector and ensure it to the mounting bracket become wet... does become loose. Safety Instructions (Continued) 17. Ceiling mounting the projector We want you also purchase a separate Kensington lock compatible security cable and attach it . BenQ recommends that you to person and property. Lamp contains mercury.
User Manual
Page 7
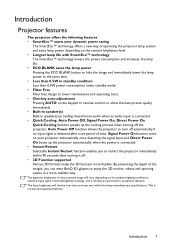
... up the projector automatically when the power is connected. • Instant Restart Selectable Instant Restart function enables you can wear BenQ 3D glasses to projection distance. The apparent brightness of the projected image will decline over time and may vary within 90... flexible. Introduction 7 Auto Power Off function allows the projector to restart the projector immediately within the lamp manufacturers specifications. This is normal and expected behavior. The lamp brightness will vary depending on your dynamic power saving The SmartEco™ technology offers a new way ...
... up the projector automatically when the power is connected. • Instant Restart Selectable Instant Restart function enables you can wear BenQ 3D glasses to projection distance. The apparent brightness of the projected image will decline over time and may vary within 90... flexible. Introduction 7 Auto Power Off function allows the projector to restart the projector immediately within the lamp manufacturers specifications. This is normal and expected behavior. The lamp brightness will vary depending on your dynamic power saving The SmartEco™ technology offers a new way ...

User Manual
Page 8
... below. RS232 cable 8 Introduction Projector QDuigiictkalSPtraortjeGctuoidr e Quick start guide Power cord VGA cable User manual CD Warranty card* Remote control with batteries Optional accessories 1. Spare lamp kit 2. QCast dongle 5. Shipping contents Carefully unpack and verify that you have all of purchase.
... below. RS232 cable 8 Introduction Projector QDuigiictkalSPtraortjeGctuoidr e Quick start guide Power cord VGA cable User manual CD Warranty card* Remote control with batteries Optional accessories 1. Spare lamp kit 2. QCast dongle 5. Shipping contents Carefully unpack and verify that you have all of purchase.

User Manual
Page 9
Used for details.) Speaker grill Lamp cover Vent (heated air exhaust) Quick-release button Lens cap Focus and Zoom ring Wireless cover Vent (cool air intake) Projection lens IR remote sensor ...
Used for details.) Speaker grill Lamp cover Vent (heated air exhaust) Quick-release button Lens cap Focus and Zoom ring Wireless cover Vent (cool air intake) Projection lens IR remote sensor ...
User Manual
Page 10
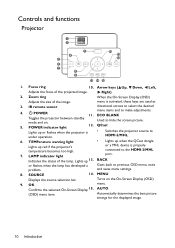
... menu is properly connected to HDMI-2/MHL. 6. POWER indicator light menu items and to select the desired 4. 5. BACK or flashes when the lamp has developed a Goes back to hide the screen picture. 12. Lights up red if the projector's temperature becomes too high. 7. Automatically determines...for the displayed image. 10 Introduction Right) 2. POWER Toggles the projector between standby mode and on the On-Screen Display (OSD) 9. LAMP indicator light or a MHL device is activated, these keys are used as 3. ECO BLANK Used to previous OSD menu, exits problem. QCast...
... menu is properly connected to HDMI-2/MHL. 6. POWER indicator light menu items and to select the desired 4. 5. BACK or flashes when the lamp has developed a Goes back to hide the screen picture. 12. Lights up red if the projector's temperature becomes too high. 7. Automatically determines...for the displayed image. 10 Introduction Right) 2. POWER Toggles the projector between standby mode and on the On-Screen Display (OSD) 9. LAMP indicator light or a MHL device is activated, these keys are used as 3. ECO BLANK Used to previous OSD menu, exits problem. QCast...
User Manual
Page 12
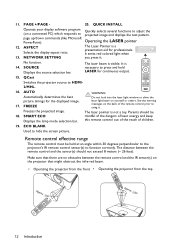
... the projector's IR remote control sensor(s) to press and hold LASER for continuous output. 15. The laser beam is not a toy. SMART ECO Displays the lamp mode selection bar.
... the projector's IR remote control sensor(s) to press and hold LASER for continuous output. 15. The laser beam is not a toy. SMART ECO Displays the lamp mode selection bar.

User Manual
Page 22
... projector 1. The projector will start up , a "Power On Ring Tone" will run the cooling fan for approximately 90 seconds before energizing the lamp. 3. If the frequency/resolution of the input signal exceeds the projector's operating range, you are prompted for details. To turn off the Power ... see "Turning off the ring tone, see the message "Out of start the projector. Please change to avoid possible dangers such as the lamp lights up procedure takes about 30 seconds. power cord) only with the projector's resolution or set the input signal to search for 3 minutes...
... projector 1. The projector will start up , a "Power On Ring Tone" will run the cooling fan for approximately 90 seconds before energizing the lamp. 3. If the frequency/resolution of the input signal exceeds the projector's operating range, you are prompted for details. To turn off the Power ... see "Turning off the ring tone, see the message "Out of start the projector. Please change to avoid possible dangers such as the lamp lights up procedure takes about 30 seconds. power cord) only with the projector's resolution or set the input signal to search for 3 minutes...

User Manual
Page 23
... Adjustment function will be displayed in a reverse direction. release button as desired, release the quick- 2 1 2 Do not look into the lens while the lamp is on the projector or remote control. Auto-adjusting the image In some cases, you may cause damage to the exhaust vent where hot air... comes from the lamp may need using the zoom ring. 2. This function is only available when PC signal (analog RGB) is equipped with a quick-release adjuster foot ...
... Adjustment function will be displayed in a reverse direction. release button as desired, release the quick- 2 1 2 Do not look into the lens while the lamp is on the projector or remote control. Auto-adjusting the image In some cases, you may cause damage to the exhaust vent where hot air... comes from the lamp may need using the zoom ring. 2. This function is only available when PC signal (analog RGB) is equipped with a quick-release adjuster foot ...

User Manual
Page 40
...cooling function. Press POWER again to start the projector after the fans stop . See "Quick Cooling" on environmental conditions and usage. Lamp life results will continue to run for approximately 90 seconds to cool down . Press POWER and a confirmation message will display prompting you ...don't respond in a few seconds, the message will not respond to cool down . To protect the lamp, the projector will disappear. 2. In such cases, press POWER again to start the projector after the fans stop and the POWER indicator ...
...cooling function. Press POWER again to start the projector after the fans stop . See "Quick Cooling" on environmental conditions and usage. Lamp life results will continue to run for approximately 90 seconds to cool down . Press POWER and a confirmation message will display prompting you ...don't respond in a few seconds, the message will not respond to cool down . To protect the lamp, the projector will disappear. 2. In such cases, press POWER again to start the projector after the fans stop and the POWER indicator ...
User Manual
Page 43
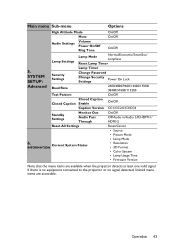
...Off Mute On/Off Audio Settings Volume Power On/Off Ring Tone On/Off Lamp Settings Lamp Mode Normal/Economic/SmartEco/ LampSave Reset Lamp Timer 5. SYSTEM SETUP: Security Settings Lamp Timer Change Password Change Security Settings Power On Lock Advanced Baud Rate 2400/4800/...All Settings Reset/Cancel • Source • Picture Mode 6. Current System Status INFORMATION • Lamp Mode • Resolution • 3D Format • Color System • Lamp Usage Time • Firmware Version Note that the menu items are accessible. If there is no equipment...
...Off Mute On/Off Audio Settings Volume Power On/Off Ring Tone On/Off Lamp Settings Lamp Mode Normal/Economic/SmartEco/ LampSave Reset Lamp Timer 5. SYSTEM SETUP: Security Settings Lamp Timer Change Password Change Security Settings Power On Lock Advanced Baud Rate 2400/4800/...All Settings Reset/Cancel • Source • Picture Mode 6. Current System Status INFORMATION • Lamp Mode • Resolution • 3D Format • Color System • Lamp Usage Time • Firmware Version Note that the menu items are accessible. If there is no equipment...
User Manual
Page 48
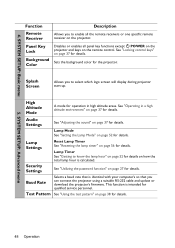
...Using the test pattern" on page 37 for the projector. Lamp Settings Security Settings Reset Lamp Timer See "Resetting the lamp timer" on how the total lamp hour is intended for details. See "Operating in high altitude areas. Lamp Timer See "Getting to enable all panel key functions except POWER.... See "Locking control keys" on page 52 for details. SYSTEM SETUP: Basic menu Function Remote Receiver Description Allows you to know the lamp hour" on page 37 for qualified service personnel. High Altitude Mode A mode for operation in a high altitude environment" on page 37 ...
...Using the test pattern" on page 37 for the projector. Lamp Settings Security Settings Reset Lamp Timer See "Resetting the lamp timer" on how the total lamp hour is intended for details. See "Operating in high altitude areas. Lamp Timer See "Getting to enable all panel key functions except POWER.... See "Locking control keys" on page 52 for details. SYSTEM SETUP: Basic menu Function Remote Receiver Description Allows you to know the lamp hour" on page 37 for qualified service personnel. High Altitude Mode A mode for operation in a high altitude environment" on page 37 ...

User Manual
Page 50
Picture Mode Shows the selected mode in the PICTURE menu. Resolution Shows the native resolution of your projector. 50 Operation Firmware Version Shows the firmware version of the input signal. 3D Format Shows the current 3D mode. Lamp Mode Shows the current lamp mode. Lamp Usage Time Displays the number of hours the lamp has been used. Color System Shows input system format. 6. INFORMATION menu Function Current System Status Description Source Shows the current signal source.
Picture Mode Shows the selected mode in the PICTURE menu. Resolution Shows the native resolution of your projector. 50 Operation Firmware Version Shows the firmware version of the input signal. 3D Format Shows the current 3D mode. Lamp Mode Shows the current lamp mode. Lamp Usage Time Displays the number of hours the lamp has been used. Color System Shows input system format. 6. INFORMATION menu Function Current System Status Description Source Shows the current signal source.

User Manual
Page 52
... to turn off automatically if no input signal is detected after a set Auto Power Off, go to the SYSTEM SETUP: Advanced > Lamp Settings > Lamp Mode menu and press / . To obtain the lamp hour information: 1. You will not automatically shut down in Economic, SmartEco or LampSave mode extends the... Time = (hours used in Normal mode) + (hours used in Economic mode) + (hours used in SmartEco mode) + (hours used in LampSave mode) Total (equivalent) lamp hour = 2.50 x (hours used in Normal mode) + 1.875 x (hours used in Economic mode) + 1.25 x (hours used in SmartEco mode) + 1.00 x (hours used ...
... to turn off automatically if no input signal is detected after a set Auto Power Off, go to the SYSTEM SETUP: Advanced > Lamp Settings > Lamp Mode menu and press / . To obtain the lamp hour information: 1. You will not automatically shut down in Economic, SmartEco or LampSave mode extends the... Time = (hours used in Normal mode) + (hours used in Economic mode) + (hours used in SmartEco mode) + (hours used in LampSave mode) Total (equivalent) lamp hour = 2.50 x (hours used in Normal mode) + 1.875 x (hours used in Economic mode) + 1.25 x (hours used in SmartEco mode) + 1.00 x (hours used ...
User Manual
Page 53
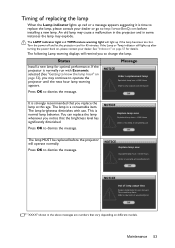
... remind you may explode. You can replace the lamp whenever you replace the lamp at www.BenQ.com The lamp MUST be replaced before installing a new lamp. NOTICE Replace lamp soon Equivalent lamp hour > XXXX Hours Order a new lamp at this age. The following Lamp warning displays will light up if the lamp becomes too hot. If the projector is...
... remind you may explode. You can replace the lamp whenever you replace the lamp at www.BenQ.com The lamp MUST be replaced before installing a new lamp. NOTICE Replace lamp soon Equivalent lamp hour > XXXX Hours Order a new lamp at this age. The following Lamp warning displays will light up if the lamp becomes too hot. If the projector is...
User Manual
Page 54
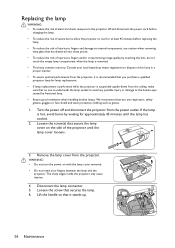
...; To reduce the risk of severe burns, allow the projector to cool for at least 45 minutes before replacing the lamp. • To reduce the risk of injuries to fingers and damage to internal components, use respirators, safety glasses, goggles or face shield and wear ...protective clothing such as gloves. 1. Loosen the screw(s) that it is removed. • This lamp contains mercury. WARNING: • Do not turn the projector off and disconnect the projector from the power outlet. Lift the handle so that secure the...
...; To reduce the risk of severe burns, allow the projector to cool for at least 45 minutes before replacing the lamp. • To reduce the risk of injuries to fingers and damage to internal components, use respirators, safety glasses, goggles or face shield and wear ...protective clothing such as gloves. 1. Loosen the screw(s) that it is removed. • This lamp contains mercury. WARNING: • Do not turn the projector off and disconnect the projector from the power outlet. Lift the handle so that secure the...

User Manual
Page 55
...and scatter broken glass in the projector. • Do not place the lamp in malfunction. • Do not over tighten the screw. 12. Tighten the screw that secure the lamp cover. Insert the lamp connector. 10. Connect the power and restart the projector. Tighten the screw...(s) that secures the lamp. 11. 7. WARNING: • Loose screw may cause a bad connection, which could ...
...and scatter broken glass in the projector. • Do not place the lamp in malfunction. • Do not over tighten the screw. 12. Tighten the screw that secure the lamp cover. Insert the lamp connector. 10. Connect the power and restart the projector. Tighten the screw...(s) that secures the lamp. 11. 7. WARNING: • Loose screw may cause a bad connection, which could ...

