

User Manual
Page 2
Table of contents Important safety instructions 3 Introduction 7 Projector features 7 Shipping contents 8 Projector exterior view 9 Controls and functions 10 Positioning your projector 14 Choosing a location 14 Obtaining a preferred projected image size 15 Connection 18 Connecting video source devices........19 Connecting video streaming dongle QCast (optional accessory 20 Operation 22 Starting up the projector 22 Adjusting the projected image 23 Using the menus 26 Securing the projector 27 Switching input signal 29 Magnifying and searching for details ...30 Selecting the...
Table of contents Important safety instructions 3 Introduction 7 Projector features 7 Shipping contents 8 Projector exterior view 9 Controls and functions 10 Positioning your projector 14 Choosing a location 14 Obtaining a preferred projected image size 15 Connection 18 Connecting video source devices........19 Connecting video streaming dongle QCast (optional accessory 20 Operation 22 Starting up the projector 22 Adjusting the projected image 23 Using the menus 26 Securing the projector 27 Switching input signal 29 Magnifying and searching for details ...30 Selecting the...
User Manual
Page 3
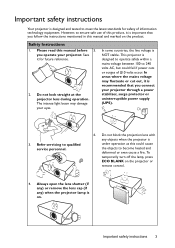
... the projector lamp is recommended that you follow the instructions mentioned in this manual before 5. Please read this manual and marked on the product. In areas where the mains voltage may damage your projector through a power stabilizer, surge protector or uninterruptible power supply (UPS). 3. Always open the lens shutter (if any) or remove the lens cap (if any objects when the projector is under operation...
... the projector lamp is recommended that you follow the instructions mentioned in this manual before 5. Please read this manual and marked on the product. In areas where the mains voltage may damage your projector through a power stabilizer, surge protector or uninterruptible power supply (UPS). 3. Always open the lens shutter (if any) or remove the lens cap (if any objects when the projector is under operation...
User Manual
Page 6
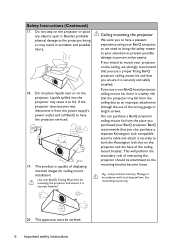
... instructions Lamp contains mercury. Safety Instructions (Continued) 17. Use only BenQ's Ceiling Mount Kit for ceiling mount installation. You can purchase a BenQ projector ceiling mount kit from the power supply's power outlet and call BenQ to have a pleasant experience using your BenQ projector, so we strongly recommend that you use a non-BenQ brand projector ceiling mount kit, there is a safety risk that you purchased your attention to prevent possible damage to fail. If you use a proper fitting BenQ projector ceiling mount...
... instructions Lamp contains mercury. Safety Instructions (Continued) 17. Use only BenQ's Ceiling Mount Kit for ceiling mount installation. You can purchase a BenQ projector ceiling mount kit from the power supply's power outlet and call BenQ to have a pleasant experience using your BenQ projector, so we strongly recommend that you use a non-BenQ brand projector ceiling mount kit, there is a safety risk that you purchased your attention to prevent possible damage to fail. If you use a proper fitting BenQ projector ceiling mount...
User Manual
Page 7
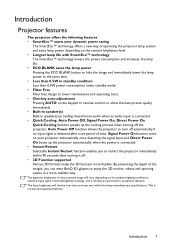
... of the images, you to projection distance. The lamp brightness will vary depending on your dynamic power saving The SmartEco™ technology offers a new way of time. Signal Power On function turns on the ambient lighting conditions, selected input signal contrast/brightness settings, and is directly proportional to restart the projector immediately within the lamp manufacturers specifications. This is connected • Quick Cooling, Auto Power Off, Signal Power On, Direct Power On Quick...
... of the images, you to projection distance. The lamp brightness will vary depending on your dynamic power saving The SmartEco™ technology offers a new way of time. Signal Power On function turns on the ambient lighting conditions, selected input signal contrast/brightness settings, and is directly proportional to restart the projector immediately within the lamp manufacturers specifications. This is connected • Quick Cooling, Auto Power Off, Signal Power On, Direct Power On Quick...
User Manual
Page 10
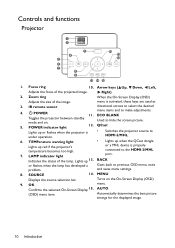
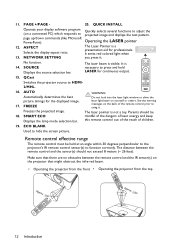
... lamp. IR remote sensor directional arrows to the HDMI-2/MHL port. LAMP indicator light or a MHL device is properly connected to select the desired 4. 5. BACK or flashes when the lamp has developed a Goes back to hide the screen picture. 12. OK menu. menu is under operation. • Switches the projector source to make adjustments. 11. ECO BLANK Used to previous OSD menu, exits problem. Indicates the status of the projected image. SOURCE 14. AUTO (OSD) menu item. Lights up or flashes...
... lamp. IR remote sensor directional arrows to the HDMI-2/MHL port. LAMP indicator light or a MHL device is properly connected to select the desired 4. 5. BACK or flashes when the lamp has developed a Goes back to hide the screen picture. 12. OK menu. menu is under operation. • Switches the projector source to make adjustments. 11. ECO BLANK Used to previous OSD menu, exits problem. Indicates the status of the projected image. SOURCE 14. AUTO (OSD) menu item. Lights up or flashes...
User Manual
Page 12
... projector source to hide the screen picture. AUTO Automatically determines the best picture timings for continuous output. 15. WARNING: Do not look into the laser light window or shine the laser light beam on the projector that there are no obstacles between the remote control and the sensor(s) should be held at an angle within 30 degrees perpendicular to the projector's IR remote control sensor(s) to adjust the projected image...
... projector source to hide the screen picture. AUTO Automatically determines the best picture timings for continuous output. 15. WARNING: Do not look into the laser light window or shine the laser light beam on the projector that there are no obstacles between the remote control and the sensor(s) should be held at an angle within 30 degrees perpendicular to the projector's IR remote control sensor(s) to adjust the projected image...

User Manual
Page 14
... BenQ Projector Ceiling Mount Kit from the ceiling behind the screen. Note that a special rear projection screen and the BenQ Projector Ceiling Mount Kit are required for quick setup and portability. 3. Rear Table Select this installation location. 2. Press OK and press / to position the projector for this location with the projector placed on the remote control and then press / until the SYSTEM SETUP: Basic menu is the most common way to select a setting...
... BenQ Projector Ceiling Mount Kit from the ceiling behind the screen. Note that a special rear projection screen and the BenQ Projector Ceiling Mount Kit are required for quick setup and portability. 3. Rear Table Select this installation location. 2. Press OK and press / to position the projector for this location with the projector placed on the remote control and then press / until the SYSTEM SETUP: Basic menu is the most common way to select a setting...

User Manual
Page 19
... Picture quality HDMI/MHL Best Component Video Better S-Video Good Video Normal Connecting audio The projector has built-in speaker(s) will most likely depend upon the availability of video quality. The D-Sub output only works when an appropriate D-Sub input is turned on and operating correctly. If the selected video image is not displayed after the projector is turned on and the correct video source has been selected, check that the signal cables...
... Picture quality HDMI/MHL Best Component Video Better S-Video Good Video Normal Connecting audio The projector has built-in speaker(s) will most likely depend upon the availability of video quality. The D-Sub output only works when an appropriate D-Sub input is turned on and operating correctly. If the selected video image is not displayed after the projector is turned on and the correct video source has been selected, check that the signal cables...
User Manual
Page 20
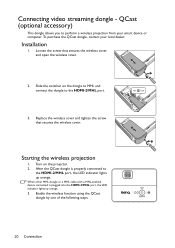
... screw that secures the wireless cover and open the wireless cover. 2 2. After the QCast dongle is plugged into the HDMI-2/MHL port, the LED indicator lights up orange. Enable the wireless function using the QCast dongle by one of the following steps. 1 2 20 Connection Installation 1. Starting the wireless projection 1. Loosen the screw that secures the wireless cover. Connecting video streaming dongle - Turn on the dongle to MHL and connect the dongle to the HDMI-2/MHL port, the LED indicator lights up orange...
... screw that secures the wireless cover and open the wireless cover. 2 2. After the QCast dongle is plugged into the HDMI-2/MHL port, the LED indicator lights up orange. Enable the wireless function using the QCast dongle by one of the following steps. 1 2 20 Connection Installation 1. Starting the wireless projection 1. Loosen the screw that secures the wireless cover. Connecting video streaming dongle - Turn on the dongle to MHL and connect the dongle to the HDMI-2/MHL port, the LED indicator lights up orange...

User Manual
Page 22
... to enter a six-digit password. Switch all of the screen. You can also press SOURCE on the projector or remote control to a lower setting. Operation Starting up procedure takes about 30 seconds. The POWER indicator light flashes green and stays green when the projector is detected for the first time, select your desired input signal. To turn off the ring tone, see the message "Out of the input signal exceeds the projector's operating range, you are prompted...
... to enter a six-digit password. Switch all of the screen. You can also press SOURCE on the projector or remote control to a lower setting. Operation Starting up procedure takes about 30 seconds. The POWER indicator light flashes green and stays green when the projector is detected for the first time, select your desired input signal. To turn off the ring tone, see the message "Out of the input signal exceeds the projector's operating range, you are prompted...

User Manual
Page 23
... the projector or remote control. Sharpen the image by rotating the focus ring. Adjusting the projected image Adjusting the projection angle The projector is selected. Be careful when you need to the exhaust vent where hot air comes from the lamp may need using the zoom ring. 2. release button as desired, release the quick- 2 1 2 Do not look into the lens while the lamp is close to optimize the picture quality...
... the projector or remote control. Sharpen the image by rotating the focus ring. Adjusting the projected image Adjusting the projection angle The projector is selected. Be careful when you need to the exhaust vent where hot air comes from the lamp may need using the zoom ring. 2. release button as desired, release the quick- 2 1 2 Do not look into the lens while the lamp is close to optimize the picture quality...
User Manual
Page 27
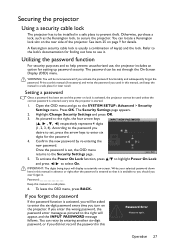
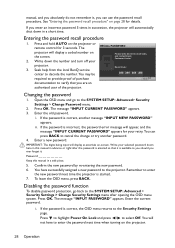
... the password If the password function is activated, you will display as the Kensington lock, to enter the six-digit password every time you used unless the correct password is entered every time the projector is activated, the projector cannot be set and the power on -screen. Otherwise, purchase a lock, such as asterisks on lock is started. 1. You can be used in this manual in this Password Error Please try again. Operation 27...
... the password If the password function is activated, you will display as the Kensington lock, to enter the six-digit password every time you used unless the correct password is entered every time the projector is activated, the projector cannot be set and the power on -screen. Otherwise, purchase a lock, such as asterisks on lock is started. 1. You can be used in this manual in this Password Error Please try again. Operation 27...
User Manual
Page 28
... RECALL PASSWORD projector will automatically shut down in succession, the projector will display a coded number on the screen. 2. Seek help from the local BenQ service Recall Code: center to enter the password next time when turning on the projector or remote control for details. i. Enter a new password. Confirm the new password by re-entering the new password. 6. To leave the OSD menu, press BACK. If you enter an incorrect password 5 times in a short time. Write down the number and turn...
... RECALL PASSWORD projector will automatically shut down in succession, the projector will display a coded number on the screen. 2. Seek help from the local BenQ service Recall Code: center to enter the password next time when turning on the projector or remote control for details. i. Enter a new password. Confirm the new password by re-entering the new password. 6. To leave the OSD menu, press BACK. If you enter an incorrect password 5 times in a short time. Write down the number and turn...
User Manual
Page 29
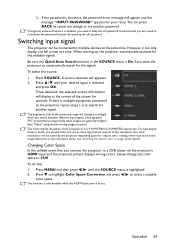
... the projector's HDMI input and the projected picture displays wrong colors, please change the color space to re-activate the password function by the projector depending upon the "aspect ratio" setting, which outputs at a time. Be sure the Quick Auto Search function in the SOURCE menu is disabled, you need to keep the old password in use an input signal which may cause some image distortion or loss of the projected image will be connected...
... the projector's HDMI input and the projected picture displays wrong colors, please change the color space to re-activate the password function by the projector depending upon the "aspect ratio" setting, which outputs at a time. Be sure the Quick Auto Search function in the SOURCE menu is disabled, you need to keep the old password in use an input signal which may cause some image distortion or loss of the projected image will be connected...

User Manual
Page 36
... -, NETWORK, NETWORK SETTING. No matter Blank Timer is activated or not, you will still hear the audio even though the image is up , and a triple beep sound will see the message "Timer is activated with an audio input connected, the audio can set the blank time in the upper left corner of the screen. If remote paging function doesn't work with a USB cable prior to your remote control has the following steps: 1. Windows...
... -, NETWORK, NETWORK SETTING. No matter Blank Timer is activated or not, you will still hear the audio even though the image is up , and a triple beep sound will see the message "Timer is activated with an audio input connected, the audio can set the blank time in the upper left corner of the screen. If remote paging function doesn't work with a USB cable prior to your remote control has the following steps: 1. Windows...

User Manual
Page 37
... Mode if your projector from being changed accidentally (by pressing / on the projector or remote control. Operating in locked status the next time it may cause a higher decibel operating noise level because of increased fan speed necessary to improve overall system cooling and performance. A confirmation message appears. 3. Adjusting the sound The sound adjustments made a correct connection to the projector audio input. See "Connection" on page 18 for example). Operation 37 To release panel key lock, use...
... Mode if your projector from being changed accidentally (by pressing / on the projector or remote control. Operating in locked status the next time it may cause a higher decibel operating noise level because of increased fan speed necessary to improve overall system cooling and performance. A confirmation message appears. 3. Adjusting the sound The sound adjustments made a correct connection to the projector audio input. See "Connection" on page 18 for example). Operation 37 To release panel key lock, use...

User Manual
Page 41
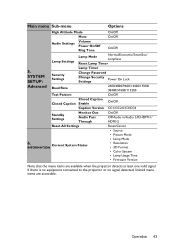
Menu operation Menu system Please note that the on-screen display (OSD) menus vary according to the signal type selected and the projector model you are using. DISPLAY 2. PICTURE 3. Main menu Sub-menu Options 1. SOURCE Wall Color Off/Light Yellow/Pink/Light Green/Blue/ Blackboard Aspect Ratio Auto/Real/4:3/16:9/16:10 Auto Keystone On/Off 2D Keystone Corner Fit Position Phase H. Size Digital Zoom 3D Mode Auto/Top Bottom/Frame Sequential/ Frame Packing/Side by Side/Off 3D Sync Invert Disable...
Menu operation Menu system Please note that the on-screen display (OSD) menus vary according to the signal type selected and the projector model you are using. DISPLAY 2. PICTURE 3. Main menu Sub-menu Options 1. SOURCE Wall Color Off/Light Yellow/Pink/Light Green/Blue/ Blackboard Aspect Ratio Auto/Real/4:3/16:9/16:10 Auto Keystone On/Off 2D Keystone Corner Fit Position Phase H. Size Digital Zoom 3D Mode Auto/Top Bottom/Frame Sequential/ Frame Packing/Side by Side/Off 3D Sync Invert Disable...
User Manual
Page 43
... the projector detects at least one valid signal. Current System Status INFORMATION • Lamp Mode • Resolution • 3D Format • Color System • Lamp Usage Time • Firmware Version Note that the menu items are accessible. Main menu Sub-menu Options High Altitude Mode On/Off Mute On/Off Audio Settings Volume Power On/Off Ring Tone On/Off Lamp Settings Lamp Mode Normal/Economic/SmartEco/ LampSave Reset Lamp Timer 5. SYSTEM SETUP: Security Settings Lamp Timer Change Password Change Security Settings Power On Lock...
... the projector detects at least one valid signal. Current System Status INFORMATION • Lamp Mode • Resolution • 3D Format • Color System • Lamp Usage Time • Firmware Version Note that the menu items are accessible. Main menu Sub-menu Options High Altitude Mode On/Off Mute On/Off Audio Settings Volume Power On/Off Ring Tone On/Off Lamp Settings Lamp Mode Normal/Economic/SmartEco/ LampSave Reset Lamp Timer 5. SYSTEM SETUP: Security Settings Lamp Timer Change Password Change Security Settings Power On Lock...

User Manual
Page 52
... no input signal is as possible, you can last up to 3000-4000 hours with proper usage. To set period of time to prevent unnecessary waste of lamp life. The projector will see the Lamp Timer information displaying on the menu. 4. The method of calculating the equivalent lamp hour is detected after a set Auto Power Off, go to the SYSTEM SETUP: Advanced > Lamp Settings > Lamp Mode menu and press / . To leave the menu, press MENU. Lamp mode...
... no input signal is as possible, you can last up to 3000-4000 hours with proper usage. To set period of time to prevent unnecessary waste of lamp life. The projector will see the Lamp Timer information displaying on the menu. 4. The method of calculating the equivalent lamp hour is detected after a set Auto Power Off, go to the SYSTEM SETUP: Advanced > Lamp Settings > Lamp Mode menu and press / . To leave the menu, press MENU. Lamp mode...

User Manual
Page 58
... signal cable is connected correctly. Replace the battery with the SOURCE key on and check that it is not correctly connected to turn on. Remove the obstacle. Please see "Entering the password recall procedure" on . The projector is switched on page 28 for details. 58 Troubleshooting Select the correct input signal with new ones. Adjust the focus of the projector if necessary. Open the lens cover. The password is an obstacle between the remote control...
... signal cable is connected correctly. Replace the battery with the SOURCE key on and check that it is not correctly connected to turn on. Remove the obstacle. Please see "Entering the password recall procedure" on . The projector is switched on page 28 for details. 58 Troubleshooting Select the correct input signal with new ones. Adjust the focus of the projector if necessary. Open the lens cover. The password is an obstacle between the remote control...


