
GP1 User Manual
Page 2
...features 7 Shipping contents 8 Projector exterior view 9 Controls and functions 10 Projector 10 Positioning your projector 13 Obtaining a preferred projected image size 13 Connection 15 Connecting a computer 15 Connecting Video source devices....... 16 Connecting a composite Video source device 18 Connecting a USB Reader source device 19 Connecting an iPod Dock device (Optional Accessory 20 Operation 21 Starting up the projector 21 Using the menus 22 Utilizing the password function ......... 23 Switching input signal 25 Adjusting the projected image 25 Magnifying and searching...
...features 7 Shipping contents 8 Projector exterior view 9 Controls and functions 10 Projector 10 Positioning your projector 13 Obtaining a preferred projected image size 13 Connection 15 Connecting a computer 15 Connecting Video source devices....... 16 Connecting a composite Video source device 18 Connecting a USB Reader source device 19 Connecting an iPod Dock device (Optional Accessory 20 Operation 21 Starting up the projector 21 Using the menus 22 Utilizing the password function ......... 23 Switching input signal 25 Adjusting the projected image 25 Magnifying and searching...

GP1 User Manual
Page 10
... volume level. Focus ring Manually corrects distorted images Adjusts the focus of the projected image. See When the On-Screen Display (OSD) menu "Switching input signal" on or off and warning status. See Indicates the touch-key and source status. Plays back and pauses the photo and movie. 10 Introduction Controls and functions Projector 5. Keypad functions under USB mode # Keypad Keypad Operation 2 BLANK Used to USB Reader main menu. MODE/ENTER Used to make adjustments. Indicates the power on page 25...
... volume level. Focus ring Manually corrects distorted images Adjusts the focus of the projected image. See When the On-Screen Display (OSD) menu "Switching input signal" on or off and warning status. See Indicates the touch-key and source status. Plays back and pauses the photo and movie. 10 Introduction Controls and functions Projector 5. Keypad functions under USB mode # Keypad Keypad Operation 2 BLANK Used to USB Reader main menu. MODE/ENTER Used to make adjustments. Indicates the power on page 25...

GP1 User Manual
Page 11
... On-Screen Display (OSD) desired menu items. menu is selected, selects an available picture setup Toggles the projector between standby mode. main screen. 4. See "Adjusting the sound" on . SOURCE 11 12 Displays the source selection bar. See "Selecting a picture mode" on mode and on page 32 for details. Keystone/Arrow keys ( / Up, / 5 Down) 6 9 Manually corrects distorted images 7 resulting from an angled projection. II POWER Depending upon which input signal is activated, the #5 and #7 keys are used...
... On-Screen Display (OSD) desired menu items. menu is selected, selects an available picture setup Toggles the projector between standby mode. main screen. 4. See "Adjusting the sound" on . SOURCE 11 12 Displays the source selection bar. See "Selecting a picture mode" on mode and on page 32 for details. Keystone/Arrow keys ( / Up, / 5 Down) 6 9 Manually corrects distorted images 7 resulting from an angled projection. II POWER Depending upon which input signal is activated, the #5 and #7 keys are used...
GP1 User Manual
Page 18
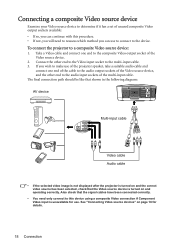
... can use to connect to the device. See "Connecting Video source devices" on and operating correctly. To connect the projector to the multi-input cable. 3. The final connection path should be like that shown in the following diagram: AV device Multi-input cable Video cable Audio cable • If the selected video image is not displayed after the projector is turned on and the correct video source has been selected, check that the signal cables have been connected...
... can use to connect to the device. See "Connecting Video source devices" on and operating correctly. To connect the projector to the multi-input cable. 3. The final connection path should be like that shown in the following diagram: AV device Multi-input cable Video cable Audio cable • If the selected video image is not displayed after the projector is turned on and the correct video source has been selected, check that the signal cables have been connected...
GP1 User Manual
Page 21
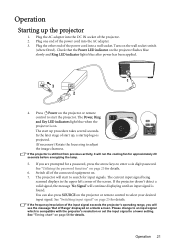
... signal, the message 'No Signal' will run the cooling fan for details. 6. Operation Starting up procedure takes several seconds. If the frequency/resolution of the connected equipment on the wall socket switch (where fitted). Check that the Power LED indicator on the projector or remote control to enter a six digit password. You can also press SOURCE on the projector flashes blue slowly and Ring LED indicator lights blue after power has been applied. 1 3 2 4. Turn on . 7. Switch all of the input signal...
... signal, the message 'No Signal' will run the cooling fan for details. 6. Operation Starting up procedure takes several seconds. If the frequency/resolution of the connected equipment on the wall socket switch (where fitted). Check that the Power LED indicator on the projector or remote control to enter a six digit password. You can also press SOURCE on the projector flashes blue slowly and Ring LED indicator lights blue after power has been applied. 1 3 2 4. Turn on . 7. Switch all of the input signal...

GP1 User Manual
Page 23
... represent 4 digits (1, 2, 3, 4). Highlight Power on lock and select On by re-entering the new password. Write your selected password down in a short time. For details of the OSD menu operation, please refer to help prevent unauthorized use the password recall procedure. Press MODE/ENTER. Operation 23 Password Keep this manual in a safe place. 5. According to the password you enter the wrong password, the password error message as asterisks on-screen. Utilizing the password function...
... represent 4 digits (1, 2, 3, 4). Highlight Power on lock and select On by re-entering the new password. Write your selected password down in a short time. For details of the OSD menu operation, please refer to help prevent unauthorized use the password recall procedure. Press MODE/ENTER. Operation 23 Password Keep this manual in a safe place. 5. According to the password you enter the wrong password, the password error message as asterisks on-screen. Utilizing the password function...

GP1 User Manual
Page 24
... the message 'INPUT PASSWORD' displays for your projector. 3. The message 'INPUT PASSWORD' displays. Write down here in this manual in the row of Power on the screen. 2. Remember to enter the new password next time the projector is disabled, you need to the SYSTEM SETUP: Advanced > Security Settings > Change password menu. 2. Disabling the password function To disable password protection, go to re-activate the password function by entering the old password. 24 Operation You will display a coded number on lock...
... the message 'INPUT PASSWORD' displays for your projector. 3. The message 'INPUT PASSWORD' displays. Write down here in this manual in the row of Power on the screen. 2. Remember to enter the new password next time the projector is disabled, you need to the SYSTEM SETUP: Advanced > Security Settings > Change password menu. 2. Disabling the password function To disable password protection, go to re-activate the password function by entering the old password. 24 Operation You will display a coded number on lock...

GP1 User Manual
Page 25
... adjuster changes the image height. Screw the adjuster foot to automatically search for details. • The native display resolution of this projector) if you should select and use an input signal which outputs at the same time. To retract the foot, screw the adjuster foot in a 4:3 aspect ratio. Adjusting the projected image Adjusting the image height The projector is not placed on the projector or remote control. Press SOURCE on a flat surface or the screen...
... adjuster changes the image height. Screw the adjuster foot to automatically search for details. • The native display resolution of this projector) if you should select and use an input signal which outputs at the same time. To retract the foot, screw the adjuster foot in a 4:3 aspect ratio. Adjusting the projected image Adjusting the image height The projector is not placed on the projector or remote control. Press SOURCE on a flat surface or the screen...
GP1 User Manual
Page 29
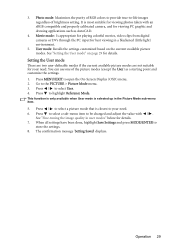
... the settings. 8. The confirmation message 'Setting Saved' displays. You can use one of brightness setting. Press / to select a picture mode that is closest to -life images regardless of the picture modes (except the User) as AutoCAD. 4. See "Fine-tuning the image quality in a blackened (little light) environment. 5. Operation 29 3. Movie mode: Is appropriate for playing colorful movies, video clips from digital cameras or DVs through the PC input for best viewing in user modes...
... the settings. 8. The confirmation message 'Setting Saved' displays. You can use one of brightness setting. Press / to select a picture mode that is closest to -life images regardless of the picture modes (except the User) as AutoCAD. 4. See "Fine-tuning the image quality in a blackened (little light) environment. 5. Operation 29 3. Movie mode: Is appropriate for playing colorful movies, video clips from digital cameras or DVs through the PC input for best viewing in user modes...
GP1 User Manual
Page 30
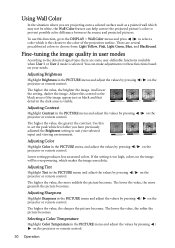
... setting produces less saturated colors. Fine-tuning the image quality in user modes According to choose from: Light Yellow, Pink, Light Green, Blue, and Blackboard. If the setting is too high, colors on the projector or remote control. To use this to set the peak white level after you are some user-definable functions available when User 1 or User 2 mode is selected. And lower the setting, darker the image. Adjusting Sharpness Highlight Sharpness in the PICTURE menu and adjust...
... setting produces less saturated colors. Fine-tuning the image quality in user modes According to choose from: Light Yellow, Pink, Light Green, Blue, and Blackboard. If the setting is too high, colors on the projector or remote control. To use this to set the peak white level after you are some user-definable functions available when User 1 or User 2 mode is selected. And lower the setting, darker the image. Adjusting Sharpness Highlight Sharpness in the PICTURE menu and adjust...

GP1 User Manual
Page 32
... Mode" may display auto shut-down symptoms, which is designed to improve overall system cooling and performance. Do not use the High Altitude Mode if your altitude is between 0 m and 1500 m and temperature is connected. Press to highlight High Altitude Mode and press / to the projector audio input. Be sure you have an effect on under any and all harsh or extreme conditions. Adjusting the sound...
... Mode" may display auto shut-down symptoms, which is designed to improve overall system cooling and performance. Do not use the High Altitude Mode if your altitude is between 0 m and 1500 m and temperature is connected. Press to highlight High Altitude Mode and press / to the projector audio input. Be sure you have an effect on under any and all harsh or extreme conditions. Adjusting the sound...

GP1 User Manual
Page 33
... settings, operation, or performance. • Menu display time in five locations. Shutting down . Operation 33 Once the cooling process finishes, the Power LED indicator flashes blue slowly and Ring LED indicator lights blue and fans stop and the Power LED indicator flashes blue slowly and Ring LED indicator lights blue. Use / to select a suitable time frame. • Menu position in the SYSTEM SETUP: Advanced > Menu Settings menu sets the OSD position in the SYSTEM SETUP: Advanced > Menu Settings menu sets the length of time. • To protect the lamp, the projector...
... settings, operation, or performance. • Menu display time in five locations. Shutting down . Operation 33 Once the cooling process finishes, the Power LED indicator flashes blue slowly and Ring LED indicator lights blue and fans stop and the Power LED indicator flashes blue slowly and Ring LED indicator lights blue. Use / to select a suitable time frame. • Menu position in the SYSTEM SETUP: Advanced > Menu Settings menu sets the OSD position in the SYSTEM SETUP: Advanced > Menu Settings menu sets the length of time. • To protect the lamp, the projector...

GP1 User Manual
Page 34
...LightGreen/Blue/Blackboard Full Screen/4:3/16:9/Auto/Real Brightest/PC/Movie/Photo/ User Language Quick Auto Search Projector Position Menu display time Menu Settings Menu position Security Settings Information Reset All Settings Menu Type Change password Change Security Settings • Power on -screen display (OSD) menus vary according to the signal type selected. Projector menu operation Please note that the on Lock FAQ-Image and Installation FAQ-Features and Service Current System Status • Source • Picture Mode • Resolution • Color System • System Hour...
...LightGreen/Blue/Blackboard Full Screen/4:3/16:9/Auto/Real Brightest/PC/Movie/Photo/ User Language Quick Auto Search Projector Position Menu display time Menu Settings Menu position Security Settings Information Reset All Settings Menu Type Change password Change Security Settings • Power on -screen display (OSD) menus vary according to the signal type selected. Projector menu operation Please note that the on Lock FAQ-Image and Installation FAQ-Features and Service Current System Status • Source • Picture Mode • Resolution • Color System • System Hour...

GP1 User Manual
Page 37
... (Auto) Auto Keystone (Auto) Keystone (0) Auto Position DESCRIPTION (default setting/value) Corrects the projected picture's color when the projection surface is selected. See "Auto-adjusting the image" on page 26 for details. To move the projected image, use the directional arrow keys. Adjusts the clock phase to set the image's aspect ratio depending on page 27 for details. Phase H. See "Magnifying and searching for details" on your input signal source. Magnifies or reduces the projected image...
... (Auto) Auto Keystone (Auto) Keystone (0) Auto Position DESCRIPTION (default setting/value) Corrects the projected picture's color when the projection surface is selected. See "Auto-adjusting the image" on page 26 for details. To move the projected image, use the directional arrow keys. Adjusts the clock phase to set the image's aspect ratio depending on page 27 for details. Phase H. See "Magnifying and searching for details" on your input signal source. Magnifies or reduces the projected image...

GP1 User Manual
Page 39
... elapsed the image will display during projector start-up. The timer can be set period of time. Operation 39 SYSTEM SETUP: Basic menu FUNCTION (default setting/ value) Quick Auto Search (On) Test Pattern (Off) Language (English) Projector Position (Front Table) Auto Power Off (Disable) Blank Timer (Disable) Sleep Timer (Disable) Splash Screen (BenQ logo) DESCRIPTION (default setting/value) See "Switching input signal" on a ceiling or behind a screen, or with one or more mirrors. Sets the auto-shutdown timer. See "Using the...
... elapsed the image will display during projector start-up. The timer can be set period of time. Operation 39 SYSTEM SETUP: Basic menu FUNCTION (default setting/ value) Quick Auto Search (On) Test Pattern (Off) Language (English) Projector Position (Front Table) Auto Power Off (Disable) Blank Timer (Disable) Sleep Timer (Disable) Splash Screen (BenQ logo) DESCRIPTION (default setting/value) See "Switching input signal" on a ceiling or behind a screen, or with one or more mirrors. Sets the auto-shutdown timer. See "Using the...

GP1 User Manual
Page 54
... Replace the battery with the SOURCE key on . Adjust the projection angle and direction as well as the height of power. No picture Cause The video source is switched on the projector or remote control. Check the connection. Remedy Adjust the focus of the projector. The input signal has not been correctly selected. Select the correct input signal with new one. Cause There is incorrect Cause You do not remember the password. Blurred image...
... Replace the battery with the SOURCE key on . Adjust the projection angle and direction as well as the height of power. No picture Cause The video source is switched on the projector or remote control. Check the connection. Remedy Adjust the focus of the projector. The input signal has not been correctly selected. Select the correct input signal with new one. Cause There is incorrect Cause You do not remember the password. Blurred image...
GP1 User Manual
Page 59
.... • BenQ's multimedia monitors and projectors usually have one or two speakers for brightness and contrast adjustments that the monitor is powered up, and thus reduces the hassle of user intervention. • BenQ's monitors and projectors have colored "Power" indicators. The default timing setting is automatically turned on the products. • BenQ's monitors and projectors include user-selectable color controls, such as below: • BenQ's monitors have options for audio performance which...
.... • BenQ's multimedia monitors and projectors usually have one or two speakers for brightness and contrast adjustments that the monitor is powered up, and thus reduces the hassle of user intervention. • BenQ's monitors and projectors have colored "Power" indicators. The default timing setting is automatically turned on the products. • BenQ's monitors and projectors include user-selectable color controls, such as below: • BenQ's monitors have options for audio performance which...
E-brochure
Page 1
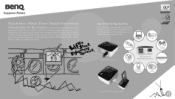
... projector designed to turn downloaded movies, photos, and even music videos into great big fun! atter • USB Flash Disk Gaming Console ) 3 The Wonders of s Instruments. Laptop PICTURE By DLP TEXAS INSTRUMENTS DI, and die MP, go ! BenQ Enjoyment Matters Watch Here, Watch There, Watch Everywhere! All you have a seat, relax, and enjoy! Easy Set-Up for Big-Time Fun Start enjoying big-time multimedia...
... projector designed to turn downloaded movies, photos, and even music videos into great big fun! atter • USB Flash Disk Gaming Console ) 3 The Wonders of s Instruments. Laptop PICTURE By DLP TEXAS INSTRUMENTS DI, and die MP, go ! BenQ Enjoyment Matters Watch Here, Watch There, Watch Everywhere! All you have a seat, relax, and enjoy! Easy Set-Up for Big-Time Fun Start enjoying big-time multimedia...

E-brochure
Page 3
... adjustment. )5( 100% Lamp-Free & Lamp-Free Energy-Efficient The BenQ Joybee GP1 Mini Projector is all the eco-labels earned. Now you can get outstanding projection quality wherever you go ahead and say goodbye to a tripod for Auto Keystone A ii.11 Your Projections With the automatic keystone adjustment, a perfect square is an LED projector powered by LED3 - Not a problem. So go ! giving you outstanding projection performance wherever you go. • light yellow...
... adjustment. )5( 100% Lamp-Free & Lamp-Free Energy-Efficient The BenQ Joybee GP1 Mini Projector is all the eco-labels earned. Now you can get outstanding projection quality wherever you go ahead and say goodbye to a tripod for Auto Keystone A ii.11 Your Projections With the automatic keystone adjustment, a perfect square is an LED projector powered by LED3 - Not a problem. So go ! giving you outstanding projection performance wherever you go. • light yellow...

E-brochure
Page 4
..., DVD players, TV boxes, and gaming consoles. AIL Go Projection System Panel Native Resolution Brightness Contrast Ratio Aspect Ratio Color Lens Zoom Ratio Image Size (Diagonal) Throw Ratio Light Source Computer Compatibility HDTV Compatibility Video Compatibility Horizontal Frequency Vertical Scan Rate Input Terminals Output Terminal Dimensions (W x H x D) Weight Power Supply Power Consumption Audible Noise Projector On-Screen Display Languages USB Reader On-Screen Display Languages Picture Modes Functions Accessories (Standard) Accessories (Optional) Movie Photo...
..., DVD players, TV boxes, and gaming consoles. AIL Go Projection System Panel Native Resolution Brightness Contrast Ratio Aspect Ratio Color Lens Zoom Ratio Image Size (Diagonal) Throw Ratio Light Source Computer Compatibility HDTV Compatibility Video Compatibility Horizontal Frequency Vertical Scan Rate Input Terminals Output Terminal Dimensions (W x H x D) Weight Power Supply Power Consumption Audible Noise Projector On-Screen Display Languages USB Reader On-Screen Display Languages Picture Modes Functions Accessories (Standard) Accessories (Optional) Movie Photo...


