Quick Start Guide
Page 11
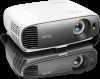
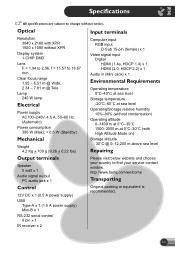
... 0-1499 m at 0°C-35°C 1500-3000 m at 0°C-30°C (with XPR 1920 x 1080 without notice. http://www.benq.com/welcome Transporting Original packing or equivalent is recommended. 11 (EN) Specifications All specifications are subject to find your country to change without XPR ...1-CHIP DMD Lens F = 1.94 to 2.06, f = 15.57 to 18.67 mm Clear focus range 1.95 - 6.51 m @ Wide, 2.34 - 7.81 m @ Tele Lamp 240 W lamp Electrical Power supply AC100-240V, 4.5 A, 50-60 Hz (Automatic) Power consumption 385 W (Max); < 0.5 W (Standby) Mechanical Weight 4.2 Kg + 100 g (9.26 + 0.22 lbs)...
... 0-1499 m at 0°C-35°C 1500-3000 m at 0°C-30°C (with XPR 1920 x 1080 without notice. http://www.benq.com/welcome Transporting Original packing or equivalent is recommended. 11 (EN) Specifications All specifications are subject to find your country to change without XPR ...1-CHIP DMD Lens F = 1.94 to 2.06, f = 15.57 to 18.67 mm Clear focus range 1.95 - 6.51 m @ Wide, 2.34 - 7.81 m @ Tele Lamp 240 W lamp Electrical Power supply AC100-240V, 4.5 A, 50-60 Hz (Automatic) Power consumption 385 W (Max); < 0.5 W (Standby) Mechanical Weight 4.2 Kg + 100 g (9.26 + 0.22 lbs)...
User Manual
Page 3
... menu ...28 INSTALLATION menu ...29 SYSTEM SETUP: BASIC menu ...30 SYSTEM SETUP: ADVANCED menu 32 INFORMATION menu ...33 Maintenance ...34 Care of the projector ...34 Lamp information ...34 Troubleshooting ...40 Specifications ...41 Projector specifications ...41 Dimensions ...42 Timing chart...43 Table of Contents 3
... menu ...28 INSTALLATION menu ...29 SYSTEM SETUP: BASIC menu ...30 SYSTEM SETUP: ADVANCED menu 32 INFORMATION menu ...33 Maintenance ...34 Care of the projector ...34 Lamp information ...34 Troubleshooting ...40 Specifications ...41 Projector specifications ...41 Dimensions ...42 Timing chart...43 Table of Contents 3

User Manual
Page 4
...approximately 45 minutes prior to ensure safe use the blank function. 4. Do not block the projection lens with any ) when the projector lamp is under operation as this manual before you connect your projector through a power stabilizer, surge protector or uninterruptible power supply (UPS). 3.... cause a fire. To temporarily turn off the lamp, use of lamps beyond the rated lamp life. Allow the projector to cool for safety of ±10 volts occur. The lamp becomes extremely hot during operation. However, to removing the lamp assembly for future reference. 2. In areas where...
...approximately 45 minutes prior to ensure safe use the blank function. 4. Do not block the projection lens with any ) when the projector lamp is under operation as this manual before you connect your projector through a power stabilizer, surge protector or uninterruptible power supply (UPS). 3.... cause a fire. To temporarily turn off the lamp, use of lamps beyond the rated lamp life. Allow the projector to cool for safety of ±10 volts occur. The lamp becomes extremely hot during operation. However, to removing the lamp assembly for future reference. 2. In areas where...
User Manual
Page 5
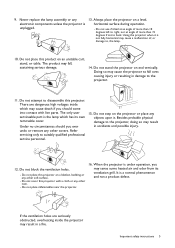
... projector with live parts. Doing so may cause the projector to fall , sustaining serious damage. 14. Do not attempt to , the lamp. 10. The only user serviceable part is the lamp which may result in a fire. Besides probable physical damage to the projector. 11. Do not block the ventilation holes. - Using the... if you should you may sense some heated air and odor from its own removable cover. When the projector is unplugged. 13. Never replace the lamp assembly or any objects upon it is a normal phenomenon and not a product defect.
... projector with live parts. Doing so may cause the projector to fall , sustaining serious damage. 14. Do not attempt to , the lamp. 10. The only user serviceable part is the lamp which may result in a fire. Besides probable physical damage to the projector. 11. Do not block the ventilation holes. - Using the... if you should you may sense some heated air and odor from its own removable cover. When the projector is unplugged. 13. Never replace the lamp assembly or any objects upon it is a normal phenomenon and not a product defect.
User Manual
Page 6
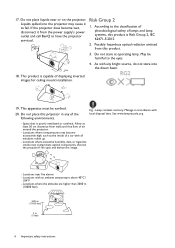
... (10000 feet) 0 m (0 feet) 6 Important safety instructions Possibly hazardous optical radiation emitted from the power supply's power outlet and call BenQ to the classification of photobiological safety of a car with any of displaying inverted images for ceiling mount installation. 19. See www.lamprecycle.org... laws. 17. Do not place liquids near fire alarms - If the projector does become excessively high, such as the inside of lamps and lamp systems, this product. 3. May be earthed. 20. This product is poorly ventilated or confined. Do not place this projector in ...
... (10000 feet) 0 m (0 feet) 6 Important safety instructions Possibly hazardous optical radiation emitted from the power supply's power outlet and call BenQ to the classification of photobiological safety of a car with any of displaying inverted images for ceiling mount installation. 19. See www.lamprecycle.org... laws. 17. Do not place liquids near fire alarms - If the projector does become excessively high, such as the inside of lamps and lamp systems, this product. 3. May be earthed. 20. This product is poorly ventilated or confined. Do not place this projector in ...
User Manual
Page 7
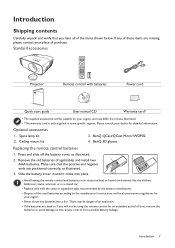
Spare lamp kit 3. Press and slide off the battery cover, as illustrated. 3. BenQ QCast/QCast Mirror/WDP02 2. Slide the battery cover in until it clicks into a fire. Please consult your dealer for your region. • Never throw the ... dead or if you have all of time, remove the batteries to avoid damage to the manufacturer's instructions and local environment regulations for detailed information. BenQ 3D glasses Replacing the remote control batteries 1. Introduction 7
Spare lamp kit 3. Press and slide off the battery cover, as illustrated. 3. BenQ QCast/QCast Mirror/WDP02 2. Slide the battery cover in until it clicks into a fire. Please consult your dealer for your region. • Never throw the ... dead or if you have all of time, remove the batteries to avoid damage to the manufacturer's instructions and local environment regulations for detailed information. BenQ 3D glasses Replacing the remote control batteries 1. Introduction 7
User Manual
Page 8
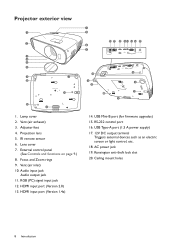
... on page 9.) 8. USB Type-A port (1.5 A power supply) 17. 12V DC output terminal Triggers external devices such as an electric screen or light control, etc. 18. Lamp cover 2. Audio input jack Audio output jack 11. Lens cover 7. Vent (air inlet) 10. Projector exterior view 1 2 3 4 5 6 3 3 20 20 20 3 1. Adjuster feet 4. HDMI input port...
... on page 9.) 8. USB Type-A port (1.5 A power supply) 17. 12V DC output terminal Triggers external devices such as an electric screen or light control, etc. 18. Lamp cover 2. Audio input jack Audio output jack 11. Lens cover 7. Vent (air inlet) 10. Projector exterior view 1 2 3 4 5 6 3 3 20 20 20 3 1. Adjuster feet 4. HDMI input port...
User Manual
Page 9
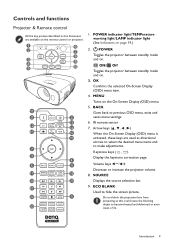
... keys / Decrease or increase the projector volume. 8. ECO BLANK Used to previous OSD menu, exits and saves menu settings. 6. POWER indicator light/TEMPerature warning light/LAMP indicator light (See Indicators on the On-Screen Display (OSD) menu. 5.
... keys / Decrease or increase the projector volume. 8. ECO BLANK Used to previous OSD menu, exits and saves menu settings. 6. POWER indicator light/TEMPerature warning light/LAMP indicator light (See Indicators on the On-Screen Display (OSD) menu. 5.
User Manual
Page 10
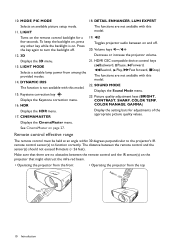
..., press any other key while the backlight is not available with this model. LIGHT MODE ( Backward, Pause, Forward, Rewind, Play, Fast forward, Stop) Selects a suitable lamp power from the top Approx. +30º Approx. +30º 10 Introduction HDR COLOR MANAGE, GAMMA) Displays the HDR menu. 17. Displays the CinemaMaster menu...
..., press any other key while the backlight is not available with this model. LIGHT MODE ( Backward, Pause, Forward, Rewind, Play, Fast forward, Stop) Selects a suitable lamp power from the top Approx. +30º Approx. +30º 10 Introduction HDR COLOR MANAGE, GAMMA) Displays the HDR menu. 17. Displays the CinemaMaster menu...
User Manual
Page 14
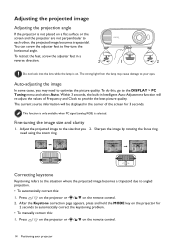
Do not look into the lens while the lamp is selected. This function is only available when PC signal (analog RGB) is on. Press / on the projector or / / on the remote control. 14 Positioning ... size that you 2. After the Keystone correction page appears, press and hold the MODE key on the projector for 3 seconds. The strong light from the lamp may need using the zoom ring. Sharpen the image by rotating the focus ring. Press / on the projector or / / on the remote control. 2. The current...
Do not look into the lens while the lamp is selected. This function is only available when PC signal (analog RGB) is on. Press / on the projector or / / on the remote control. 14 Positioning ... size that you 2. After the Keystone correction page appears, press and hold the MODE key on the projector for 3 seconds. The strong light from the lamp may need using the zoom ring. Sharpen the image by rotating the focus ring. Press / on the projector or / / on the remote control. 2. The current...
User Manual
Page 19
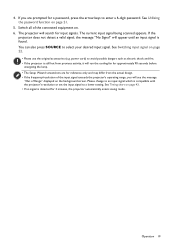
... found. If the projector does not detect a valid signal, the message "No Signal" will run the cooling fan for approximately 90 seconds before energizing the lamp. • The Setup Wizard screenshots are prompted for input signals. Switch all of Range" displayed on page 43. • If no signal is detected for...
... found. If the projector does not detect a valid signal, the message "No Signal" will run the cooling fan for approximately 90 seconds before energizing the lamp. • The Setup Wizard screenshots are prompted for input signals. Switch all of Range" displayed on page 43. • If no signal is detected for...
User Manual
Page 23
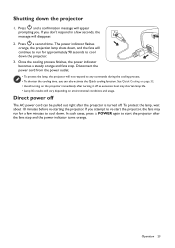
...don't respond in a few minutes to re-start the projector after the fans stop . Operation 23 The power indicator flashes orange, the projection lamp shuts down, and the fans will vary depending on environmental conditions and usage. Press a second time. See Quick Cooling on page 32. •... a few seconds, the message will disappear. 2. In such cases, press POWER again to start the projector, the fans may shorten lamp life. • Lamp life results will continue to run for approximately 90 seconds to any commands during the cooling process. • To shorten the cooling time...
...don't respond in a few minutes to re-start the projector after the fans stop . Operation 23 The power indicator flashes orange, the projection lamp shuts down, and the fans will vary depending on environmental conditions and usage. Press a second time. See Quick Cooling on page 32. •... a few seconds, the message will disappear. 2. In such cases, press POWER again to start the projector, the fans may shorten lamp life. • Lamp life results will continue to run for approximately 90 seconds to any commands during the cooling process. • To shorten the cooling time...
User Manual
Page 26
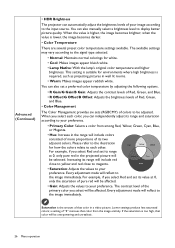
... each color, you select will reflect to your preference. Please refer to the illustration for white. • Cool: Makes images appear bluish white. • Lamp Native: With the lamp's original color temperature and higher brightness. If the saturation is required, such as projecting pictures in a video picture. Advanced (Continued) • HDR Brightness...
... each color, you select will reflect to your preference. Please refer to the illustration for white. • Cool: Makes images appear bluish white. • Lamp Native: With the lamp's original color temperature and higher brightness. If the saturation is required, such as projecting pictures in a video picture. Advanced (Continued) • HDR Brightness...
User Manual
Page 27
...Reduces electrical image noise caused by a device. When Off is selected, the Color Temperature function is not available. • Light Mode: Selects a suitable lamp power from the light of the projection beam, portraying every skin tone in its most suitable color gamut to the range of skin tones from... among the provided modes. See Extending lamp life on page 35. The current picture mode returns to define difference levels of hue only for the selected Picture Mode (including preset ...
...Reduces electrical image noise caused by a device. When Off is selected, the Color Temperature function is not available. • Light Mode: Selects a suitable lamp power from the light of the projection beam, portraying every skin tone in its most suitable color gamut to the range of skin tones from... among the provided modes. See Extending lamp life on page 35. The current picture mode returns to define difference levels of hue only for the selected Picture Mode (including preset ...
User Manual
Page 30
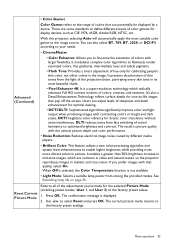
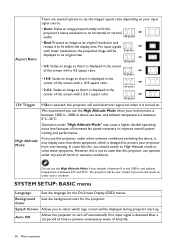
... symptoms. However, this projector can operate under such a condition. Aspect Ratio There are several options to set period of time to prevent unnecessary waste of lamp life. 30 Menu operation
... symptoms. However, this projector can operate under such a condition. Aspect Ratio There are several options to set period of time to prevent unnecessary waste of lamp life. 30 Menu operation
User Manual
Page 32
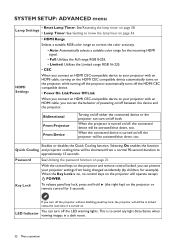
SYSTEM SETUP: ADVANCED menu • Reset Lamp Timer: See Resetting the lamp timer on page 21. Enables or disables the Quick Cooling function. With the control keys on the projector and remote control locked, you can set ... (the right key) on /off the LED warning lights. If you connect an HDMI CEC-compatible device to approximately 15 seconds. Lamp Settings • Lamp Timer: See Getting to know the lamp hour on . When the projector is turned on page 34. • HDMI Range Selects a suitable RGB color range to correct the...
SYSTEM SETUP: ADVANCED menu • Reset Lamp Timer: See Resetting the lamp timer on page 21. Enables or disables the Quick Cooling function. With the control keys on the projector and remote control locked, you can set ... (the right key) on /off the LED warning lights. If you connect an HDMI CEC-compatible device to approximately 15 seconds. Lamp Settings • Lamp Timer: See Getting to know the lamp hour on . When the projector is turned on page 34. • HDMI Range Selects a suitable RGB color range to correct the...
User Manual
Page 33
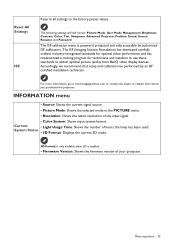
...be performed by authorized ISF calibrators. Reset All Settings ISF Returns all settings to www.imagingscience.com or contact the dealer or retailer from BenQ video display devices. The ISF calibration menu is enabled. • Firmware Version: Shows the firmware version of your projector. INFORMATION menu...source. • Picture Mode: Shows the selected mode in the PICTURE menu. • Resolution: Shows the native resolution of hours the lamp has been used. System Status • 3D Format: Displays the current 3D mode. 3D Format is only available when 3D is password ...
...be performed by authorized ISF calibrators. Reset All Settings ISF Returns all settings to www.imagingscience.com or contact the dealer or retailer from BenQ video display devices. The ISF calibration menu is enabled. • Firmware Version: Shows the firmware version of your projector. INFORMATION menu...source. • Picture Mode: Shows the selected mode in the PICTURE menu. • Resolution: Shows the native resolution of hours the lamp has been used. System Status • 3D Format: Displays the current 3D mode. 3D Format is only available when 3D is password ...
User Manual
Page 34
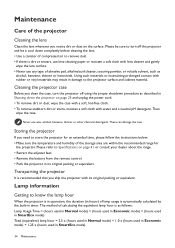
...rubber or vinyl materials may result in timer. These can damage the case. Please refer to know the lamp hour When the projector is in operation, the duration (in hours) of lamp usage is dirt or smears, use lens-cleaning paper or moisten a soft cloth with water and a neutral... gently wipe the lens surface. • Never use wax, alcohol, benzene, thinner or other chemical detergents. The method of calculating the equivalent lamp hour is recommended that you clean the case, turn off using the proper shutdown procedure as described in Shutting down completely before cleaning the lens...
...rubber or vinyl materials may result in timer. These can damage the case. Please refer to know the lamp hour When the projector is in operation, the duration (in hours) of lamp usage is dirt or smears, use lens-cleaning paper or moisten a soft cloth with water and a neutral... gently wipe the lens surface. • Never use wax, alcohol, benzene, thinner or other chemical detergents. The method of calculating the equivalent lamp hour is recommended that you clean the case, turn off using the proper shutdown procedure as described in Shutting down completely before cleaning the lens...
User Manual
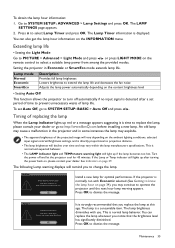
Page 35
... significantly diminished. Setting the projector in some instances the lamp may vary within the lamp manufacturers specifications. See Indicators on the INFORMATION menu. Notice Replace Lamp Soon Lamp hour > XXXX Hours Order a new lamp at www.BenQ.com Install a new lamp for 45 minutes. You can replace the lamp whenever you notice that you to SYSTEM SETUP: BASIC...
... significantly diminished. Setting the projector in some instances the lamp may vary within the lamp manufacturers specifications. See Indicators on the INFORMATION menu. Notice Replace Lamp Soon Lamp hour > XXXX Hours Order a new lamp at www.BenQ.com Install a new lamp for 45 minutes. You can replace the lamp whenever you notice that you to SYSTEM SETUP: BASIC...

User Manual
Page 36
... power off and disconnect the power cord before changing the lamp. • To reduce the risk of the projector until the lamp has cooled. 2. We recommend that you purchase a qualified projector lamp for at www.BenQ.com The lamp MUST be replaced before replacing the lamp. • To reduce the risk of electrical shock, always turn...
... power off and disconnect the power cord before changing the lamp. • To reduce the risk of the projector until the lamp has cooled. 2. We recommend that you purchase a qualified projector lamp for at www.BenQ.com The lamp MUST be replaced before replacing the lamp. • To reduce the risk of electrical shock, always turn...

