
User Manual
Page 2
... the projector 20 Using a security cable lock 20 Utilizing the password function 20 Selecting an input source 23 Renaming an input source 23 Adjusting the projected image 24 Adjusting the projection angle 24 Auto-adjusting the image 24 Fine-tuning the image size and clarity ..... 24 Correcting keystone 25 Menu Functions 26 About the OSD Menus 26 2 Table of replacing the lamp 49 Replacing the lamp 50 Indicators 52 Troubleshooting 54 Specifications 55 Projector specifications 55 Dimensions 56 Ceiling mount installation 56 Timing chart...
... the projector 20 Using a security cable lock 20 Utilizing the password function 20 Selecting an input source 23 Renaming an input source 23 Adjusting the projected image 24 Adjusting the projection angle 24 Auto-adjusting the image 24 Fine-tuning the image size and clarity ..... 24 Correcting keystone 25 Menu Functions 26 About the OSD Menus 26 2 Table of replacing the lamp 49 Replacing the lamp 50 Indicators 52 Troubleshooting 54 Specifications 55 Projector specifications 55 Dimensions 56 Ceiling mount installation 56 Timing chart...
User Manual
Page 5
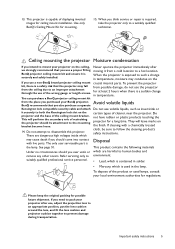
... high voltages inside which is a sudden change securely and safely installed. Please keep the original packing for at least 2 hours when there is used lamps, consult your projector after we strongly recommend that the projector may fall from possible damage, do not use the projector from the ceiling due to an improper attachment through the use of displaying inverted images for regulations. If you think service or repair...
... high voltages inside which is a sudden change securely and safely installed. Please keep the original packing for at least 2 hours when there is used lamps, consult your projector after we strongly recommend that the projector may fall from possible damage, do not use the projector from the ceiling due to an improper attachment through the use of displaying inverted images for regulations. If you think service or repair...
User Manual
Page 8
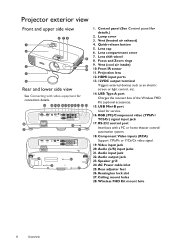
... such as an electric screen or light control, etc. 14. RGB (PC)/Component video (YPbPr/ YCbCr) signal input jack 17. Audio output jack 23. Kensington lock slot 27. Lamp cover 3. Vent (cool air intake) 10. Component Video inputs (RCA) Support Y/PB/PR or Y/CB/CR video signal. 19. AC Power cable inlet 25. Ceiling mount holes 28. Wireless FHD Kit mount hole 8 Overview Control panel (See Control panel for service. 16. Quick-release button 5. USB Type-A port Charges the receiver...
... such as an electric screen or light control, etc. 14. RGB (PC)/Component video (YPbPr/ YCbCr) signal input jack 17. Audio output jack 23. Kensington lock slot 27. Lamp cover 3. Vent (cool air intake) 10. Component Video inputs (RCA) Support Y/PB/PR or Y/CB/CR video signal. 19. AC Power cable inlet 25. Ceiling mount holes 28. Wireless FHD Kit mount hole 8 Overview Control panel (See Control panel for service. 16. Quick-release button 5. USB Type-A port Charges the receiver...
User Manual
Page 9
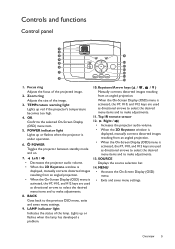
... the projector's temperature becomes too high. 4. Manually corrects distorted images resulting 2. Adjusts the size of the projected image. Top IR remote sensor 12. BACK Goes back to make adjustments. 8. Overview 9 Zoom ring from an angled projection. SOURCE • Decreases the projector audio volume. Focus ring 10. Keystone/Arrow keys ( / , / ) Adjusts the focus of the image. 3. Controls and functions Control panel 1 2 3 9 4 5 10 6 11 1122 7 10 13 8 14 1. Displays the source selection bar. • When the 2D Keystone window is...
... the projector's temperature becomes too high. 4. Manually corrects distorted images resulting 2. Adjusts the size of the projected image. Top IR remote sensor 12. BACK Goes back to make adjustments. 8. Overview 9 Zoom ring from an angled projection. SOURCE • Decreases the projector audio volume. Focus ring 10. Keystone/Arrow keys ( / , / ) Adjusts the focus of the image. 3. Controls and functions Control panel 1 2 3 9 4 5 10 6 11 1122 7 10 13 8 14 1. Displays the source selection bar. • When the 2D Keystone window is...
User Manual
Page 12
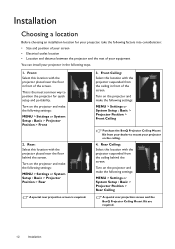
... settings: MENU > Settings or System Setup : Basic > Projector Position > Rear Ceiling A special rear projection screen and the BenQ Projector Ceiling Mount Kit are required. 12 Installation Turn on the projector and make the following settings: MENU > Settings or System Setup : Basic > Projector Position > Rear A special rear projection screen is the most common way to mount your screen • Electrical outlet location • Location and distance between the projector and the rest of the screen. Rear Ceiling: Select this location with the projector...
... settings: MENU > Settings or System Setup : Basic > Projector Position > Rear Ceiling A special rear projection screen and the BenQ Projector Ceiling Mount Kit are required. 12 Installation Turn on the projector and make the following settings: MENU > Settings or System Setup : Basic > Projector Position > Rear A special rear projection screen is the most common way to mount your screen • Electrical outlet location • Location and distance between the projector and the rest of the screen. Rear Ceiling: Select this location with the projector...
User Manual
Page 18
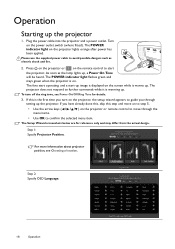
... design. Press on the projector or on the remote control to move on to step 5. • Use the arrow keys ( / / / ) on the projector or remote control to start -up image is warming up. Turn on . The POWER indicator light on the screen while it is displayed on the projector lights orange after power has been applied. As soon as electric shock and fire. 2. The fans start operating, and a start the projector. Step 1: Specify Projector Position.
... design. Press on the projector or on the remote control to move on to step 5. • Use the arrow keys ( / / / ) on the projector or remote control to start -up image is warming up. Turn on . The POWER indicator light on the screen while it is displayed on the projector lights orange after power has been applied. As soon as electric shock and fire. 2. The fans start operating, and a start the projector. Step 1: Specify Projector Position.
User Manual
Page 19
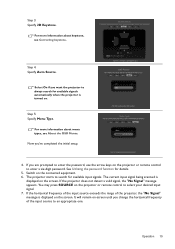
... Signal" message appears. Operation 19 Switch on the projector or remote control to enter a six-digit password. The current input signal being scanned is turned on -screen until you want the projector to an appropriate one. Step 5: Specify Menu Type. See Utilizing the password function for available input signals. It will remain on . For more information about menu types, see Correcting keystone. If you 've completed the initial setup. 4. Step 4: Specify Auto Source...
... Signal" message appears. Operation 19 Switch on the projector or remote control to enter a six-digit password. The current input signal being scanned is turned on -screen until you want the projector to an appropriate one. Step 5: Specify Menu Type. See Utilizing the password function for available input signals. It will remain on . For more information about menu types, see Correcting keystone. If you 've completed the initial setup. 4. Step 4: Specify Auto Source...
User Manual
Page 20
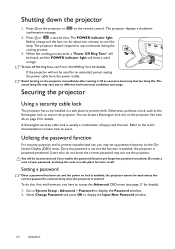
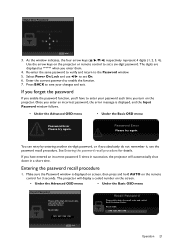
... set up password security via the OnScreen Display (OSD) menu. You can locate a Kensington lock slot on the projector or confirmation message. Press on the projector. Select Change Password and press OK to cool the lamp. Setting a password Once a password has been set and the function is enabled, the projector is enabled, the projector cannot be heard, and the POWER indicator light will be used for details). 1. Shutting down the projector 1. The POWER indicator light flashes orange and the fans...
... set up password security via the OnScreen Display (OSD) menu. You can locate a Kensington lock slot on the projector or confirmation message. Press on the projector. Select Change Password and press OK to cool the lamp. Setting a password Once a password has been set and the function is enabled, the projector is enabled, the projector cannot be heard, and the POWER indicator light will be used for details). 1. Shutting down the projector 1. The POWER indicator light flashes orange and the fans...
User Manual
Page 21
... screen. • Under the Advanced OSD menu • Under the Basic OSD menu Recall Password Please write down the recall code, and contact BenQ Customer Center. Entering the password recall procedure 1. The projector will automatically shut down in a short time. Use the arrow keys on the remote control for details. Re-enter the same password to verify and return to set On. 6. Select Power On Lock and use...
... screen. • Under the Advanced OSD menu • Under the Basic OSD menu Recall Password Please write down the recall code, and contact BenQ Customer Center. Entering the password recall procedure 1. The projector will automatically shut down in a short time. Use the arrow keys on the remote control for details. Re-enter the same password to verify and return to set On. 6. Select Power On Lock and use...

User Manual
Page 22
... down the number and turn on the projector or remote control to enter the password next time you turn on different models. You may be asked to enter the old password. • If the password is correct, the Input New Password window is displayed. • If the password is incorrect, the password error message is Off. Go to System Setup : Advanced > Password to decode the number. You have to set a new password. Select Power On Lock and use / to...
... down the number and turn on the projector or remote control to enter the password next time you turn on different models. You may be asked to enter the old password. • If the password is correct, the Input New Password window is displayed. • If the password is incorrect, the password error message is Off. Go to System Setup : Advanced > Password to decode the number. You have to set a new password. Select Power On Lock and use / to...
User Manual
Page 29
... the power is not white. See Choosing a location for more mirrors. Volume Mute Fast Mode 3D Mode 3D Sync Invert Settings • Wall Color • Projector Position Adjusts the volume level of the projector's internal speaker or the volume being output from these options: Light Yellow, Pink, Light Green, or Blue. The function is enabled: • The brightness level of the projected image decreases. • The Picture Mode cannot be adjusted. •...
... the power is not white. See Choosing a location for more mirrors. Volume Mute Fast Mode 3D Mode 3D Sync Invert Settings • Wall Color • Projector Position Adjusts the volume level of the projector's internal speaker or the volume being output from these options: Light Yellow, Pink, Light Green, or Blue. The function is enabled: • The brightness level of the projected image decreases. • The Picture Mode cannot be adjusted. •...

User Manual
Page 30
If the function is installed. When you adjust the image size and focus so as to check if the projected image is given only when certain input sources are in use. 30 Menu Functions Displays the following settings will still remain: Keystone, Rename User Mode, Language, Projector Position, Menu Type, Source Rename, Reset Lamp Timer, High Altitude Mode, Password, Key Lock, and ISF. Sets whether the projector searches automatically for the incoming HDMI signal. • Full: Utilizes the Full range RGB 0-255...
If the function is installed. When you adjust the image size and focus so as to check if the projected image is given only when certain input sources are in use. 30 Menu Functions Displays the following settings will still remain: Keystone, Rename User Mode, Language, Projector Position, Menu Type, Source Rename, Reset Lamp Timer, High Altitude Mode, Password, Key Lock, and ISF. Sets whether the projector searches automatically for the incoming HDMI signal. • Full: Utilizes the Full range RGB 0-255...

User Manual
Page 31
Basic OSD menu - Menu Wall Color Projector Position Test Pattern Auto Source Menu Type HDMI Range Reset Lamp Timer Reset All Settings Information Submenus and Descriptions Activate to check if the projected image is free of your projector. • Source: Displays the current signal source. • Picture Mode: Displays the current Picture Mode. • Resolution: Displays the native resolution of the input source. • Color System: Displays input system format. • Lamp Usage Time: Displays the number of hours the lamp has been used input source. See Choosing a location for ...
Basic OSD menu - Menu Wall Color Projector Position Test Pattern Auto Source Menu Type HDMI Range Reset Lamp Timer Reset All Settings Information Submenus and Descriptions Activate to check if the projected image is free of your projector. • Source: Displays the current signal source. • Picture Mode: Displays the current Picture Mode. • Resolution: Displays the native resolution of the input source. • Color System: Displays input system format. • Lamp Usage Time: Displays the number of hours the lamp has been used input source. See Choosing a location for ...

User Manual
Page 37
... Setting Light Mode for the selected Picture Mode (including preset modes, User 1, and User 2) return to reset other picture modes. Advanced... Press OK. Use / to the factory preset settings. 3. The lag between the signal input and output will be set to Auto, and Overscan Adjustment will be reduced and result in darker projected pictures. The confirmation message is selected, the light output will be minimized to 0 during operation. • Film Mode Enhances picture quality when projecting composite image...
... Setting Light Mode for the selected Picture Mode (including preset modes, User 1, and User 2) return to reset other picture modes. Advanced... Press OK. Use / to the factory preset settings. 3. The lag between the signal input and output will be set to Auto, and Overscan Adjustment will be reduced and result in darker projected pictures. The confirmation message is selected, the light output will be minimized to 0 during operation. • Film Mode Enhances picture quality when projecting composite image...

User Manual
Page 42
... you adjust the image size and focus so as "CC" in hours) of lamp usage which helps you can use the projector's remote control to control your area). Select a baud rate that is identical with your projector with a suitable RS-232 cable and update or download the projector's firmware. You can connect the projector with an HDMI cable, turning on the HDMI CEC compatible device automatically turns on the projector, while turning off the projector automatically turns off the HDMI...
... you adjust the image size and focus so as "CC" in hours) of lamp usage which helps you can use the projector's remote control to control your area). Select a baud rate that is identical with your projector with a suitable RS-232 cable and update or download the projector's firmware. You can connect the projector with an HDMI cable, turning on the HDMI CEC compatible device automatically turns on the projector, while turning off the projector automatically turns off the HDMI...

User Manual
Page 43
...: Keystone, Rename User Mode, Language, Projector Position, Menu Type, Source Rename, Reset Lamp Timer, High Altitude Mode, Password, Key Lock, and ISF. However, if the projector is not working properly, the LED indicators light or flash to remind you purchased the projector. Accordingly, we recommend that a problem may cause a higher decibel operating noise level because of the projector to obtain optimal picture quality from BenQ video display devices. For security purposes and to prevent unauthorized use of increased fan...
...: Keystone, Rename User Mode, Language, Projector Position, Menu Type, Source Rename, Reset Lamp Timer, High Altitude Mode, Password, Key Lock, and ISF. However, if the projector is not working properly, the LED indicators light or flash to remind you purchased the projector. Accordingly, we recommend that a problem may cause a higher decibel operating noise level because of the projector to obtain optimal picture quality from BenQ video display devices. For security purposes and to prevent unauthorized use of increased fan...
User Manual
Page 46
... System Setup : Basic Background Color Splash Screen Projector Position Auto Off Direct Power On Menu Settings Source Rename Auto Source Lamp Settings HDMI Settings Baud Rate Test Pattern System Setup : Advanced Closed Caption Quick Cooling High Altitude Mode Password Information Key Lock LED Indicator Reset All Settings ISF Source Picture Mode Resolution Color System Lamp Usage Time 3D Format Firmware Version Black/Blue/Purple BenQ/Black/Blue Front/Front Ceiling/Rear/Rear Ceiling Disable/5 min/10 min/15 min/20 min/25 min/ 30 min On/Off Menu...
... System Setup : Basic Background Color Splash Screen Projector Position Auto Off Direct Power On Menu Settings Source Rename Auto Source Lamp Settings HDMI Settings Baud Rate Test Pattern System Setup : Advanced Closed Caption Quick Cooling High Altitude Mode Password Information Key Lock LED Indicator Reset All Settings ISF Source Picture Mode Resolution Color System Lamp Usage Time 3D Format Firmware Version Black/Blue/Purple BenQ/Black/Blue Front/Front Ceiling/Rear/Rear Ceiling Disable/5 min/10 min/15 min/20 min/25 min/ 30 min On/Off Menu...

User Manual
Page 48
... to System Setup : Advanced > Lamp Settings. 2. Use to save your desired mode, and press OK to select Lamp Timer and press OK, the Lamp Timer information is displayed. 4. Setting Light Mode Setting the projector in SmartEco mode) To obtain the lamp hour information: 1. If the Economic or SmartEco mode is selected, the light output will be reduced and result in hours) of lamp usage is in operation, the duration (in darker projected pictures. 1. To access...
... to System Setup : Advanced > Lamp Settings. 2. Use to save your desired mode, and press OK to select Lamp Timer and press OK, the Lamp Timer information is displayed. 4. Setting Light Mode Setting the projector in SmartEco mode) To obtain the lamp hour information: 1. If the Economic or SmartEco mode is selected, the light output will be reduced and result in hours) of lamp usage is in operation, the duration (in darker projected pictures. 1. To access...

User Manual
Page 52
... desired speed) Fan 3 error (the actual fan speed is ±25% outside the desired speed) 52 Maintenance Do not reset if the lamp is displayed to notify that the lamp time has been reset to Settings > Reset Lamp Timer, and select Reset. A "Reset Successfully" message is not new or replaced as this could cause damage. Connect the power and restart the projector. 16. 15. Check the following information about the indicator lights. After the...
... desired speed) Fan 3 error (the actual fan speed is ±25% outside the desired speed) 52 Maintenance Do not reset if the lamp is displayed to notify that the lamp time has been reset to Settings > Reset Lamp Timer, and select Reset. A "Reset Successfully" message is not new or replaced as this could cause damage. Connect the power and restart the projector. 16. 15. Check the following information about the indicator lights. After the...

User Manual
Page 54
... not display correctly The settings in the 3D menu. Troubleshooting Problem Cause Remedy The projector does not turn the projector on . There is not correctly Adjust the focus of the batteries with the SOURCE key on the projector or remote control. Check the connection. The input source has not been correctly selected. The projection lens is no power from the projector. Adjust the projection angle and direction as well as the height of the projector. Remove...
... not display correctly The settings in the 3D menu. Troubleshooting Problem Cause Remedy The projector does not turn the projector on . There is not correctly Adjust the focus of the batteries with the SOURCE key on the projector or remote control. Check the connection. The input source has not been correctly selected. The projection lens is no power from the projector. Adjust the projection angle and direction as well as the height of the projector. Remove...


