
GW Series User Manual
Page 1
LCD Monitor User Manual GW2250 / GW2250M / GW2250HM GW2450 / GW2450M / GW2450HM GW2750HM
LCD Monitor User Manual GW2250 / GW2250M / GW2250HM GW2450 / GW2450M / GW2450HM GW2750HM

GW Series User Manual
Page 2
...over a radiator or heat source, or in a built-in the contents hereof without the prior written permission of BenQ Corporation. Clean the LCD monitor surface with respect to the contents hereof and specifically disclaims any warranties, merchantability or fitness for any particular purpose. Power... objects or spill liquid of any kind into any language or computer language, in any form or by BenQ Corporation. Care And Cleaning • Cleaning. Your monitor should be used. Please follow these safety instructions for best performance, and long life for servicing. 2 Servicing...
...over a radiator or heat source, or in a built-in the contents hereof without the prior written permission of BenQ Corporation. Clean the LCD monitor surface with respect to the contents hereof and specifically disclaims any warranties, merchantability or fitness for any particular purpose. Power... objects or spill liquid of any kind into any language or computer language, in any form or by BenQ Corporation. Care And Cleaning • Cleaning. Your monitor should be used. Please follow these safety instructions for best performance, and long life for servicing. 2 Servicing...

GW Series User Manual
Page 4
...Getting to know your monitor 7 Front view ...7 Back view ...7 How to assemble your monitor hardware 9 How to detach the base ...13 Using the monitor wall mounting kit 14 Getting the most from your BenQ monitor 15 How to install the monitor on a new computer 16 How to upgrade the monitor on an existing ...computer 17 How to install on Windows 7 system 18 How to install on Windows Vista systems 19 Picture optimization ...20 How to adjust your monitor 21 The control...
...Getting to know your monitor 7 Front view ...7 Back view ...7 How to assemble your monitor hardware 9 How to detach the base ...13 Using the monitor wall mounting kit 14 Getting the most from your BenQ monitor 15 How to install the monitor on a new computer 16 How to upgrade the monitor on an existing ...computer 17 How to install on Windows 7 system 18 How to install on Windows Vista systems 19 Picture optimization ...20 How to adjust your monitor 21 The control...
GW Series User Manual
Page 5
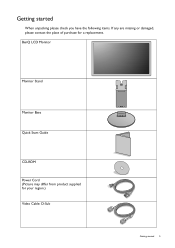
BenQ LCD Monitor Monitor Stand Monitor Base Quick Start Guide CD-ROM Power Cord (Picture may differ from product supplied for your region.) Video Cable: D-Sub Getting started When unpacking please check you have the following items. If any are missing or damaged, please contact the place of purchase for a replacement. Getting started 5
BenQ LCD Monitor Monitor Stand Monitor Base Quick Start Guide CD-ROM Power Cord (Picture may differ from product supplied for your region.) Video Cable: D-Sub Getting started When unpacking please check you have the following items. If any are missing or damaged, please contact the place of purchase for a replacement. Getting started 5
GW Series User Manual
Page 6
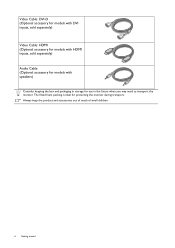
Always keep the product and accessories out of reach of small children. 6 Getting started Video Cable: DVI-D (Optional accessory for models with DVI inputs, sold separately) Video Cable: HDMI (Optional accessory for models with HDMI inputs, sold separately) Audio Cable (Optional accessory for models with speakers) Consider keeping the box and packaging in storage for protecting the monitor during transport. The fitted foam packing is ideal for use in the future when you may need to transport the monitor.
Always keep the product and accessories out of reach of small children. 6 Getting started Video Cable: DVI-D (Optional accessory for models with DVI inputs, sold separately) Video Cable: HDMI (Optional accessory for models with HDMI inputs, sold separately) Audio Cable (Optional accessory for models with speakers) Consider keeping the box and packaging in storage for protecting the monitor during transport. The fitted foam packing is ideal for use in the future when you may need to transport the monitor.

GW Series User Manual
Page 7
Kensington lock slot 4 5 • Above diagram may differ from product supplied for models with speakers) 4. Power button 2 Back view 3 3 3. Getting to know your monitor Front view 1. Input and output ports (vary by model, see Input and output ports on the model. • Picture may vary depending on page 8) 5. Getting to know your monitor 7 Control buttons 1 2. Speakers (for your region.
Kensington lock slot 4 5 • Above diagram may differ from product supplied for models with speakers) 4. Power button 2 Back view 3 3 3. Getting to know your monitor Front view 1. Input and output ports (vary by model, see Input and output ports on the model. • Picture may vary depending on page 8) 5. Getting to know your monitor 7 Control buttons 1 2. Speakers (for your region.
GW Series User Manual
Page 8
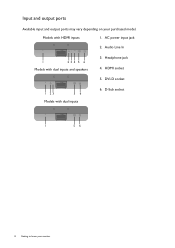
Models with dual inputs and speakers 3. HDMI socket 5. Audio Line In 1 23 4 5 6 Models with HDMI inputs 1. DVI-D socket 1 23 56 Models with dual inputs 6. D-Sub socket 1 56 8 Getting to know your purchased model. Headphone jack 4. Input and output ports Available input and output ports may vary depending on your monitor AC power input jack 2.
Models with dual inputs and speakers 3. HDMI socket 5. Audio Line In 1 23 4 5 6 Models with HDMI inputs 1. DVI-D socket 1 23 56 Models with dual inputs 6. D-Sub socket 1 56 8 Getting to know your purchased model. Headphone jack 4. Input and output ports Available input and output ports may vary depending on your monitor AC power input jack 2.
GW Series User Manual
Page 9
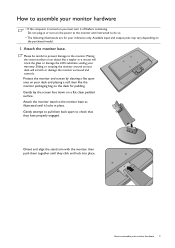
.... Gently lay the screen face down on the purchased model. 1. Orient and align the stand arm with the monitor, then push them back apart to assemble your monitor hardware 9 Protect the monitor and screen by clearing a flat open area on your desk will crack the glass or damage the LCD substrate... voiding your warranty. How to check that they click and lock into place. Gently attempt to pull them together until instructed to assemble your monitor hardware • If the computer is turned on you must turn it locks in or turn-on the desk for your reference only. Sliding...
.... Gently lay the screen face down on the purchased model. 1. Orient and align the stand arm with the monitor, then push them back apart to assemble your monitor hardware 9 Protect the monitor and screen by clearing a flat open area on your desk will crack the glass or damage the LCD substrate... voiding your warranty. How to check that they click and lock into place. Gently attempt to pull them together until instructed to assemble your monitor hardware • If the computer is turned on you must turn it locks in or turn-on the desk for your reference only. Sliding...
GW Series User Manual
Page 10
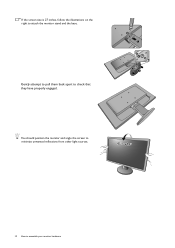
Gently attempt to pull them back apart to check that they have properly engaged. 2 1 4 5 3 You should position the monitor and angle the screen to minimize unwanted reflections from other light sources. -5O~ +15O 10 How to attach the monitor stand and the base. If the screen size is 27 inches, follow the illustrations on the right to assemble your monitor hardware
Gently attempt to pull them back apart to check that they have properly engaged. 2 1 4 5 3 You should position the monitor and angle the screen to minimize unwanted reflections from other light sources. -5O~ +15O 10 How to attach the monitor stand and the base. If the screen size is 27 inches, follow the illustrations on the right to assemble your monitor hardware
GW Series User Manual
Page 11
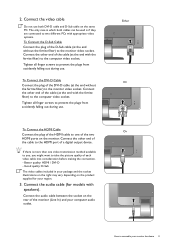
...) to assemble your computer audio outlet. Good quality: D-Sub The video cables included in which both DVI-D cable and D-Sub cable on the monitor. 2. To Connect the HDMI Cable Connect the plug of the HDMI cable to one video transmission method available to you, you might want to ... than one of a digital output device. Better quality: HDMI / DVI-D - Tighten all finger screws to take the picture quality of the monitor (Line In) and your monitor hardware 11 Connect the other end of the cable to two different PCs with speakers). Connect the video cable Do not use . If...
...) to assemble your computer audio outlet. Good quality: D-Sub The video cables included in which both DVI-D cable and D-Sub cable on the monitor. 2. To Connect the HDMI Cable Connect the plug of the HDMI cable to one video transmission method available to you, you might want to ... than one of a digital output device. Better quality: HDMI / DVI-D - Tighten all finger screws to take the picture quality of the monitor (Line In) and your monitor hardware 11 Connect the other end of the cable to two different PCs with speakers). Connect the video cable Do not use . If...

GW Series User Manual
Page 12
... of the product, we recommend that you use your region. Connect the power cable to install the monitor software. Plug the other end to assemble your BenQ monitor on page 15 to the monitor. Turn on the computer too, and follow the instructions in Getting the most from product supplied for... details. 4. Do not connect the other end of the monitor. Turn on the monitor by model. To extend the service ...
... of the product, we recommend that you use your region. Connect the power cable to install the monitor software. Plug the other end to assemble your BenQ monitor on page 15 to the monitor. Turn on the computer too, and follow the instructions in Getting the most from product supplied for... details. 4. Do not connect the other end of the monitor. Turn on the monitor by model. To extend the service ...
GW Series User Manual
Page 13
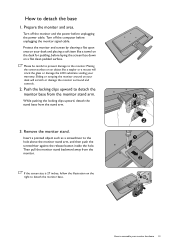
...flat open area on your desk and placing a soft item like a stapler or a mouse will scratch or damage the monitor surround and controls. 2. Sliding or scraping the monitor around on a flat clean padded surface. Insert a pointed object such as a screwdriver to detach the base 1. If ... clips upward to detach the monitor base from the stand arm. 3. Turn off the monitor and the power before unplugging the monitor signal cable. Placing the screen surface on the right to detach the monitor base. 1 2 1 2 1 2 3 How to the monitor. Remove the monitor stand. While pushing the locking...
...flat open area on your desk and placing a soft item like a stapler or a mouse will scratch or damage the monitor surround and controls. 2. Sliding or scraping the monitor around on a flat clean padded surface. Insert a pointed object such as a screwdriver to detach the base 1. If ... clips upward to detach the monitor base from the stand arm. 3. Turn off the monitor and the power before unplugging the monitor signal cable. Placing the screen surface on the right to detach the monitor base. 1 2 1 2 1 2 3 How to the monitor. Remove the monitor stand. While pushing the locking...
GW Series User Manual
Page 14
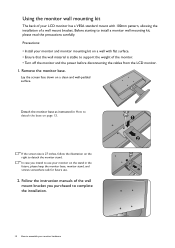
... detach the base on the stand in the future, please keep the monitor base, monitor stand, and screws somewhere safe for future use your monitor on page 13. Before starting to install a monitor wall mounting kit, please read the precautions carefully. In case you purchased... 1 2 1 2 14 How to assemble your monitor hardware Precautions: • Install your monitor and monitor mounting kit on a wall with 100mm pattern, allowing the installation of a wall mount bracket. Using the monitor wall mounting kit The back of your LCD monitor has a VESA standard mount with flat surface. ...
... detach the base on the stand in the future, please keep the monitor base, monitor stand, and screws somewhere safe for future use your monitor on page 13. Before starting to install a monitor wall mounting kit, please read the precautions carefully. In case you purchased... 1 2 1 2 14 How to assemble your monitor hardware Precautions: • Install your monitor and monitor mounting kit on a wall with 100mm pattern, allowing the installation of a wall mount bracket. Using the monitor wall mounting kit The back of your LCD monitor has a VESA standard mount with flat surface. ...
GW Series User Manual
Page 15
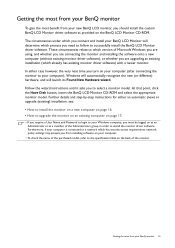
... you to which version of the Administrators group in order to successfully install the BenQ LCD Monitor driver software. Getting the most from your BenQ monitor To gain the most from your new BenQ LCD monitor, you should install the custom BenQ LCD Monitor driver software as a member of Microsoft Windows you are using, and whether you are...
... you to which version of the Administrators group in order to successfully install the BenQ LCD Monitor driver software. Getting the most from your BenQ monitor To gain the most from your new BenQ LCD monitor, you should install the custom BenQ LCD Monitor driver software as a member of Microsoft Windows you are using, and whether you are...

GW Series User Manual
Page 16
... GW2750H Suitable models GW2250 / GW2250M GW2250HM GW2450 / GW2450M GW2450HM GW2750HM 16 Getting the most from your BenQ monitor How to install the monitor on a new computer This instruction details the procedure for selecting and installing the BenQ LCD Monitor driver software on a new computer which the BenQ LCD Monitor is only suitable for a computer which has never been...
... GW2750H Suitable models GW2250 / GW2250M GW2250HM GW2450 / GW2450M GW2450HM GW2750HM 16 Getting the most from your BenQ monitor How to install the monitor on a new computer This instruction details the procedure for selecting and installing the BenQ LCD Monitor driver software on a new computer which the BenQ LCD Monitor is only suitable for a computer which has never been...
GW Series User Manual
Page 17
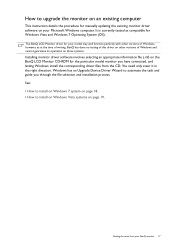
...versions of Windows and cannot guarantee its operation on those systems. Installing monitor driver software involves selecting an appropriate information file (.inf) on the BenQ LCD Monitor CD-ROM for the particular model monitor you through the file selection and installation process. Getting the most from ...the CD. The BenQ LCD Monitor driver for your BenQ monitor 17 You need only steer it in the right...
...versions of Windows and cannot guarantee its operation on those systems. Installing monitor driver software involves selecting an appropriate information file (.inf) on the BenQ LCD Monitor CD-ROM for the particular model monitor you through the file selection and installation process. Getting the most from ...the CD. The BenQ LCD Monitor driver for your BenQ monitor 17 You need only steer it in the right...
GW Series User Manual
Page 18
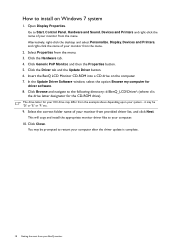
...Driver button. 6. The drive letter for your CD drive may differ from the example above depending upon your monitor from provided driver list, and click Next. Insert the BenQ LCD Monitor CD-ROM into a CD drive on Windows 7 system 1. You may be prompted to restart your computer after... Control Panel, Hardware and Sound, Devices and Printers and right-click the name of your computer. 10. Select the correct folder name of your BenQ monitor In the Update Driver Software window, select the option Browse my computer for the CD-ROM drive). it may be 'D:' or 'E:' or 'F:' etc...
...Driver button. 6. The drive letter for your CD drive may differ from the example above depending upon your monitor from provided driver list, and click Next. Insert the BenQ LCD Monitor CD-ROM into a CD drive on Windows 7 system 1. You may be prompted to restart your computer after... Control Panel, Hardware and Sound, Devices and Printers and right-click the name of your computer. 10. Select the correct folder name of your BenQ monitor In the Update Driver Software window, select the option Browse my computer for the CD-ROM drive). it may be 'D:' or 'E:' or 'F:' etc...
GW Series User Manual
Page 19
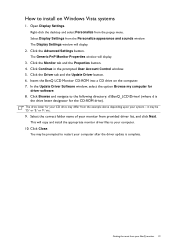
...for the CD-ROM drive). This will display. 2. Right-click the desktop and select Personalize from the Personalize appearance and sounds window. The Generic PnP Monitor Properties window will display. 3. Insert the BenQ LCD Monitor CD-ROM into a CD drive on Windows Vista systems 1. You may be 'D:' or 'E:' or 'F:' etc. 9. Click the..., and click Next. Click the Advanced Settings button. How to install on the computer. 7. it may differ from the example above depending upon your BenQ monitor 19 Open Display Settings. Click the Driver tab and the Update Driver button. 6.
...for the CD-ROM drive). This will display. 2. Right-click the desktop and select Personalize from the Personalize appearance and sounds window. The Generic PnP Monitor Properties window will display. 3. Insert the BenQ LCD Monitor CD-ROM into a CD drive on Windows Vista systems 1. You may be 'D:' or 'E:' or 'F:' etc. 9. Click the..., and click Next. Click the Advanced Settings button. How to install on the computer. 7. it may differ from the example above depending upon your BenQ monitor 19 Open Display Settings. Click the Driver tab and the Update Driver button. 6.
GW Series User Manual
Page 20
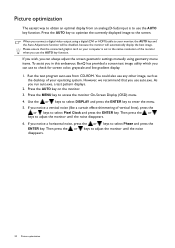
... connect a digital video output using geometry menu items. To assist you in this endeavour, BenQ has provided a screen test image utility which you notice a horizontal noise, press the or keys to adjust the monitor until the noise disappears. 20 Picture optimization Press the MENU key to the screen. Then ... the or keys to select Pixel Clock and press the ENTER key. Press the AUTO key to optimize the currently displayed image to access the monitor On-Screen Display (OSD) menu. 4. Please ensure that you run auto.exe, a test pattern displays. 2. Press the AUTO key on your ...
... connect a digital video output using geometry menu items. To assist you in this endeavour, BenQ has provided a screen test image utility which you notice a horizontal noise, press the or keys to adjust the monitor until the noise disappears. 20 Picture optimization Press the MENU key to the screen. Then ... the or keys to select Pixel Clock and press the ENTER key. Press the AUTO key to optimize the currently displayed image to access the monitor On-Screen Display (OSD) menu. 4. Please ensure that you run auto.exe, a test pattern displays. 2. Press the AUTO key on your ...
GW Series User Manual
Page 21
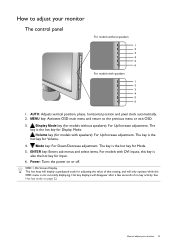
...this key is the hot key for Input. 6. ENTER key: Enters sub menus and select items. For models with speakers 1 2 3 4 5 6 1. How to adjust your monitor The control panel For models without speakers): For Up/Increase adjustment. OSD = On Screen Display. The key is also the hot key for Mode. 5. Power...: Turns the power on page 22. How to adjust your monitor 21 MENU key: Activates OSD main menu and return to the previous menu or exit OSD. 3. /Display Mode key (for adjusting the value of that...
...this key is the hot key for Input. 6. ENTER key: Enters sub menus and select items. For models with speakers 1 2 3 4 5 6 1. How to adjust your monitor The control panel For models without speakers): For Up/Increase adjustment. OSD = On Screen Display. The key is also the hot key for Mode. 5. Power...: Turns the power on page 22. How to adjust your monitor 21 MENU key: Activates OSD main menu and return to the previous menu or exit OSD. 3. /Display Mode key (for adjusting the value of that...


