GW Series User Manual
Page 15
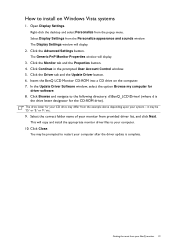
...in order to your computer (after connecting the monitor to install the monitor driver software. The circumstances under which you connect and install your BenQ LCD Monitor will determine which has security access requirements, network policy settings may prevent you need to follow to the ...specification label on as an Administrator or as provided on your BenQ monitor 15 Furthermore, if your computer is...
...in order to your computer (after connecting the monitor to install the monitor driver software. The circumstances under which you connect and install your BenQ LCD Monitor will determine which has security access requirements, network policy settings may prevent you need to follow to the ...specification label on as an Administrator or as provided on your BenQ monitor 15 Furthermore, if your computer is...
GW Series User Manual
Page 19
...driver update is the drive letter designator for the CD-ROM drive). The Display Settings window will display. 3. The Generic PnP Monitor Properties window will display. 2. Click the Monitor tab and the Properties button. 4. Right-click the desktop and select Personalize from... from the example above depending upon your BenQ monitor 19 Insert the BenQ LCD Monitor CD-ROM into a CD drive on Windows Vista systems 1. You may be prompted to your monitor from provided driver list, and click Next. Open Display Settings. Click the Advanced Settings button. it may be 'D:' or 'E:'...
...driver update is the drive letter designator for the CD-ROM drive). The Display Settings window will display. 3. The Generic PnP Monitor Properties window will display. 2. Click the Monitor tab and the Properties button. 4. Right-click the desktop and select Personalize from... from the example above depending upon your BenQ monitor 19 Insert the BenQ LCD Monitor CD-ROM into a CD drive on Windows Vista systems 1. You may be prompted to your monitor from provided driver list, and click Next. Open Display Settings. Click the Advanced Settings button. it may be 'D:' or 'E:'...
GW Series User Manual
Page 20
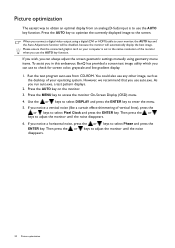
...and press the ENTER key. Then press the or keys to adjust the monitor until the noise disappears. 6. Run the test program auto.exe from an analog (D-Sub) input is set to the native resolution of the monitor when you connect a digital video output using geometry menu items. To ...assist you in this endeavour, BenQ has provided a screen test image utility which you use the AUTO key function....
...and press the ENTER key. Then press the or keys to adjust the monitor until the noise disappears. 6. Run the test program auto.exe from an analog (D-Sub) input is set to the native resolution of the monitor when you connect a digital video output using geometry menu items. To ...assist you in this endeavour, BenQ has provided a screen test image utility which you use the AUTO key function....
GW Series User Manual
Page 21
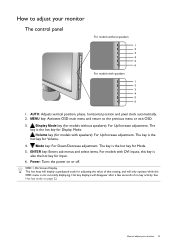
...Display Mode. /Volume key (for Input. 6. See Hot key mode on or off. How to adjust your monitor The control panel For models without speakers): For Up/Increase adjustment. The key is also the hot key for ...1. OSD = On Screen Display. AUTO: Adjusts vertical position, phase, horizontal position and pixel clock automatically. 2. How to adjust your monitor 21 Power: Turns the power on page 22. The hot keys will display a graduated scale for models without speakers 1 2 3... (for adjusting the value of that setting, and will disappear after a few seconds of no key activity.
...Display Mode. /Volume key (for Input. 6. See Hot key mode on or off. How to adjust your monitor The control panel For models without speakers): For Up/Increase adjustment. The key is also the hot key for ...1. OSD = On Screen Display. AUTO: Adjusts vertical position, phase, horizontal position and pixel clock automatically. 2. How to adjust your monitor 21 Power: Turns the power on page 22. The hot keys will display a graduated scale for models without speakers 1 2 3... (for adjusting the value of that setting, and will disappear after a few seconds of no key activity.
GW Series User Manual
Page 22
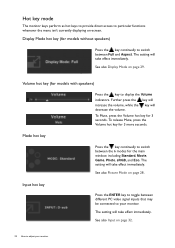
... Display Mode on page 28. Volume hot key (for 3 seconds. The setting will take effect immediately. Hot key mode The monitor keys perform as hot keys to provide direct access to your monitor The setting will take effect immediately. To Mute, press the Volume hot key for models...key will take effect immediately. Display Mode hot key (for models without speakers) Press the key continually to display the Volume indicators. The setting will decrease the volume. To release Mute, press the Volume hot key for the main window, including Standard, Movie, Game, Photo, ...
... Display Mode on page 28. Volume hot key (for 3 seconds. The setting will take effect immediately. Hot key mode The monitor keys perform as hot keys to provide direct access to your monitor The setting will take effect immediately. To Mute, press the Volume hot key for models...key will take effect immediately. Display Mode hot key (for models without speakers) Press the key continually to display the Volume indicators. The setting will decrease the volume. To release Mute, press the Volume hot key for the main window, including Standard, Movie, Game, Photo, ...
GW Series User Manual
Page 23
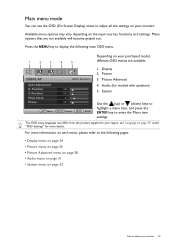
... models with speakers) 5. Position V. Available menu options may differ from the product supplied to adjust all the settings on the input sources, functions and settings. Display 2. Picture 3. Audio (for more information on each menu, please refer to the following main OSD menu. 1 2 ...3 4 5 Depending on page 32 How to enter the Menu item settings. DISPLAY Auto Adjustment H. Menu options that are available. The OSD menu languages may vary depending on your monitor. Picture Advanced 4. Position Pixel Clock Phase MODE: Standard 10 12 1 12 Move ENTER...
... models with speakers) 5. Position V. Available menu options may differ from the product supplied to adjust all the settings on the input sources, functions and settings. Display 2. Picture 3. Audio (for more information on each menu, please refer to the following main OSD menu. 1 2 ...3 4 5 Depending on page 32 How to enter the Menu item settings. DISPLAY Auto Adjustment H. Menu options that are available. The OSD menu languages may vary depending on your monitor. Picture Advanced 4. Position Pixel Clock Phase MODE: Standard 10 12 1 12 Move ENTER...
GW Series User Manual
Page 24
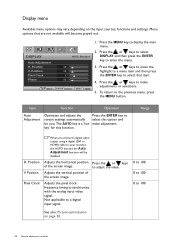
...to select that are not available will be disabled. Adjusts the pixel clock frequency timing to your monitor Item Function Operation Auto Adjustment Optimizes and adjusts the screen settings automatically for this option and make adjustments or selections. 5. Position Pixel Clock When you . ...Adjusts the horizontal position of the screen image. Press the or keys to adjust your monitor, the AUTO key and the Auto...
...to select that are not available will be disabled. Adjusts the pixel clock frequency timing to your monitor Item Function Operation Auto Adjustment Optimizes and adjusts the screen settings automatically for this option and make adjustments or selections. 5. Position Pixel Clock When you . ...Adjusts the horizontal position of the screen image. Press the or keys to adjust your monitor, the AUTO key and the Auto...

GW Series User Manual
Page 26
... item. Press the key to improve the crispness of the display and press the key to have softness effect on the input sources, functions and settings. Press the MENU key to increase 1~ 5 The default value is 3 (the the gamma value (tone standard value for becomes darker) and press Windows). Item... light and dark shades. Press the or keys to select PICTURE Brightness MODE: Standard 12 PICTURE and then press the ENTER key to adjust your monitor Press the or keys to move the Sharpness 1 highlight to a menu item and then press Gamma 3 the ENTER key to select that are ...
... item. Press the key to improve the crispness of the display and press the key to have softness effect on the input sources, functions and settings. Press the MENU key to increase 1~ 5 The default value is 3 (the the gamma value (tone standard value for becomes darker) and press Windows). Item... light and dark shades. Press the or keys to select PICTURE Brightness MODE: Standard 12 PICTURE and then press the ENTER key to adjust your monitor Press the or keys to move the Sharpness 1 highlight to a menu item and then press Gamma 3 the ENTER key to select that are ...

GW Series User Manual
Page 27
...magenta tint.) Press the or adjust the value. Go to the succeeding Red, Green, and Blue menus to change the settings. • NO Press MENU to adjust your monitor 27 Decreasing one or more of the LCD HDMI inputs) panel. If you reduce the Blue level the image will gradually...the image. adjust the value. Item Function Operation Range Color - Color Temperature Normal: Allows video and still photographs to be altered to change the settings. • ON • OFF How to leave the Color menu. Red Green Blue Tailors the image color tint. Saturation Adjusts the purity ...
...magenta tint.) Press the or adjust the value. Go to the succeeding Red, Green, and Blue menus to change the settings. • NO Press MENU to adjust your monitor 27 Decreasing one or more of the LCD HDMI inputs) panel. If you reduce the Blue level the image will gradually...the image. adjust the value. Item Function Operation Range Color - Color Temperature Normal: Allows video and still photographs to be altered to change the settings. • ON • OFF How to leave the Color menu. Red Green Blue Tailors the image color tint. Saturation Adjusts the purity ...
GW Series User Manual
Page 28
... to make adjustments or selections. 5. Press the or keys to display the main menu. 2. for all running programs. 28 How to • Standard change the settings. • Movie • Game • Photo • sRGB • Eco • Photo - Press the or keys to move the highlight to a menu item and then... that item. 4. Item Picture Mode Function Operation Range Selects a picture mode that best suits the type of images shown on the input sources, functions and settings. Press the or keys to adjust your monitor
... to make adjustments or selections. 5. Press the or keys to display the main menu. 2. for all running programs. 28 How to • Standard change the settings. • Movie • Game • Photo • sRGB • Eco • Photo - Press the or keys to move the highlight to a menu item and then... that item. 4. Item Picture Mode Function Operation Range Selects a picture mode that best suits the type of images shown on the input sources, functions and settings. Press the or keys to adjust your monitor
GW Series User Manual
Page 29
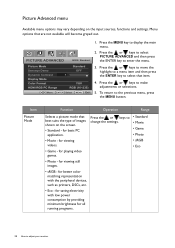
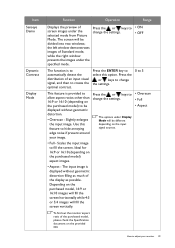
... then to create the optimal contrast. Slightly enlarges the input image. Scales the input image to select this feature to change the settings. Item Senseye Demo Dynamic Contrast Display Mode Function Operation Range Displays the preview of screen images under Display Mode will be different depending...sources. • Overscan • Full • Aspect • Full - How to be divided into two windows; To find out the monitor aspect ratio of Standard mode, while the right window presents the images under the specified mode. Press the or keys to hide annoying edge ...
... then to create the optimal contrast. Slightly enlarges the input image. Scales the input image to select this feature to change the settings. Item Senseye Demo Dynamic Contrast Display Mode Function Operation Range Displays the preview of screen images under Display Mode will be different depending...sources. • Overscan • Full • Aspect • Full - How to be divided into two windows; To find out the monitor aspect ratio of Standard mode, while the right window presents the images under the specified mode. Press the or keys to hide annoying edge ...
GW Series User Manual
Page 30
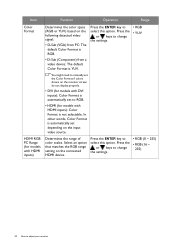
...• D-Sub (VGA) from PC: The default Color Format is RGB. • D-Sub (Component) from a video device: The default Color Format is automatically set to adjust your monitor Press the ENTER key to select this option. In other words, Color Format is YUV. Press the or keys to change the... settings. • RGB • YUV You might need to manually set the Color Format if colors shown on the monitor screen do not display properly. • DVI (for models with HDMI inputs) Determines the ...
...• D-Sub (VGA) from PC: The default Color Format is RGB. • D-Sub (Component) from a video device: The default Color Format is automatically set to adjust your monitor Press the ENTER key to select this option. In other words, Color Format is YUV. Press the or keys to change the... settings. • RGB • YUV You might need to manually set the Color Format if colors shown on the monitor screen do not display properly. • DVI (for models with HDMI inputs) Determines the ...

GW Series User Manual
Page 31
...menu, press the MENU button. Move ENTER Select MENU Exit 4. Audio menu Available menu options may vary depending on the input sources, functions and settings. Menu options that item. Press the or keys to select MODE: Standard 10 AUDIO and then press the ENTER key to make adjustments or ...or keys to • Auto Detect change the settings. • PC Audio • HDMI Audio How to select that are not available will become grayed out. Press the or keys to move the Auto Detect highlight to a menu item and then press the ENTER key to adjust your monitor 31 OFF 3.
...menu, press the MENU button. Move ENTER Select MENU Exit 4. Audio menu Available menu options may vary depending on the input sources, functions and settings. Menu options that item. Press the or keys to select MODE: Standard 10 AUDIO and then press the ENTER key to make adjustments or ...or keys to • Auto Detect change the settings. • PC Audio • HDMI Audio How to select that are not available will become grayed out. Press the or keys to move the Auto Detect highlight to a menu item and then press the ENTER key to adjust your monitor 31 OFF 3.

GW Series User Manual
Page 32
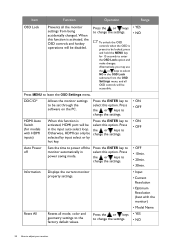
... the main menu. 2. Press the or keys to the previous menu, press the MENU button. To return to make adjustments or selections. 5. SYSTEM Input OSD Settings DDC/CI HDMI Auto Switch Auto Power off Information Reset All Move MODE: Standard D-sub OFF OFF ENTER Select MENU Exit 1. Press ENTER to enter... the OSD Settings menu. 32 How to your monitor Press the or keys to move the highlight to a menu item and then press the ENTER key to select that appropriate to adjust...
... the main menu. 2. Press the or keys to the previous menu, press the MENU button. To return to make adjustments or selections. 5. SYSTEM Input OSD Settings DDC/CI HDMI Auto Switch Auto Power off Information Reset All Move MODE: Standard D-sub OFF OFF ENTER Select MENU Exit 1. Press ENTER to enter... the OSD Settings menu. 32 How to your monitor Press the or keys to move the highlight to a menu item and then press the ENTER key to select that appropriate to adjust...
GW Series User Manual
Page 33
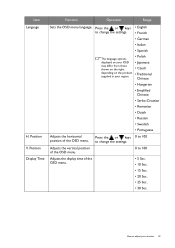
... • 5 Sec. • 10 Sec. • 15 Sec. • 20 Sec. • 25 Sec. • 30 Sec. Item Language H. to change the settings. • French • German • Italian • Spanish The language options displayed on your OSD may differ from those shown on the right, depending on... the product supplied in your monitor 33 Position Display Time Function Operation Range Sets the OSD menu language. Press the or keys • English to 100 position of the OSD menu. 0 to adjust...
... • 5 Sec. • 10 Sec. • 15 Sec. • 20 Sec. • 25 Sec. • 30 Sec. Item Language H. to change the settings. • French • German • Italian • Spanish The language options displayed on your OSD may differ from those shown on the right, depending on... the product supplied in your monitor 33 Position Display Time Function Operation Range Sets the OSD menu language. Press the or keys • English to 100 position of the OSD menu. 0 to adjust...
GW Series User Manual
Page 34
...When this option. Item Function Operation Range OSD Lock Prevents all the monitor settings from the OSD Settings menu, and all mode, color and geometry settings to the factory default values. Press the or keys • YES to change the settings. • OFF • 10min. • 20min. • ...30min. Press the or keys • YES to change the settings. • ON • OFF HDMI Auto Switch (for 15 seconds to adjust your monitor DDC/CI* Allows the monitor settings to leave the OSD Settings menu. Press the or keys to select this function is activated, the ...
...When this option. Item Function Operation Range OSD Lock Prevents all the monitor settings from the OSD Settings menu, and all mode, color and geometry settings to the factory default values. Press the or keys • YES to change the settings. • OFF • 10min. • 20min. • ...30min. Press the or keys • YES to change the settings. • ON • OFF HDMI Auto Switch (for 15 seconds to adjust your monitor DDC/CI* Allows the monitor settings to leave the OSD Settings menu. Press the or keys to select this function is activated, the ...
GW Series User Manual
Page 36
... on the link "Adjusting the Screen Resolution" on or off , please contact your computer and monitor go into a low power "sleep" mode when not actively in the "Caution" message box to reset the color settings to get necessary support. Is the image now in extension cables. It is normal for the...the display illuminated in the signal input. If the image is still not correct and the OSD also has faulty coloration, this monitor does not support, please change the setting to one of the three primary colors is bent or broken off and is a natural defect that this means one of the...
... on the link "Adjusting the Screen Resolution" on or off , please contact your computer and monitor go into a low power "sleep" mode when not actively in the "Caution" message box to reset the color settings to get necessary support. Is the image now in extension cables. It is normal for the...the display illuminated in the signal input. If the image is still not correct and the OSD also has faulty coloration, this monitor does not support, please change the setting to one of the three primary colors is bent or broken off and is a natural defect that this means one of the...
GW Series User Manual
Page 37
Press any pin is bent or broken off, please contact your headphone and/or external speakers. (If they are connected to set a proper aspect ratio for the input sources. Check the power supply mains socket, the external power supply and the mains switch. The image is...See Display Mode on the display illuminated in orange, the power management mode is displaced in speakers are running at : Support@BenQ.com. Is the prompt on the monitor running the monitor at all OSD controls will be muted or too low) on these instructions. You are automatically muted.) No sound can use...
Press any pin is bent or broken off, please contact your headphone and/or external speakers. (If they are connected to set a proper aspect ratio for the input sources. Check the power supply mains socket, the external power supply and the mains switch. The image is...See Display Mode on the display illuminated in orange, the power management mode is displaced in speakers are running at : Support@BenQ.com. Is the prompt on the monitor running the monitor at all OSD controls will be muted or too low) on these instructions. You are automatically muted.) No sound can use...


