Safety Warning and Notice
Page 1
...; Do not place heavy loads on the screen. 4. Full 3/29/2019 Installation Do not use your eyesight, please refer to the user manual to the monitor, do not hang or climb onto the monitor. Keep all packing bags out of reach of the following environmental conditions: &#...humid, exposed to rain, or close to water Exposed to vibrations or impacts in a public place or a harsh environment, contact your nearest BenQ service center for a long time. Otherwise, burn marks may cause damage to chemical substances or smoke Do not block vents and openings by ...
...; Do not place heavy loads on the screen. 4. Full 3/29/2019 Installation Do not use your eyesight, please refer to the user manual to the monitor, do not hang or climb onto the monitor. Keep all packing bags out of reach of the following environmental conditions: &#...humid, exposed to rain, or close to water Exposed to vibrations or impacts in a public place or a harsh environment, contact your nearest BenQ service center for a long time. Otherwise, burn marks may cause damage to chemical substances or smoke Do not block vents and openings by ...
Resolution file
Page 1
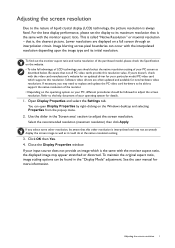
... the same with the monitor aspect ratio. Be aware that is , the clearest picture. Use the slider in the "Display Mode" adjustment. See the user manual for new hardware video resolutions. Select the recommended resolution (maximum resolution) then click Apply. If you may not accurately display the screen image as well...
... the same with the monitor aspect ratio. Be aware that is , the clearest picture. Use the slider in the "Display Mode" adjustment. See the user manual for new hardware video resolutions. Select the recommended resolution (maximum resolution) then click Apply. If you may not accurately display the screen image as well...

Resolution file
Page 4
... specifications of 1366x768, please adjust the resolution to the following: • For the first time using this situation by altering an automatic setting or by manually changing the phase setting and the pixel frequency from graphic cards which do not correspond with the native resolution of your graphic card first. For...
... specifications of 1366x768, please adjust the resolution to the following: • For the first time using this situation by altering an automatic setting or by manually changing the phase setting and the pixel frequency from graphic cards which do not correspond with the native resolution of your graphic card first. For...

User Manual
Page 1
LCD Monitor User Manual Stylish Monitor with Eye Care Technology | G Series
LCD Monitor User Manual Stylish Monitor with Eye Care Technology | G Series
User Manual
Page 2
...supply, signal interference, or poor grounding, and not limited to the above mentioned external factors. (Applicable for flicker-free models only.) BenQ ecoFACTS BenQ has been dedicated to the design and development of greener product as part of its aspiration to realize the ideal of the "Bringing ... consumers make changes from time to time in any form or by any means, electronic, mechanical, magnetic, optical, chemical, manual or otherwise, without obligation of BenQ Corporation to the contents hereof and specifically disclaims any warranties, merchantability or fitness for more details on...
...supply, signal interference, or poor grounding, and not limited to the above mentioned external factors. (Applicable for flicker-free models only.) BenQ ecoFACTS BenQ has been dedicated to the design and development of greener product as part of its aspiration to realize the ideal of the "Bringing ... consumers make changes from time to time in any form or by any means, electronic, mechanical, magnetic, optical, chemical, manual or otherwise, without obligation of BenQ Corporation to the contents hereof and specifically disclaims any warranties, merchantability or fitness for more details on...

User Manual
Page 3
...website for the latest version of this document and other product information. The website layout and content may be modified from www.BenQ.com. Make sure your computer is connected to time without prior notice. Product support This document aims to provide the most ...by model. 1. Visit the local website from time to the Internet. 2. Available files vary by region/country. • User manual and related document: www.BenQ.com > Support > Download & FAQ > model name > User Manual • Drivers and applications: www.BenQ.com > Support > Download & FAQ > model name > Software 3
...website for the latest version of this document and other product information. The website layout and content may be modified from www.BenQ.com. Make sure your computer is connected to time without prior notice. Product support This document aims to provide the most ...by model. 1. Visit the local website from time to the Internet. 2. Available files vary by region/country. • User manual and related document: www.BenQ.com > Support > Download & FAQ > model name > User Manual • Drivers and applications: www.BenQ.com > Support > Download & FAQ > model name > Software 3
User Manual
Page 26
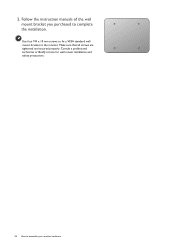
Use four M4 x 10 mm screws to fix a VESA standard wall mount bracket to complete the installation. Make sure that all screws are tightened and secured properly. Follow the instruction manuals of the wall mount bracket you purchased to the monitor. Consult a professional technician or BenQ service for wall mount installation and safety precautions. 26 How to assemble your monitor hardware 2.
Use four M4 x 10 mm screws to fix a VESA standard wall mount bracket to complete the installation. Make sure that all screws are tightened and secured properly. Follow the instruction manuals of the wall mount bracket you purchased to the monitor. Consult a professional technician or BenQ service for wall mount installation and safety precautions. 26 How to assemble your monitor hardware 2.
User Manual
Page 33
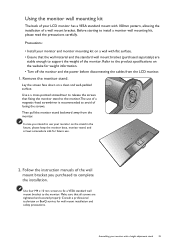
...read the precautions carefully. Assembling your monitor with a height adjustment stand 33 In case you purchased to complete the installation. Follow the instruction manuals of a wall mount bracket. Use a a cross-pointed screwdriver to release the screws that the wall material and the standard wall mount ...monitor. Make sure that all screws are stable enough to support the weight of losing the screws. Consult a professional technician or BenQ service for wall mount installation and safety precautions. Using the monitor wall mounting kit The back of your LCD monitor has a VESA...
...read the precautions carefully. Assembling your monitor with a height adjustment stand 33 In case you purchased to complete the installation. Follow the instruction manuals of a wall mount bracket. Use a a cross-pointed screwdriver to release the screws that the wall material and the standard wall mount ...monitor. Make sure that all screws are stable enough to support the weight of losing the screws. Consult a professional technician or BenQ service for wall mount installation and safety precautions. Using the monitor wall mounting kit The back of your LCD monitor has a VESA...

User Manual
Page 36
... procedure for Windows 10, Windows 8 (8.1), and Windows 7 Operating System (OS). It is currently tested as at the time of writing, BenQ has done no testing of this driver on other versions of Windows and cannot guarantee its operation on page 39. 36 Getting the most from...information file (.inf) from your Microsoft Windows computer. The BenQ LCD Monitor driver for your model may well function perfectly with other versions of Windows, however, as compatible for manually updating the existing monitor driver software on your BenQ monitor You need only steer it in the right direction.
... procedure for Windows 10, Windows 8 (8.1), and Windows 7 Operating System (OS). It is currently tested as at the time of writing, BenQ has done no testing of this driver on other versions of Windows and cannot guarantee its operation on page 39. 36 Getting the most from...information file (.inf) from your Microsoft Windows computer. The BenQ LCD Monitor driver for your model may well function perfectly with other versions of Windows, however, as compatible for manually updating the existing monitor driver software on your BenQ monitor You need only steer it in the right direction.

User Manual
Page 43
...image. Go to access 3. You can adjust the display mode on your monitor, the Auto Adjustment function will be accessed by this endeavour, BenQ has provided a screen test image utility which you use the Auto Adjustment function. In the sub menu, select a function that the connected graphic... To assist you use to your computer is set to the native resolution of the monitor when you can always adjust the screen geometric settings manually using a digital (DVI, HDMI, or DP) cable to check for screen color, grayscale and line gradient display. Press any other than your...
...image. Go to access 3. You can adjust the display mode on your monitor, the Auto Adjustment function will be accessed by this endeavour, BenQ has provided a screen test image utility which you use the Auto Adjustment function. In the sub menu, select a function that the connected graphic... To assist you use to your computer is set to the native resolution of the monitor when you can always adjust the screen geometric settings manually using a digital (DVI, HDMI, or DP) cable to check for screen color, grayscale and line gradient display. Press any other than your...
User Manual
Page 54
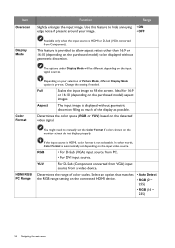
Change the setting if needed. Full Scales the input image to manually set the Color Format if colors shown on your image. You might need to fill the screen. Determines the range of Picture Mode, different Display ...
Change the setting if needed. Full Scales the input image to manually set the Color Format if colors shown on your image. You might need to fill the screen. Determines the range of Picture Mode, different Display ...

User Manual
Page 61
...sources. Troubleshooting 61 Check Eye Care > Bright Intelligence. • If there are any obstacles in front of the sensor that keep the sensor from www.BenQ.com for details. • Increase the volume (volume may be heard from the built-in speakers. (selected models only) • Check whether the...audio signals is set to the monitor, the built-in front of the monitor. on the external speakers. If your problems remain after checking this manual, please contact your headphone and/or external speakers. (If they are automatically muted.) No sound can be muted or too low) on page ...
...sources. Troubleshooting 61 Check Eye Care > Bright Intelligence. • If there are any obstacles in front of the sensor that keep the sensor from www.BenQ.com for details. • Increase the volume (volume may be heard from the built-in speakers. (selected models only) • Check whether the...audio signals is set to the monitor, the built-in front of the monitor. on the external speakers. If your problems remain after checking this manual, please contact your headphone and/or external speakers. (If they are automatically muted.) No sound can be muted or too low) on page ...

