

User Manual
Page 4
... to know your monitor 7 Front view...7 Back view ...7 Input and output ports...8 How to assemble your monitor hardware 9 How to detach the stand and the base 13 Using the monitor wall mounting kit 15 Getting the most from your BenQ monitor 16 How to install the monitor on a new computer 17 How...
... to know your monitor 7 Front view...7 Back view ...7 Input and output ports...8 How to assemble your monitor hardware 9 How to detach the stand and the base 13 Using the monitor wall mounting kit 15 Getting the most from your BenQ monitor 16 How to install the monitor on a new computer 17 How...
User Manual
Page 7
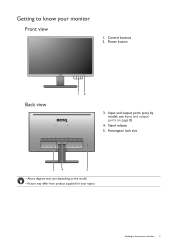
Input and output ports (vary by model, see Input and output ports on the model. • Picture may vary depending on page 8) 4. Getting to know your monitor 7 Getting to know your monitor Front view 1. Stand release 5. Power button Back view 12 3. Kensington lock slot 34 5 • Above diagram may differ from product supplied for your region. Control buttons 2.
Input and output ports (vary by model, see Input and output ports on the model. • Picture may vary depending on page 8) 4. Getting to know your monitor 7 Getting to know your monitor Front view 1. Stand release 5. Power button Back view 12 3. Kensington lock slot 34 5 • Above diagram may differ from product supplied for your region. Control buttons 2.
User Manual
Page 8
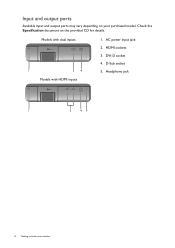
HDMI sockets 3. Models with dual inputs 1 34 Models with HDMI inputs 1. AC power input jack 2. Input and output ports Available input and output ports may vary depending on the provided CD for details. Headphone jack 1 2 45 8 Getting to know your purchased model. Check the Specification document on your monitor D-Sub socket 5. DVI-D socket 4.
HDMI sockets 3. Models with dual inputs 1 34 Models with HDMI inputs 1. AC power input jack 2. Input and output ports Available input and output ports may vary depending on the provided CD for details. Headphone jack 1 2 45 8 Getting to know your purchased model. Check the Specification document on your monitor D-Sub socket 5. DVI-D socket 4.
User Manual
Page 11
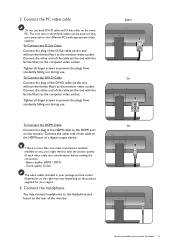
... monitor hardware 11 Tighten all finger screws to the monitor video socket. Connect the other end of the cable to the HDMI port of the HDMI cable to the HDMI port on the rear of the cable (at the end without the ferrite filter) to prevent the plugs from accidently falling out...
... monitor hardware 11 Tighten all finger screws to the monitor video socket. Connect the other end of the cable to the HDMI port of the HDMI cable to the HDMI port on the rear of the cable (at the end without the ferrite filter) to prevent the plugs from accidently falling out...
User Manual
Page 37
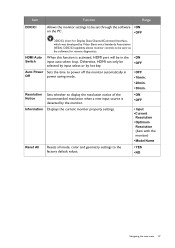
.../CI, short for remote diagnostics. Resolution Notice Sets whether to display the resolution notice of the recommended resolution when a new input source is activated, HDMI port will be in Off power saving mode. • OFF • 10min. • 20min. • 30min. HDMI Auto Switch When this function is detected by hot...
.../CI, short for remote diagnostics. Resolution Notice Sets whether to display the resolution notice of the recommended resolution when a new input source is activated, HDMI port will be in Off power saving mode. • OFF • 10min. • 20min. • 30min. HDMI Auto Switch When this function is detected by hot...

