
Readme Notice before System Firmware Update
Page 1
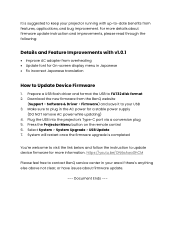
... Upgrade > USB Update 7. For more information. Make sure to FAT32 disk format 2. Press the Projector Menu button on the remote control 6. https://youtu.be/ON4oAwaGhCM Please feel free to contact BenQ service center in the AC power for a stable power supply (DO NOT remove AC power while updating...) 4. System will restart once the firmware upgrade is suggested to keep your projector running with v1.0.1 • Improve AC adapter from the BenQ website (Support > Software & Driver > Firmware) and save it to your area if there's anything else above...
... Upgrade > USB Update 7. For more information. Make sure to FAT32 disk format 2. Press the Projector Menu button on the remote control 6. https://youtu.be/ON4oAwaGhCM Please feel free to contact BenQ service center in the AC power for a stable power supply (DO NOT remove AC power while updating...) 4. System will restart once the firmware upgrade is suggested to keep your projector running with v1.0.1 • Improve AC adapter from the BenQ website (Support > Software & Driver > Firmware) and save it to your area if there's anything else above...

Readme Notice before USB-C Firmware Update
Page 1
For more details about firmware update instruction and improvements, please read through the following: Details and Feature Improvements for USB-C firmware • Support charging iPhone through USB-C port How to update USB-C firmware to charge iPhone through BenQ GV31 projector Required tools and materials USB-C firmare upgrade tool for GV31 USB-A to USB-C cable (with up-to keep your projector running with data transferring available) BenQ GV31 projector Step 1: Operate the USB-C firmare upgrade tool It is suggested to -date benefits from features, applications, and bug improvement.
For more details about firmware update instruction and improvements, please read through the following: Details and Feature Improvements for USB-C firmware • Support charging iPhone through USB-C port How to update USB-C firmware to charge iPhone through BenQ GV31 projector Required tools and materials USB-C firmare upgrade tool for GV31 USB-A to USB-C cable (with up-to keep your projector running with data transferring available) BenQ GV31 projector Step 1: Operate the USB-C firmare upgrade tool It is suggested to -date benefits from features, applications, and bug improvement.
User Manual
Page 3
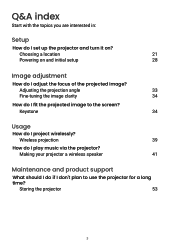
...Fine-tuning the image clarity 34 How do I fit the projected image to use the projector for a long time? Q&A index Start with the topics you are interested in: Setup How do I set up the projector and turn it on and initial setup 28 Image adjustment How do I adjust the ...focus of the projected image? Choosing a location 21 Powering on ? Making your projector a wireless speaker 41 Maintenance and product support What should I do if...
...Fine-tuning the image clarity 34 How do I fit the projected image to use the projector for a long time? Q&A index Start with the topics you are interested in: Setup How do I set up the projector and turn it on and initial setup 28 Image adjustment How do I adjust the ...focus of the projected image? Choosing a location 21 Powering on ? Making your projector a wireless speaker 41 Maintenance and product support What should I do if...
User Manual
Page 4
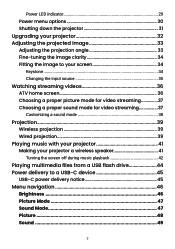
...HDMI port 15 Wired connection (USB-A port 15 Wired connection (USB-C port 15 Remote control (projector remote control only 18 Remote control effective range 19 Setting to power on projector by remote control 19 Turning remote control backlight on/off 20 Installation 21 Choosing a location 21 ...Obtaining a preferred image size 23 Projection dimensions 23 Using the projector in an outdoor setting 24 Installing the ATV dongle 25 Power supply 27 Charging the battery 27 Getting started 28 Powering on ...
...HDMI port 15 Wired connection (USB-A port 15 Wired connection (USB-C port 15 Remote control (projector remote control only 18 Remote control effective range 19 Setting to power on projector by remote control 19 Turning remote control backlight on/off 20 Installation 21 Choosing a location 21 ...Obtaining a preferred image size 23 Projection dimensions 23 Using the projector in an outdoor setting 24 Installing the ATV dongle 25 Power supply 27 Charging the battery 27 Getting started 28 Powering on ...
User Manual
Page 5
Power LED indicator 29 Power menu options 30 Shutting down the projector 31 Upgrading your projector 32 Adjusting the projected image 33 Adjusting the projection angle 33 Fine-tuning the image clarity 34 Fitting the image to your screen 34 ...Choosing a proper sound mode for video streaming 37 Customizing a sound mode 38 Projection...39 Wireless projection 39 Wired projection 39 Playing music with your projector 41 Making your projector a wireless speaker 41 Turning the screen off during music playback 42 Playing multimedia files from a USB flash drive 44 Power delivery to a USB...
Power LED indicator 29 Power menu options 30 Shutting down the projector 31 Upgrading your projector 32 Adjusting the projected image 33 Adjusting the projection angle 33 Fine-tuning the image clarity 34 Fitting the image to your screen 34 ...Choosing a proper sound mode for video streaming 37 Customizing a sound mode 38 Projection...39 Wireless projection 39 Wired projection 39 Playing music with your projector 41 Making your projector a wireless speaker 41 Turning the screen off during music playback 42 Playing multimedia files from a USB flash drive 44 Power delivery to a USB...
User Manual
Page 6
... 52 Maintenance 53 Care of the projector 53 Cleaning the lens 53 Storing the projector 53 Transporting the projector 54 Light source information 54 Extending LED life 54 Troubleshooting 55 Specifications 57 Projector specifications 57 Timing chart 59 Video ...timings 60 Supported file formats 61 Appendix...62 Working with a tripod (purchased separately 62 Pairing with a new remote control 63 Copyright & disclaimer 64 Copyright...64 Disclaimer...64 Warranty...65 Statement regarding hyperlinks and third-party websites..... 65 BenQ...
... 52 Maintenance 53 Care of the projector 53 Cleaning the lens 53 Storing the projector 53 Transporting the projector 54 Light source information 54 Extending LED life 54 Troubleshooting 55 Specifications 57 Projector specifications 57 Timing chart 59 Video ...timings 60 Supported file formats 61 Appendix...62 Working with a tripod (purchased separately 62 Pairing with a new remote control 63 Copyright & disclaimer 64 Copyright...64 Disclaimer...64 Warranty...65 Statement regarding hyperlinks and third-party websites..... 65 BenQ...
User Manual
Page 7
... become excessively high, such as it is important that is designed and tested to fall and be damaged. • Do not place inflammables near the projector. Allow at least 50 cm clearance from walls and free flow of this product, it may fall over, causing injury or resulting in this... projector in a safe place for safety of more than 10 degrees left to right, nor at an angle of more than 15 degrees front to back. 3. ...
... become excessively high, such as it is important that is designed and tested to fall and be damaged. • Do not place inflammables near the projector. Allow at least 50 cm clearance from walls and free flow of this product, it may fall over, causing injury or resulting in this... projector in a safe place for safety of more than 10 degrees left to right, nor at an angle of more than 15 degrees front to back. 3. ...
User Manual
Page 8
...the screen. • Locations near fire alarms. • Locations with any item. • Do not place the projector on (even in powersaving mode). • Do not cover the projector with an ambient temperature above 40°C /104°F • Locations where the altitudes are higher than 2000 ...m (6562 feet). 2000 m (6562 feet) 0 m (0 feet) 5. Do not block the vents holes while the projector is recommended that you connect the projector through a power stabilizer, surge protector or uninterruptible power supply (UPS) as appropriate to your situation. 8
...the screen. • Locations near fire alarms. • Locations with any item. • Do not place the projector on (even in powersaving mode). • Do not cover the projector with an ambient temperature above 40°C /104°F • Locations where the altitudes are higher than 2000 ...m (6562 feet). 2000 m (6562 feet) 0 m (0 feet) 5. Do not block the vents holes while the projector is recommended that you connect the projector through a power stabilizer, surge protector or uninterruptible power supply (UPS) as appropriate to your situation. 8
User Manual
Page 9
It may harm your warranty. Do not look straight into the projector will void your sight. 10. Excessive operation of LEDs beyond the rated LED life. Liquids spilled into the projector lens during operation. Do not operate the projector LED beyond the rated life could cause LEDs to have the projector repaired. 9. If the projector does become wet, disconnect it . 8. Do not place liquids near or on the projector or place any objects upon it from the power point and call BenQ to break on rare occasions. 9 7. Do not step on the projector.
It may harm your warranty. Do not look straight into the projector will void your sight. 10. Excessive operation of LEDs beyond the rated LED life. Liquids spilled into the projector lens during operation. Do not operate the projector LED beyond the rated life could cause LEDs to have the projector repaired. 9. If the projector does become wet, disconnect it . 8. Do not place liquids near or on the projector or place any objects upon it from the power point and call BenQ to break on rare occasions. 9 7. Do not step on the projector.
User Manual
Page 10
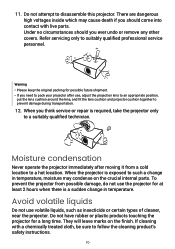
... inside which may condense on the finish. Warning • Please keep the original packing for a long time. To prevent the projector from a cold location to follow the cleaning product's safety instructions. 10 Do not have rubber or plastic products touching the... possible future shipment. • If you think service or repair is required, take the projector only to prevent damage during transportation. 12. Refer servicing only to disassemble this projector. When the projector is a sudden change in temperature. Avoid volatile liquids Do not use , adjust the projection lens to...
... inside which may condense on the finish. Warning • Please keep the original packing for a long time. To prevent the projector from a cold location to follow the cleaning product's safety instructions. 10 Do not have rubber or plastic products touching the... possible future shipment. • If you think service or repair is required, take the projector only to prevent damage during transportation. 12. Refer servicing only to disassemble this projector. When the projector is a sudden change in temperature. Avoid volatile liquids Do not use , adjust the projection lens to...

User Manual
Page 12
GV31 ATV dongle (QS02) Projector's remote control (With two AAA batteries) Quick start guide Regulatory statements Warranty card (Varies by region) Power adapter Power cord (Varies by region) Base Note &#...
GV31 ATV dongle (QS02) Projector's remote control (With two AAA batteries) Quick start guide Regulatory statements Warranty card (Varies by region) Power adapter Power cord (Varies by region) Base Note &#...
User Manual
Page 13
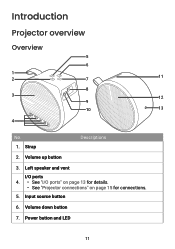
Strap Descriptions 2. Input source button 6. Power button and LED 11 Volume down button 7. Introduction Projector overview Overview 5 6 1 2 7 11 8 3 12 9 10 13 4 No. 1. Volume up button 3. Left speaker and vent I/O ports 4. • See "I/O ports" on page 13 for details. • See "Projector connections" on page 15 for connections. 5.
Strap Descriptions 2. Input source button 6. Power button and LED 11 Volume down button 7. Introduction Projector overview Overview 5 6 1 2 7 11 8 3 12 9 10 13 4 No. 1. Volume up button 3. Left speaker and vent I/O ports 4. • See "I/O ports" on page 13 for details. • See "Projector connections" on page 15 for connections. 5.
User Manual
Page 15
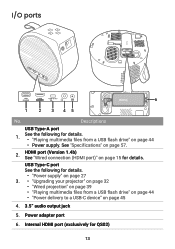
... "Specifications" on page 45 4. 3.5" audio output jack 5. I/O ports 6 1 2 3 45 No. Internal HDMI port (exclusively for details. • "Power supply" on page 27 3. • "Upgrading your projector" on page 32 • "Wired projection" on page 39 • "Playing multimedia files from a USB flash drive" on page 15 for details.
... "Specifications" on page 45 4. 3.5" audio output jack 5. I/O ports 6 1 2 3 45 No. Internal HDMI port (exclusively for details. • "Power supply" on page 27 3. • "Upgrading your projector" on page 32 • "Wired projection" on page 39 • "Playing multimedia files from a USB flash drive" on page 15 for details.
User Manual
Page 17
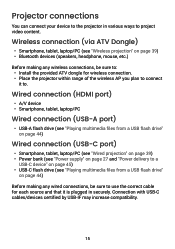
... content. Connection with USB-C cables/devices certified by USB-IF may increase compatibility. 15 Projector connections You can connect your device to the projector in various ways to use the correct cable for wireless connection. • Place the projector within range of the wireless AP you plan to connect it is plugged in...
... content. Connection with USB-C cables/devices certified by USB-IF may increase compatibility. 15 Projector connections You can connect your device to the projector in various ways to use the correct cable for wireless connection. • Place the projector within range of the wireless AP you plan to connect it is plugged in...

User Manual
Page 19
... for reference only. 17 Note • In the connections above is for reference only. • If the selected video image is not displayed after the projector is turned on and the correct video source has been selected, check that the video source device is connected. • The illustration above , some cables...
... for reference only. 17 Note • In the connections above is for reference only. • If the selected video image is not displayed after the projector is turned on and the correct video source has been selected, check that the video source device is connected. • The illustration above , some cables...
User Manual
Page 20
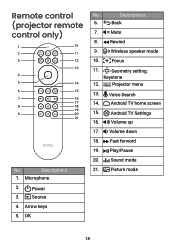
Android TV home screen 15. Picture mode 18 Microphone 2. Volume down 18. Mute 8. Geometry setting: Keystone 12. Fast forword 19. Arrow keys 5. Focus 11. Volume up 17. Descriptions 1. Projector menu 13. Voice Search 14. Android TV Settings 16. Play/Pause 20. Remote control (projector remote control only) 1 10 2 11 3 12 13 4 5 14 6 15 7 16 17 8 18 19 9 20 21 No. Source 4. Wireless speaker mode 10. Descriptions 6. Rewind 9. OK No. Back 7. Sound mode 21. Power 3.
Android TV home screen 15. Picture mode 18 Microphone 2. Volume down 18. Mute 8. Geometry setting: Keystone 12. Fast forword 19. Arrow keys 5. Focus 11. Volume up 17. Descriptions 1. Projector menu 13. Voice Search 14. Android TV Settings 16. Play/Pause 20. Remote control (projector remote control only) 1 10 2 11 3 12 13 4 5 14 6 15 7 16 17 8 18 19 9 20 21 No. Source 4. Wireless speaker mode 10. Descriptions 6. Rewind 9. OK No. Back 7. Sound mode 21. Power 3.
User Manual
Page 21
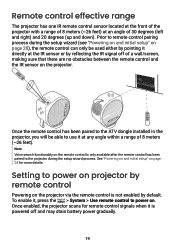
... on and initial setup" on page 28 for remote control signals when it , press the > System > Use remote control to power on the projector. Once enabled, the projector scans for more details. To enable it is powered off of a wall/screen, making sure that there are no obstacles between the remote control...) at any angle within a range of 30 degrees (left and right) and 20 degrees (up and down). Prior to the ATV dongle installed in the projector, you will be used either by reflecting the IR signal off and may drain battery power gradually. 19 Once the remote control has been paired...
... on and initial setup" on page 28 for remote control signals when it , press the > System > Use remote control to power on the projector. Once enabled, the projector scans for more details. To enable it is powered off of a wall/screen, making sure that there are no obstacles between the remote control...) at any angle within a range of 30 degrees (left and right) and 20 degrees (up and down). Prior to the ATV dongle installed in the projector, you will be used either by reflecting the IR signal off and may drain battery power gradually. 19 Once the remote control has been paired...
User Manual
Page 23
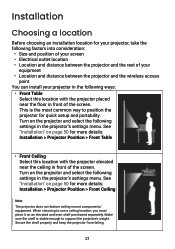
...8226; Electrical outlet location • Location and distance between the projector and the rest of your equipment • Location and distance between the projector and the wireless access point You can install your projector in the following ways: • Front Table Select this location...Turn on page 50 for more details: Installation > Projector Position > Front Table • Front Ceiling Select this location with the projector elevated near the floor in the projector's settings menu. See "Installation" on the projector and select the following settings in front of the screen...
...8226; Electrical outlet location • Location and distance between the projector and the rest of your equipment • Location and distance between the projector and the wireless access point You can install your projector in the following ways: • Front Table Select this location...Turn on page 50 for more details: Installation > Projector Position > Front Table • Front Ceiling Select this location with the projector elevated near the floor in the projector's settings menu. See "Installation" on the projector and select the following settings in front of the screen...
User Manual
Page 24
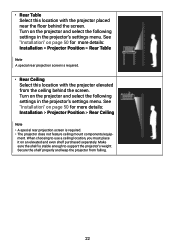
.... Make sure the shelf is required. • Rear Ceiling Select this location with the projector elevated from falling. 22 See "Installation" on an elevated and even shelf purchased separately. • Rear Table Select this location with the projector placed near the floor behind the screen. Secure the shelf properly and keep the...
.... Make sure the shelf is required. • Rear Ceiling Select this location with the projector elevated from falling. 22 See "Installation" on an elevated and even shelf purchased separately. • Rear Table Select this location with the projector placed near the floor behind the screen. Secure the shelf properly and keep the...
User Manual
Page 25
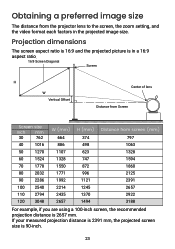
...:9 aspect ratio. 16:9 Screen Diagonal Screen H W Vertical Offset Center of lens Distance from Screen Screen size Inch mm 30 762 W (mm) H (mm) Distance from the projector lens to the screen, the zoom setting, and the video format each factors in the projected image size. Obtaining a preferred image size The distance from...
...:9 aspect ratio. 16:9 Screen Diagonal Screen H W Vertical Offset Center of lens Distance from Screen Screen size Inch mm 30 762 W (mm) H (mm) Distance from the projector lens to the screen, the zoom setting, and the video format each factors in the projected image size. Obtaining a preferred image size The distance from...


