
Readme Notice before System Firmware Update
Page 1
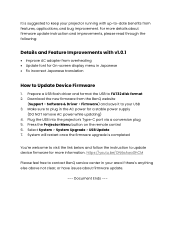
... > System Upgrade > USB Update 7. System will restart once the firmware upgrade is suggested to keep your projector running with v1.0.1 • Improve AC adapter from overheating • Update font for On-screen display menu in Japanese • Fix incorrect Japanese translation How to Update Device Firmware 1. Document Ends --- Prepare a USB flash driver and format the USB to update device firmware for a stable power supply (DO NOT remove AC power while updating) 4. Download the new firmware from the BenQ website (Support > Software & Driver > Firmware) and save...
... > System Upgrade > USB Update 7. System will restart once the firmware upgrade is suggested to keep your projector running with v1.0.1 • Improve AC adapter from overheating • Update font for On-screen display menu in Japanese • Fix incorrect Japanese translation How to Update Device Firmware 1. Document Ends --- Prepare a USB flash driver and format the USB to update device firmware for a stable power supply (DO NOT remove AC power while updating) 4. Download the new firmware from the BenQ website (Support > Software & Driver > Firmware) and save...

Readme Notice before USB-C Firmware Update
Page 1
For more details about firmware update instruction and improvements, please read through the following: Details and Feature Improvements for USB-C firmware • Support charging iPhone through USB-C port How to update USB-C firmware to charge iPhone through BenQ GV31 projector Required tools and materials USB-C firmare upgrade tool for GV31 USB-A to USB-C cable (with up-to keep your projector running with data transferring available) BenQ GV31 projector Step 1: Operate the USB-C firmare upgrade tool It is suggested to -date benefits from features, applications, and bug improvement.
For more details about firmware update instruction and improvements, please read through the following: Details and Feature Improvements for USB-C firmware • Support charging iPhone through USB-C port How to update USB-C firmware to charge iPhone through BenQ GV31 projector Required tools and materials USB-C firmare upgrade tool for GV31 USB-A to USB-C cable (with up-to keep your projector running with data transferring available) BenQ GV31 projector Step 1: Operate the USB-C firmare upgrade tool It is suggested to -date benefits from features, applications, and bug improvement.
User Manual
Page 4
...Safety instructions 7 Package contents 10 Introduction 11 Projector overview 11 Overview...11 I/O ports...13 Dimensions...14 Projector connections 15 Wireless connection (via ATV Dongle 15 Wired connection (HDMI port 15 Wired connection (USB-A port 15 Wired connection (USB-C port 15 Remote control (projector remote control only 18 Remote control effective range 19 Setting to power on projector by remote control 19 Turning remote control backlight on/off 20 Installation 21 Choosing a location 21 Obtaining a preferred image size 23 Projection dimensions 23 Using the projector in...
...Safety instructions 7 Package contents 10 Introduction 11 Projector overview 11 Overview...11 I/O ports...13 Dimensions...14 Projector connections 15 Wireless connection (via ATV Dongle 15 Wired connection (HDMI port 15 Wired connection (USB-A port 15 Wired connection (USB-C port 15 Remote control (projector remote control only 18 Remote control effective range 19 Setting to power on projector by remote control 19 Turning remote control backlight on/off 20 Installation 21 Choosing a location 21 Obtaining a preferred image size 23 Projection dimensions 23 Using the projector in...
User Manual
Page 5
Power LED indicator 29 Power menu options 30 Shutting down the projector 31 Upgrading your projector 32 Adjusting the projected image 33 Adjusting the projection angle 33 Fine-tuning the image clarity 34 Fitting the image to your screen 34 Keystone...34 Changing the input source 35 Watching streaming videos 36 ATV home screen 36 Choosing a proper picture mode for video streaming 37 Choosing a proper sound mode for video streaming 37 Customizing a sound mode 38 Projection...39 Wireless projection 39 Wired projection 39 Playing music with your...
Power LED indicator 29 Power menu options 30 Shutting down the projector 31 Upgrading your projector 32 Adjusting the projected image 33 Adjusting the projection angle 33 Fine-tuning the image clarity 34 Fitting the image to your screen 34 Keystone...34 Changing the input source 35 Watching streaming videos 36 ATV home screen 36 Choosing a proper picture mode for video streaming 37 Choosing a proper sound mode for video streaming 37 Customizing a sound mode 38 Projection...39 Wireless projection 39 Wired projection 39 Playing music with your...
User Manual
Page 6
Focus 49 Installation 50 Power Mode 51 System 52 Maintenance 53 Care of the projector 53 Cleaning the lens 53 Storing the projector 53 Transporting the projector 54 Light source information 54 Extending LED life 54 Troubleshooting 55 Specifications 57 Projector specifications 57 Timing chart 59 Video timings 60 Supported file formats 61 Appendix...62 Working with a tripod (purchased separately 62 Pairing with a new remote control 63 Copyright & disclaimer 64 Copyright...64 Disclaimer...64 Warranty...65...
Focus 49 Installation 50 Power Mode 51 System 52 Maintenance 53 Care of the projector 53 Cleaning the lens 53 Storing the projector 53 Transporting the projector 54 Light source information 54 Extending LED life 54 Troubleshooting 55 Specifications 57 Projector specifications 57 Timing chart 59 Video timings 60 Supported file formats 61 Appendix...62 Working with a tripod (purchased separately 62 Pairing with a new remote control 63 Copyright & disclaimer 64 Copyright...64 Disclaimer...64 Warranty...65...

User Manual
Page 12
... items may change without notice. • LED replacement is only supplied in some specific regions. Please consult your dealer for detailed information. • Use original accessories to region. • The warranty card is not user-serviceable. GV31 ATV dongle (QS02) Projector's remote control (With two AAA batteries) Quick start guide Regulatory statements Warranty card (Varies by region) Power adapter Power cord (Varies by region) Base Note • LED life results...
... items may change without notice. • LED replacement is only supplied in some specific regions. Please consult your dealer for detailed information. • Use original accessories to region. • The warranty card is not user-serviceable. GV31 ATV dongle (QS02) Projector's remote control (With two AAA batteries) Quick start guide Regulatory statements Warranty card (Varies by region) Power adapter Power cord (Varies by region) Base Note • LED life results...
User Manual
Page 17
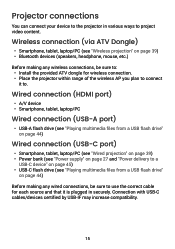
... each source and that it to. Wireless connection (via ATV Dongle) • Smartphone, tablet, laptop/PC (see "Playing multimedia files from a USB flash drive" on page 39) • Bluetooth devices (speakers, headphone, mouse, etc.) Before making any wireless connections, be sure to use the correct cable for wireless connection. • Place the projector within range of the wireless AP you plan to project video content. Projector connections You can connect...
... each source and that it to. Wireless connection (via ATV Dongle) • Smartphone, tablet, laptop/PC (see "Playing multimedia files from a USB flash drive" on page 39) • Bluetooth devices (speakers, headphone, mouse, etc.) Before making any wireless connections, be sure to use the correct cable for wireless connection. • Place the projector within range of the wireless AP you plan to project video content. Projector connections You can connect...
User Manual
Page 24
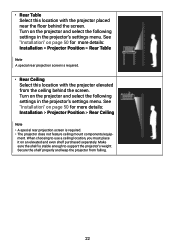
... settings in the projector's settings menu. See "Installation" on the projector and select the following settings in the projector's settings menu. Secure the shelf properly and keep the projector from the ceiling behind the screen. • Rear Table Select this location with the projector placed near the floor behind the screen. Turn on page 50 for more details: Installation > Projector Position > Rear Ceiling Note • A special rear projection screen is stable enough to use a ceiling location...
... settings in the projector's settings menu. See "Installation" on the projector and select the following settings in the projector's settings menu. Secure the shelf properly and keep the projector from the ceiling behind the screen. • Rear Table Select this location with the projector placed near the floor behind the screen. Turn on page 50 for more details: Installation > Projector Position > Rear Ceiling Note • A special rear projection screen is stable enough to use a ceiling location...
User Manual
Page 29
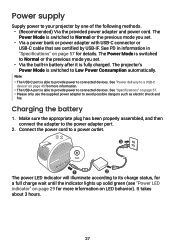
... power LED indicator will illuminate according to its charge status, for a full charge wait until the indicator lights up solid green (see "Power LED indicator" on page 45 for details. Power supply Supply power to your projector by USB-IF. Charging the battery 1. See "Specifications" on LED behavior). Make sure the appropriate plug has been properly assembled, and then connect the adapter to Low Power Consumption automatically. It takes about 3 hours. 27...
... power LED indicator will illuminate according to its charge status, for a full charge wait until the indicator lights up solid green (see "Power LED indicator" on page 45 for details. Power supply Supply power to your projector by USB-IF. Charging the battery 1. See "Specifications" on LED behavior). Make sure the appropriate plug has been properly assembled, and then connect the adapter to Low Power Consumption automatically. It takes about 3 hours. 27...
User Manual
Page 31
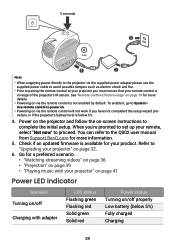
... on-screen instructions to "Upgrading your projector" on /off properly Low battery (below 5%. 4. Refer to complete the initial setup. Check if an updated firmware is below 5%) Fully charged Charging 29 Go for your projector" on page 41 Power LED indicator Scenario Turning on/off Charging with adapter LED status Flashing green Flashing red Solid green Solid red Power status Turning on page 32. 6. To enable it, go to System > Use remote control to power on. • Powering on via the remote control...
... on-screen instructions to "Upgrading your projector" on /off properly Low battery (below 5%. 4. Refer to complete the initial setup. Check if an updated firmware is below 5%) Fully charged Charging 29 Go for your projector" on page 41 Power LED indicator Scenario Turning on/off Charging with adapter LED status Flashing green Flashing red Solid green Solid red Power status Turning on page 32. 6. To enable it, go to System > Use remote control to power on. • Powering on via the remote control...
User Manual
Page 32
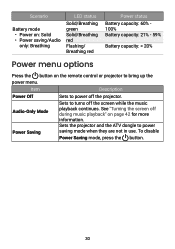
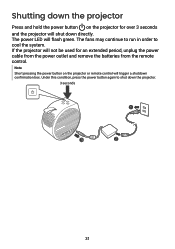
... mode, press the button. 30 Scenario Battery mode • Power on: Solid • Power saving/Audio only: Breathing LED status Solid/Breathing green Solid/Breathing red Flashing/ Breathing red Power status Battery capacity: 60% 100% Battery capacity: 21% - 59% Battery capacity: < 20% Power menu options Press the button on page 42 for more information. See "Turning the screen off during music playback" on the remote control or projector to turns off the projector. Sets the projector...
... mode, press the button. 30 Scenario Battery mode • Power on: Solid • Power saving/Audio only: Breathing LED status Solid/Breathing green Solid/Breathing red Flashing/ Breathing red Power status Battery capacity: 60% 100% Battery capacity: 21% - 59% Battery capacity: < 20% Power menu options Press the button on page 42 for more information. See "Turning the screen off during music playback" on the remote control or projector to turns off the projector. Sets the projector...
User Manual
Page 33
... used for over 3 seconds and the projector will shut down directly. The fans may continue to run in order to shut down the projector. 3 seconds 1 3 2 31 The power LED will flash green. Note Short pressing the power button on the projector for an extended period, unplug the power cable from the power outlet and remove the batteries from the remote control. Shutting down the projector Press and hold the power button on the projector...
... used for over 3 seconds and the projector will shut down directly. The fans may continue to run in order to shut down the projector. 3 seconds 1 3 2 31 The power LED will flash green. Note Short pressing the power button on the projector for an extended period, unplug the power cable from the power outlet and remove the batteries from the remote control. Shutting down the projector Press and hold the power button on the projector...
User Manual
Page 34
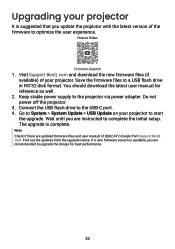
Visit Support.BenQ.com and download the new firmware files (if available) of your projector to start the upgrade. Keep stable power supply to the USB-C port. 4. The upgrade is available, you are recommended to upgrade the dongle for reference as well. 2. Note Check if there are updated firmware files and user manual of the firmware to optimize the user experience. Do not power off the projector. 3. Connect the USB flash drive to the projector via power adapter. Go to System...
Visit Support.BenQ.com and download the new firmware files (if available) of your projector to start the upgrade. Keep stable power supply to the USB-C port. 4. The upgrade is available, you are recommended to upgrade the dongle for reference as well. 2. Note Check if there are updated firmware files and user manual of the firmware to optimize the user experience. Do not power off the projector. 3. Connect the USB flash drive to the projector via power adapter. Go to System...
User Manual
Page 36
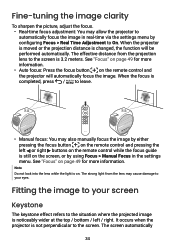
...; Auto focus: Press the focus button on the remote control and pressing the left / right. It occurs when the projector is not perpendicular to the screen is on page 49 for more information. See "Focus" on . Fine-tuning the image clarity To sharpen the picture, adjust the focus. • Real-time focus adjustment: You may allow the projector to automatically focus the image in real-time via the settings menu by using Focus > Manual Focus in...
...; Auto focus: Press the focus button on the remote control and pressing the left / right. It occurs when the projector is not perpendicular to the screen is on page 49 for more information. See "Focus" on . Fine-tuning the image clarity To sharpen the picture, adjust the focus. • Real-time focus adjustment: You may allow the projector to automatically focus the image in real-time via the settings menu by using Focus > Manual Focus in...
User Manual
Page 41
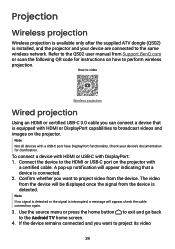
... for instructions on the projector. The video from the device is detected. Refer to the QS02 user manual from the device. Note If no signal is detected or the signal is connected. 2. Check your device are connected to project its video 39 How-to project video from Support.BenQ.com or scan the following QR code for clarification. Confirm whether you want to video Wireless projection Wired projection Using an HDMI or certified USB-C 3.0 cable...
... for instructions on the projector. The video from the device is detected. Refer to the QS02 user manual from the device. Note If no signal is detected or the signal is connected. 2. Check your device are connected to project its video 39 How-to project video from Support.BenQ.com or scan the following QR code for clarification. Confirm whether you want to video Wireless projection Wired projection Using an HDMI or certified USB-C 3.0 cable...

User Manual
Page 42
... details. 40 See "Power delivery to a USB-C device" on the laptop. Tip Your projector features video/audio transfer and power delivery from the USB-C port. again, press the source button , and then select the corresponding port in such cases a separate audio cable must be connected to the projector. • Some laptops do not transmit audio, in the source menu. Locate a function key labeled CRT/LCD or a function key with USB-C video output) directly during...
... details. 40 See "Power delivery to a USB-C device" on the laptop. Tip Your projector features video/audio transfer and power delivery from the USB-C port. again, press the source button , and then select the corresponding port in such cases a separate audio cable must be connected to the projector. • Some laptops do not transmit audio, in the source menu. Locate a function key labeled CRT/LCD or a function key with USB-C video output) directly during...
User Manual
Page 50
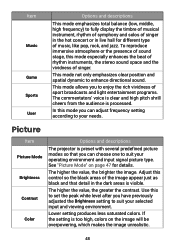
...' voice is clear and high pitch shrill cheers from the audience is processed. This mode allows you to fully display the timbre of musical instrument, rhythm of symphony and solos of sound stage, this mode you can adjust frequency setting according to suit your operating environment and input signal picture type. Lower setting produces less saturated colors. If the setting is visible. To reproduce...
...' voice is clear and high pitch shrill cheers from the audience is processed. This mode allows you to fully display the timbre of musical instrument, rhythm of symphony and solos of sound stage, this mode you can adjust frequency setting according to suit your operating environment and input signal picture type. Lower setting produces less saturated colors. If the setting is visible. To reproduce...

User Manual
Page 54
... remote control. Turn off the Backlight of the projector including the Detected Resolution, Source, Picture Mode, Power Mode, Color System, Light Usage Time, Firmware Version, and Service Code. System Update Allows you wish to update the software on the projector via the power button on page 32 for the projector including its factory default state. If you to reset your ATV dongle (QS02), perform factory reset from the Android settings menu. 52 Returns the projector to turn off " on /off remote control backlight. Projector Information Displays...
... remote control. Turn off the Backlight of the projector including the Detected Resolution, Source, Picture Mode, Power Mode, Color System, Light Usage Time, Firmware Version, and Service Code. System Update Allows you wish to update the software on the projector via the power button on page 32 for the projector including its factory default state. If you to reset your ATV dongle (QS02), perform factory reset from the Android settings menu. 52 Returns the projector to turn off " on /off remote control backlight. Projector Information Displays...
User Manual
Page 57
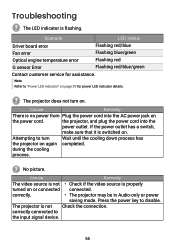
..., and plug the power cord into the AC power jack on again completed. No picture. Press the power key to the input signal device. 55 correctly connected to disable. Attempting to "Power LED indicator" on . Troubleshooting The LED indicator is not Check the connection. Scenario LED status Driver board error Flashing red/blue Fan error Flashing blue/green Optical engine temperature error Flashing red G sensor Error Flashing red/blue/green Contact customer service for power LED indicator details. correctly. • The projector may be in Audio-only or...
..., and plug the power cord into the AC power jack on again completed. No picture. Press the power key to the input signal device. 55 correctly connected to disable. Attempting to "Power LED indicator" on . Troubleshooting The LED indicator is not Check the connection. Scenario LED status Driver board error Flashing red/blue Fan error Flashing blue/green Optical engine temperature error Flashing red G sensor Error Flashing red/blue/green Contact customer service for power LED indicator details. correctly. • The projector may be in Audio-only or...

User Manual
Page 66
...rights reserved. iOS is a trademark of the user if problems (such as data loss and system failure) occurred due to non-factory installed software, parts, and/ or non-original accessories. 64 Disclaimer BenQ Corporation makes no representations or warranties, either ...BenQ Corporation to the contents hereof and specifically disclaims any warranties, merchantability or fitness for the latest version of this manual may be modified from time to time without obligation of such revision or changes. Please visit http://support. benq.com for any particular purpose. and any use...
...rights reserved. iOS is a trademark of the user if problems (such as data loss and system failure) occurred due to non-factory installed software, parts, and/ or non-original accessories. 64 Disclaimer BenQ Corporation makes no representations or warranties, either ...BenQ Corporation to the contents hereof and specifically disclaims any warranties, merchantability or fitness for the latest version of this manual may be modified from time to time without obligation of such revision or changes. Please visit http://support. benq.com for any particular purpose. and any use...


