

Monitor Reference Guide
Page 1
...Black eQualizer • FPS Mode & RTS Mode • Display Mode & Smart Scaling • ZeroFlicker & Low Blue Light Description / Features GW2255 GW2265HM GL2460HM GL2760H GW2760HS GW2765HT 21.5" W 1080p, 6ms GTG. 20M:1 DCR, D-Sub/ DVI, 8.1 Lbs 22" W 1080p, 6ms GTG. 20M:1 DCR, D-sub/DVI-D/...4ms GTG. 20M:1 DCR, Height adjustable stand, D-sub / DVI-DL / DP / HDMI / Headphone jack/Audio-in,1W x 2 Speakers, 15.2 Lbs Creative NEW! RL2755HM XL2411Z XL2420G NEW! BenQ America Corp. Product names, logos, brands, and other trademarks featured or referred to change without notice. All rights...
...Black eQualizer • FPS Mode & RTS Mode • Display Mode & Smart Scaling • ZeroFlicker & Low Blue Light Description / Features GW2255 GW2265HM GL2460HM GL2760H GW2760HS GW2765HT 21.5" W 1080p, 6ms GTG. 20M:1 DCR, D-Sub/ DVI, 8.1 Lbs 22" W 1080p, 6ms GTG. 20M:1 DCR, D-sub/DVI-D/...4ms GTG. 20M:1 DCR, Height adjustable stand, D-sub / DVI-DL / DP / HDMI / Headphone jack/Audio-in,1W x 2 Speakers, 15.2 Lbs Creative NEW! RL2755HM XL2411Z XL2420G NEW! BenQ America Corp. Product names, logos, brands, and other trademarks featured or referred to change without notice. All rights...
GL60 Series User Manual
Page 4
......8 How to assemble your monitor hardware 9 How to detach the stand base ...13 Using the monitor wall mounting kit 14 Getting the most from your BenQ monitor 15 How to install the monitor on a new computer 16 How to upgrade the monitor on an existing computer 17 How to install on... Adjusting display mode ...23 Choosing an appropriate picture mode 24 Navigating the main menu ...25 Display menu ...26 Picture menu ...28 Picture Advanced menu ...30 Audio menu ...33 System menu ...34 Troubleshooting ...37 Frequently asked questions (FAQ) ...37 Need more help?...39 4
......8 How to assemble your monitor hardware 9 How to detach the stand base ...13 Using the monitor wall mounting kit 14 Getting the most from your BenQ monitor 15 How to install the monitor on a new computer 16 How to upgrade the monitor on an existing computer 17 How to install on... Adjusting display mode ...23 Choosing an appropriate picture mode 24 Navigating the main menu ...25 Display menu ...26 Picture menu ...28 Picture Advanced menu ...30 Audio menu ...33 System menu ...34 Troubleshooting ...37 Frequently asked questions (FAQ) ...37 Need more help?...39 4
GL60 Series User Manual
Page 6
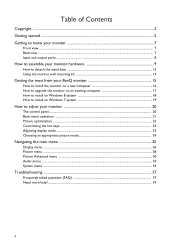
... started The fitted foam packing is ideal for your region. Video Cable: D-Sub Video Cable: DVI-D (Optional accessory) Video Cable: HDMI (Optional accessory, sold separately) Audio Cable (Optional accessory, sold separately) • Available accessories and the pictures shown here may need to transport the monitor.
... started The fitted foam packing is ideal for your region. Video Cable: D-Sub Video Cable: DVI-D (Optional accessory) Video Cable: HDMI (Optional accessory, sold separately) Audio Cable (Optional accessory, sold separately) • Available accessories and the pictures shown here may need to transport the monitor.
GL60 Series User Manual
Page 8
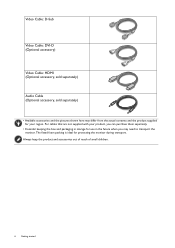
Input and output ports Available input and output ports may vary depending on the provided CD for details. Audio Line In 1 23 4 5 6 Models with HDMI inputs 6. Check the Specification document on your monitor AC power input jack 2. Headphone jack 4. HDMI socket 5. DVI-D socket 1 56 Models with dual inputs 3. Models with audio and HDMI inputs 1. D-Sub socket 1 34 5 6 8 Getting to know your purchased model.
Input and output ports Available input and output ports may vary depending on the provided CD for details. Audio Line In 1 23 4 5 6 Models with HDMI inputs 6. Check the Specification document on your monitor AC power input jack 2. Headphone jack 4. HDMI socket 5. DVI-D socket 1 56 Models with dual inputs 3. Models with audio and HDMI inputs 1. D-Sub socket 1 34 5 6 8 Getting to know your purchased model.
GL60 Series User Manual
Page 11
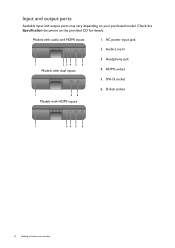
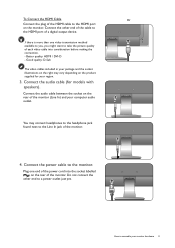
...video cable into the socket labelled on the monitor. Better quality: HDMI / DVI-D - Connect the audio cable (for your monitor hardware 11 How to the Line In jack of the monitor (Line In) and your computer... audio outlet. To Connect the HDMI Cable Or Connect the plug of a digital output device. If there ...Plug one video transmission method available to you, you might want to the monitor. Connect the audio cable between the socket on the product supplied for models with speakers).
...video cable into the socket labelled on the monitor. Better quality: HDMI / DVI-D - Connect the audio cable (for your monitor hardware 11 How to the Line In jack of the monitor (Line In) and your computer... audio outlet. To Connect the HDMI Cable Or Connect the plug of a digital output device. If there ...Plug one video transmission method available to you, you might want to the monitor. Connect the audio cable between the socket on the product supplied for models with speakers).
GL60 Series User Manual
Page 25
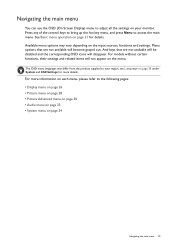
... refer to the following pages: • Display menu on page 26 • Picture menu on page 28 • Picture Advanced menu on page 30 • Audio menu on page 33 • System menu on the input sources, functions and settings. Available menu options may differ from the product supplied to access...
... refer to the following pages: • Display menu on page 26 • Picture menu on page 28 • Picture Advanced menu on page 30 • Audio menu on page 33 • System menu on the input sources, functions and settings. Available menu options may differ from the product supplied to access...
GL60 Series User Manual
Page 26
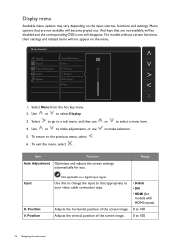
Menu options that appropriate to your video cable connection type. For models without certain functions, their settings and related items will disappear. Position Audio V. To return to select Display. 3. Item Auto Adjustment Function Optimizes and adjusts the screen settings automatically for models with HDMI inputs) 0 to 100 0 to make ...
Menu options that appropriate to your video cable connection type. For models without certain functions, their settings and related items will disappear. Position Audio V. To return to select Display. 3. Item Auto Adjustment Function Optimizes and adjusts the screen settings automatically for models with HDMI inputs) 0 to 100 0 to make ...
GL60 Series User Manual
Page 28
... Windows). • 2 • 3 • 4 • 5 28 Navigating the main menu Select to go to a sub menu, and then use 5. Mode: User Display Picture Picture Advanced Audio System Brightness Contrast Sharpness Gamma Color Temperature Hue Saturation Reset Color Normal Bluish Reddish User Define R G50 B 100 100 100 1. Select Menu from the hot...
... Windows). • 2 • 3 • 4 • 5 28 Navigating the main menu Select to go to a sub menu, and then use 5. Mode: User Display Picture Picture Advanced Audio System Brightness Contrast Sharpness Gamma Color Temperature Hue Saturation Reset Color Normal Bluish Reddish User Define R G50 B 100 100 100 1. Select Menu from the hot...

GL60 Series User Manual
Page 30
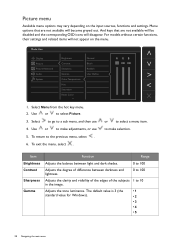
... from the hot key menu. 2. Menu options that best suits the type of blue light exposure to your eyes. Mode: Standard Display Picture Picture Advanced Audio System Picture Mode Senseye Demo Dynamic Contrast Overscan Display Mode Color Format HDMI RGB PC Range Standard Low Blue Light Movie Game Photo sRGB Eco...
... from the hot key menu. 2. Menu options that best suits the type of blue light exposure to your eyes. Mode: Standard Display Picture Picture Advanced Audio System Picture Mode Senseye Demo Dynamic Contrast Overscan Display Mode Color Format HDMI RGB PC Range Standard Low Blue Light Movie Game Photo sRGB Eco...
GL60 Series User Manual
Page 33
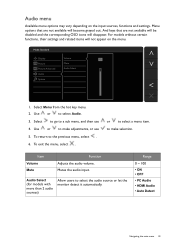
... and settings. To return to select a menu item. Item Volume Mute Function Adjusts the audio volume. Mutes the audio input. Range 0 ~ 100 • ON • OFF • PC Audio • HDMI Audio • Auto Detect Navigating the main menu 33 To exit the menu, select . Mode...then use 5. or to the previous menu, select . 6. Use or to make adjustments, or use 4. Audio Select (for models with more than 2 audio sources) Allow users to select Audio. 3. to make selection. For models without certain functions, their settings and related items will become grayed out....
... and settings. To return to select a menu item. Item Volume Mute Function Adjusts the audio volume. Mutes the audio input. Range 0 ~ 100 • ON • OFF • PC Audio • HDMI Audio • Auto Detect Navigating the main menu 33 To exit the menu, select . Mode...then use 5. or to the previous menu, select . 6. Use or to make adjustments, or use 4. Audio Select (for models with more than 2 audio sources) Allow users to select Audio. 3. to make selection. For models without certain functions, their settings and related items will become grayed out....
GL60 Series User Manual
Page 34
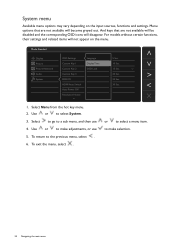
... and settings. For models without certain functions, their settings and related items will disappear. To exit the menu, select . Mode: Standard Display Picture Picture Advanced Audio System OSD Settings Custom Key 1 Custom Key 2 Custom Key 3 DDC/CI HDMI Auto Switch Auto Power Off Resolution Notice Language Display Time OSD Lock 5 Sec...
... and settings. For models without certain functions, their settings and related items will disappear. To exit the menu, select . Mode: Standard Display Picture Picture Advanced Audio System OSD Settings Custom Key 1 Custom Key 2 Custom Key 3 DDC/CI HDMI Auto Switch Auto Power Off Resolution Notice Language Display Time OSD Lock 5 Sec...