US 3 Year LCD Monitor Warranty
Page 3
...to or loss of your rights. Please call Technical Support Center to you specific legal rights. All prices, products, terms and conditions are subject to BenQ or BenQ Authorized Service Provider without notice. IN NO EVENT SHALL BenQ BE LIABLE FOR ANY INDIRECT, INCIDENTAL, SPECIAL OR ..., please DO NOT SEND ANY BenQ product to change without BenQ's authorization. YOU AGREE THAT REPAIR OR REPLACEMENT, AS APPLICABLE, UNDER THE WARRANTY SERVICES DESCRIBED HEREIN IS YOUR SOLE AND EXCLUSIVE REMEDY WITH RESPECT TO ANY BREACH OF THE BenQ LIMITED WARRANTY SET FORTH HEREIN. Some states or ...
...to or loss of your rights. Please call Technical Support Center to you specific legal rights. All prices, products, terms and conditions are subject to BenQ or BenQ Authorized Service Provider without notice. IN NO EVENT SHALL BenQ BE LIABLE FOR ANY INDIRECT, INCIDENTAL, SPECIAL OR ..., please DO NOT SEND ANY BenQ product to change without BenQ's authorization. YOU AGREE THAT REPAIR OR REPLACEMENT, AS APPLICABLE, UNDER THE WARRANTY SERVICES DESCRIBED HEREIN IS YOUR SOLE AND EXCLUSIVE REMEDY WITH RESPECT TO ANY BREACH OF THE BenQ LIMITED WARRANTY SET FORTH HEREIN. Some states or ...
GL60 Series User Manual
Page 2
..., chemical, manual or otherwise, without obligation of BenQ Corporation to notify any liquid, aerosol or glass cleaners. • Slots and openings on the marked label. No part of BenQ Corporation. Clean the LCD monitor surface with respect to make changes from the wall outlet before cleaning. They must be blocked or covered. Copyright Copyright © 2014 by external factors such as a power disconnect device...
..., chemical, manual or otherwise, without obligation of BenQ Corporation to notify any liquid, aerosol or glass cleaners. • Slots and openings on the marked label. No part of BenQ Corporation. Clean the LCD monitor surface with respect to make changes from the wall outlet before cleaning. They must be blocked or covered. Copyright Copyright © 2014 by external factors such as a power disconnect device...
GL60 Series User Manual
Page 4
... view ...7 Input and output ports...8 How to assemble your monitor hardware 9 How to detach the stand base ...13 Using the monitor wall mounting kit 14 Getting the most from your BenQ monitor 15 How to install the monitor on a new computer 16 How to upgrade the monitor on an existing computer 17 How to install on Windows 8 system 18 How to install on Windows 7 system 19 How to adjust your monitor 20 The control panel...
... view ...7 Input and output ports...8 How to assemble your monitor hardware 9 How to detach the stand base ...13 Using the monitor wall mounting kit 14 Getting the most from your BenQ monitor 15 How to install the monitor on a new computer 16 How to upgrade the monitor on an existing computer 17 How to install on Windows 8 system 18 How to install on Windows 7 system 19 How to adjust your monitor 20 The control panel...

GL60 Series User Manual
Page 9
... purchased model. 1. If the screen size is turned on you must turn it locks in or turn-on the power to the monitor until they click and lock into place. How to assemble your monitor hardware • If the computer is 27 inches, follow the illustration on the right to attach the monitor stand and the base. How to the monitor. Attach the monitor base. Orient and align the stand...
... purchased model. 1. If the screen size is turned on you must turn it locks in or turn-on the power to the monitor until they click and lock into place. How to assemble your monitor hardware • If the computer is 27 inches, follow the illustration on the right to attach the monitor stand and the base. How to the monitor. Attach the monitor base. Orient and align the stand...

GL60 Series User Manual
Page 11
... the product supplied for models with speakers). Plug one video transmission method available to you, you might want to take the picture quality of the power cord into consideration before making the connection. - Connect the audio cable (for your monitor hardware 11 You may vary depending on the rear of the monitor. Do not connect the other end of the cable to the monitor. Better quality: HDMI / DVI-D - Connect the audio cable between...
... the product supplied for models with speakers). Plug one video transmission method available to you, you might want to take the picture quality of the power cord into consideration before making the connection. - Connect the audio cable (for your monitor hardware 11 You may vary depending on the rear of the monitor. Do not connect the other end of the cable to the monitor. Better quality: HDMI / DVI-D - Connect the audio cable between...

GL60 Series User Manual
Page 13
... the locking clips to assemble your desk and placing a soft item like a stapler or a mouse will scratch or damage the monitor surround and controls. 2. If the screen size is 27 inches, follow the illustration on the bottom of the monitor base and detach the monitor base as a screwdriver to detach the monitor base. Turn off the computer before unplugging the power cable. Remove the monitor stand. While holding the monitor stand...
... the locking clips to assemble your desk and placing a soft item like a stapler or a mouse will scratch or damage the monitor surround and controls. 2. If the screen size is 27 inches, follow the illustration on the bottom of the monitor base and detach the monitor base as a screwdriver to detach the monitor base. Turn off the computer before unplugging the power cable. Remove the monitor stand. While holding the monitor stand...

GL60 Series User Manual
Page 14
... surface. Follow the instruction manuals of the wall mount bracket you purchased to complete the installation. 1 Release button 2 14 How to assemble your monitor hardware Using the monitor wall mounting kit The back of your LCD monitor has a VESA standard mount with flat surface. • Ensure that the wall material is stable to support the weight of the monitor. • Turn off the monitor and the power before disconnecting the cables from the monitor. 2. Remove the monitor stand.
... surface. Follow the instruction manuals of the wall mount bracket you purchased to complete the installation. 1 Release button 2 14 How to assemble your monitor hardware Using the monitor wall mounting kit The back of your LCD monitor has a VESA standard mount with flat surface. • Ensure that the wall material is stable to support the weight of the monitor. • Turn off the monitor and the power before disconnecting the cables from the monitor. 2. Remove the monitor stand.
GL60 Series User Manual
Page 15
... or as provided on the BenQ LCD Monitor CD-ROM. Further details and step-by-step instructions for either case however, the very next time you need to follow to successfully install the BenQ LCD Monitor driver software. Furthermore, if your computer is connected to a network which process you turn on your computer (after connecting the monitor to your computer), Windows will automatically recognize the new...
... or as provided on the BenQ LCD Monitor CD-ROM. Further details and step-by-step instructions for either case however, the very next time you need to follow to successfully install the BenQ LCD Monitor driver software. Furthermore, if your computer is connected to a network which process you turn on your computer (after connecting the monitor to your computer), Windows will automatically recognize the new...

GL60 Series User Manual
Page 16
... GL2460 GL2760 Suitable models GL2265 GL2460 / GL2460HM GL2760 / GL2760H 16 Getting the most from your monitor hardware on an existing computer. 1. Check the option for my device option, and click Next. 4. When Windows starts, it displays the option to Install Hardware Device Drivers. 2. How to install the monitor on a new computer This instruction details the procedure for selecting and installing the BenQ LCD Monitor driver software on the...
... GL2460 GL2760 Suitable models GL2265 GL2460 / GL2460HM GL2760 / GL2760H 16 Getting the most from your monitor hardware on an existing computer. 1. Check the option for my device option, and click Next. 4. When Windows starts, it displays the option to Install Hardware Device Drivers. 2. How to install the monitor on a new computer This instruction details the procedure for selecting and installing the BenQ LCD Monitor driver software on the...
GL60 Series User Manual
Page 17
.... Installing monitor driver software involves selecting an appropriate information file (.inf) on the BenQ LCD Monitor CD-ROM for manually updating the existing monitor driver software on your BenQ monitor 17 Windows has an Upgrade Device Driver Wizard to install on Windows 7 system on page 19. See: • How to install on Windows 8 system on page 18 • How to automate the task and guide you have connected, and letting Windows install the corresponding driver files...
.... Installing monitor driver software involves selecting an appropriate information file (.inf) on the BenQ LCD Monitor CD-ROM for manually updating the existing monitor driver software on your BenQ monitor 17 Windows has an Upgrade Device Driver Wizard to install on Windows 7 system on page 19. See: • How to install on Windows 8 system on page 18 • How to automate the task and guide you have connected, and letting Windows install the corresponding driver files...
GL60 Series User Manual
Page 18
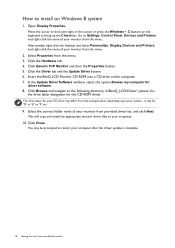
... screen or press the Windows + C buttons on the computer. 7. Click Close. Open Display Properties. Move the cursor to restart your computer after the driver update is the drive letter designator for driver software. 8. Insert the BenQ LCD Monitor CD-ROM into a CD drive on the keyboard to the following directory: d:\BenQ_LCD\Driver\ (where d is complete. 18 Getting the most from your monitor from the menu...
... screen or press the Windows + C buttons on the computer. 7. Click Close. Open Display Properties. Move the cursor to restart your computer after the driver update is the drive letter designator for driver software. 8. Insert the BenQ LCD Monitor CD-ROM into a CD drive on the keyboard to the following directory: d:\BenQ_LCD\Driver\ (where d is complete. 18 Getting the most from your monitor from the menu...
GL60 Series User Manual
Page 19
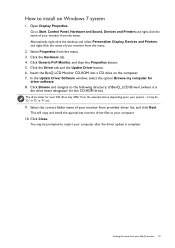
... and install the appropriate monitor driver files to Start, Control Panel, Hardware and Sound, Devices and Printers and right-click the name of your monitor from the menu. Alternatively, right-click the desktop and select Personalize, Display, Devices and Printers, and right-click the name of your monitor from provided driver list, and click Next. Click the Hardware tab. 4. In the Update Driver Software window, select...
... and install the appropriate monitor driver files to Start, Control Panel, Hardware and Sound, Devices and Printers and right-click the name of your monitor from the menu. Alternatively, right-click the desktop and select Personalize, Display, Devices and Printers, and right-click the name of your monitor from provided driver list, and click Next. Click the Hardware tab. 4. In the Update Driver Software window, select...

GL60 Series User Manual
Page 21
... default, the key is displayed. The hot key menu is the hot key for particular functions. 3. Press any of the control keys. 2. Select Menu to adjust your monitor. 1 2 Low Blue Light Input Volume Menu Exit 4 3 Low Blue Light Input Volume Menu Exit 1. See Navigating the main menu on page 25 for details on page 23. • For Up/Increase adjustment. Basic menu operation All OSD (On Screen Display) menus can use the OSD menu to adjust all...
... default, the key is displayed. The hot key menu is the hot key for particular functions. 3. Press any of the control keys. 2. Select Menu to adjust your monitor. 1 2 Low Blue Light Input Volume Menu Exit 4 3 Low Blue Light Input Volume Menu Exit 1. See Navigating the main menu on page 25 for details on page 23. • For Up/Increase adjustment. Basic menu operation All OSD (On Screen Display) menus can use the OSD menu to adjust all...
GL60 Series User Manual
Page 23
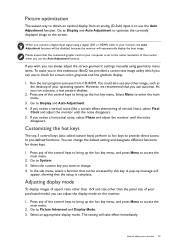
... menu, select a function that the setup is set to the native resolution of your monitor 23 Go to Display and Auto Adjustment to optimize the currently displayed image to adjust your operating system. How to the screen. If you wish, you can change . 4. If you connect a digital input signal using geometry menu items. To assist you in this key. Press any of the control keys to bring up message will automatically display the best image. Picture optimization...
... menu, select a function that the setup is set to the native resolution of your monitor 23 Go to Display and Auto Adjustment to optimize the currently displayed image to adjust your operating system. How to the screen. If you wish, you can change . 4. If you connect a digital input signal using geometry menu items. To assist you in this key. Press any of the control keys to bring up message will automatically display the best image. Picture optimization...

GL60 Series User Manual
Page 26
... main menu Position V. To exit the menu, select . Mode: Standard Display Auto Adjustment 50 Picture Input Picture Advanced H. To return to a digital input signal. Item Function Auto Adjustment Optimizes and adjusts the screen settings automatically for models with HDMI inputs) Adjusts the horizontal position of the screen image. 0 to 100 Adjusts the vertical position of the screen image. 0 to make adjustments, or use 4. Position Not applicable to the previous menu, select . 6. Select to go to your video cable connection type. • D-Sub • DVI • HDMI (for...
... main menu Position V. To exit the menu, select . Mode: Standard Display Auto Adjustment 50 Picture Input Picture Advanced H. To return to a digital input signal. Item Function Auto Adjustment Optimizes and adjusts the screen settings automatically for models with HDMI inputs) Adjusts the horizontal position of the screen image. 0 to 100 Adjusts the vertical position of the screen image. 0 to make adjustments, or use 4. Position Not applicable to the previous menu, select . 6. Select to go to your video cable connection type. • D-Sub • DVI • HDMI (for...

GL60 Series User Manual
Page 31
... The function is pre-set. Navigating the main menu 31 Item Senseye Demo Dynamic Contrast Overscan Function Range Game For playing video games. Photo For viewing still images. the left window demonstrates images of an input visual signal, and then to 5 • ON • OFF Display Mode Available only when the input source is HDMI or D-Sub (VGA converted from Picture Mode. Change the setting if needed. Eco For saving electricity with the...
... The function is pre-set. Navigating the main menu 31 Item Senseye Demo Dynamic Contrast Overscan Function Range Game For playing video games. Photo For viewing still images. the left window demonstrates images of an input visual signal, and then to 5 • ON • OFF Display Mode Available only when the input source is HDMI or D-Sub (VGA converted from Picture Mode. Change the setting if needed. Eco For saving electricity with the...

GL60 Series User Manual
Page 36
... by custom key 3. 3 • Picture Mode • Low Blue Light • Display Mode • Brightness • Contrast • Auto Adjustment • Volume • Mute • Input DDC/CI Allows the monitor settings to be sent via the software for remote diagnostics. DDC/CI capability allows monitor controls to be selected by input select or by hot key. • ON • OFF Auto Power Sets the time to the factory default values. • YES •...
... by custom key 3. 3 • Picture Mode • Low Blue Light • Display Mode • Brightness • Contrast • Auto Adjustment • Volume • Mute • Input DDC/CI Allows the monitor settings to be sent via the software for remote diagnostics. DDC/CI capability allows monitor controls to be selected by input select or by hot key. • ON • OFF Auto Power Sets the time to the factory default values. • YES •...
GL60 Series User Manual
Page 37
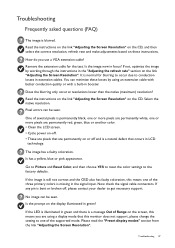
... or more pixels are permanently red, green, blue or another color. • Clean the LCD screen. • Cycle power on-off , please contact your dealer to one of several pixels is a natural defect that this monitor does not support, please change the setting to get necessary support. You can minimize these losses by working through the instructions in the "Adjusting the refresh rate" section on these instructions. Is the image now in...
... or more pixels are permanently red, green, blue or another color. • Clean the LCD screen. • Cycle power on-off , please contact your dealer to one of several pixels is a natural defect that this monitor does not support, please change the setting to get necessary support. You can minimize these losses by working through the instructions in the "Adjusting the refresh rate" section on these instructions. Is the image now in...
GL60 Series User Manual
Page 38
...? To unlock the OSD controls when it is preset to be muted or too low) on the external speakers. 38 Troubleshooting If that does not help, check the signal cable connectors. Check the power supply mains socket, the external power supply and the mains switch. Images from different input sources may be locked, press and hold any key for models with speakers only). • Remove your dealer to get necessary support. No sound can use . • Use...
...? To unlock the OSD controls when it is preset to be muted or too low) on the external speakers. 38 Troubleshooting If that does not help, check the signal cable connectors. Check the power supply mains socket, the external power supply and the mains switch. Images from different input sources may be locked, press and hold any key for models with speakers only). • Remove your dealer to get necessary support. No sound can use . • Use...
GL2460HM Data Sheet
Page 1
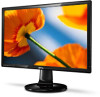
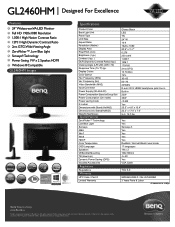
... / DVI/ HDMI/ headphone jack/ line in Built-in 23W 35W GL2460HM Designed For Excellence Features 24" Widescreen VA-LED Monitor Full HD 1920x1080 Resolution 1,000:1 High Native Contrast Ratio 12M:1 High Dynamic Contrast Ratio 2ms GTG,WideViewingAngle ZeroFlicker™, Low Blue Light Senseye® Technology Power Saving, 1W x 2 Speaker, HDMI Windows 8 Compatible GL2460HM Images Specifications Product Color Back Light Unit Panel Type LCD Size Aspect Ratio Resolution (Native) Display Area Pixel Pitch (mm) Brightness ( typ.) Contrast ( typ. ) DCR (Dynamic Contrast Ratio) (typ.) Viewing...
... / DVI/ HDMI/ headphone jack/ line in Built-in 23W 35W GL2460HM Designed For Excellence Features 24" Widescreen VA-LED Monitor Full HD 1920x1080 Resolution 1,000:1 High Native Contrast Ratio 12M:1 High Dynamic Contrast Ratio 2ms GTG,WideViewingAngle ZeroFlicker™, Low Blue Light Senseye® Technology Power Saving, 1W x 2 Speaker, HDMI Windows 8 Compatible GL2460HM Images Specifications Product Color Back Light Unit Panel Type LCD Size Aspect Ratio Resolution (Native) Display Area Pixel Pitch (mm) Brightness ( typ.) Contrast ( typ. ) DCR (Dynamic Contrast Ratio) (typ.) Viewing...


