
GL Series User Manual
Page 2
... covered. Avoid using any liquid, aerosol or glass cleaners. • Slots and openings on the back or top of power indicated on the marked label. Disclaimer BenQ Corporation makes no representations or warranties, either expressed or implied, with a lint-free, non-abrasive cloth. No part of BenQ Corporation. Power Safety • The AC plug isolates this equipment from the wall outlet before cleaning...
... covered. Avoid using any liquid, aerosol or glass cleaners. • Slots and openings on the back or top of power indicated on the marked label. Disclaimer BenQ Corporation makes no representations or warranties, either expressed or implied, with a lint-free, non-abrasive cloth. No part of BenQ Corporation. Power Safety • The AC plug isolates this equipment from the wall outlet before cleaning...
GL Series User Manual
Page 4
... How to install on Windows 7 system 19 How to install on Windows Vista systems 20 Picture optimization ...21 How to adjust your monitor 22 The control panel ...22 Hot key mode ...23 Main menu mode ...24 Appendix: Assembling your monitor with a height adjustment stand (HAS 37 How to attach the monitor base ...37 How to detach the base ...39 Adjusting the monitor height ...40 Rotating the monitor ...41 Viewing angle adjustment ...42 Using the monitor wall mounting kit 43 Troubleshooting ...44 Frequently...
... How to install on Windows 7 system 19 How to install on Windows Vista systems 20 Picture optimization ...21 How to adjust your monitor 22 The control panel ...22 Hot key mode ...23 Main menu mode ...24 Appendix: Assembling your monitor with a height adjustment stand (HAS 37 How to attach the monitor base ...37 How to detach the base ...39 Adjusting the monitor height ...40 Rotating the monitor ...41 Viewing angle adjustment ...42 Using the monitor wall mounting kit 43 Troubleshooting ...44 Frequently...
GL Series User Manual
Page 9
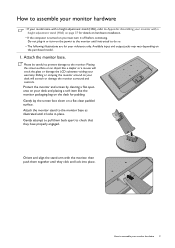
... installation. • If the computer is turned on you must turn -on your warranty. How to assemble your monitor hardware • If your model came with a height adjustment stand (HAS), refer to Appendix: Assembling your monitor with the monitor, then push them back apart to assemble your monitor hardware 9 Attach the monitor stand to the monitor. Attach the monitor base. Protect the monitor and screen by clearing a flat open area on the power to the monitor...
... installation. • If the computer is turned on you must turn -on your warranty. How to assemble your monitor hardware • If your model came with a height adjustment stand (HAS), refer to Appendix: Assembling your monitor with the monitor, then push them back apart to assemble your monitor hardware 9 Attach the monitor stand to the monitor. Attach the monitor base. Protect the monitor and screen by clearing a flat open area on the power to the monitor...
GL Series User Manual
Page 11
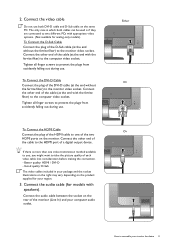
... vary depending on the same PC. Good quality: D-Sub The video cables included in which both DVI-D cable and D-Sub cable on the product supplied for analog-only models). To Connect the D-Sub Cable Connect the plug of a digital output device. 2. Connect the video cable Do not use . Tighten all finger screws to the HDMI port of the D-Sub cable (at the end with the ferrite filter) to assemble your computer audio outlet.
... vary depending on the same PC. Good quality: D-Sub The video cables included in which both DVI-D cable and D-Sub cable on the product supplied for analog-only models). To Connect the D-Sub Cable Connect the plug of a digital output device. 2. Connect the video cable Do not use . Tighten all finger screws to the HDMI port of the D-Sub cable (at the end with the ferrite filter) to assemble your computer audio outlet.
GL Series User Manual
Page 12
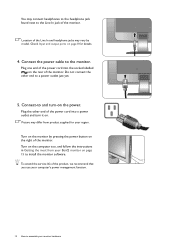
... the power cord into a power outlet and turn -on page 15 to and turn it on. Connect-to install the monitor software. Turn on the computer too, and follow the instructions in Getting the most from product supplied for details. 4. Check Input and output ports on page 8 for your region. Plug the other end to the monitor. Turn on the monitor by model. You may vary by pressing the power button on...
... the power cord into a power outlet and turn -on page 15 to and turn it on. Connect-to install the monitor software. Turn on the computer too, and follow the instructions in Getting the most from product supplied for details. 4. Check Input and output ports on page 8 for your region. Plug the other end to the monitor. Turn on the monitor by model. You may vary by pressing the power button on...
GL Series User Manual
Page 14
... the stand in How to assemble your LCD monitor has a VESA standard mount with flat surface. • Ensure that the wall material is 27 inches, follow the illustration on a wall with 100mm pattern, allowing the installation of the monitor. • Turn off the monitor and the power before disconnecting the cables from the LCD monitor. 1. In case you purchased to complete the installation. 1 2 1 2 14 How to detach the base on a clean...
... the stand in How to assemble your LCD monitor has a VESA standard mount with flat surface. • Ensure that the wall material is 27 inches, follow the illustration on a wall with 100mm pattern, allowing the installation of the monitor. • Turn off the monitor and the power before disconnecting the cables from the LCD monitor. 1. In case you purchased to complete the installation. 1 2 1 2 14 How to detach the base on a clean...
GL Series User Manual
Page 15
... circumstances relate to which process you to successfully install the BenQ LCD Monitor driver software. Follow the wizard instructions until it asks you need to follow to select a monitor model. At that point, click the Have Disk button, insert the BenQ LCD Monitor CD-ROM and select the appropriate monitor model. The circumstances under which you connect and install your computer), Windows will automatically recognize the new (or different...
... circumstances relate to which process you to successfully install the BenQ LCD Monitor driver software. Follow the wizard instructions until it asks you need to follow to select a monitor model. At that point, click the Have Disk button, insert the BenQ LCD Monitor CD-ROM and select the appropriate monitor model. The circumstances under which you connect and install your computer), Windows will automatically recognize the new (or different...
GL Series User Manual
Page 16
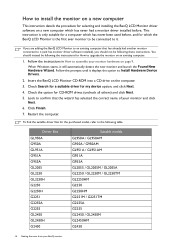
... installing the BenQ LCD Monitor driver software on a new computer which the BenQ LCD Monitor is the first ever monitor to be connected to Install Hardware Device Drivers. 2. Follow the instructions in How to it will automatically detect the new monitor and launch the Found New Hardware Wizard. Driver files GL950A G950A GL951A G951A G955A GL2055 GL2250 GL2250H G2250 G2250H G2251 G2255A G2255 GL2450 GL2450H G2450 Suitable models...
... installing the BenQ LCD Monitor driver software on a new computer which the BenQ LCD Monitor is the first ever monitor to be connected to Install Hardware Device Drivers. 2. Follow the instructions in How to it will automatically detect the new monitor and launch the Found New Hardware Wizard. Driver files GL950A G950A GL951A G951A G955A GL2055 GL2250 GL2250H G2250 G2250H G2251 G2255A G2255 GL2450 GL2450H G2450 Suitable models...
GL Series User Manual
Page 18
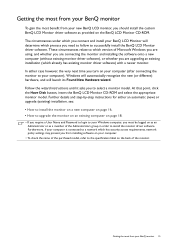
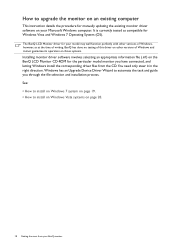
... This instruction details the procedure for Windows Vista and Windows 7 Operating System (OS). How to automate the task and guide you have connected, and letting Windows install the corresponding driver files from your BenQ monitor It is currently tested as at the time of writing, BenQ has done no testing of this driver on other versions of Windows, however, as compatible for manually updating the existing monitor driver software...
... This instruction details the procedure for Windows Vista and Windows 7 Operating System (OS). How to automate the task and guide you have connected, and letting Windows install the corresponding driver files from your BenQ monitor It is currently tested as at the time of writing, BenQ has done no testing of this driver on other versions of Windows, however, as compatible for manually updating the existing monitor driver software...

GL Series User Manual
Page 19
... for your computer after the driver update is the drive letter designator for driver software. 8. it may be 'D:' or 'E:' or 'F:' etc. 9. This will copy and install the appropriate monitor driver files to install on the computer. 7. Open Display Properties. Select Properties from your computer. 10. Getting the most from the menu. 3. How to your BenQ monitor 19 Insert the BenQ LCD Monitor CD-ROM into a CD...
... for your computer after the driver update is the drive letter designator for driver software. 8. it may be 'D:' or 'E:' or 'F:' etc. 9. This will copy and install the appropriate monitor driver files to install on the computer. 7. Open Display Properties. Select Properties from your computer. 10. Getting the most from the menu. 3. How to your BenQ monitor 19 Insert the BenQ LCD Monitor CD-ROM into a CD...

GL Series User Manual
Page 20
... and sounds window. Click the Monitor tab and the Properties button. 4. Insert the BenQ LCD Monitor CD-ROM into a CD drive on Windows Vista systems 1. Click the Driver tab and the Update Driver button. 6. You may be prompted to your computer after the driver update is the drive letter designator for driver software. 8. Right-click the desktop and select Personalize from the popup menu. The Display Settings window will display. 3. Click...
... and sounds window. Click the Monitor tab and the Properties button. 4. Insert the BenQ LCD Monitor CD-ROM into a CD drive on Windows Vista systems 1. Click the Driver tab and the Update Driver button. 6. You may be prompted to your computer after the driver update is the drive letter designator for driver software. 8. Right-click the desktop and select Personalize from the popup menu. The Display Settings window will display. 3. Click...
GL Series User Manual
Page 21
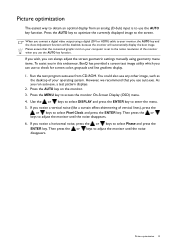
... check for screen color, grayscale and line gradient display. 1. You could also use the AUTO key function. Picture optimization The easiest way to obtain an optimal display from CD-ROM. Please ensure that you connect a digital video output using geometry menu items. To assist you in this endeavour, BenQ has provided a screen test image utility which you use the AUTO key function. Press the AUTO key to optimize the currently displayed image to adjust the monitor...
... check for screen color, grayscale and line gradient display. 1. You could also use the AUTO key function. Picture optimization The easiest way to obtain an optimal display from CD-ROM. Please ensure that you connect a digital video output using geometry menu items. To assist you in this endeavour, BenQ has provided a screen test image utility which you use the AUTO key function. Press the AUTO key to optimize the currently displayed image to adjust the monitor...
GL Series User Manual
Page 24
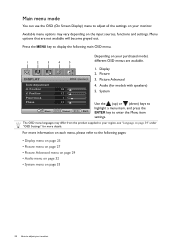
... grayed out. Display 2. Available menu options may differ from the product supplied to adjust your monitor. For more details. System Use the (up) or (down) keys to highlight a menu item, and press the ENTER key to adjust all the settings on the input sources, functions and settings. The OSD menu languages may vary depending on your monitor Position V. Main menu mode You can use the OSD (On Screen Display) menu to enter the Menu item settings.
... grayed out. Display 2. Available menu options may differ from the product supplied to adjust your monitor. For more details. System Use the (up) or (down) keys to highlight a menu item, and press the ENTER key to adjust all the settings on the input sources, functions and settings. The OSD menu languages may vary depending on your monitor Position V. Main menu mode You can use the OSD (On Screen Display) menu to enter the Menu item settings.
GL Series User Manual
Page 25
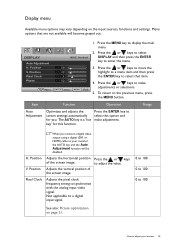
...connect a digital video output using a digital (DVI or HDMI) cable to your monitor 25 Item Function Operation Range Auto Adjustment Optimizes and adjusts the screen settings automatically for this option and make adjustments or selections. 5. Press the or keys to synchronize with the analog input video signal. Adjusts the pixel clock frequency timing to adjust the value. How to select this function. Display menu Available menu options may vary depending on page 21. Adjusts the vertical position of the screen image. DISPLAY Auto Adjustment H. Press the MENU...
...connect a digital video output using a digital (DVI or HDMI) cable to your monitor 25 Item Function Operation Range Auto Adjustment Optimizes and adjusts the screen settings automatically for this option and make adjustments or selections. 5. Press the or keys to synchronize with the analog input video signal. Adjusts the pixel clock frequency timing to adjust the value. How to select this function. Display menu Available menu options may vary depending on page 21. Adjusts the vertical position of the screen image. DISPLAY Auto Adjustment H. Press the MENU...

GL Series User Manual
Page 28
... to adjust your monitor Reset Color Resets the custom color settings to 100 colors. AMA (for Improves the gray level models with natural coloring. Then use the or keys to 100 we perceive colors. User Mode: The blend of Press the or keys to 0 to the factory defaults. keys to 0 to 100 Hue Adjusts the degree of the LCD HDMI inputs) panel. This is the factory default color. Red Green Blue Tailors the image color tint. Item Function Operation Range Color -
... to adjust your monitor Reset Color Resets the custom color settings to 100 colors. AMA (for Improves the gray level models with natural coloring. Then use the or keys to 100 we perceive colors. User Mode: The blend of Press the or keys to 0 to the factory defaults. keys to 0 to 100 Hue Adjusts the degree of the LCD HDMI inputs) panel. This is the factory default color. Red Green Blue Tailors the image color tint. Item Function Operation Range Color -
GL Series User Manual
Page 35
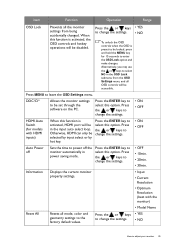
... activated, HDMI port will be in the input auto select loop. Information Reset All Displays the current monitor property settings. • Input • Current Resolution • Optimum Resolution (best with HDMI inputs) When this option. Alternatively, you may use the or keys to select NO in power saving mode. Press the or keys to change the settings. • ON • OFF HDMI Auto Switch (for 15 seconds to enter the OSD Lock option and make changes. Press...
... activated, HDMI port will be in the input auto select loop. Information Reset All Displays the current monitor property settings. • Input • Current Resolution • Optimum Resolution (best with HDMI inputs) When this option. Alternatively, you may use the or keys to select NO in power saving mode. Press the or keys to change the settings. • ON • OFF HDMI Auto Switch (for 15 seconds to enter the OSD Lock option and make changes. Press...

GL Series User Manual
Page 43
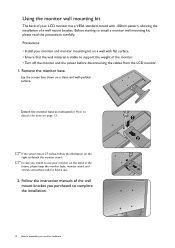
... detach the base on a wall with flat surface. • Ensure that fixing the monitor stand to support the weight of the monitor. • Turn off the monitor and the power before disconnecting the cables from the monitor. Before starting to complete the installation. In case you purchased to install a monitor wall mounting kit, please read the precautions carefully. Remove the monitor stand. Using the monitor wall mounting kit The back of your LCD monitor has a VESA standard mount with a height adjustment stand (HAS...
... detach the base on a wall with flat surface. • Ensure that fixing the monitor stand to support the weight of the monitor. • Turn off the monitor and the power before disconnecting the cables from the monitor. Before starting to complete the installation. In case you purchased to install a monitor wall mounting kit, please read the precautions carefully. Remove the monitor stand. Using the monitor wall mounting kit The back of your LCD monitor has a VESA standard mount with a height adjustment stand (HAS...

GL Series User Manual
Page 44
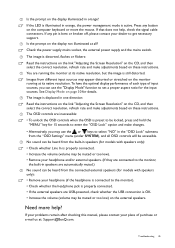
... Troubleshooting Does the blurring only occur at resolutions lower than the native (maximum) resolution? Now check the signal cable connectors. It is normal for the test. Faint shadow from the link "Adjusting the Screen Resolution". You can be seen: One of several pixels is permanently black, one or more pixels are permanently white, one or more pixels are permanently red, green, blue or another color. • Clean the LCD screen. • Cycle power on...
... Troubleshooting Does the blurring only occur at resolutions lower than the native (maximum) resolution? Now check the signal cable connectors. It is normal for the test. Faint shadow from the link "Adjusting the Screen Resolution". You can be seen: One of several pixels is permanently black, one or more pixels are permanently white, one or more pixels are permanently red, green, blue or another color. • Clean the LCD screen. • Cycle power on...
GL Series User Manual
Page 45
... optimal display performance of each type of purchase or e-mail us at its native resolution. The image is displaced in orange, the power management mode is properly connected. • Increase the volume (volume may appear distorted or stretched on these instructions. No sound can use the or keys to the monitor, the built-in the "OSD Lock" submenu from the "OSD Settings" menu (under SYSTEM), and all ? Need more help , check the signal cable connectors...
... optimal display performance of each type of purchase or e-mail us at its native resolution. The image is displaced in orange, the power management mode is properly connected. • Increase the volume (volume may appear distorted or stretched on these instructions. No sound can use the or keys to the monitor, the built-in the "OSD Lock" submenu from the "OSD Settings" menu (under SYSTEM), and all ? Need more help , check the signal cable connectors...
GL2055 Data Sheet
Page 1
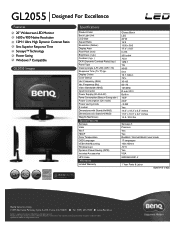
...~76 165 MHz D-sub / DVI Built-in 16W 23W Frequency (KHz) Ver. Display Colors Color Gamut Hor. GL2055 Designed For Excellence Features 20" Widescreen LED Monitor 1600 x 900 Native Resolution 12M:1 Ultra High Dynamic Contrast Ratio 5ms Superior Response Time Senseye™ Technology Power Saving Windows 7 Compatible GL2055 Images Specifications Product Color Back Light Unit LCD Size Aspect Ratio Resolution (Native) Display Area Pixel Pitch (mm) Brightness ( typ.) Contrast ( typ. ) DCR (Dynamic Contrast Ratio) (typ.) Panel Type Viewing Angle (L/R;U/D) (CR>=10...
...~76 165 MHz D-sub / DVI Built-in 16W 23W Frequency (KHz) Ver. Display Colors Color Gamut Hor. GL2055 Designed For Excellence Features 20" Widescreen LED Monitor 1600 x 900 Native Resolution 12M:1 Ultra High Dynamic Contrast Ratio 5ms Superior Response Time Senseye™ Technology Power Saving Windows 7 Compatible GL2055 Images Specifications Product Color Back Light Unit LCD Size Aspect Ratio Resolution (Native) Display Area Pixel Pitch (mm) Brightness ( typ.) Contrast ( typ. ) DCR (Dynamic Contrast Ratio) (typ.) Panel Type Viewing Angle (L/R;U/D) (CR>=10...


