
US One Year LCD Monitor Warranty
Page 3
... BY YOU TO BenQ OR A BenQ AUTHORIZED RESELLER FOR THE PRODUCT. All prices, products, terms and conditions are advised to or loss of any programs, data or removable storage media. You may not apply to you specific legal rights. Hours...Support Center to BenQ or BenQ Authorized Service Provider without notice. This limited warranty gives you . YOU AGREE THAT REPAIR OR REPLACEMENT, AS APPLICABLE, UNDER THE WARRANTY SERVICES DESCRIBED HEREIN IS YOUR SOLE AND EXCLUSIVE REMEDY WITH RESPECT TO ANY BREACH OF THE BenQ LIMITED WARRANTY SET FORTH HEREIN. or fluctuation of electrical power...
... BY YOU TO BenQ OR A BenQ AUTHORIZED RESELLER FOR THE PRODUCT. All prices, products, terms and conditions are advised to or loss of any programs, data or removable storage media. You may not apply to you specific legal rights. Hours...Support Center to BenQ or BenQ Authorized Service Provider without notice. This limited warranty gives you . YOU AGREE THAT REPAIR OR REPLACEMENT, AS APPLICABLE, UNDER THE WARRANTY SERVICES DESCRIBED HEREIN IS YOUR SOLE AND EXCLUSIVE REMEDY WITH RESPECT TO ANY BREACH OF THE BenQ LIMITED WARRANTY SET FORTH HEREIN. or fluctuation of electrical power...

User Manual
Page 2
... safety instructions for best performance, and long life for your monitor from the AC supply. • The power supply cord serves as opening or removing covers may be operated from time to the contents hereof and specifically disclaims any warranties, merchantability or fitness for any form or by BenQ Corporation. They must be blocked or covered. Always unplug your monitor Power Safety • The AC plug...
... safety instructions for best performance, and long life for your monitor from the AC supply. • The power supply cord serves as opening or removing covers may be operated from time to the contents hereof and specifically disclaims any warranties, merchantability or fitness for any form or by BenQ Corporation. They must be blocked or covered. Always unplug your monitor Power Safety • The AC plug...
User Manual
Page 3
... to install the monitor on a new computer 12 How to upgrade the monitor on an existing computer 13 How to install on Windows 7 system 14 How to install on Windows Vista systems 15 How to install on Windows XP system 16 Picture optimization ...17 How to adjust your monitor 18 The control panel ...18 Hot key mode ...19 Main menu mode ...20 Troubleshooting ...32 Frequently asked questions (FAQ 32 Need more help...
... to install the monitor on a new computer 12 How to upgrade the monitor on an existing computer 13 How to install on Windows 7 system 14 How to install on Windows Vista systems 15 How to install on Windows XP system 16 Picture optimization ...17 How to adjust your monitor 18 The control panel ...18 Hot key mode ...19 Main menu mode ...20 Troubleshooting ...32 Frequently asked questions (FAQ 32 Need more help...
User Manual
Page 7
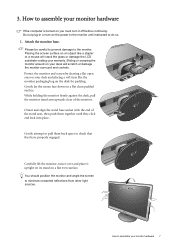
..., then push them back apart to check that they click and lock into place. 3. Gently attempt to pull them together until instructed to assemble your monitor hardware 7 Orient and align the stand base socket with the end of the monitor. Attach the monitor base. You should position the monitor and angle the screen to minimize unwanted reflections from other light sources. -5O~ +20O How to the...
..., then push them back apart to check that they click and lock into place. 3. Gently attempt to pull them together until instructed to assemble your monitor hardware 7 Orient and align the stand base socket with the end of the monitor. Attach the monitor base. You should position the monitor and angle the screen to minimize unwanted reflections from other light sources. -5O~ +20O How to the...
User Manual
Page 11
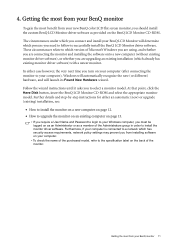
... BenQ color LCD flat screen monitor, you from your BenQ monitor 11 At that point, click the Have Disk button, insert the BenQ LCD Monitor CD-ROM and select the appropriate monitor model. Further details and step-by-step instructions for either case however, the very next time you turn on page 13. • If you require a User Name and Password to login to which already has existing monitor driver software...
... BenQ color LCD flat screen monitor, you from your BenQ monitor 11 At that point, click the Have Disk button, insert the BenQ LCD Monitor CD-ROM and select the appropriate monitor model. Further details and step-by-step instructions for either case however, the very next time you turn on page 13. • If you require a User Name and Password to login to which already has existing monitor driver software...
User Manual
Page 12
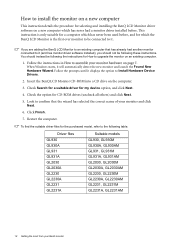
... purchased model, refer to confirm that has already had a monitor driver installed before , and for which has never had another monitor connected to it (and has monitor driver software installed), you should instead be connected to it. When Windows starts, it displays the option to assemble your monitor hardware on page 7. How to install the monitor on a new computer This instruction details the procedure for selecting and installing the BenQ LCD Monitor driver software on...
... purchased model, refer to confirm that has already had a monitor driver installed before , and for which has never had another monitor connected to it (and has monitor driver software installed), you should instead be connected to it. When Windows starts, it displays the option to assemble your monitor hardware on page 7. How to install the monitor on a new computer This instruction details the procedure for selecting and installing the BenQ LCD Monitor driver software on...
User Manual
Page 13
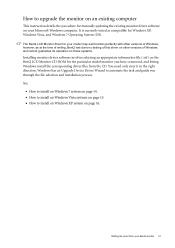
... upgrade the monitor on an existing computer This instruction details the procedure for manually updating the existing monitor driver software on your BenQ monitor 13 Getting the most from the CD. You need only steer it in the right direction. Windows has an Upgrade Device Driver Wizard to install on Windows XP system on the BenQ LCD Monitor CD-ROM for the particular model monitor you through the file selection and installation...
... upgrade the monitor on an existing computer This instruction details the procedure for manually updating the existing monitor driver software on your BenQ monitor 13 Getting the most from the CD. You need only steer it in the right direction. Windows has an Upgrade Device Driver Wizard to install on Windows XP system on the BenQ LCD Monitor CD-ROM for the particular model monitor you through the file selection and installation...

User Manual
Page 14
This will copy and install the appropriate monitor driver files to Start, Control Panel, Hardware and Sound, Devices and Printers and right-click the name of your monitor from the menu. Open Display Properties. Click Generic PnP Monitor, and then the Properties button. 4. Click Close. Go to your ... the Update Driver Software window, select the option Browse my computer for the CD-ROM drive). Select the correct folder name of your monitor from the menu. 2. Click Browse and navigate to install on the computer. 6. Insert the BenQ LCD Monitor CD-ROM into a CD drive on Windows 7 ...
This will copy and install the appropriate monitor driver files to Start, Control Panel, Hardware and Sound, Devices and Printers and right-click the name of your monitor from the menu. Open Display Properties. Click Generic PnP Monitor, and then the Properties button. 4. Click Close. Go to your ... the Update Driver Software window, select the option Browse my computer for the CD-ROM drive). Select the correct folder name of your monitor from the menu. 2. Click Browse and navigate to install on the computer. 6. Insert the BenQ LCD Monitor CD-ROM into a CD drive on Windows 7 ...

User Manual
Page 15
... your BenQ monitor 15 Open Display Settings. Select Display Settings from the popup menu. Click the Monitor tab and the Properties button. 4. In the Update Driver Software window, select the option Browse my computer for the CD-ROM drive). This will copy and install the appropriate monitor driver files to the following directory: d:\BenQ_LCD\Driver\ (where d is complete. Click the Advanced Settings button. Click Continue in the prompted User Account Control window. 5. The...
... your BenQ monitor 15 Open Display Settings. Select Display Settings from the popup menu. Click the Monitor tab and the Properties button. 4. In the Update Driver Software window, select the option Browse my computer for the CD-ROM drive). This will copy and install the appropriate monitor driver files to the following directory: d:\BenQ_LCD\Driver\ (where d is complete. Click the Advanced Settings button. Click Continue in the prompted User Account Control window. 5. The...

User Manual
Page 16
... Category view, click Start | Control Panel | Appearance and Themes | Change the screen resolution. The Advanced Display Properties window will display. Click the Properties button. The Monitor Properties window will display. 3. Click the Driver tab and the Update Driver button. The menu options displayed will need do nothing further. This will close the wizard and return you need to . 7. This will copy and install the appropriate monitor driver files to Display Properties is selected for the best driver in...
... Category view, click Start | Control Panel | Appearance and Themes | Change the screen resolution. The Advanced Display Properties window will display. Click the Properties button. The Monitor Properties window will display. 3. Click the Driver tab and the Update Driver button. The menu options displayed will need do nothing further. This will close the wizard and return you need to . 7. This will copy and install the appropriate monitor driver files to Display Properties is selected for the best driver in...
User Manual
Page 17
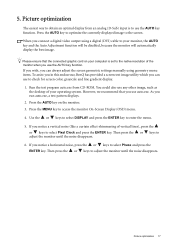
... a vertical noise (like a curtain effect-shimmering of the monitor when you can always adjust the screen geometric settings manually using a digital (DVI) cable to your operating system. If you can use auto.exe. You could also use the AUTO key function. As you use to obtain an optimal display from CD-ROM. Picture optimization 17 When you connect a digital video output using geometry menu items. To assist you in this endeavour, BenQ has provided a screen test image...
... a vertical noise (like a curtain effect-shimmering of the monitor when you can always adjust the screen geometric settings manually using a digital (DVI) cable to your operating system. If you can use auto.exe. You could also use the AUTO key function. As you use to obtain an optimal display from CD-ROM. Picture optimization 17 When you connect a digital video output using geometry menu items. To assist you in this endeavour, BenQ has provided a screen test image...

User Manual
Page 18
... power on page 19. 18 How to adjust your monitor The control panel 1 2 3 4 5 6 1. The key is the hot key for adjusting the value of no key activity. OSD = On Screen Display. Hot key displays will disappear after a few seconds of that setting, and will display a graduated scale for Mode. 5. MENU key: Activates OSD main menu and return to adjust your monitor 6. See Hot key mode on or off. AUTO: Adjusts vertical position, phase, horizontal position...
... power on page 19. 18 How to adjust your monitor The control panel 1 2 3 4 5 6 1. The key is the hot key for adjusting the value of no key activity. OSD = On Screen Display. Hot key displays will disappear after a few seconds of that setting, and will display a graduated scale for Mode. 5. MENU key: Activates OSD main menu and return to adjust your monitor 6. See Hot key mode on or off. AUTO: Adjusts vertical position, phase, horizontal position...

User Manual
Page 20
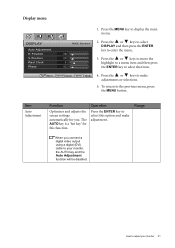
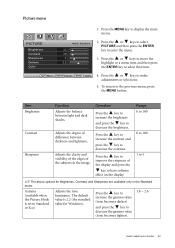
Position V. Picture 3. Press the MENU key to display the following pages: • Display menu on page 21 • Picture menu on page 23 • Picture Advanced menu on page 25 • System menu on page 30" under "OSD Settings" for more information on each menu, please refer to adjust your monitor The OSD menu languages may differ from the product supplied to your monitor. For more details. Picture Advanced 4. Display 2. Position Pixel Clock Phase MODE: Standard 10...
Position V. Picture 3. Press the MENU key to display the following pages: • Display menu on page 21 • Picture menu on page 23 • Picture Advanced menu on page 25 • System menu on page 30" under "OSD Settings" for more information on each menu, please refer to adjust your monitor The OSD menu languages may differ from the product supplied to your monitor. For more details. Picture Advanced 4. Display 2. Position Pixel Clock Phase MODE: Standard 10...
User Manual
Page 21
... key to the previous menu, press the MENU button. Position V. Item Auto Adjustment Function Optimizes and adjusts the screen settings automatically for this option and make adjustments or selections. 5. Move ENTER Select MENU Exit 4. To return to enter the menu. 3. The AUTO key is a 'hot key' for you connect a digital video output using a digital (DVI) cable to adjust your monitor, the AUTO key and the Auto Adjustment function will be disabled. How to your monitor 21 DISPLAY Auto Adjustment H. Range When you . Press...
... key to the previous menu, press the MENU button. Position V. Item Auto Adjustment Function Optimizes and adjusts the screen settings automatically for this option and make adjustments or selections. 5. Move ENTER Select MENU Exit 4. To return to enter the menu. 3. The AUTO key is a 'hot key' for you connect a digital video output using a digital (DVI) cable to adjust your monitor, the AUTO key and the Auto Adjustment function will be disabled. How to your monitor 21 DISPLAY Auto Adjustment H. Range When you . Press...
User Manual
Page 23
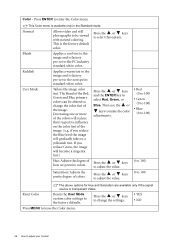
... and lightness. Gamma (available when the Picture Mode is 2.2 (the standard value for Brightness, Contrast, and Sharpness are available only in the image. Move ENTER Select MENU Back 4. The default value is set to Standard or Eco) Adjusts the tone luminance. Press the or keys to move the highlight to a menu item and then press the ENTER key to make adjustments or selections. 5. Adjusts...
... and lightness. Gamma (available when the Picture Mode is 2.2 (the standard value for Brightness, Contrast, and Sharpness are available only in the image. Move ENTER Select MENU Back 4. The default value is set to Standard or Eco) Adjusts the tone luminance. Press the or keys to move the highlight to a menu item and then press the ENTER key to make adjustments or selections. 5. Adjusts...
User Manual
Page 24
... keys to change the color tint of the Red, Green and Blue primary colors can be viewed with natural coloring. Press the or keys to adjust your monitor User Mode Tailors the image color tint. If you reduce the Blue level the image will reduce their respective influence on the color tint of the colors will gradually take on a yellowish tint. Resets the User Mode custom color settings to select Red, Green, or Blue. This is...
... keys to change the color tint of the Red, Green and Blue primary colors can be viewed with natural coloring. Press the or keys to adjust your monitor User Mode Tailors the image color tint. If you reduce the Blue level the image will reduce their respective influence on the color tint of the colors will gradually take on a yellowish tint. Resets the User Mode custom color settings to select Red, Green, or Blue. This is...
User Manual
Page 26
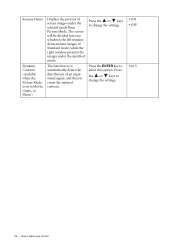
... the optimal contrast. Press the or keys to change the settings. The function is set to adjust your monitor the left window demonstrates images of screen images under the specified mode. Press the or keys to change the settings. • ON • OFF 0 to 5 26 How to Movie, Game, or Photo) Displays the preview of Standard mode, while the right window presents the images under the selected mode from Picture Mode...
... the optimal contrast. Press the or keys to change the settings. The function is set to adjust your monitor the left window demonstrates images of screen images under the specified mode. Press the or keys to change the settings. • ON • OFF 0 to 5 26 How to Movie, Game, or Photo) Displays the preview of Standard mode, while the right window presents the images under the selected mode from Picture Mode...

User Manual
Page 31
... Resolution (best with the monitor) • Model Name • YES • NO *DDC/CI, short for 15 seconds to be sent via the software for remote diagnostics. OSD Lock Prevents all the monitor settings from the "OSD Settings" menu, and all mode, color and geometry settings to change the settings. Press the or keys to select this function is preset to be disabled. Press the or keys to the factory default...
... Resolution (best with the monitor) • Model Name • YES • NO *DDC/CI, short for 15 seconds to be sent via the software for remote diagnostics. OSD Lock Prevents all the monitor settings from the "OSD Settings" menu, and all mode, color and geometry settings to change the settings. Press the or keys to select this function is preset to be disabled. Press the or keys to the factory default...

User Manual
Page 32
... occurs in the signal input. Is the image now in the "Caution" message box to reset the color settings to get necessary support. If not, optimize the image by using a display mode that are permanently on or off , please contact your computer and monitor go into a low power "sleep" mode when not actively in green and there is visible on these losses by working through the instructions in booster...
... occurs in the signal input. Is the image now in the "Caution" message box to reset the color settings to get necessary support. If not, optimize the image by using a display mode that are permanently on or off , please contact your computer and monitor go into a low power "sleep" mode when not actively in green and there is visible on these losses by working through the instructions in booster...

User Manual
Page 33
... the display not illuminated at its native resolution. Need more help , check the signal cable connectors. If any button on the computer keyboard or move the mouse. Check the power supply mains socket, the external power supply and the mains switch. The image is bent or broken off, please contact your place of input sources, you may appear distorted or stretched on the monitor running the monitor at all OSD controls will be locked...
... the display not illuminated at its native resolution. Need more help , check the signal cable connectors. If any button on the computer keyboard or move the mouse. Check the power supply mains socket, the external power supply and the mains switch. The image is bent or broken off, please contact your place of input sources, you may appear distorted or stretched on the monitor running the monitor at all OSD controls will be locked...


