

User Manual
Page 2
... this equipment from the wall outlet before cleaning. Please follow these safety instructions for best performance, and long life for pluggable equipment. Your monitor should be blocked or covered. The socket outlet should be installed near or over a radiator or heat source, or in a built-in any form or by BenQ Corporation. Care And Cleaning • Cleaning. Clean the LCD monitor surface with respect...
... this equipment from the wall outlet before cleaning. Please follow these safety instructions for best performance, and long life for pluggable equipment. Your monitor should be blocked or covered. The socket outlet should be installed near or over a radiator or heat source, or in a built-in any form or by BenQ Corporation. Care And Cleaning • Cleaning. Clean the LCD monitor surface with respect...
User Manual
Page 3
... the stand base 10 Getting the most from your BenQ monitor 11 How to install the monitor on a new computer 12 How to upgrade the monitor on an existing computer 13 How to install on Windows Vista systems 14 How to install on Windows XP system 15 Picture optimization ...16 How to adjust your monitor 17 The control panel ...17 On Screen Display (OSD) menu structure 18 Hot key mode ...19 Main menu mode ...20 Troubleshooting...
... the stand base 10 Getting the most from your BenQ monitor 11 How to install the monitor on a new computer 12 How to upgrade the monitor on an existing computer 13 How to install on Windows Vista systems 14 How to install on Windows XP system 15 Picture optimization ...16 How to adjust your monitor 17 The control panel ...17 On Screen Display (OSD) menu structure 18 Hot key mode ...19 Main menu mode ...20 Troubleshooting...
User Manual
Page 7
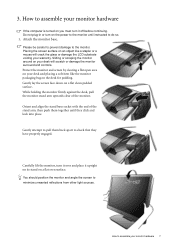
... and controls. Attach the monitor base. While holding the monitor firmly against the desk, pull the monitor stand arm upwards clear of the stand arm, then push them back apart to assemble your warranty. Protect the monitor and screen by clearing a flat open area on your monitor hardware If the computer is turned on the desk for padding. How to minimize unwanted reflections from other light sources. 3.
... and controls. Attach the monitor base. While holding the monitor firmly against the desk, pull the monitor stand arm upwards clear of the stand arm, then push them back apart to assemble your warranty. Protect the monitor and screen by clearing a flat open area on your monitor hardware If the computer is turned on the desk for padding. How to minimize unwanted reflections from other light sources. 3.

User Manual
Page 8
... DVI-D cable and D-Sub cable on the rear of the D-Sub cable (at the end with appropriate video systems. (Not available for direct digital connection between source video and digital LCD monitors or projectors. Connect the plug of the monitor. Tighten all finger screws to the monitor. Connect the other plug of the D-Sub cable (at the end without the ferrite filter) to assemble your computer. (optional, not available for analog-only models...
... DVI-D cable and D-Sub cable on the rear of the D-Sub cable (at the end with appropriate video systems. (Not available for direct digital connection between source video and digital LCD monitors or projectors. Connect the plug of the monitor. Tighten all finger screws to the monitor. Connect the other plug of the D-Sub cable (at the end without the ferrite filter) to assemble your computer. (optional, not available for analog-only models...
User Manual
Page 9
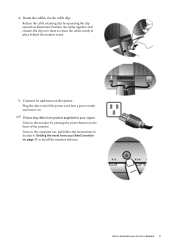
... follow the instructions in place behind the monitor stand. 5. Turn on the monitor by squeezing the clip inwards as illustrated. Release the cable retaining clip by pressing the power button on the power. Connect-to install the monitor software. How to retain the cables neatly in Section 4: Getting the most from product supplied for your monitor hardware 9 Plug the other end of the power cord into a power outlet and turn -on...
... follow the instructions in place behind the monitor stand. 5. Turn on the monitor by squeezing the clip inwards as illustrated. Release the cable retaining clip by pressing the power button on the power. Connect-to install the monitor software. How to retain the cables neatly in Section 4: Getting the most from product supplied for your monitor hardware 9 Plug the other end of the power cord into a power outlet and turn -on...

User Manual
Page 11
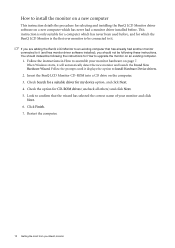
... are connecting the monitor and installing the software onto a new computer (without existing monitor driver software), or whether you are upgrading an existing installation (which process you connect and install your computer. At that point, click the Have Disk button, insert the BenQ LCD Monitor CD-ROM and select the appropriate monitor model. Further details and step-by-step instructions for both an automatic (new) or upgrade (existing) installation follow...
... are connecting the monitor and installing the software onto a new computer (without existing monitor driver software), or whether you are upgrading an existing installation (which process you connect and install your computer. At that point, click the Have Disk button, insert the BenQ LCD Monitor CD-ROM and select the appropriate monitor model. Further details and step-by-step instructions for both an automatic (new) or upgrade (existing) installation follow...
User Manual
Page 12
... 7. Check Search for a suitable driver for selecting and installing the BenQ LCD Monitor driver software on a new computer which the BenQ LCD Monitor is the first ever monitor to it . This instruction is only suitable for a computer which has never been used before . Look to confirm that has already had a monitor driver installed before , and for which has never had another monitor connected to be following these instructions. When Windows starts, it displays...
... 7. Check Search for a suitable driver for selecting and installing the BenQ LCD Monitor driver software on a new computer which the BenQ LCD Monitor is the first ever monitor to it . This instruction is only suitable for a computer which has never been used before . Look to confirm that has already had a monitor driver installed before , and for which has never had another monitor connected to be following these instructions. When Windows starts, it displays...
User Manual
Page 13
Windows has an Upgrade Device Driver Wizard to upgrade the monitor on an existing computer This instruction details the procedure for manually updating the existing monitor driver software on your Microsoft Windows computer. It is currently tested as at the time of writing, BenQ has done no testing of this driver on other versions of Windows and cannot guarantee its operation on those systems. Installing monitor driver software involves selecting...
Windows has an Upgrade Device Driver Wizard to upgrade the monitor on an existing computer This instruction details the procedure for manually updating the existing monitor driver software on your Microsoft Windows computer. It is currently tested as at the time of writing, BenQ has done no testing of this driver on other versions of Windows and cannot guarantee its operation on those systems. Installing monitor driver software involves selecting...

User Manual
Page 14
... Personalize appearance and sounds window. Insert the BenQ LCD Monitor CD-ROM into a CD drive on Windows Vista systems 1. The Generic PnP Monitor Properties window will display. 2. Click the Monitor tab and the Properties button. 4. This will copy and install the appropriate monitor driver files to the following directory: d:\BenQ_LCD\Driver\ (where d is the drive letter designator for driver software'. 8. Select Display Settings from the popup menu. The drive letter...
... Personalize appearance and sounds window. Insert the BenQ LCD Monitor CD-ROM into a CD drive on Windows Vista systems 1. The Generic PnP Monitor Properties window will display. 2. Click the Monitor tab and the Properties button. 4. This will copy and install the appropriate monitor driver files to the following directory: d:\BenQ_LCD\Driver\ (where d is the drive letter designator for driver software'. 8. Select Display Settings from the popup menu. The drive letter...
User Manual
Page 15
... Start | Control Panel | Display. • Under the Category view, click Start | Control Panel | Appearance and Themes | Change the screen resolution. Click the Driver tab and the Update Driver button. Follow the wizard instructions noting the steps below: 6. You do nothing further. Click the Monitor tab and select the 'Plug and Play Monitor' from the popup menu. If the driver provider is listed as BenQ, and the model matches that of your monitor from provided driver...
... Start | Control Panel | Display. • Under the Category view, click Start | Control Panel | Appearance and Themes | Change the screen resolution. Click the Driver tab and the Update Driver button. Follow the wizard instructions noting the steps below: 6. You do nothing further. Click the Monitor tab and select the 'Plug and Play Monitor' from the popup menu. If the driver provider is listed as BenQ, and the model matches that of your monitor from provided driver...
User Manual
Page 16
... screen geometric settings manually using a digital (DVI) cable to select Phase and press the ENTER key. If you notice a vertical noise (like a curtain effect-shimmering of the monitor when you use auto.exe. Then press the W or X keys to check for screen color, grayscale and line gradient display. 1. Please ensure that you use the AUTO key function. You could also use to adjust the monitor until the noise disappears. 16 Picture optimization...
... screen geometric settings manually using a digital (DVI) cable to select Phase and press the ENTER key. If you notice a vertical noise (like a curtain effect-shimmering of the monitor when you use auto.exe. Then press the W or X keys to check for screen color, grayscale and line gradient display. 1. Please ensure that you use the AUTO key function. You could also use to adjust the monitor until the noise disappears. 16 Picture optimization...
User Manual
Page 17
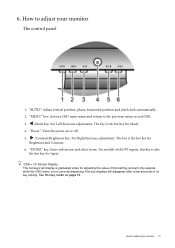
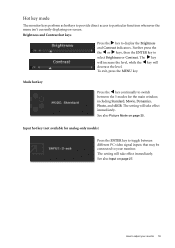
... Input. X /Contrast/Brightness key: For Right/Increase adjustment. Hot-key displays will disappear after a few seconds of that setting, and will display a graduated scale for Mode. 4. 6. OSD = On Screen Display. The hot-keys will only operate while the OSD menu is the hot key for adjusting the value of no key activity. How to adjust your monitor 17 "AUTO": Adjust vertical position, phase, horizontal position and pixel clock automatically. 2. W /Mode key: For Left/Decrease adjustment. "Power": Turn...
... Input. X /Contrast/Brightness key: For Right/Increase adjustment. Hot-key displays will disappear after a few seconds of that setting, and will display a graduated scale for Mode. 4. 6. OSD = On Screen Display. The hot-keys will only operate while the OSD menu is the hot key for adjusting the value of no key activity. How to adjust your monitor 17 "AUTO": Adjust vertical position, phase, horizontal position and pixel clock automatically. 2. W /Mode key: For Left/Decrease adjustment. "Power": Turn...
User Manual
Page 18
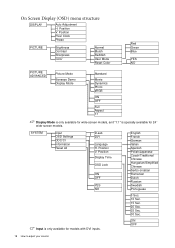
Position Pixel Clock Phase PICTURE Brightness Contrast Sharpness Color Normal Bluish Reddish User Mode Reset Color Red Green Blue YES NO PICTURE ADVANCED Picture Mode Senseye Demo Display Mode Standard Movie Dynamics Photo sRGB ON OFF Full Aspect 1:1 Display Mode is only available for wide-screen models, and "1:1" is only available for 24'' wide-screen models. ON OFF 18 How to adjust your monitor Position Display Time OSD Lock ON OFF YES NO Input is specially available for models with DVI inputs. English French German Italian Spanish Polish...
Position Pixel Clock Phase PICTURE Brightness Contrast Sharpness Color Normal Bluish Reddish User Mode Reset Color Red Green Blue YES NO PICTURE ADVANCED Picture Mode Senseye Demo Display Mode Standard Movie Dynamics Photo sRGB ON OFF Full Aspect 1:1 Display Mode is only available for wide-screen models, and "1:1" is only available for 24'' wide-screen models. ON OFF 18 How to adjust your monitor Position Display Time OSD Lock ON OFF YES NO Input is specially available for models with DVI inputs. English French German Italian Spanish Polish...
User Manual
Page 19
... 5 modes for analog-only models) Press the ENTER key to toggle between different PC video signal inputs that may be connected to display the Brightness and Contrast indicators. To exit, press the MENU key. The setting will take effect immediately. See also Picture Mode on -screen. How to adjust your monitor. Mode hot key Press the W key continually to select Brightness or Contrast. The setting will take effect immediately. Brightness and Contrast hot...
... 5 modes for analog-only models) Press the ENTER key to toggle between different PC video signal inputs that may be connected to display the Brightness and Contrast indicators. To exit, press the MENU key. The setting will take effect immediately. See also Picture Mode on -screen. How to adjust your monitor. Mode hot key Press the W key continually to select Brightness or Contrast. The setting will take effect immediately. Brightness and Contrast hot...
User Manual
Page 20
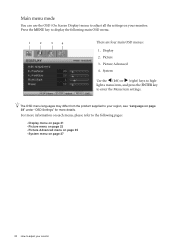
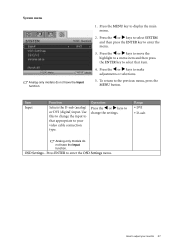
Display 2. Picture Advanced 4. Main menu mode You can use the OSD (On Screen Display) menu to adjust all the settings on page 27 20 How to adjust your monitor. System Use the W (left) or X (right) keys to display the following pages: • Display menu on page 21 • Picture menu on page 23 • Picture Advanced menu on page 25 • System menu on your monitor Press the MENU key to high- Picture 3. light a menu item, and press...
Display 2. Picture Advanced 4. Main menu mode You can use the OSD (On Screen Display) menu to adjust all the settings on page 27 20 How to adjust your monitor. System Use the W (left) or X (right) keys to display the following pages: • Display menu on page 21 • Picture menu on page 23 • Picture Advanced menu on page 25 • System menu on your monitor Press the MENU key to high- Picture 3. light a menu item, and press...
User Manual
Page 21
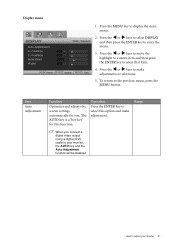
... the MENU button. Display menu 1. Press the W or X keys to select DISPLAY and then press the ENTER key to adjust your monitor, the AUTO key and the Auto Adjustment function will be disabled. Item Auto Adjustment Function Optimizes and adjusts the screen settings automatically for this option and make adjustments or selections. 5. The AUTO key is a 'hot-key' for you connect a digital video output using a digital (DVI) cable to display the main menu. 2. How to enter the menu. 3. Press the MENU...
... the MENU button. Display menu 1. Press the W or X keys to select DISPLAY and then press the ENTER key to adjust your monitor, the AUTO key and the Auto Adjustment function will be disabled. Item Auto Adjustment Function Optimizes and adjusts the screen settings automatically for this option and make adjustments or selections. 5. The AUTO key is a 'hot-key' for you connect a digital video output using a digital (DVI) cable to display the main menu. 2. How to enter the menu. 3. Press the MENU...
User Manual
Page 27
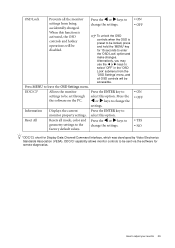
... MENU key to make adjustments or selections. 5. To return to enter the menu. 3. Press the W or X keys to select SYSTEM and then press the ENTER key to the previous menu, press the MENU button. Operation Press the W or X keys to change the input to change the settings. How to enter the OSD Settings menu. Item Input Function Selects the D-sub (analog) or DVI (digital) input. Press ENTER to adjust your video cable connection...
... MENU key to make adjustments or selections. 5. To return to enter the menu. 3. Press the W or X keys to select SYSTEM and then press the ENTER key to the previous menu, press the MENU button. Operation Press the W or X keys to change the input to change the settings. How to enter the OSD Settings menu. Item Input Function Selects the D-sub (analog) or DVI (digital) input. Press ENTER to adjust your video cable connection...
User Manual
Page 29
... to settings to change the settings. Press the W or X keys to be accessible. OSD Lock Prevents all the monitor settings from the 'OSD Settings' menu, and all mode, color and geometry settings to Reset All monitor property settings. How to leave the OSD Settings menu. To unlock the OSD controls when the OSD is activated, the OSD controls and hotkey operations will be set through select this option. W or X keys to be sent via the software for remote...
... to settings to change the settings. Press the W or X keys to be accessible. OSD Lock Prevents all the monitor settings from the 'OSD Settings' menu, and all mode, color and geometry settings to Reset All monitor property settings. How to leave the OSD Settings menu. To unlock the OSD controls when the OSD is activated, the OSD controls and hotkey operations will be set through select this option. W or X keys to be sent via the software for remote...
User Manual
Page 30
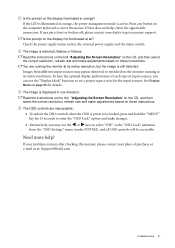
... green and there is illuminated in green? Select MENU > PICTURE > Color > Reset Color, and then choose "YES" in LCD technology. If any pin is blurred: Read the instructions on the link "Adjusting the Screen Resolution" on the CD, and then select the correct resolution, refresh rate and make adjustments based on or off , please contact your computer and monitor go into a low power "sleep" mode when not actively in booster. Select the native resolution. Pixel errors...
... green and there is illuminated in green? Select MENU > PICTURE > Color > Reset Color, and then choose "YES" in LCD technology. If any pin is blurred: Read the instructions on the link "Adjusting the Screen Resolution" on the CD, and then select the correct resolution, refresh rate and make adjustments based on or off , please contact your computer and monitor go into a low power "sleep" mode when not actively in booster. Select the native resolution. Pixel errors...
User Manual
Page 31
... mode is distorted, flashes or flickers: Read the instructions on the link "Adjusting the Screen Resolution" on the CD, and then select the correct resolution, refresh rate and make adjustments based on the computer keyboard or move the mouse. If any button on these instructions. See Display Mode on page 26 for the input sources. Need more help , check the signal cable connectors. Press any pin is illuminated in the "OSD Lock" submenu from different input sources may use the "Display Mode...
... mode is distorted, flashes or flickers: Read the instructions on the link "Adjusting the Screen Resolution" on the CD, and then select the correct resolution, refresh rate and make adjustments based on the computer keyboard or move the mouse. If any button on these instructions. See Display Mode on page 26 for the input sources. Need more help , check the signal cable connectors. Press any pin is illuminated in the "OSD Lock" submenu from different input sources may use the "Display Mode...


