

User Manual
Page 2
...openings on the back or top of the cabinet are not sure of the type of power available, consult your monitor from the type of power indicated on the marked label. Please follow these safety instructions for best performance, and long life for your monitor Power Safety • The AC plug... power company. Clean the LCD monitor surface with respect to notify any person of such revision or changes. No part of this publication and to make changes from the AC supply. • The power supply cord serves as opening or removing covers may be blocked or covered. Further, BenQ Corporation...
...openings on the back or top of the cabinet are not sure of the type of power available, consult your monitor from the type of power indicated on the marked label. Please follow these safety instructions for best performance, and long life for your monitor Power Safety • The AC plug... power company. Clean the LCD monitor surface with respect to notify any person of such revision or changes. No part of this publication and to make changes from the AC supply. • The power supply cord serves as opening or removing covers may be blocked or covered. Further, BenQ Corporation...

User Manual
Page 3
... 12 How to install on Windows Vista systems 13 How to install on Windows XP system 14 How to adjust the screen resolution 15 How to adjust the screen refresh rate 16 Picture optimization ...17 How to adjust your monitor 18 The control panel ...18 On Screen Display (OSD) menu structure 19 Hot key mode ...20 Main menu mode ...21 Troubleshooting ...31 Frequently asked questions (FAQ 31 Need more help? ...32 Supported PC Timings ...33 Specifications ...34 Table of...
... 12 How to install on Windows Vista systems 13 How to install on Windows XP system 14 How to adjust the screen resolution 15 How to adjust the screen refresh rate 16 Picture optimization ...17 How to adjust your monitor 18 The control panel ...18 On Screen Display (OSD) menu structure 19 Hot key mode ...20 Main menu mode ...21 Troubleshooting ...31 Frequently asked questions (FAQ 31 Need more help? ...32 Supported PC Timings ...33 Specifications ...34 Table of...

User Manual
Page 4
1. BenQ LCD Monitor Quick Start Guide CD-ROM Power Cord (Picture may need to transport the monitor. The fitted foam packing is ideal for use in the future when you may differ from product supplied for your region) Signal Cable: D-Sub Signal Cable: DVI-D (optional) Consider keeping the box and packaging in storage for protecting the monitor during transport. 4 Getting started When unpacking please check you have the following items. If any are missing or damaged, please contact the place of purchase for a replacement. Getting started
1. BenQ LCD Monitor Quick Start Guide CD-ROM Power Cord (Picture may need to transport the monitor. The fitted foam packing is ideal for use in the future when you may differ from product supplied for your region) Signal Cable: D-Sub Signal Cable: DVI-D (optional) Consider keeping the box and packaging in storage for protecting the monitor during transport. 4 Getting started When unpacking please check you have the following items. If any are missing or damaged, please contact the place of purchase for a replacement. Getting started

User Manual
Page 6
... and lock into place. Protect the monitor and screen by clearing a flat open area on your monitor hardware If the computer is turned on an object like the monitor packaging bag on the power to the monitor until they have properly engaged. Orient and align the stand base socket with the end of the monitor. Gently attempt to pull them together until instructed to...
... and lock into place. Protect the monitor and screen by clearing a flat open area on your monitor hardware If the computer is turned on an object like the monitor packaging bag on the power to the monitor until they have properly engaged. Orient and align the stand base socket with the end of the monitor. Gently attempt to pull them together until instructed to...

User Manual
Page 8
... most from product supplied for your monitor hardware Release the cable retaining clip by pressing the power button on the computer too, and follow the instructions in place behind the monitor stand. 5. Plug the other end of the monitor. Turn on the monitor by squeezing the clip inwards as illustrated. Connect-to assemble your region. Turn on the front of the power cord into a power outlet and turn -on . 4.
... most from product supplied for your monitor hardware Release the cable retaining clip by pressing the power button on the computer too, and follow the instructions in place behind the monitor stand. 5. Plug the other end of the monitor. Turn on the monitor by squeezing the clip inwards as illustrated. Connect-to assemble your region. Turn on the front of the power cord into a power outlet and turn -on . 4.

User Manual
Page 10
... a monitor model. 4. Getting the most from your BenQ monitor To gain the most from your new BenQ color LCD flat screen monitor, you are upgrading an existing installation (which has security access requirements, network policy settings may prevent you to successfully install the BenQ LCD Monitor driver software. Follow the wizard instructions until it asks you from installing software on your computer. 10 Getting the most benefit from your computer is connected to...
... a monitor model. 4. Getting the most from your BenQ monitor To gain the most from your new BenQ color LCD flat screen monitor, you are upgrading an existing installation (which has security access requirements, network policy settings may prevent you to successfully install the BenQ LCD Monitor driver software. Follow the wizard instructions until it asks you from installing software on your computer. 10 Getting the most benefit from your computer is connected to...

User Manual
Page 11
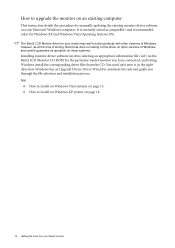
... install the monitor on a new computer This instruction details the procedure for How to upgrade the monitor on an existing computer. 1. Follow the prompts until it (and has monitor driver software installed), you should not be connected to assemble your BenQ monitor 11 You should instead be following these instructions. Check Search for a suitable driver for which has never been used before . Getting the most from your monitor...
... install the monitor on a new computer This instruction details the procedure for How to upgrade the monitor on an existing computer. 1. Follow the prompts until it (and has monitor driver software installed), you should not be connected to assemble your BenQ monitor 11 You should instead be following these instructions. Check Search for a suitable driver for which has never been used before . Getting the most from your monitor...
User Manual
Page 12
... to upgrade the monitor on an existing computer This instruction details the procedure for manually updating the existing monitor driver software on your model may well function perfectly with other versions of Windows, however, as compatible (and recommended only) for Windows XP and Windows Vista Operating System (OS). See: • How to install on Windows Vista systems on page 13. • How to install on Windows XP...
... to upgrade the monitor on an existing computer This instruction details the procedure for manually updating the existing monitor driver software on your model may well function perfectly with other versions of Windows, however, as compatible (and recommended only) for Windows XP and Windows Vista Operating System (OS). See: • How to install on Windows Vista systems on page 13. • How to install on Windows XP...
User Manual
Page 13
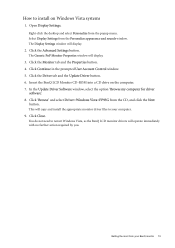
... the BenQ LCD monitor drivers will copy and install the appropriate monitor driver files to install on the computer. 7. How to your BenQ monitor 13 Right-click the desktop and select Personalize from the Personalize appearance and sounds window. Click 'Browse' and select Driver>Windows Vista>FP95G from your computer. 9. Getting the most from the CD, and click the Next button. Open Display Settings. Click the Advanced Settings button. Click the Monitor...
... the BenQ LCD monitor drivers will copy and install the appropriate monitor driver files to install on the computer. 7. How to your BenQ monitor 13 Right-click the desktop and select Personalize from the Personalize appearance and sounds window. Click 'Browse' and select Driver>Windows Vista>FP95G from your computer. 9. Getting the most from the CD, and click the Next button. Open Display Settings. Click the Advanced Settings button. Click the Monitor...

User Manual
Page 14
... main Start menu item. If the driver provider is selected for drives and the BenQ LCD Monitor CD inserted in the location 'd:\Driver\Windows XP\FP95G\ FP95G.inf ' or similar. Click Finish. How to the Monitor Properties window, now renamed BenQ FP95G Properties. 11. Open Display Properties. However, if BenQ is not listed as BenQ, and the model matches that of these instructions. 5. Click the Driver tab and the Update Driver button. Insert the BenQ LCD Monitor...
... main Start menu item. If the driver provider is selected for drives and the BenQ LCD Monitor CD inserted in the location 'd:\Driver\Windows XP\FP95G\ FP95G.inf ' or similar. Click Finish. How to the Monitor Properties window, now renamed BenQ FP95G Properties. 11. Open Display Properties. However, if BenQ is not listed as BenQ, and the model matches that of these instructions. 5. Click the Driver tab and the Update Driver button. Insert the BenQ LCD Monitor...

User Manual
Page 15
The best possible picture for your PC screen resolution setting. 1. Use the slider in the 'Screen area' section to adjust the screen resolution 15 Close the Display Properties window. How to adjust the screen resolution Due to the nature of liquid crystal display (LCD) technology, the picture resolution is called "Native Resolution" or maximal resolution - This is always fixed. Image blurring across pixel boundaries can open Display Properties by right-clicking on the Windows desktop and selecting Properties from...
The best possible picture for your PC screen resolution setting. 1. Use the slider in the 'Screen area' section to adjust the screen resolution 15 Close the Display Properties window. How to adjust the screen resolution Due to the nature of liquid crystal display (LCD) technology, the picture resolution is called "Native Resolution" or maximal resolution - This is always fixed. Image blurring across pixel boundaries can open Display Properties by right-clicking on the Windows desktop and selecting Properties from...
User Manual
Page 16
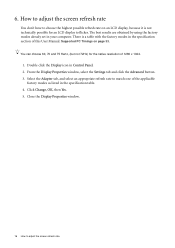
... this User Manual: Supported PC Timings on an LCD display, because it is a table with the factory modes in the specification section of the applicable factory modes as listed in the specification table. 4. There is not technically possible for the native resolution of 1280 x 1024. 1. Double click the Display icon in your computer. Click Change, OK, then Yes. 5. 6. How to adjust the screen refresh rate You don't have to flicker...
... this User Manual: Supported PC Timings on an LCD display, because it is a table with the factory modes in the specification section of the applicable factory modes as listed in the specification table. 4. There is not technically possible for the native resolution of 1280 x 1024. 1. Double click the Display icon in your computer. Click Change, OK, then Yes. 5. 6. How to adjust the screen refresh rate You don't have to flicker...
User Manual
Page 17
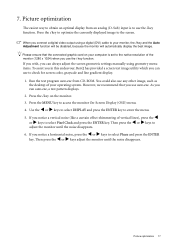
... an analog (D-Sub) input is set to enter the menu. 5. As you can always adjust the screen geometric settings manually using a digital (DVI) cable to check for screen color, grayscale and line gradient display. 1. If you connect a digital video output using geometry menu items. To assist you in this endeavour, BenQ has provided a screen test image utility which you run auto.exe, a test pattern displays. 2. Press the i key to optimize the currently displayed image to access the monitor On-Screen Display (OSD) menu. 4. Press...
... an analog (D-Sub) input is set to enter the menu. 5. As you can always adjust the screen geometric settings manually using a digital (DVI) cable to check for screen color, grayscale and line gradient display. 1. If you connect a digital video output using geometry menu items. To assist you in this endeavour, BenQ has provided a screen test image utility which you run auto.exe, a test pattern displays. 2. Press the i key to optimize the currently displayed image to access the monitor On-Screen Display (OSD) menu. 4. Press...

User Manual
Page 18
... key activity. Hot-key displays will disappear after a few seconds of that setting, and will display a graduated scale for Brightness and Contrast. 5. 8. "i key": Adjust vertical position, phase, horizontal position and pixel clock automatically. 2. OSD = On Screen Display. The hot-keys will only operate while the OSD menu is also the hot key for Mode. 4. "Power": Turn the power on page 20. 18 How to adjust your monitor The control panel 1. The key is the...
... key activity. Hot-key displays will disappear after a few seconds of that setting, and will display a graduated scale for Brightness and Contrast. 5. 8. "i key": Adjust vertical position, phase, horizontal position and pixel clock automatically. 2. OSD = On Screen Display. The hot-keys will only operate while the OSD menu is also the hot key for Mode. 4. "Power": Turn the power on page 20. 18 How to adjust your monitor The control panel 1. The key is the...
User Manual
Page 21
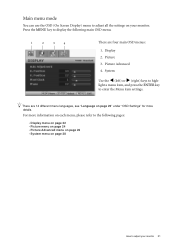
... enter the Menu item settings. Picture 3. Picture Advanced 4. There are four main OSD menus: 1. For more information on each menu, please refer to the following main OSD menu. 1 2 3 4 There are 14 different menu languages, see "Language on page 28 How to adjust your monitor. light a menu item, and press the ENTER key to high- Main menu mode You can use the OSD (On Screen Display) menu to adjust all the settings on your monitor 21
... enter the Menu item settings. Picture 3. Picture Advanced 4. There are four main OSD menus: 1. For more information on each menu, please refer to the following main OSD menu. 1 2 3 4 There are 14 different menu languages, see "Language on page 28 How to adjust your monitor. light a menu item, and press the ENTER key to high- Main menu mode You can use the OSD (On Screen Display) menu to adjust all the settings on your monitor 21
User Manual
Page 22
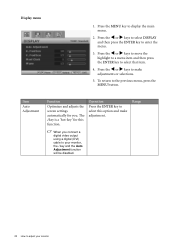
... select that item. 4. The i key is a 'hot-key' for you connect a digital video output using a digital (DVI) cable to your monitor Press the W or X keys to move the highlight to a menu item and then press the ENTER key to make adjustment. Item Auto Adjustment Function Optimizes and adjusts the screen settings automatically for this option and make adjustments or selections. 5. Operation Press the ENTER key to select this function...
... select that item. 4. The i key is a 'hot-key' for you connect a digital video output using a digital (DVI) cable to your monitor Press the W or X keys to move the highlight to a menu item and then press the ENTER key to make adjustment. Item Auto Adjustment Function Optimizes and adjusts the screen settings automatically for this option and make adjustments or selections. 5. Operation Press the ENTER key to select this function...

User Manual
Page 30
... to change the settings. To unlock the OSD controls when the OSD is activated, the OSD controls and hotkey operations will be accessible. select this function is preset to be locked, press and hold the 'MENU' key for 15 seconds to leave the OSD Settings menu. OSD Lock Prevents all OSD controls will be disabled. When this option. Alternatively, you may use the W or X keys to the factory default values. Resets all mode, color...
... to change the settings. To unlock the OSD controls when the OSD is activated, the OSD controls and hotkey operations will be accessible. select this function is preset to be locked, press and hold the 'MENU' key for 15 seconds to leave the OSD Settings menu. OSD Lock Prevents all OSD controls will be disabled. When this option. Alternatively, you may use the W or X keys to the factory default values. Resets all mode, color...

User Manual
Page 31
... than the native (maximum) resolution? Remove the extension cable for blurring to occur due to adjust the screen resolution on or off and is a natural defect that are permanently white, one of several pixels is permanently black, one or more pixels are permanently red, green, blue or another color. • Clean the LCD screen. • Cycle power on-off , please contact your computer and monitor go into a low power "sleep" mode when not...
... than the native (maximum) resolution? Remove the extension cable for blurring to occur due to adjust the screen resolution on or off and is a natural defect that are permanently white, one of several pixels is permanently black, one or more pixels are permanently red, green, blue or another color. • Clean the LCD screen. • Cycle power on-off , please contact your computer and monitor go into a low power "sleep" mode when not...
User Manual
Page 32
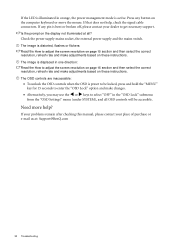
If the LED is illuminated in the "OSD Lock" submenu from the "OSD Settings" menu (under SYSTEM), and all ? Need more help , check the signal cable connectors. Is the prompt on the display not illuminated at : Support@BenQ.com 32 Troubleshooting Check the power supply mains socket, the external power supply and the mains switch. The image is active. Press any pin is bent or broken off, please contact your place of purchase or...
If the LED is illuminated in the "OSD Lock" submenu from the "OSD Settings" menu (under SYSTEM), and all ? Need more help , check the signal cable connectors. Is the prompt on the display not illuminated at : Support@BenQ.com 32 Troubleshooting Check the power supply mains socket, the external power supply and the mains switch. The image is active. Press any pin is bent or broken off, please contact your place of purchase or...

User Manual
Page 33
....16(N) 135.09 Comment DOS DOS DOS Macintosh VESA VESA VESA VESA VESA VESA Macintosh VESA VESA VESA VESA Macintosh SUN 66 SUN VESA IBMI VESA SPARC2 • Image disruption may improve this situation by altering an automatic setting or by manually changing the phase setting and the pixel frequency from the "DISPLAY" menu. • To extend the service life of signal frequency differences from graphic cards which do not correspond with the usual standard...
....16(N) 135.09 Comment DOS DOS DOS Macintosh VESA VESA VESA VESA VESA VESA Macintosh VESA VESA VESA VESA Macintosh SUN 66 SUN VESA IBMI VESA SPARC2 • Image disruption may improve this situation by altering an automatic setting or by manually changing the phase setting and the pixel frequency from the "DISPLAY" menu. • To extend the service life of signal frequency differences from graphic cards which do not correspond with the usual standard...


