Brochure
Page 1
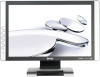
... Features Net Weight (kg) Regulations AMA Technology Senseye Technology 6 display modes (inc. 2 gaming modes) 4.7kg TCO03 Headquarters BenQ Corporation Digital Media Business Group 157 Shan-Ying Rd., Gueishan, Taoyuan 333, laiwan, R.O.0 Tel: +886-2-2799-8800 Fax: +886-2-2656...:1 160* / 160°(CR>=10) 5ms (2ms GTG) 16.7 million 31-83 FP94VW LCD Monitor Ver. Doc. Product specifications are ! 4 FP94VW LCD Monitor O Contrast 800:1 D-sub DVI-D NOM.' ..y . .. A 153mm V 210mm 420mm LCD Panel Size Resolution (max.) Display Area (mm) Pixel Pitch (mm) Brightness (typ.) ...
... Features Net Weight (kg) Regulations AMA Technology Senseye Technology 6 display modes (inc. 2 gaming modes) 4.7kg TCO03 Headquarters BenQ Corporation Digital Media Business Group 157 Shan-Ying Rd., Gueishan, Taoyuan 333, laiwan, R.O.0 Tel: +886-2-2799-8800 Fax: +886-2-2656...:1 160* / 160°(CR>=10) 5ms (2ms GTG) 16.7 million 31-83 FP94VW LCD Monitor Ver. Doc. Product specifications are ! 4 FP94VW LCD Monitor O Contrast 800:1 D-sub DVI-D NOM.' ..y . .. A 153mm V 210mm 420mm LCD Panel Size Resolution (max.) Display Area (mm) Pixel Pitch (mm) Brightness (typ.) ...

User Manual
Page 1
FP94VW 19" Wide-Screen LCD Monitor User Manual Welcome
FP94VW 19" Wide-Screen LCD Monitor User Manual Welcome

User Manual
Page 2
... retrieval system or translated into any language or computer language, in the contents hereof without the prior written permission of BenQ Corporation. Clean the LCD monitor surface with respect to the contents hereof and specifically disclaims any warranties, merchantability or fitness for servicing. 2 If any ...cabinet are not sure of the type of power available, consult your monitor from time to time in any form or by BenQ Corporation. Your monitor should be blocked or covered. Further, BenQ Corporation reserves the right to revise this publication and to make changes...
... retrieval system or translated into any language or computer language, in the contents hereof without the prior written permission of BenQ Corporation. Clean the LCD monitor surface with respect to the contents hereof and specifically disclaims any warranties, merchantability or fitness for servicing. 2 If any ...cabinet are not sure of the type of power available, consult your monitor from time to time in any form or by BenQ Corporation. Your monitor should be blocked or covered. Further, BenQ Corporation reserves the right to revise this publication and to make changes...

User Manual
Page 4
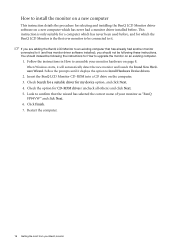
Getting started When unpacking please check you have the following items. If any are missing or damaged, please contact the place of purchase for your graphic card supports the resolution of 1440 x 900. BenQ LCD Monitor Monitor Base Accessory Hangers CD-ROM Quick Start Guide Power Cord (Picture may differ from product supplied for a replacement. Please ensure that your region) 4 Getting started Your FP94VW will provide the optimal display performance of the video resolution standard of 1440 x 900. 1.
Getting started When unpacking please check you have the following items. If any are missing or damaged, please contact the place of purchase for your graphic card supports the resolution of 1440 x 900. BenQ LCD Monitor Monitor Base Accessory Hangers CD-ROM Quick Start Guide Power Cord (Picture may differ from product supplied for a replacement. Please ensure that your region) 4 Getting started Your FP94VW will provide the optimal display performance of the video resolution standard of 1440 x 900. 1.

User Manual
Page 7
Rear cover: VESA mount inside The back of your monitor 7 D-Sub input connector Getting to know your LCD monitor has a VESA standard mount with 100mm pattern, allowing the installation of a wall mount bracket. DVI-D input connector 5. See Audio menu on page 13 to receive the audio signal from HDMI input. HDMI input connector 4. Power AC input connector 3. See Using the monitor wall mounting kit on page 35 for information about audio controls. 1. Earphone socket Plug the earphone or headset into the earphone socket to learn more. 2. Left-side view Back view 1.
Rear cover: VESA mount inside The back of your monitor 7 D-Sub input connector Getting to know your LCD monitor has a VESA standard mount with 100mm pattern, allowing the installation of a wall mount bracket. DVI-D input connector 5. See Audio menu on page 13 to receive the audio signal from HDMI input. HDMI input connector 4. Power AC input connector 3. See Using the monitor wall mounting kit on page 35 for information about audio controls. 1. Earphone socket Plug the earphone or headset into the earphone socket to learn more. 2. Left-side view Back view 1.

User Manual
Page 8
Placing the screen surface on an object like the monitor packaging bag on your desk will crack the glass or damage the LCD substrate voiding your warranty. Sliding or scraping the monitor around on the desk for padding. Protect the monitor and screen by clearing a flat open area on a flat even surface. Orient and align...
Placing the screen surface on an object like the monitor packaging bag on your desk will crack the glass or damage the LCD substrate voiding your warranty. Sliding or scraping the monitor around on the desk for padding. Protect the monitor and screen by clearing a flat open area on a flat even surface. Orient and align...

User Manual
Page 9
... plugs from accidently falling out during use both cables can be used for direct digital connection between source video and digital LCD monitors or projectors. Connect the other end to the monitor D-Sub socket. 2. The digital video signals produce a superior quality picture than analog video signals. Connect the PC video cable.... The only case in which both DVI-D cable and D-Sub cable on the rear of the DVI-D cable to the monitor DVI-D socket and the other end to the DVI-D port on your computer. (optional) The DVI-D format is used is if they are connected...
... plugs from accidently falling out during use both cables can be used for direct digital connection between source video and digital LCD monitors or projectors. Connect the other end to the monitor D-Sub socket. 2. The digital video signals produce a superior quality picture than analog video signals. Connect the PC video cable.... The only case in which both DVI-D cable and D-Sub cable on the rear of the DVI-D cable to the monitor DVI-D socket and the other end to the DVI-D port on your computer. (optional) The DVI-D format is used is if they are connected...

User Manual
Page 12
... cable. Turn off the computer before laying the screen face down on your desk will crack the glass or damage the LCD substrate voiding your warranty. Sliding or scraping the monitor around on a flat clean padded surface. 2. Placing the screen surface on an object like a towel on one side of ...the stand base while pulling the edge of the base away from the monitor stand arm. 12 How to the monitor. Release the other locking clip to detach the stand base from the stand arm. 3. Prepare the monitor and area. Release the locking clip on the desk for padding, before unplugging...
... cable. Turn off the computer before laying the screen face down on your desk will crack the glass or damage the LCD substrate voiding your warranty. Sliding or scraping the monitor around on a flat clean padded surface. 2. Placing the screen surface on an object like a towel on one side of ...the stand base while pulling the edge of the base away from the monitor stand arm. 12 How to the monitor. Release the other locking clip to detach the stand base from the stand arm. 3. Prepare the monitor and area. Release the locking clip on the desk for padding, before unplugging...

User Manual
Page 13
... the monitor. • Turn off the monitor and the power before disconnecting the cables from the LCD monitor. 1. Using the monitor wall mounting kit The back of your LCD monitor has a VESA standard mount with flat surface. • Ensure that fixing the monitor stand to assemble your monitor hardware 13 Then pull the monitor stand backward away from your BenQ monitor on...
... the monitor. • Turn off the monitor and the power before disconnecting the cables from the LCD monitor. 1. Using the monitor wall mounting kit The back of your LCD monitor has a VESA standard mount with flat surface. • Ensure that fixing the monitor stand to assemble your monitor hardware 13 Then pull the monitor stand backward away from your BenQ monitor on...

User Manual
Page 15
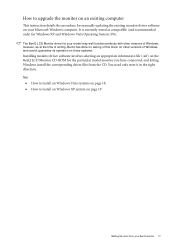
... group in order to successfully install the BenQ LCD Monitor driver software. In either case however, the very next time you turn on your computer (after connecting the monitor to your BenQ LCD Monitor will determine which you should install the custom BenQ LCD Monitor driver software as a member of Microsoft Windows...Hardware wizard. See: • How to install the monitor on a new computer on page 16. • How to upgrade the monitor on an existing computer on the BenQ LCD Monitor CD-ROM. 4. Getting the most from your BenQ monitor To gain the most from installing software on as ...
... group in order to successfully install the BenQ LCD Monitor driver software. In either case however, the very next time you turn on your computer (after connecting the monitor to your BenQ LCD Monitor will determine which you should install the custom BenQ LCD Monitor driver software as a member of Microsoft Windows...Hardware wizard. See: • How to install the monitor on a new computer on page 16. • How to upgrade the monitor on an existing computer on the BenQ LCD Monitor CD-ROM. 4. Getting the most from your BenQ monitor To gain the most from installing software on as ...
User Manual
Page 16
...When Windows starts, it . Insert the BenQ LCD Monitor CD-ROM into a CD drive on page 8. Check Search for a suitable driver for CD-ROM drives (uncheck all others) and click Next. 5. Restart the computer. 16 Getting the most from your monitor as "BenQ FP94VW" and click Next. 6. Follow the ...prompts until it (and has monitor driver software installed), you are adding the BenQ LCD Monitor to an existing computer that the wizard has selected the correct name of ...
...When Windows starts, it . Insert the BenQ LCD Monitor CD-ROM into a CD drive on page 8. Check Search for a suitable driver for CD-ROM drives (uncheck all others) and click Next. 5. Restart the computer. 16 Getting the most from your monitor as "BenQ FP94VW" and click Next. 6. Follow the ...prompts until it (and has monitor driver software installed), you are adding the BenQ LCD Monitor to an existing computer that the wizard has selected the correct name of ...
User Manual
Page 17
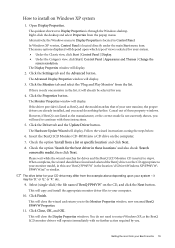
The BenQ LCD Monitor driver for your model may well function perfectly with other versions of Windows, however, as compatible (and recommended only) for Windows XP and Windows Vista ... and cannot guarantee its operation on those systems. Installing monitor driver software involves selecting an appropriate information file (.inf) on page 19 Getting the most from the CD. How to install on Windows XP system on the BenQ LCD Monitor CD-ROM for the particular model monitor you have connected, and letting Windows install the...
The BenQ LCD Monitor driver for your model may well function perfectly with other versions of Windows, however, as compatible (and recommended only) for Windows XP and Windows Vista ... and cannot guarantee its operation on those systems. Installing monitor driver software involves selecting an appropriate information file (.inf) on page 19 Getting the most from the CD. How to install on Windows XP system on the BenQ LCD Monitor CD-ROM for the particular model monitor you have connected, and letting Windows install the...
User Manual
Page 18
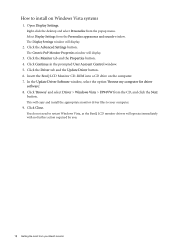
...Click 'Browse' and select Driver > Windows Vista > FP94VW from the popup menu. The Display Settings window will display. 3. Click the Advanced Settings button. Click Continue in the prompted User Account Control window. 5. Insert the BenQ LCD Monitor CD-ROM into a CD drive on Windows Vista ...systems 1. How to your BenQ monitor The Generic PnP Monitor Properties window will display. 2. Click the Driver tab and the Update Driver button. ...
...Click 'Browse' and select Driver > Windows Vista > FP94VW from the popup menu. The Display Settings window will display. 3. Click the Advanced Settings button. Click Continue in the prompted User Account Control window. 5. Insert the BenQ LCD Monitor CD-ROM into a CD drive on Windows Vista ...systems 1. How to your BenQ monitor The Generic PnP Monitor Properties window will display. 2. Click the Driver tab and the Update Driver button. ...
User Manual
Page 19
... list, it may differ from the example above depending upon which type of view is listed as the BenQ LCD monitor drivers will copy and install the appropriate monitor driver files to the Monitor Properties window, now renamed BenQ FP94VW Properties. 11. Cancel out of these locations' and also check 'Search removable media', then click Next. The...
... list, it may differ from the example above depending upon which type of view is listed as the BenQ LCD monitor drivers will copy and install the appropriate monitor driver files to the Monitor Properties window, now renamed BenQ FP94VW Properties. 11. Cancel out of these locations' and also check 'Search removable media', then click Next. The...
User Manual
Page 20
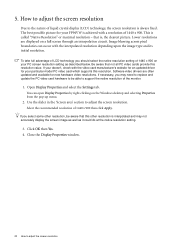
To take full advantage of LCD technology you select some other resolution, be able to support the native resolution of the monitor. 1. If your FP94VW is achieved with the video card manufacturer's website for an updated driver for new hardware video resolutions. Click OK ...then Yes. 4. 5. The best possible picture for your doesn't, check with a resolution of liquid crystal display (LCD) technology, the ...
To take full advantage of LCD technology you select some other resolution, be able to support the native resolution of the monitor. 1. If your FP94VW is achieved with the video card manufacturer's website for an updated driver for new hardware video resolutions. Click OK ...then Yes. 4. 5. The best possible picture for your doesn't, check with a resolution of liquid crystal display (LCD) technology, the ...

User Manual
Page 34
... of the image. • Aspect - This mode may have different native aspect ratios. • Full - Press the ENTER key to adjust your monitor The options under Display Mode will be different depending on the input signal sources. When PC is the input signal source: • Full • ...images which are already in a 4:3 aspect, like DVD movies. • 4:3 Aspect - Displays the image across the complete width and height of the LCD panel. Most suitable for images which are already in a 16:9 aspect, like standard computer. Press the t or u keys to fit into two windows;
... of the image. • Aspect - This mode may have different native aspect ratios. • Full - Press the ENTER key to adjust your monitor The options under Display Mode will be different depending on the input signal sources. When PC is the input signal source: • Full • ...images which are already in a 4:3 aspect, like DVD movies. • 4:3 Aspect - Displays the image across the complete width and height of the LCD panel. Most suitable for images which are already in a 16:9 aspect, like standard computer. Press the t or u keys to fit into two windows;

User Manual
Page 39
...Range" on the screen, this means you use . • Use a screensaver to conduction losses in LCD technology. Troubleshooting 39 Select the native resolution. If the image is normal for the test. Is the ... section It is still not correct and the OSD also has faulty coloration, this monitor does not support, please change the setting to one or more pixels are permanently red, green,... blue or another color. • Clean the LCD screen. • Cycle power on-off , please contact your computer and monitor go into a low power "sleep" mode when not actively in...
...Range" on the screen, this means you use . • Use a screensaver to conduction losses in LCD technology. Troubleshooting 39 Select the native resolution. If the image is normal for the test. Is the ... section It is still not correct and the OSD also has faulty coloration, this monitor does not support, please change the setting to one or more pixels are permanently red, green,... blue or another color. • Clean the LCD screen. • Cycle power on-off , please contact your computer and monitor go into a low power "sleep" mode when not actively in...

User Manual
Page 43
DDC/CI capability allows monitor controls to be 30 to 40 ms while the "Response Time" is 12 ms. BenQ's AMA technology greatly reduces the GTG response time so moving images ...and then off again (or from black to white and back again, it to switch between the many LCD monitors is desirable for the display of moving parts of grayscale images. With Advanced Motion Acceleration (AMA), the ... 2 ms. *DDC/CI, short for a pixel to transition to an intermediate level of an LCD panel may generally be sent via the software for it does not specify the time required to turn completely black...
DDC/CI capability allows monitor controls to be 30 to 40 ms while the "Response Time" is 12 ms. BenQ's AMA technology greatly reduces the GTG response time so moving images ...and then off again (or from black to white and back again, it to switch between the many LCD monitors is desirable for the display of moving parts of grayscale images. With Advanced Motion Acceleration (AMA), the ... 2 ms. *DDC/CI, short for a pixel to transition to an intermediate level of an LCD panel may generally be sent via the software for it does not specify the time required to turn completely black...


