Brochure
Page 2
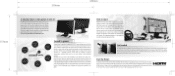
... your games. you the best available digital video and audio performance, while ensuring that it would be the choice for high-end gaming setups for years to get optimized display settings for users who demand slick, sophisticated graphics in substance, with a muted black chassis that sets off the on-screen action and ultra-sleek textured aluminum panels on the FP94VW, it will remain state...
... your games. you the best available digital video and audio performance, while ensuring that it would be the choice for high-end gaming setups for years to get optimized display settings for users who demand slick, sophisticated graphics in substance, with a muted black chassis that sets off the on-screen action and ultra-sleek textured aluminum panels on the FP94VW, it will remain state...

User Manual
Page 2
... specifically disclaims any particular purpose. Please follow these safety instructions for best performance, and long life for your monitor Power Safety • The AC plug isolates this product yourself, as a power disconnect device for any warranties, merchantability or fitness for pluggable equipment. Clean the LCD monitor surface with respect to service this equipment from the AC supply. • The power supply cord serves as opening or removing covers...
... specifically disclaims any particular purpose. Please follow these safety instructions for best performance, and long life for your monitor Power Safety • The AC plug isolates this product yourself, as a power disconnect device for any warranties, merchantability or fitness for pluggable equipment. Clean the LCD monitor surface with respect to service this equipment from the AC supply. • The power supply cord serves as opening or removing covers...

User Manual
Page 3
... 17 How to install on Windows Vista systems 18 How to install on Windows XP system 19 How to adjust the screen resolution 20 How to adjust the screen refresh rate 21 Picture optimization ...22 How to adjust your monitor 23 The control panel ...23 On Screen Display (OSD) menu structure 24 Hot key mode ...26 Main menu mode ...28 Troubleshooting ...39 Frequently asked questions (FAQ 39 Need more help? ...40 Supported PC Timings ...41 Specifications ...42 Table of...
... 17 How to install on Windows Vista systems 18 How to install on Windows XP system 19 How to adjust the screen resolution 20 How to adjust the screen refresh rate 21 Picture optimization ...22 How to adjust your monitor 23 The control panel ...23 On Screen Display (OSD) menu structure 24 Hot key mode ...26 Main menu mode ...28 Troubleshooting ...39 Frequently asked questions (FAQ 39 Need more help? ...40 Supported PC Timings ...41 Specifications ...42 Table of...

User Manual
Page 13
Using the monitor wall mounting kit The back of your LCD monitor has a VESA standard mount with flat surface. • Ensure that fixing the monitor stand to assemble your BenQ monitor on the stand in "Getting the most from the monitor. Detach the monitor base as instructed in the future, please keep the monitor base, monitor stand, and screws somewhere safe for future use. Remove the monitor stand. Then pull the monitor stand backward away from your monitor hardware 13 Use a a cross-pointed screwdriver to...
Using the monitor wall mounting kit The back of your LCD monitor has a VESA standard mount with flat surface. • Ensure that fixing the monitor stand to assemble your BenQ monitor on the stand in "Getting the most from the monitor. Detach the monitor base as instructed in the future, please keep the monitor base, monitor stand, and screws somewhere safe for future use. Remove the monitor stand. Then pull the monitor stand backward away from your monitor hardware 13 Use a a cross-pointed screwdriver to...

User Manual
Page 15
... install your new BenQ color LCD flat screen monitor, you need to your BenQ monitor 15 At that point, click the Have Disk button, insert the BenQ LCD Monitor CD-ROM and select the appropriate monitor model. Follow the wizard instructions until it asks you are upgrading an existing installation (which process you should install the custom BenQ LCD Monitor driver software as a member of Microsoft Windows you are using, and whether you are connecting the monitor and installing the software...
... install your new BenQ color LCD flat screen monitor, you need to your BenQ monitor 15 At that point, click the Have Disk button, insert the BenQ LCD Monitor CD-ROM and select the appropriate monitor model. Follow the wizard instructions until it asks you are upgrading an existing installation (which process you should install the custom BenQ LCD Monitor driver software as a member of Microsoft Windows you are using, and whether you are connecting the monitor and installing the software...

User Manual
Page 16
... your monitor as "BenQ FP94VW" and click Next. 6. When Windows starts, it . Click Finish. 7. If you should instead be following these instructions. Check the option for my device option, and click Next. 4. Follow the prompts until it displays the option to confirm that has already had a monitor driver installed before , and for which has never had another monitor connected to it (and has monitor driver software installed...
... your monitor as "BenQ FP94VW" and click Next. 6. When Windows starts, it . Click Finish. 7. If you should instead be following these instructions. Check the option for my device option, and click Next. 4. Follow the prompts until it displays the option to confirm that has already had a monitor driver installed before , and for which has never had another monitor connected to it (and has monitor driver software installed...
User Manual
Page 17
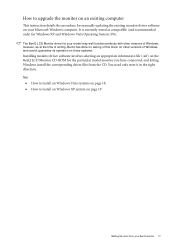
... manually updating the existing monitor driver software on your Microsoft Windows computer. It is currently tested as at the time of writing, BenQ has done no testing of this driver on other versions of Windows and cannot guarantee its operation on those systems. Installing monitor driver software involves selecting an appropriate information file (.inf) on the BenQ LCD Monitor CD-ROM for the particular model monitor you have connected...
... manually updating the existing monitor driver software on your Microsoft Windows computer. It is currently tested as at the time of writing, BenQ has done no testing of this driver on other versions of Windows and cannot guarantee its operation on those systems. Installing monitor driver software involves selecting an appropriate information file (.inf) on the BenQ LCD Monitor CD-ROM for the particular model monitor you have connected...
User Manual
Page 18
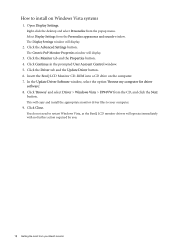
... menu. Select Display Settings from the CD, and click the Next button. The Display Settings window will display. 3. Click Close. Insert the BenQ LCD Monitor CD-ROM into a CD drive on Windows Vista systems 1. In the Update Driver Software window, select the option 'Browse my computer for driver software'. 8. Click 'Browse' and select Driver > Windows Vista > FP94VW from the Personalize appearance and sounds window. Click Continue in the prompted User Account Control window. 5. Open Display Settings. The Generic PnP Monitor...
... menu. Select Display Settings from the CD, and click the Next button. The Display Settings window will display. 3. Click Close. Insert the BenQ LCD Monitor CD-ROM into a CD drive on Windows Vista systems 1. In the Update Driver Software window, select the option 'Browse my computer for driver software'. 8. Click 'Browse' and select Driver > Windows Vista > FP94VW from the Personalize appearance and sounds window. Click Continue in the prompted User Account Control window. 5. Open Display Settings. The Generic PnP Monitor...
User Manual
Page 19
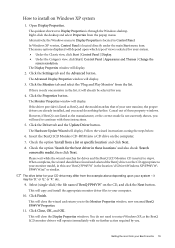
... in the location 'd:\Driver\Windows XP\FP94VW\ FP94VW.inf ' or similar. The Advanced Display Properties window will display. The Monitor Properties window will display. 3. Insert the BenQ LCD Monitor CD-ROM into a CD drive on the CD, and click the Next button. Check the option 'Install from your system. • Under the Classic view, click Start | Control Panel | Display. • Under the Category view, click Start | Control Panel | Appearance and Themes | Change the screen resolution. When completes, the...
... in the location 'd:\Driver\Windows XP\FP94VW\ FP94VW.inf ' or similar. The Advanced Display Properties window will display. The Monitor Properties window will display. 3. Insert the BenQ LCD Monitor CD-ROM into a CD drive on the CD, and click the Next button. Check the option 'Install from your system. • Under the Classic view, click Start | Control Panel | Display. • Under the Category view, click Start | Control Panel | Appearance and Themes | Change the screen resolution. When completes, the...
User Manual
Page 20
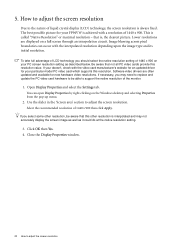
...-up menu. 2. Close the Display Properties window. 20 How to adjust the screen resolution. 5. Open Display Properties and select the Settings tab. Click OK then Yes. 4. If your doesn't, check with the video card manufacturer's website for an updated driver for your FP94VW is achieved with the interpolated resolution depending upon the image type and its initial resolution. To take full advantage of the monitor. 1. How to adjust the screen resolution Due...
...-up menu. 2. Close the Display Properties window. 20 How to adjust the screen resolution. 5. Open Display Properties and select the Settings tab. Click OK then Yes. 4. If your doesn't, check with the video card manufacturer's website for an updated driver for your FP94VW is achieved with the interpolated resolution depending upon the image type and its initial resolution. To take full advantage of the monitor. 1. How to adjust the screen resolution Due...

User Manual
Page 21
... an LCD display to adjust the screen refresh rate 21 How to adjust the screen refresh rate You don't have to match one of this User Manual: Supported PC Timings on an LCD display, because it is a table with the factory modes in Control Panel. 2. From the Display Properties window, select the Settings tab and click the Advanced button. 3. Click Change, OK, then Yes. 5. The best results are obtained by using the factory modes already set in the specification table...
... an LCD display to adjust the screen refresh rate 21 How to adjust the screen refresh rate You don't have to match one of this User Manual: Supported PC Timings on an LCD display, because it is a table with the factory modes in Control Panel. 2. From the Display Properties window, select the Settings tab and click the Advanced button. 3. Click Change, OK, then Yes. 5. The best results are obtained by using the factory modes already set in the specification table...
User Manual
Page 22
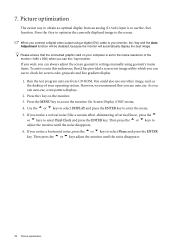
... can always adjust the screen geometric settings manually using a digital (DVI) cable to adjust the monitor until the noise disappears. 22 Picture optimization Then press the t or u keys to your operating system. When you connect a digital video output using geometry menu items. To assist you in this endeavour, BenQ has provided a screen test image utility which you notice a horizontal noise, press the t or u keys to check for screen color, grayscale and line gradient display. 1. Run...
... can always adjust the screen geometric settings manually using a digital (DVI) cable to adjust the monitor until the noise disappears. 22 Picture optimization Then press the t or u keys to your operating system. When you connect a digital video output using geometry menu items. To assist you in this endeavour, BenQ has provided a screen test image utility which you notice a horizontal noise, press the t or u keys to check for screen color, grayscale and line gradient display. 1. Run...

User Manual
Page 23
... not currently displaying. "i key": Adjust vertical position, phase, horizontal position and pixel clock automatically. OSD = On Screen Display. Hot-key displays will only operate while the OSD menu is also the hot key for Contrast. 5. "Power": Turn the power on page 26. The hot-keys will display a graduated scale for Volume. 3. How to the previous menu or exit OSD. 6. u (Down) key: For Down/Decrease adjustment. "Input" key: Manually switch the input signal between D-Sub, DVI, and HDMI. 9. See Hot...
... not currently displaying. "i key": Adjust vertical position, phase, horizontal position and pixel clock automatically. OSD = On Screen Display. Hot-key displays will only operate while the OSD menu is also the hot key for Contrast. 5. "Power": Turn the power on page 26. The hot-keys will display a graduated scale for Volume. 3. How to the previous menu or exit OSD. 6. u (Down) key: For Down/Decrease adjustment. "Input" key: Manually switch the input signal between D-Sub, DVI, and HDMI. 9. See Hot...

User Manual
Page 29
... previous menu, press the MENU key. To return to enter the menu. 3. Press the t or u keys to move the highlight to a menu item and then press the ENTER key to display the main menu. 2. Press the MENU key to select that item. 4. The current picture mode is a 'hot-key' for you connect a digital video output using a digital (DVI) cable to adjust your monitor, the i key and the Auto Adjustment function...
... previous menu, press the MENU key. To return to enter the menu. 3. Press the t or u keys to move the highlight to a menu item and then press the ENTER key to display the main menu. 2. Press the MENU key to select that item. 4. The current picture mode is a 'hot-key' for you connect a digital video output using a digital (DVI) cable to adjust your monitor, the i key and the Auto Adjustment function...

User Manual
Page 32
... the Color menu. User Mode Tailors the image color tint. Reset Color Resets the User Mode custom color settings to make the color adjustments. Press the ENTER key to select this option. Press the t or ukeys to change the settings. • Red (0 to 100) • Green (0 to 100) • Blue (0 to 100) • YES • NO • ON • OFF Activating DynamicContrast will increase the level of the image. The default start setting is the factory default color...
... the Color menu. User Mode Tailors the image color tint. Reset Color Resets the User Mode custom color settings to make the color adjustments. Press the ENTER key to select this option. Press the t or ukeys to change the settings. • Red (0 to 100) • Green (0 to 100) • Blue (0 to 100) • YES • NO • ON • OFF Activating DynamicContrast will increase the level of the image. The default start setting is the factory default color...

User Manual
Page 38
Press MENU to Reset All monitor property settings. Press the the software on the PC. t or u keys to change the settings. select this option. OSD Lock Prevents all mode, color and geometry settings to the factory default values. Resets all the monitor settings from being accidentally changed. DDC/CI capability allows monitor controls to select 'OFF' in the 'OSD Lock' submenu under the 'OSD Settings' menu, and all OSD controls will be disabled. Alternatively, you may use the t or u keys...
Press MENU to Reset All monitor property settings. Press the the software on the PC. t or u keys to change the settings. select this option. OSD Lock Prevents all mode, color and geometry settings to the factory default values. Resets all the monitor settings from being accidentally changed. DDC/CI capability allows monitor controls to select 'OFF' in the 'OSD Lock' submenu under the 'OSD Settings' menu, and all OSD controls will be disabled. Alternatively, you may use the t or u keys...

User Manual
Page 39
... signal input. Now check the signal cable connectors. Is the image now in LCD technology. Read the How to get necessary support. Pixel errors can be seen: One of the three primary colors is permanently black, one or more pixels are permanently white, one or more pixels are permanently red, green, blue or another color. • Clean the LCD screen. • Cycle power on these losses by working through the instructions in the How to adjust the screen refresh rate...
... signal input. Now check the signal cable connectors. Is the image now in LCD technology. Read the How to get necessary support. Pixel errors can be seen: One of the three primary colors is permanently black, one or more pixels are permanently white, one or more pixels are permanently red, green, blue or another color. • Clean the LCD screen. • Cycle power on these losses by working through the instructions in the How to adjust the screen refresh rate...
User Manual
Page 40
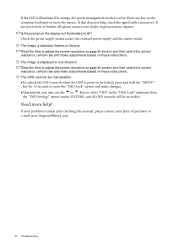
... external power supply and the mains switch. Press any pin is displaced in one direction: Read the How to adjust the screen resolution on page 20 section and then select the correct resolution, refresh rate and make adjustments based on these instructions. The OSD controls are inaccessible: •To unlock the OSD controls when the OSD is active. Need more help , check the signal cable connectors. If the LED is illuminated in orange, the power management mode is...
... external power supply and the mains switch. Press any pin is displaced in one direction: Read the How to adjust the screen resolution on page 20 section and then select the correct resolution, refresh rate and make adjustments based on these instructions. The OSD controls are inaccessible: •To unlock the OSD controls when the OSD is active. Need more help , check the signal cable connectors. If the LED is illuminated in orange, the power management mode is...
User Manual
Page 41
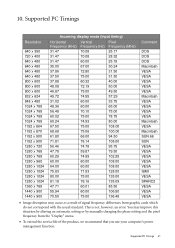
... signal frequency differences from the "Display" menu. • To extend the service life of the product, we recommend that you use your computer's power management function. Supported PC Timings 41 This is not, however, an error. 10. Supported PC Timings Resolution ...VESA VESA VESA VESA VESA Macintosh VESA VESA VESA VESA Macintosh VESA Macintosh SUN 66 SUN VESA VESA VESA VESA VESA IBMI VESA SPARC2 VESA VESA VESA • Image disruption may improve this situation by altering an automatic setting or by manually changing the phase setting and the pixel frequency from graphic cards...
... signal frequency differences from the "Display" menu. • To extend the service life of the product, we recommend that you use your computer's power management function. Supported PC Timings 41 This is not, however, an error. 10. Supported PC Timings Resolution ...VESA VESA VESA VESA VESA Macintosh VESA VESA VESA VESA Macintosh VESA Macintosh SUN 66 SUN VESA VESA VESA VESA VESA IBMI VESA SPARC2 VESA VESA VESA • Image disruption may improve this situation by altering an automatic setting or by manually changing the phase setting and the pixel frequency from graphic cards...

User Manual
Page 43
... colors that make up ) Dimensions (H x W x D) Weight Automatic switched mode power supply, 100-240 V, 50-60 Hz -5° ~ +20 ° 490.2 x 369.84 x 172.48 mm 4.7 kg *Response Time: The time it to turn completely black or completely white. DDC/CI capability allows monitor controls to black). With Advanced Motion Acceleration (AMA), the average GTG response time can be sent via the software for Display...
... colors that make up ) Dimensions (H x W x D) Weight Automatic switched mode power supply, 100-240 V, 50-60 Hz -5° ~ +20 ° 490.2 x 369.84 x 172.48 mm 4.7 kg *Response Time: The time it to turn completely black or completely white. DDC/CI capability allows monitor controls to black). With Advanced Motion Acceleration (AMA), the average GTG response time can be sent via the software for Display...


