

User Manual
Page 2
... the AC supply. • The power supply cord serves as a power disconnect device for servicing. 2 They must not be reproduced, transmitted, transcribed, stored in a retrieval system or translated into this publication and to make changes from the wall outlet before cleaning. i Copyright Copyright © 2005 by any means, electronic, mechanical, magnetic, optical, chemical, manual or otherwise, without obligation of BenQ Corporation to...
... the AC supply. • The power supply cord serves as a power disconnect device for servicing. 2 They must not be reproduced, transmitted, transcribed, stored in a retrieval system or translated into this publication and to make changes from the wall outlet before cleaning. i Copyright Copyright © 2005 by any means, electronic, mechanical, magnetic, optical, chemical, manual or otherwise, without obligation of BenQ Corporation to...
User Manual
Page 3
... to install on Windows 2000, ME, & 98 systems 18 How to complete the Windows Upgrade Device Driver Wizard 19 How to adjust the screen resolution 21 How to adjust the screen refresh rate 22 How to set the picture optimization 23 How to adjust your monitor 24 A Look at the Control Panel 24 Hot Key Mode ...25 Main Menu Mode ...25 Troubleshooting ...33 Frequently Asked Questions (FAQ 33 Need More Help? ...34 Supported operating modes 35 Specifications ...36...
... to install on Windows 2000, ME, & 98 systems 18 How to complete the Windows Upgrade Device Driver Wizard 19 How to adjust the screen resolution 21 How to adjust the screen refresh rate 22 How to set the picture optimization 23 How to adjust your monitor 24 A Look at the Control Panel 24 Hot Key Mode ...25 Main Menu Mode ...25 Troubleshooting ...33 Frequently Asked Questions (FAQ 33 Need More Help? ...34 Supported operating modes 35 Specifications ...36...
User Manual
Page 7
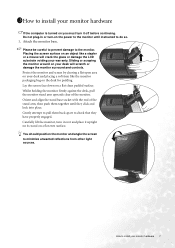
... they click and lock into place. Gently attempt to pull them together until instructed to do so. 1. Lay the screen face down on the power to the monitor until they have properly engaged. You should position the monitor and angle the screen to install your monitor hardware 7 How to minimize unwanted reflections from other light sources. Attach the monitor base. Placing the screen surface on...
... they click and lock into place. Gently attempt to pull them together until instructed to do so. 1. Lay the screen face down on the power to the monitor until they have properly engaged. You should position the monitor and angle the screen to install your monitor hardware 7 How to minimize unwanted reflections from other light sources. Attach the monitor base. Placing the screen surface on...
User Manual
Page 8
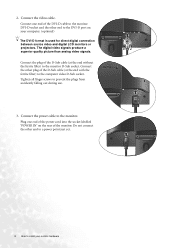
Connect the video cable. The digital video signals produce a superior quality picture than analog video signals. Tighten all finger screws to the computer video D-Sub socket. Connect one end of the power cord into the socket labelled 'POWER IN' on your monitor hardware Do not connect the other end to a power point just yet. 8 How to the DVI-D port on the rear of the D-Sub cable (at the end without the ferrite filter...
Connect the video cable. The digital video signals produce a superior quality picture than analog video signals. Tighten all finger screws to the computer video D-Sub socket. Connect one end of the power cord into the socket labelled 'POWER IN' on your monitor hardware Do not connect the other end to a power point just yet. 8 How to the DVI-D port on the rear of the D-Sub cable (at the end without the ferrite filter...

User Manual
Page 9
... monitor stand. 5. How to install your BenQ monitor to install the monitor software. 4. Turn on the monitor by squeezing the clip inwards as illustrated. Route the cables via the loose bracket. Position the cables together and reinsert the clip over them to and turn it on the power. Plug the other end of the monitor. Release the cable retaining clip by pressing the power button on the front of the power cord...
... monitor stand. 5. How to install your BenQ monitor to install the monitor software. 4. Turn on the monitor by squeezing the clip inwards as illustrated. Route the cables via the loose bracket. Position the cables together and reinsert the clip over them to and turn it on the power. Plug the other end of the monitor. Release the cable retaining clip by pressing the power button on the front of the power cord...
User Manual
Page 11
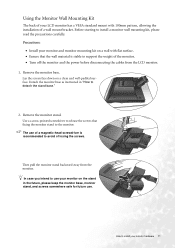
... to install your monitor hardware 11 Then pull the monitor stand backward away from the LCD monitor. 1. Remove the monitor stand. Before starting to avoid of losing the screws. Remove the monitor base. Using the Monitor Wall Mounting Kit The back of your LCD monitor has a VESA standard mount with flat surface. • Ensure that fixing the monitor stand to support the weight of the monitor. • Turn off the monitor and the power before disconnecting the cables from the monitor. The use of a wall mount...
... to install your monitor hardware 11 Then pull the monitor stand backward away from the LCD monitor. 1. Remove the monitor stand. Before starting to avoid of losing the screws. Remove the monitor base. Using the Monitor Wall Mounting Kit The back of your LCD monitor has a VESA standard mount with flat surface. • Ensure that fixing the monitor stand to support the weight of the monitor. • Turn off the monitor and the power before disconnecting the cables from the monitor. The use of a wall mount...

User Manual
Page 13
... the most benefit from your new BenQ color LCD flat screen monitor, you should install the custom BenQ LCD Monitor driver software as a member of Microsoft Windows you are using, and whether you are connecting the monitor and installing the software onto a new computer (without existing monitor driver software), or whether you are upgrading an existing installation (which process you need to a network which you connect and install your BenQ LCD Monitor will launch its Found New Hardware wizard...
... the most benefit from your new BenQ color LCD flat screen monitor, you should install the custom BenQ LCD Monitor driver software as a member of Microsoft Windows you are using, and whether you are connecting the monitor and installing the software onto a new computer (without existing monitor driver software), or whether you are upgrading an existing installation (which process you need to a network which you connect and install your BenQ LCD Monitor will launch its Found New Hardware wizard...

User Manual
Page 14
... instruction is the first ever monitor to be connected to it. Check the option for my device option, and click Next. 4. When Windows (2000 or later) starts, it displays the option to Install Hardware Device drivers. 2. Look to confirm that has already had a monitor driver installed before , and for which has never had another monitor connected to it (and has monitor driver software installed), you are adding the BenQ LCD Monitor...
... instruction is the first ever monitor to be connected to it. Check the option for my device option, and click Next. 4. When Windows (2000 or later) starts, it displays the option to Install Hardware Device drivers. 2. Look to confirm that has already had a monitor driver installed before , and for which has never had another monitor connected to it (and has monitor driver software installed), you are adding the BenQ LCD Monitor...
User Manual
Page 15
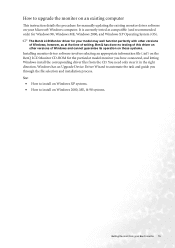
... upgrade the monitor on an existing computer This instruction details the procedure for manually updating the existing monitor driver software on your model may well function perfectly with other versions of Windows, however, as compatible (and recommended only) for the particular model monitor you through the file selection and installation process. See: • How to install on the BenQ LCD Monitor CD-ROM for Windows 98, Windows ME, Windows 2000, and Windows...
... upgrade the monitor on an existing computer This instruction details the procedure for manually updating the existing monitor driver software on your model may well function perfectly with other versions of Windows, however, as compatible (and recommended only) for the particular model monitor you through the file selection and installation process. See: • How to install on the BenQ LCD Monitor CD-ROM for Windows 98, Windows ME, Windows 2000, and Windows...

User Manual
Page 16
... Windows menu to Display Properties is located directly under the main Start menu item. Click the Monitor tab and select the 'Plug and Play Monitor' from your system. • Under the Classic view, click Start | Control Panel | Display. • Under the Category view, click Start | Control Panel | Appearance and Themes | Change the screen resolution. However, if BenQ is not listed as BenQ, and the model matches that of these instructions. 5. The quickest shortcut to Display...
... Windows menu to Display Properties is located directly under the main Start menu item. Click the Monitor tab and select the 'Plug and Play Monitor' from your system. • Under the Classic view, click Start | Control Panel | Display. • Under the Category view, click Start | Control Panel | Appearance and Themes | Change the screen resolution. However, if BenQ is not listed as BenQ, and the model matches that of these instructions. 5. The quickest shortcut to Display...

User Manual
Page 17
You do not need to restart Windows XP, as the BenQ LCD monitor drivers will close the Display Properties windows. Getting the most from your BenQ monitor 17 This will operate immediately with no further action required by you.
You do not need to restart Windows XP, as the BenQ LCD monitor drivers will close the Display Properties windows. Getting the most from your BenQ monitor 17 This will operate immediately with no further action required by you.
User Manual
Page 18
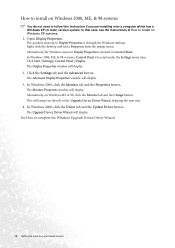
... Windows Upgrade Device Driver Wizard. 18 Getting the most from the popup menu. Open Display Properties. Alternatively, the Windows menu to Display Properties is located under the Settings menu item. In Windows 2000, click the Monitor tab and the Properties button. Click Start | Settings | Control Panel | Display. The Display Properties window will display. The Monitor Properties window will display. 2. How to install on Windows ME or 98, click the Monitor tab and the Change button. In that case, see the instructions...
... Windows Upgrade Device Driver Wizard. 18 Getting the most from the popup menu. Open Display Properties. Alternatively, the Windows menu to Display Properties is located under the Settings menu item. In Windows 2000, click the Monitor tab and the Properties button. Click Start | Settings | Control Panel | Display. The Display Properties window will display. The Monitor Properties window will display. 2. How to install on Windows ME or 98, click the Monitor tab and the Change button. In that case, see the instructions...
User Manual
Page 19
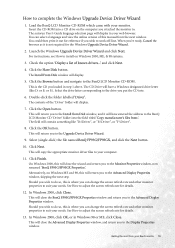
..., this will copy the appropriate monitor driver files to the Display Properties window. How to the Upgrade Device Driver Wizard. 9. Click Finish. Alternatively, on Windows ME and 98, this is the CD you can change the screen refresh rate and other monitor properties to the BenQ LCD Monitor CD 'Driver' folder into a CD drive on Windows 2000, ME, & 98 systems. 3. Click the Open button. Getting the most from your...
..., this will copy the appropriate monitor driver files to the Display Properties window. How to the Upgrade Device Driver Wizard. 9. Click Finish. Alternatively, on Windows ME and 98, this is the CD you can change the screen refresh rate and other monitor properties to the BenQ LCD Monitor CD 'Driver' folder into a CD drive on Windows 2000, ME, & 98 systems. 3. Click the Open button. Getting the most from your...
User Manual
Page 21
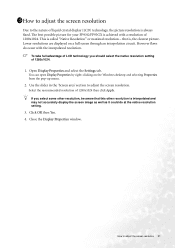
... fixed. Use the slider in the 'Screen area' section to adjust the screen resolution 21 If you should select the native resolution setting of 1280x1024. Close the Display Properties window. You can open Display Properties by right-clicking on a full screen through an interpolation circuit. Lower resolutions are displayed on the Windows desktop and selecting Properties from the pop-up menu. 2. Open Display Properties and select the Settings tab. The best possible picture...
... fixed. Use the slider in the 'Screen area' section to adjust the screen resolution 21 If you should select the native resolution setting of 1280x1024. Close the Display Properties window. You can open Display Properties by right-clicking on a full screen through an interpolation circuit. Lower resolutions are displayed on the Windows desktop and selecting Properties from the pop-up menu. 2. Open Display Properties and select the Settings tab. The best possible picture...

User Manual
Page 22
... native resolution of 1280x1024. 1. Close the Display Properties window. 22 How to match one of the applicable factory modes as listed in Control Panel. 2. 1611How to adjust the screen refresh rate You don't have to choose the highest possible refresh rate on an LCD display, because it is a table with the factory modes in the specification section of this User's Manual. Select the Adapter tab, and select an appropriate refresh rate to adjust the screen refresh rate Click Change...
... native resolution of 1280x1024. 1. Close the Display Properties window. 22 How to match one of the applicable factory modes as listed in Control Panel. 2. 1611How to adjust the screen refresh rate You don't have to choose the highest possible refresh rate on an LCD display, because it is a table with the factory modes in the specification section of this User's Manual. Select the Adapter tab, and select an appropriate refresh rate to adjust the screen refresh rate Click Change...

User Manual
Page 23
... MODE message is to use to check for screen color, grayscale and line gradient display. 1. Press the Enter key to select Phase and press the Enter key again. If you notice a vertical noise, press the W or X keys to select Geometry and press the Enter key. 1711How to set the picture optimization The easiest way to obtain an optimal display is on the monitor panel...
... MODE message is to use to check for screen color, grayscale and line gradient display. 1. Press the Enter key to select Phase and press the Enter key again. If you notice a vertical noise, press the W or X keys to select Geometry and press the Enter key. 1711How to set the picture optimization The easiest way to obtain an optimal display is on the monitor panel...

User Manual
Page 32
Display Information: Select Display Information to previous menu. Press the Exit key to return to display the current monitor property settings. Miscellaneous sub menu Input Select: Press the W or X keys to select D-sub (analog) or DVI (digital) input to adjust your monitor Press the Exit key to return to previous menu. 32 How to activate the new settings. Sharpness: Press the W or X keys to previous menu. Press the Exit key to return to adjust the degree of Sharpness.
Display Information: Select Display Information to previous menu. Press the Exit key to return to display the current monitor property settings. Miscellaneous sub menu Input Select: Press the W or X keys to select D-sub (analog) or DVI (digital) input to adjust your monitor Press the Exit key to return to previous menu. 32 How to activate the new settings. Sharpness: Press the W or X keys to previous menu. Press the Exit key to return to adjust the degree of Sharpness.

User Manual
Page 33
... faulty coloration, this monitor does not support, please change the setting to enter "Recall" sub menu. If that occurs in the signal input. If not, optimize the image by using a display mode that are pixels that this means one or more pixels are permanently white, one of the supported mode. Read the How to adjust the screen resolution section, and then select the correct resolution, refresh rate and make adjustments based on these losses by working through the instructions...
... faulty coloration, this monitor does not support, please change the setting to enter "Recall" sub menu. If that occurs in the signal input. If not, optimize the image by using a display mode that are pixels that this means one or more pixels are permanently white, one of the supported mode. Read the How to adjust the screen resolution section, and then select the correct resolution, refresh rate and make adjustments based on these losses by working through the instructions...

User Manual
Page 34
Need More Help? If your problems remain after checking this manual, please contact your place of purchase or e-mail us at: Support@BenQ.com 34 Troubleshooting The image is distorted, flashes or flickers: Read the How to adjust the screen resolution section and then select the correct resolution, refresh rate and make adjustments based on these instructions. The image is displaced in one direction: Read the How to adjust the screen resolution section and then select the correct resolution, refresh rate and make adjustments based on these instructions.
Need More Help? If your problems remain after checking this manual, please contact your place of purchase or e-mail us at: Support@BenQ.com 34 Troubleshooting The image is distorted, flashes or flickers: Read the How to adjust the screen resolution section and then select the correct resolution, refresh rate and make adjustments based on these instructions. The image is displaced in one direction: Read the How to adjust the screen resolution section and then select the correct resolution, refresh rate and make adjustments based on these instructions.
User Manual
Page 35
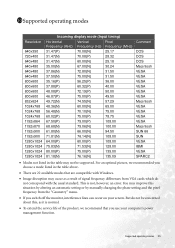
... the service life of signal frequency differences from the "Geometry" menu. • If you use your screen. But do not correspond with the usual standard. Supported operating modes 35 11011Supported operating modes Resolution 640x350 720x400 640x480 640x480 640x480 640x480 800x600 800x600 800x600 800x600 832x624 1024x768 1024x768 1024x768 1152x864 1152x870 1152x900 1152x900 1280x1024 1280x1024 1280x1024 1280x1024 Incoming display mode (Input timing) Horizontal Vertical Pixel Frequency (KHz) Frequency (Hz) Frequency (MHz...
... the service life of signal frequency differences from the "Geometry" menu. • If you use your screen. But do not correspond with the usual standard. Supported operating modes 35 11011Supported operating modes Resolution 640x350 720x400 640x480 640x480 640x480 640x480 800x600 800x600 800x600 800x600 832x624 1024x768 1024x768 1024x768 1152x864 1152x870 1152x900 1152x900 1280x1024 1280x1024 1280x1024 1280x1024 Incoming display mode (Input timing) Horizontal Vertical Pixel Frequency (KHz) Frequency (Hz) Frequency (MHz...


