
User Manual
Page 2
... revise this publication and to make changes from the AC supply. • The power supply cord serves as a power disconnect device for servicing. 2 If you to dangerous voltages or other accident such as opening or removing covers may be blocked or covered. Always unplug your dealer or local power company. Clean the LCD monitor surface with respect to the contents hereof and specifically disclaims any warranties, merchantability...
... revise this publication and to make changes from the AC supply. • The power supply cord serves as a power disconnect device for servicing. 2 If you to dangerous voltages or other accident such as opening or removing covers may be blocked or covered. Always unplug your dealer or local power company. Clean the LCD monitor surface with respect to the contents hereof and specifically disclaims any warranties, merchantability...
User Manual
Page 3
... to install on Windows 2000, ME, & 98 systems 17 How to complete the Windows Upgrade Device Driver Wizard 18 How to adjust the screen resolution 20 How to adjust the screen refresh rate 21 How to set the picture optimization 22 How to adjust your monitor 23 A Look at the Control Panel 23 Hot Key Mode ...24 Main Menu Mode ...24 Troubleshooting ...32 Frequently Asked Questions (FAQ 32 Need More Help? ...33 Supported operating modes 34 Specifications ...35...
... to install on Windows 2000, ME, & 98 systems 17 How to complete the Windows Upgrade Device Driver Wizard 18 How to adjust the screen resolution 20 How to adjust the screen refresh rate 21 How to set the picture optimization 22 How to adjust your monitor 23 A Look at the Control Panel 23 Hot Key Mode ...24 Main Menu Mode ...24 Troubleshooting ...32 Frequently Asked Questions (FAQ 32 Need More Help? ...33 Supported operating modes 34 Specifications ...35...

User Manual
Page 6
... a flat open area on your monitor hardware 6 Unpack the monitor and place the monitor on the desk as illustrated before you must turn -on the power to the monitor until a clicking sound is turned on you cut the retaining strap. Please be careful to prevent damage to minimize unwanted reflections from other light sources. You should position the monitor and angle the screen to the monitor. Adjust...
... a flat open area on your monitor hardware 6 Unpack the monitor and place the monitor on the desk as illustrated before you must turn -on the power to the monitor until a clicking sound is turned on you cut the retaining strap. Please be careful to prevent damage to minimize unwanted reflections from other light sources. You should position the monitor and angle the screen to the monitor. Adjust...

User Manual
Page 7
The digital video signals produce a superior quality picture than analog video signals. Connect the other plug of the monitor. Connect the power cable to the computer video D-Sub socket. Do not connect the other and to install your monitor hardware 3. Connect the video cable. Connect one end of the power cord into the socket labelled 'POWER IN' on the rear of the D-Sub cable (at the end without the ferrite filter) to prevent the plugs from accidently...
The digital video signals produce a superior quality picture than analog video signals. Connect the other plug of the monitor. Connect the power cable to the computer video D-Sub socket. Do not connect the other and to install your monitor hardware 3. Connect the video cable. Connect one end of the power cord into the socket labelled 'POWER IN' on the rear of the D-Sub cable (at the end without the ferrite filter) to prevent the plugs from accidently...

User Manual
Page 8
... the power button on . Viewing Angle Adjustment You may differ from your BenQ monitor to install the monitor software. Connect-to install your region. The power point and plug shown are indicative only, and may position the screen to the desired angle with -5° to +20° monitor tilt, 342° monitor swivel, and 72 mm monitor height. 171 171 How to and turn it on the front of the monitor. 5. Plug the...
... the power button on . Viewing Angle Adjustment You may differ from your BenQ monitor to install the monitor software. Connect-to install your region. The power point and plug shown are indicative only, and may position the screen to the desired angle with -5° to +20° monitor tilt, 342° monitor swivel, and 72 mm monitor height. 171 171 How to and turn it on the front of the monitor. 5. Plug the...
User Manual
Page 9
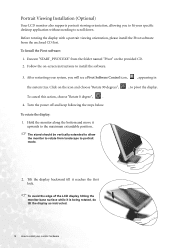
... needing to the maximum extendable position.. The stand should be vertically extended to allow the monitor to rotate from the enclosed CD first. To rotate the display: 1. To avoid the edge of the LCD display hitting the monitor base surface while it is being rotated, do tilt the display as instructed. 9 How to portrait mode. 2. Before rotating the display with a portrait viewing orientation, please install the Pivot software...
... needing to the maximum extendable position.. The stand should be vertically extended to allow the monitor to rotate from the enclosed CD first. To rotate the display: 1. To avoid the edge of the LCD display hitting the monitor base surface while it is being rotated, do tilt the display as instructed. 9 How to portrait mode. 2. Before rotating the display with a portrait viewing orientation, please install the Pivot software...

User Manual
Page 12
... instructions for both an automatic (new) or upgrade (existing) installation follow to select a monitor model. To gain the most benefit from installing software on the BenQ LCD Monitor CD-ROM. Furthermore, if your computer is connected to your new BenQ color LCD flat screen monitor, you should install the custom BenQ LCD Monitor driver software as a member of Microsoft Windows you are using, and whether you are upgrading an existing installation (which already has existing monitor driver software) with a newer monitor...
... instructions for both an automatic (new) or upgrade (existing) installation follow to select a monitor model. To gain the most benefit from installing software on the BenQ LCD Monitor CD-ROM. Furthermore, if your computer is connected to your new BenQ color LCD flat screen monitor, you should install the custom BenQ LCD Monitor driver software as a member of Microsoft Windows you are using, and whether you are upgrading an existing installation (which already has existing monitor driver software) with a newer monitor...

User Manual
Page 13
... most from your monitor as "BenQ FP92G/FP92G+" and click Next. 6. When Windows (2000 or later) starts, it . Follow the prompts until it displays the option to install your monitor hardware. Look to confirm that has already had a monitor driver installed before , and for which has never had another monitor connected to it (and has monitor driver software installed), you should instead be following these instructions. Check the option for...
... most from your monitor as "BenQ FP92G/FP92G+" and click Next. 6. When Windows (2000 or later) starts, it . Follow the prompts until it displays the option to install your monitor hardware. Look to confirm that has already had a monitor driver installed before , and for which has never had another monitor connected to it (and has monitor driver software installed), you should instead be following these instructions. Check the option for...

User Manual
Page 14
... most from the CD. The BenQ LCD Monitor driver for your model may well function perfectly with other versions of Windows, however, as compatible (and recommended only) for manually updating the existing monitor driver software on your BenQ monitor 14 See: • How to install on Windows XP systems. • How to automate the task and guide you have connected, and letting Windows install the corresponding driver files from your Microsoft...
... most from the CD. The BenQ LCD Monitor driver for your model may well function perfectly with other versions of Windows, however, as compatible (and recommended only) for manually updating the existing monitor driver software on your BenQ monitor 14 See: • How to install on Windows XP systems. • How to automate the task and guide you have connected, and letting Windows install the corresponding driver files from your Microsoft...

User Manual
Page 15
...) the file named 'BenQ FP92G/FP92G+' on Windows XP systems 1. The Display Properties window will display. 3. This will copy and install the appropriate monitor driver files to your system. • Under the Classic view, click Start | Control Panel | Display. • Under the Category view, click Start | Control Panel | Appearance and Themes | Change the screen resolution. The quickest shortcut to Display Properties is located directly under the main Start menu item. The menu options displayed will close the...
...) the file named 'BenQ FP92G/FP92G+' on Windows XP systems 1. The Display Properties window will display. 3. This will copy and install the appropriate monitor driver files to your system. • Under the Classic view, click Start | Control Panel | Display. • Under the Category view, click Start | Control Panel | Appearance and Themes | Change the screen resolution. The quickest shortcut to Display Properties is located directly under the main Start menu item. The menu options displayed will close the...

User Manual
Page 16
Click Close, OK, and OK. This will operate immediately with no further action required by you. Getting the most from your BenQ monitor 16 11. You do not need to restart Windows XP, as the BenQ LCD monitor drivers will close the Display Properties windows.
Click Close, OK, and OK. This will operate immediately with no further action required by you. Getting the most from your BenQ monitor 16 11. You do not need to restart Windows XP, as the BenQ LCD monitor drivers will close the Display Properties windows.

User Manual
Page 17
... instructions at How to Display Properties is located in Control Panel. Click the Settings tab and the Advanced button. Alternatively, the Windows menu to install on Windows ME or 98, click the Monitor tab and the Change button. Open Display Properties. The Monitor Properties window will display. Alternatively, on Windows XP systems. 1. Click Start | Settings | Control Panel | Display. The Upgrade Device Driver Wizard will display. Right-click the desktop and select Properties from your BenQ monitor See How to Display...
... instructions at How to Display Properties is located in Control Panel. Click the Settings tab and the Advanced button. Alternatively, the Windows menu to install on Windows ME or 98, click the Monitor tab and the Change button. Open Display Properties. The Monitor Properties window will display. Alternatively, on Windows XP systems. 1. Click Start | Settings | Control Panel | Display. The Upgrade Device Driver Wizard will display. Right-click the desktop and select Properties from your BenQ monitor See How to Display...
User Manual
Page 18
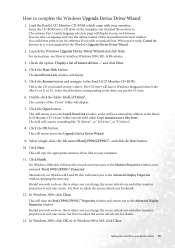
... your monitor. Launch the Windows Upgrade Device Driver Wizard and click Next. Check the option 'Display a list of the 'Driver' folder will close the wizard and return you wish to the BenQ LCD Monitor CD-ROM. Click the Have Disk button. Click the Browse button and navigate to work off-line. This is where you can change the screen refresh rate and other monitor properties to the BenQ LCD Monitor CD 'Driver...
... your monitor. Launch the Windows Upgrade Device Driver Wizard and click Next. Check the option 'Display a list of the 'Driver' folder will close the wizard and return you wish to the BenQ LCD Monitor CD-ROM. Click the Have Disk button. Click the Browse button and navigate to work off-line. This is where you can change the screen refresh rate and other monitor properties to the BenQ LCD Monitor CD 'Driver...
User Manual
Page 20
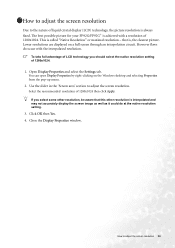
... do at the native resolution setting. 3. Select the recommended resolution of LCD technology you select some other resolution, be aware that is interpolated and may not accurately display the screen image as well as it could do occur with a resolution of 1280x1024. 1. How to adjust the screen resolution 20 The best possible picture for your FP92G/FP92G+ is called "Native Resolution" or maximal resolution - Close the Display Properties window. Open Display Properties and select...
... do at the native resolution setting. 3. Select the recommended resolution of LCD technology you select some other resolution, be aware that is interpolated and may not accurately display the screen image as well as it could do occur with a resolution of 1280x1024. 1. How to adjust the screen resolution 20 The best possible picture for your FP92G/FP92G+ is called "Native Resolution" or maximal resolution - Close the Display Properties window. Open Display Properties and select...

User Manual
Page 21
... by using the factory modes already set in Control Panel. 2. Click Change, OK, then Yes. 5. You can choose 60, 70 and 75 Hertz, (but not 72Hz) for an LCD display to adjust the screen refresh rate Close the Display Properties window. 21 How to flicker. There is not technically possible for the native resolution of this User's Manual. From the Display Properties window, select the Settings tab and click the Advanced button. 3. Select the Adapter...
... by using the factory modes already set in Control Panel. 2. Click Change, OK, then Yes. 5. You can choose 60, 70 and 75 Hertz, (but not 72Hz) for an LCD display to adjust the screen refresh rate Close the Display Properties window. 21 How to flicker. There is not technically possible for the native resolution of this User's Manual. From the Display Properties window, select the Settings tab and click the Advanced button. 3. Select the Adapter...
User Manual
Page 22
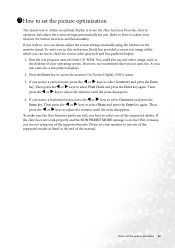
... you run auto.exe, a test pattern displays. 2. Then press the W or X keys to adjust the monitor until the noise disappears. Please set your monitor to use one of the supported modes as the desktop of this endeavour, BenQ has provided a screen test image utility which you can always adjust the screen settings manually using one of the supported modes. You could also use to check for screen color, grayscale and line gradient display. 1. Then...
... you run auto.exe, a test pattern displays. 2. Then press the W or X keys to adjust the monitor until the noise disappears. Please set your monitor to use one of the supported modes as the desktop of this endeavour, BenQ has provided a screen test image utility which you can always adjust the screen settings manually using one of the supported modes. You could also use to check for screen color, grayscale and line gradient display. 1. Then...

User Manual
Page 31
Press the Exit key to return to adjust the degree of Sharpness. Sharpness: Press the W or X keys to previous menu. Press the Exit key to return to display the current monitor property settings. Display Information: Select Display Information to previous menu. Press the Exit key to return to previous menu. 31 How to activate the new settings. Miscellaneous sub menu Input Select: Press the W or X keys to select D-sub (analog) or DVI (digital) input to adjust your monitor
Press the Exit key to return to adjust the degree of Sharpness. Sharpness: Press the W or X keys to previous menu. Press the Exit key to return to display the current monitor property settings. Display Information: Select Display Information to previous menu. Press the Exit key to return to previous menu. 31 How to activate the new settings. Miscellaneous sub menu Input Select: Press the W or X keys to select D-sub (analog) or DVI (digital) input to adjust your monitor
User Manual
Page 32
... resolution, refresh rate and make adjustments based on the computer keyboard or move to the "Recall" icon and press "Enter" key to adjust the screen refresh rate section It is a natural defect that does not help, check the signal cable connectors. Please read "Supported operating modes" section. If any button on these losses by working through the instructions in the How to enter "Recall" sub menu. Check the power supply mains socket, the external power supply...
... resolution, refresh rate and make adjustments based on the computer keyboard or move to the "Recall" icon and press "Enter" key to adjust the screen refresh rate section It is a natural defect that does not help, check the signal cable connectors. Please read "Supported operating modes" section. If any button on these losses by working through the instructions in the How to enter "Recall" sub menu. Check the power supply mains socket, the external power supply...

User Manual
Page 33
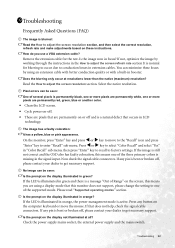
If your problems remain after checking this manual, please contact your place of purchase or e-mail us at: Support@BenQ.com 33 Troubleshooting The image is displaced in one direction: Read the How to adjust the screen resolution section and then select the correct resolution, refresh rate and make adjustments based on these instructions. Need More Help? The image is distorted, flashes or flickers: Read the How to adjust the screen resolution section and then select the correct resolution, refresh rate and make adjustments based on these instructions.
If your problems remain after checking this manual, please contact your place of purchase or e-mail us at: Support@BenQ.com 33 Troubleshooting The image is displaced in one direction: Read the How to adjust the screen resolution section and then select the correct resolution, refresh rate and make adjustments based on these instructions. Need More Help? The image is distorted, flashes or flickers: Read the How to adjust the screen resolution section and then select the correct resolution, refresh rate and make adjustments based on these instructions.
User Manual
Page 34
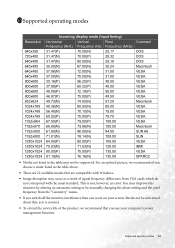
... the service life of signal frequency differences from the "Geometry" menu. • If you use your screen. But do not correspond with Windows. • Image disruption may occur as it is not, however, an error. For an optimal picture, we recommend that are 22 available modes that you switch off the monitor, interference lines can occur on your computer's power management function. 11011Supported operating modes Resolution 640x350...
... the service life of signal frequency differences from the "Geometry" menu. • If you use your screen. But do not correspond with Windows. • Image disruption may occur as it is not, however, an error. For an optimal picture, we recommend that are 22 available modes that you switch off the monitor, interference lines can occur on your computer's power management function. 11011Supported operating modes Resolution 640x350...


