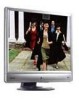

User Manual
Page 2
... cleaning. Always unplug your monitor from the AC supply. • The power supply cord serves as dropping or mishandling occurs, contact qualified service personnel for ventilation. They must not be operated from time to time in any of the above mentioned misuse or other risks. All rights reserved. Clean the LCD monitor surface with respect to the contents hereof and specifically...
... cleaning. Always unplug your monitor from the AC supply. • The power supply cord serves as dropping or mishandling occurs, contact qualified service personnel for ventilation. They must not be operated from time to time in any of the above mentioned misuse or other risks. All rights reserved. Clean the LCD monitor surface with respect to the contents hereof and specifically...
User Manual
Page 3
... to install on Windows 2000, ME, & 98 systems 17 How to complete the Windows Upgrade Device Driver Wizard 18 How to adjust the screen resolution 20 How to adjust the screen refresh rate 21 How to set the picture optimization 22 How to adjust your monitor 23 A Look at the Control Panel 23 Hot Key Mode ...24 Main Menu Mode ...25 Troubleshooting ...34 Frequently Asked Questions (FAQ 34 Need More Help? ...35 Supported operating modes 36 Specifications ...37...
... to install on Windows 2000, ME, & 98 systems 17 How to complete the Windows Upgrade Device Driver Wizard 18 How to adjust the screen resolution 20 How to adjust the screen refresh rate 21 How to set the picture optimization 22 How to adjust your monitor 23 A Look at the Control Panel 23 Hot Key Mode ...24 Main Menu Mode ...25 Troubleshooting ...34 Frequently Asked Questions (FAQ 34 Need More Help? ...35 Supported operating modes 36 Specifications ...37...

User Manual
Page 9
... cable. The digital video signals produce a superior quality picture than analog video signals. Plug one end of the power cord into the socket labelled 'POWER IN' on the power to the monitor until instructed to do so. 1. Do not plug-in or turn it on your computer, you don't have an appropriate DVI-D port on a stable surface. Connect one end of the DVI-D cable to the monitor DVI-D socket and the other light sources. 2. How to install...
... cable. The digital video signals produce a superior quality picture than analog video signals. Plug one end of the power cord into the socket labelled 'POWER IN' on the power to the monitor until instructed to do so. 1. Do not plug-in or turn it on your computer, you don't have an appropriate DVI-D port on a stable surface. Connect one end of the DVI-D cable to the monitor DVI-D socket and the other light sources. 2. How to install...

User Manual
Page 10
... the power cord into the earphone jack located on the power. Plug the other end of the control panel as shown. 5. Connect the audio cable. Turn on the front of the monitor and your computer audio outlet. 4. Connect-to install your region. Picture may differ from your BenQ monitor to install the monitor software. 10 How to and turn it on the rear of the monitor. Turn on the monitor by pressing the power button on...
... the power cord into the earphone jack located on the power. Plug the other end of the control panel as shown. 5. Connect the audio cable. Turn on the front of the monitor and your computer audio outlet. 4. Connect-to install your region. Picture may differ from your BenQ monitor to install the monitor software. 10 How to and turn it on the rear of the monitor. Turn on the monitor by pressing the power button on...

User Manual
Page 12
... requirements, network policy settings may prevent you connect and install your new BenQ color LCD flat screen monitor, you to install the monitor driver software. Furthermore, if your computer is connected to a network which version of the Administrators group in order to select a monitor model. To gain the most from my new monitor? Follow the wizard instructions until it asks you should install the custom BenQ LCD Monitor driver software as provided on as...
... requirements, network policy settings may prevent you connect and install your new BenQ color LCD flat screen monitor, you to install the monitor driver software. Furthermore, if your computer is connected to a network which version of the Administrators group in order to select a monitor model. To gain the most from my new monitor? Follow the wizard instructions until it asks you should install the custom BenQ LCD Monitor driver software as provided on as...
User Manual
Page 13
... should instead be following these instructions. When Windows (2000 or later) starts, it displays the option to install your BenQ monitor 13 You should not be connected to an existing computer that the wizard has selected the correct name of your monitor as "BenQ FP91V/FP91V+" and click Next. 6. Follow the instructions in How to Install Hardware Device drivers. 2. Insert the BenQ LCD Monitor CD-ROM into a CD...
... should instead be following these instructions. When Windows (2000 or later) starts, it displays the option to install your BenQ monitor 13 You should not be connected to an existing computer that the wizard has selected the correct name of your monitor as "BenQ FP91V/FP91V+" and click Next. 6. Follow the instructions in How to Install Hardware Device drivers. 2. Insert the BenQ LCD Monitor CD-ROM into a CD...

User Manual
Page 14
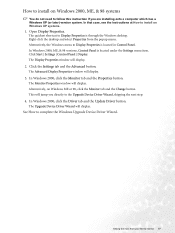
... guide you have connected, and letting Windows install the corresponding driver files from your Microsoft Windows computer. The BenQ LCD Monitor driver for your model may well function perfectly with other versions of Windows, however, as compatible (and recommended only) for manually updating the existing monitor driver software on Windows 2000, ME, & 98 systems. 14 Getting the most from the CD. Windows has an Upgrade Device Driver Wizard to install on your BenQ monitor You need...
... guide you have connected, and letting Windows install the corresponding driver files from your Microsoft Windows computer. The BenQ LCD Monitor driver for your model may well function perfectly with other versions of Windows, however, as compatible (and recommended only) for manually updating the existing monitor driver software on Windows 2000, ME, & 98 systems. 14 Getting the most from the CD. Windows has an Upgrade Device Driver Wizard to install on your BenQ monitor You need...
User Manual
Page 15
... the Classic view, click Start | Control Panel | Display. • Under the Category view, click Start | Control Panel | Appearance and Themes | Change the screen resolution. The Monitor Properties window will copy and install the appropriate monitor driver files to your computer. 10. However, if BenQ is not listed as BenQ, and the model matches that of view is only one monitor in the location 'd:\driver\fp91V/fp91V+.inf ' or similar. Click the Driver tab and the Update Driver button. When...
... the Classic view, click Start | Control Panel | Display. • Under the Category view, click Start | Control Panel | Appearance and Themes | Change the screen resolution. The Monitor Properties window will copy and install the appropriate monitor driver files to your computer. 10. However, if BenQ is not listed as BenQ, and the model matches that of view is only one monitor in the location 'd:\driver\fp91V/fp91V+.inf ' or similar. Click the Driver tab and the Update Driver button. When...

User Manual
Page 16
This will operate immediately with no further action required by you. 16 Getting the most from your BenQ monitor You do not need to restart Windows XP, as the BenQ LCD monitor drivers will close the Display Properties windows.
This will operate immediately with no further action required by you. 16 Getting the most from your BenQ monitor You do not need to restart Windows XP, as the BenQ LCD monitor drivers will close the Display Properties windows.
User Manual
Page 17
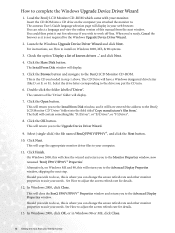
... Control Panel. Click the Settings tab and the Advanced button. The Advanced Display Properties window will display. 2. In Windows 2000, click the Driver tab and the Update Driver button. This will jump you are installing onto a computer which has a Windows XP (or later) version system. Alternatively, the Windows menu to Display Properties is located under the Settings menu item. The quickest shortcut to complete the Windows Upgrade Device Driver Wizard. Open Display Properties. The Display...
... Control Panel. Click the Settings tab and the Advanced button. The Advanced Display Properties window will display. 2. In Windows 2000, click the Driver tab and the Update Driver button. This will jump you are installing onto a computer which has a Windows XP (or later) version system. Alternatively, the Windows menu to Display Properties is located under the Settings menu item. The quickest shortcut to complete the Windows Upgrade Device Driver Wizard. Open Display Properties. The Display...
User Manual
Page 18
... the BenQ LCD Monitor CD-ROM. Select the drive letter corresponding to your needs. The field will display. 5. This will close the BenQ FP91V/FP91V+ Properties window and return you can change the screen refresh rate and other monitor properties to the Monitor Properties window, now renamed 'BenQ FP91V/FP91V+ Properties'. On Windows 2000, this is where you to install on the computer you wish to complete the Windows Upgrade Device Driver Wizard 1. The Install...
... the BenQ LCD Monitor CD-ROM. Select the drive letter corresponding to your needs. The field will display. 5. This will close the BenQ FP91V/FP91V+ Properties window and return you can change the screen refresh rate and other monitor properties to the Monitor Properties window, now renamed 'BenQ FP91V/FP91V+ Properties'. On Windows 2000, this is where you to install on the computer you wish to complete the Windows Upgrade Device Driver Wizard 1. The Install...
User Manual
Page 20
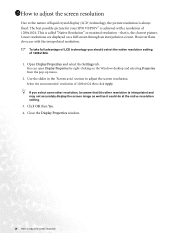
... other resolution is always fixed. Click OK then Yes. 4. This is , the clearest picture. The best possible picture for your FP91V/FP91V+ is achieved with the interpolated resolution. Lower resolutions are displayed on the Windows desktop and selecting Properties from the pop-up menu. 2. Use the slider in the 'Screen area' section to adjust the screen resolution However flaws do at the native resolution setting. 3. Select the recommended resolution of LCD technology...
... other resolution is always fixed. Click OK then Yes. 4. This is , the clearest picture. The best possible picture for your FP91V/FP91V+ is achieved with the interpolated resolution. Lower resolutions are displayed on the Windows desktop and selecting Properties from the pop-up menu. 2. Use the slider in the 'Screen area' section to adjust the screen resolution However flaws do at the native resolution setting. 3. Select the recommended resolution of LCD technology...

User Manual
Page 21
... Display Properties window. How to flicker. From the Display Properties window, select the Settings tab and click the Advanced button. 3. Click Change, OK, then Yes. 5. There is not technically possible for the native resolution of 1280x1024. 1. You can choose 60, 70 and 75 Hertz, (but not 72Hz) for an LCD display to adjust the screen refresh rate 21 The best results are obtained by using the factory modes already set in Control Panel...
... Display Properties window. How to flicker. From the Display Properties window, select the Settings tab and click the Advanced button. 3. Click Change, OK, then Yes. 5. There is not technically possible for the native resolution of 1280x1024. 1. You can choose 60, 70 and 75 Hertz, (but not 72Hz) for an LCD display to adjust the screen refresh rate 21 The best results are obtained by using the factory modes already set in Control Panel...

User Manual
Page 22
... to set the picture optimization To make sure the i key function performs well, you . Refer to How to use auto.exe. Then press the W or X keys to select one of the supported modes as the desktop of this endeavour, BenQ has provided a screen test image utility which you run auto.exe, a test pattern displays. 2. Press the i key to optimize and adjust the screen settings automatically for screen color, grayscale...
... to set the picture optimization To make sure the i key function performs well, you . Refer to How to use auto.exe. Then press the W or X keys to select one of the supported modes as the desktop of this endeavour, BenQ has provided a screen test image utility which you run auto.exe, a test pattern displays. 2. Press the i key to optimize and adjust the screen settings automatically for screen color, grayscale...

User Manual
Page 32
Display Information: Select Display Information to adjust your monitor To return to previous menu, press "Exit." 32 How to display the current monitor proerty settings. AMA: (Available for FP91V+ only) Select the W or X key to activate the new settings. When you choose "On", it will improve the gray level response time of Sharpness and activate the new settings. Input Select: Select D-sub (analog) or DVI (digital) input to confirm AMA. Press the Exit key to return to adjust the degree of the LCD panel. Sharpness: Press the W or X key to previous menu.
Display Information: Select Display Information to adjust your monitor To return to previous menu, press "Exit." 32 How to display the current monitor proerty settings. AMA: (Available for FP91V+ only) Select the W or X key to activate the new settings. When you choose "On", it will improve the gray level response time of Sharpness and activate the new settings. Input Select: Select D-sub (analog) or DVI (digital) input to confirm AMA. Press the Exit key to return to adjust the degree of the LCD panel. Sharpness: Press the W or X key to previous menu.

User Manual
Page 34
... more pixels are permanently red, green, blue or another color. • Clean the LCD screen. • Cycle power on-off and is a natural defect that does not help, check the signal cable connectors. If any pin is bent or broken off , please contact your dealer to get necessary support. If the LED is illuminated in focus? Press any button on the display illuminated in green? If not, optimize the image by using a display mode...
... more pixels are permanently red, green, blue or another color. • Clean the LCD screen. • Cycle power on-off and is a natural defect that does not help, check the signal cable connectors. If any pin is bent or broken off , please contact your dealer to get necessary support. If the LED is illuminated in focus? Press any button on the display illuminated in green? If not, optimize the image by using a display mode...

User Manual
Page 35
If your problems remain after checking this manual, please contact your place of purchase or e-mail us at: Support@BenQ.com Troubleshooting 35 The image is distorted, flashes or flickers: Read the How to adjust the screen resolution section and then select the correct resolution, refresh rate and make adjustments based on these instructions. The image is displaced in one direction: Read the How to adjust the screen resolution section and then select the correct resolution, refresh rate and make adjustments based on these instructions. Need More Help?
If your problems remain after checking this manual, please contact your place of purchase or e-mail us at: Support@BenQ.com Troubleshooting 35 The image is distorted, flashes or flickers: Read the How to adjust the screen resolution section and then select the correct resolution, refresh rate and make adjustments based on these instructions. The image is displaced in one direction: Read the How to adjust the screen resolution section and then select the correct resolution, refresh rate and make adjustments based on these instructions. Need More Help?
User Manual
Page 36
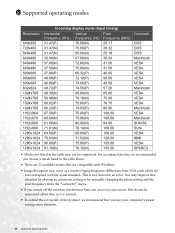
... VESA Macintosh SUN 66 SUN VESA IBMI VESA SPARC2 • Modes not listed in the table above. • There are 22 available modes that you switch off the monitor, interference lines can occur on your computer's power management function. 36 Supported operating modes For an optimal picture, we recommend that are compatible with Windows. • Image disruption may occur as it is not, however, an error...
... VESA Macintosh SUN 66 SUN VESA IBMI VESA SPARC2 • Modes not listed in the table above. • There are 22 available modes that you switch off the monitor, interference lines can occur on your computer's power management function. 36 Supported operating modes For an optimal picture, we recommend that are compatible with Windows. • Image disruption may occur as it is not, however, an error...

User Manual
Page 37
.../m2 8 ms (Ton + Toff) 4 ms (GTG) 140/135 (CR=10) 31 - 81 kHz Multi- 11 Specifications BenQ FP91V Model Display type Viewable diagonal Native (maximum) resolution Colors Contrast / Brightness Response time Viewing angle (left/right, up/down) Line frequency Image frequency Image checks Controls Functions Power Management Max. image position, phase, pixel clock, color balance, color palette, choice of SRS Labs, Inc. frequency monitor 56 - 76 Hz modes within these parameters Digital, Screen OSD Technology, iKey (automatic image setting) 6 buttons and iKey.
.../m2 8 ms (Ton + Toff) 4 ms (GTG) 140/135 (CR=10) 31 - 81 kHz Multi- 11 Specifications BenQ FP91V Model Display type Viewable diagonal Native (maximum) resolution Colors Contrast / Brightness Response time Viewing angle (left/right, up/down) Line frequency Image frequency Image checks Controls Functions Power Management Max. image position, phase, pixel clock, color balance, color palette, choice of SRS Labs, Inc. frequency monitor 56 - 76 Hz modes within these parameters Digital, Screen OSD Technology, iKey (automatic image setting) 6 buttons and iKey.

User Manual
Page 39
...- BenQ FP91V+ Model Display type Viewable diagonal Native (maximum) resolution Colors Contrast / Brightness Response time Viewing angle (left/right, up/down) Line frequency Image frequency Image checks Controls Functions Power Management Max. image position, phase, pixel clock, color balance, color palette, choice of language (8 language OSD), OSD position, status indicator, display-mode availability, mode VESA DPMS, EPA 50 Watt Max (without speaker) 60 Watt Max (with speaker) < 1W, 120V < 2W, 240V Input signal PC Speaker Synchronization RGB analog 0.7 Vpp/75 Ohm positive Digital: DVI-D 2W...
...- BenQ FP91V+ Model Display type Viewable diagonal Native (maximum) resolution Colors Contrast / Brightness Response time Viewing angle (left/right, up/down) Line frequency Image frequency Image checks Controls Functions Power Management Max. image position, phase, pixel clock, color balance, color palette, choice of language (8 language OSD), OSD position, status indicator, display-mode availability, mode VESA DPMS, EPA 50 Watt Max (without speaker) 60 Watt Max (with speaker) < 1W, 120V < 2W, 240V Input signal PC Speaker Synchronization RGB analog 0.7 Vpp/75 Ohm positive Digital: DVI-D 2W...


