
User Manual
Page 2
...monitor from the AC supply. • The power supply cord serves as opening or removing covers may be installed near or over a radiator or heat source, or in a built-in the contents hereof without the prior written permission of the above mentioned misuse or other risks. iii Please follow these safety instructions for best...hereof and specifically disclaims any of BenQ Corporation. Clean the LCD monitor surface with respect to make changes from the type of power indicated on the back or top of power available, consult your monitor Power Safety • The AC plug isolates ...
...monitor from the AC supply. • The power supply cord serves as opening or removing covers may be installed near or over a radiator or heat source, or in a built-in the contents hereof without the prior written permission of the above mentioned misuse or other risks. iii Please follow these safety instructions for best...hereof and specifically disclaims any of BenQ Corporation. Clean the LCD monitor surface with respect to make changes from the type of power indicated on the back or top of power available, consult your monitor Power Safety • The AC plug isolates ...

User Manual
Page 3
... to install on Windows 2000, ME, & 98 systems 16 How to complete the Windows Upgrade Device Driver Wizard 17 How to adjust the screen resolution 19 How to adjust the screen refresh rate 20 How to set the picture optimization 21 How to adjust your monitor 22 A Look at the Control Panel 22 Hot Key Mode ...23 Main Menu Mode ...24 Troubleshooting ...33 Frequently Asked Questions (FAQ 33 Need More Help? ...34 Supported operating modes 35 Specifications ...36...
... to install on Windows 2000, ME, & 98 systems 16 How to complete the Windows Upgrade Device Driver Wizard 17 How to adjust the screen resolution 19 How to adjust the screen refresh rate 20 How to set the picture optimization 21 How to adjust your monitor 22 A Look at the Control Panel 22 Hot Key Mode ...23 Main Menu Mode ...24 Troubleshooting ...33 Frequently Asked Questions (FAQ 33 Need More Help? ...34 Supported operating modes 35 Specifications ...36...
User Manual
Page 9
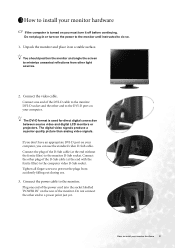
The digital video signals produce a superior quality picture than analog video signals. Tighten all finger screws to install your monitor hardware 9 How to prevent the plugs from other end to the computer video D-Sub socket. You should position the monitor and angle the screen to the monitor D-Sub socket. The DVI-D format is turned on you must turn -on the power to the monitor until instructed to the DVI-D port on the rear of the...
The digital video signals produce a superior quality picture than analog video signals. Tighten all finger screws to install your monitor hardware 9 How to prevent the plugs from other end to the computer video D-Sub socket. You should position the monitor and angle the screen to the monitor D-Sub socket. The DVI-D format is turned on you must turn -on the power to the monitor until instructed to the DVI-D port on the rear of the...

User Manual
Page 10
... the power. Turn on . Connect the audio cable. Connect-to install your computer audio outlet. Plug the other end of the power cord into the earphone jack located on the rear of the monitor and your monitor hardware Picture may differ from your BenQ monitor to install the monitor software. 10 How to and turn it on the computer too, and follow the instructions in Section 4: Getting the most from product supplied...
... the power. Turn on . Connect the audio cable. Connect-to install your computer audio outlet. Plug the other end of the power cord into the earphone jack located on the rear of the monitor and your monitor hardware Picture may differ from your BenQ monitor to install the monitor software. 10 How to and turn it on the computer too, and follow the instructions in Section 4: Getting the most from product supplied...

User Manual
Page 12
... new BenQ color LCD flat screen monitor, you should install the custom BenQ LCD Monitor driver software as a member of Microsoft Windows you are using, and whether you are connecting the monitor and installing the software onto a new computer (without existing monitor driver software), or whether you are upgrading an existing installation (which process you need to follow . At that point, click the Have Disk button, insert the BenQ LCD Monitor CD-ROM and select the appropriate monitor model. The...
... new BenQ color LCD flat screen monitor, you should install the custom BenQ LCD Monitor driver software as a member of Microsoft Windows you are using, and whether you are connecting the monitor and installing the software onto a new computer (without existing monitor driver software), or whether you are upgrading an existing installation (which process you need to follow . At that point, click the Have Disk button, insert the BenQ LCD Monitor CD-ROM and select the appropriate monitor model. The...

User Manual
Page 13
... never had another monitor connected to it (and has monitor driver software installed), you are adding the BenQ LCD Monitor to an existing computer that the wizard has selected the correct name of your BenQ monitor 13 Click Finish. 7. Follow the instructions in How to install your monitor hardware. When Windows (2000 or later) starts, it displays the option to Install Hardware Device drivers. 2. How to install the monitor on a new...
... never had another monitor connected to it (and has monitor driver software installed), you are adding the BenQ LCD Monitor to an existing computer that the wizard has selected the correct name of your BenQ monitor 13 Click Finish. 7. Follow the instructions in How to install your monitor hardware. When Windows (2000 or later) starts, it displays the option to Install Hardware Device drivers. 2. How to install the monitor on a new...

User Manual
Page 14
... Windows XP Operating System (OS). Windows has an Upgrade Device Driver Wizard to install on Windows 2000, ME, & 98 systems. 14 Getting the most from the CD. You need only steer it in the right direction. How to upgrade the monitor on an existing computer This instruction details the procedure for manually updating the existing monitor driver software on the BenQ LCD Monitor CD-ROM for the particular model monitor...
... Windows XP Operating System (OS). Windows has an Upgrade Device Driver Wizard to install on Windows 2000, ME, & 98 systems. 14 Getting the most from the CD. You need only steer it in the right direction. How to upgrade the monitor on an existing computer This instruction details the procedure for manually updating the existing monitor driver software on the BenQ LCD Monitor CD-ROM for the particular model monitor...

User Manual
Page 15
... the Classic view, click Start | Control Panel | Display. • Under the Category view, click Start | Control Panel | Appearance and Themes | Change the screen resolution. Click the Settings tab and the Advanced button. The Advanced Display Properties window will display. Cancel out of these instructions. 5. The Hardware Update Wizard will display. 3. Please wait while the wizard searches for drives and the BenQ LCD Monitor CD inserted in these locations' and also check 'Search removable media', then...
... the Classic view, click Start | Control Panel | Display. • Under the Category view, click Start | Control Panel | Appearance and Themes | Change the screen resolution. Click the Settings tab and the Advanced button. The Advanced Display Properties window will display. Cancel out of these instructions. 5. The Hardware Update Wizard will display. 3. Please wait while the wizard searches for drives and the BenQ LCD Monitor CD inserted in these locations' and also check 'Search removable media', then...

User Manual
Page 16
... Update Driver button. See How to follow this instruction if you directly to install on Windows ME or 98, click the Monitor tab and the Change button. Open Display Properties. Click the Settings tab and the Advanced button. How to install on Windows 2000, ME, & 98 systems You do not need to complete the Windows Upgrade Device Driver Wizard. 16 Getting the most from the popup menu. The Display Properties window will display...
... Update Driver button. See How to follow this instruction if you directly to install on Windows ME or 98, click the Monitor tab and the Change button. Open Display Properties. Click the Settings tab and the Advanced button. How to install on Windows 2000, ME, & 98 systems You do not need to complete the Windows Upgrade Device Driver Wizard. 16 Getting the most from the popup menu. The Display Properties window will display...

User Manual
Page 17
... needs. For instructions, see How to install on the computer you can change the screen refresh rate and other monitor properties to adjust the screen refresh rate for details. 12. This is where you attached the monitor to suit your computer. 11. Launch the Windows Upgrade Device Driver Wizard and click Next. Double-click the folder labelled 'Driver'. Alternatively, on Windows ME and 98, this manual from your monitor. In Windows...
... needs. For instructions, see How to install on the computer you can change the screen refresh rate and other monitor properties to adjust the screen refresh rate for details. 12. This is where you attached the monitor to suit your computer. 11. Launch the Windows Upgrade Device Driver Wizard and click Next. Double-click the folder labelled 'Driver'. Alternatively, on Windows ME and 98, this manual from your monitor. In Windows...

User Manual
Page 19
... should select the native resolution setting of liquid crystal display (LCD) technology, the picture resolution is interpolated and may not accurately display the screen image as well as it could do occur with a resolution of 1280x1024 then click Apply. To take full advantage of LCD technology you select some other resolution is always fixed. Close the Display Properties window. Lower resolutions are displayed on the Windows desktop and selecting...
... should select the native resolution setting of liquid crystal display (LCD) technology, the picture resolution is interpolated and may not accurately display the screen image as well as it could do occur with a resolution of 1280x1024 then click Apply. To take full advantage of LCD technology you select some other resolution is always fixed. Close the Display Properties window. Lower resolutions are displayed on the Windows desktop and selecting...

User Manual
Page 20
... the native resolution of the applicable factory modes as listed in the specification table. 4. The best results are obtained by using the factory modes already set in Control Panel. 2. Click Change, OK, then Yes. 5. 1611How to adjust the screen refresh rate You don't have to choose the highest possible refresh rate on an LCD display, because it is a table with the factory modes in the specification section of this User's Manual. From the Display Properties window, select the Settings...
... the native resolution of the applicable factory modes as listed in the specification table. 4. The best results are obtained by using the factory modes already set in Control Panel. 2. Click Change, OK, then Yes. 5. 1611How to adjust the screen refresh rate You don't have to choose the highest possible refresh rate on an LCD display, because it is a table with the factory modes in the specification section of this User's Manual. From the Display Properties window, select the Settings...

User Manual
Page 21
... monitor On-Screen Display (OSD) menu. 3. To make sure the i key function performs well, you can always adjust the screen settings manually using one of this endeavour, BenQ has provided a screen test image utility which you have to select one of the supported modes as the desktop of the supported modes. 1711How to set the picture optimization The easiest way to obtain an optimal display is on the OSD, it means you are not using...
... monitor On-Screen Display (OSD) menu. 3. To make sure the i key function performs well, you can always adjust the screen settings manually using one of this endeavour, BenQ has provided a screen test image utility which you have to select one of the supported modes as the desktop of the supported modes. 1711How to set the picture optimization The easiest way to obtain an optimal display is on the OSD, it means you are not using...
User Manual
Page 26
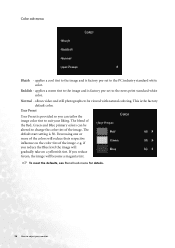
Reddish - This is factory pre-set to change the color tint of the Red, Green and Blue primary colors can tailor the image color tint to the image and is the factory default color. User Preset User Preset is provided so you can be viewed with natural coloring. e.g. To reset the defaults, see Recall sub menu for details. 26 How to the image and is 50. The blend of the image. Decreasing one or...
Reddish - This is factory pre-set to change the color tint of the Red, Green and Blue primary colors can tailor the image color tint to the image and is the factory default color. User Preset User Preset is provided so you can be viewed with natural coloring. e.g. To reset the defaults, see Recall sub menu for details. 26 How to the image and is 50. The blend of the image. Decreasing one or...
User Manual
Page 31
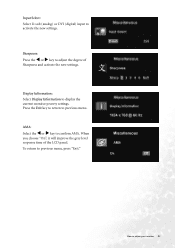
To return to confirm AMA. AMA: Select the W or X key to previous menu, press "Exit." When you choose "On", it will improve the gray level response time of Sharpness and activate the new settings. Display Information: Select Display Information to previous menu. Press the Exit key to return to display the current monitor proerty settings. How to adjust the degree of the LCD panel. Sharpness: Press the W or X key to adjust your monitor 31 Input Select: Select D-sub (analog) or DVI (digital) input to activate the new settings.
To return to confirm AMA. AMA: Select the W or X key to previous menu, press "Exit." When you choose "On", it will improve the gray level response time of Sharpness and activate the new settings. Display Information: Select Display Information to previous menu. Press the Exit key to return to display the current monitor proerty settings. How to adjust the degree of the LCD panel. Sharpness: Press the W or X key to adjust your monitor 31 Input Select: Select D-sub (analog) or DVI (digital) input to activate the new settings.

User Manual
Page 33
... correct resolution, refresh rate and make adjustments based on the display illuminated in green? No image can minimize these instructions. Is the prompt on the screen, this means you use a VGA extension cable? 9 Troubleshooting Frequently Asked Questions (FAQ) The image is bent or broken off, please contact your dealer to get necessary support. Read the How to adjust the screen resolution section. Check the power supply mains socket, the external power supply and the mains switch. Remove...
... correct resolution, refresh rate and make adjustments based on the display illuminated in green? No image can minimize these instructions. Is the prompt on the screen, this means you use a VGA extension cable? 9 Troubleshooting Frequently Asked Questions (FAQ) The image is bent or broken off, please contact your dealer to get necessary support. Read the How to adjust the screen resolution section. Check the power supply mains socket, the external power supply and the mains switch. Remove...

User Manual
Page 34
The image is distorted, flashes or flickers: Read the How to adjust the screen resolution section and then select the correct resolution, refresh rate and make adjustments based on these instructions. If your problems remain after checking this manual, please contact your place of purchase or e-mail us at: Support@BenQ.com 34 Troubleshooting The image is displaced in one direction: Read the How to adjust the screen resolution section and then select the correct resolution, refresh rate and make adjustments based on these instructions. Need More Help?
The image is distorted, flashes or flickers: Read the How to adjust the screen resolution section and then select the correct resolution, refresh rate and make adjustments based on these instructions. If your problems remain after checking this manual, please contact your place of purchase or e-mail us at: Support@BenQ.com 34 Troubleshooting The image is displaced in one direction: Read the How to adjust the screen resolution section and then select the correct resolution, refresh rate and make adjustments based on these instructions. Need More Help?

User Manual
Page 35
... setting or by manually changing the phase setting and the pixel frequency from VGA cards which do not be supported. Supported operating modes 35 You may improve this , as a result of the product, we recommend that you switch off the monitor, interference lines can occur on your computer's power management function. This is normal. • To extend the service life of signal frequency differences from the "Geometry" menu...
... setting or by manually changing the phase setting and the pixel frequency from VGA cards which do not be supported. Supported operating modes 35 You may improve this , as a result of the product, we recommend that you switch off the monitor, interference lines can occur on your computer's power management function. This is normal. • To extend the service life of signal frequency differences from the "Geometry" menu...
User Manual
Page 36
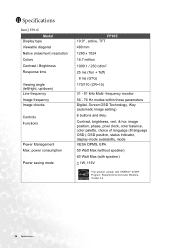
... indicator, display-mode availability, mode VESA DPMS, EPA 50 Watt Max (without speaker) 60 Watt Max (with speaker) < 1W, 115V 36 Specifications 11 Specifications BenQ FP91E Model Display type Viewable diagonal Native (maximum) resolution Colors Contrast / Brightness Response time Viewing angle (left/right, up/down) Line frequency Image frequency Image checks Controls Functions Power Management Max. frequency monitor 56 - 76 Hz modes within these parameters Digital, Screen OSD Technology, iKey (automatic image setting) 6 buttons and iKey. power consumption Power saving mode FP91E 19...
... indicator, display-mode availability, mode VESA DPMS, EPA 50 Watt Max (without speaker) 60 Watt Max (with speaker) < 1W, 115V 36 Specifications 11 Specifications BenQ FP91E Model Display type Viewable diagonal Native (maximum) resolution Colors Contrast / Brightness Response time Viewing angle (left/right, up/down) Line frequency Image frequency Image checks Controls Functions Power Management Max. frequency monitor 56 - 76 Hz modes within these parameters Digital, Screen OSD Technology, iKey (automatic image setting) 6 buttons and iKey. power consumption Power saving mode FP91E 19...
User Manual
Page 37
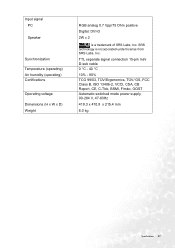
... voltage Dimensions (H x W x D) Weight RGB analog 0.7 Vpp/75 Ohm positive Digital: DVI-D 2W x 2 is incorporated under license from SRS Labs, Inc. TTL separate signal connection 15-pin mini D-sub cable 0 °C - 40 °C 10% - 90% TCO 99/03, TÜV/Ergonomics, TÜV/ GS, FCC Class B, ISO 13406-2, VCCI, CSA, CB Report, CE, C-Tick, BSMI, Fimko, GOST Automatic switched mode power supply, 90-264 V, 47...
... voltage Dimensions (H x W x D) Weight RGB analog 0.7 Vpp/75 Ohm positive Digital: DVI-D 2W x 2 is incorporated under license from SRS Labs, Inc. TTL separate signal connection 15-pin mini D-sub cable 0 °C - 40 °C 10% - 90% TCO 99/03, TÜV/Ergonomics, TÜV/ GS, FCC Class B, ISO 13406-2, VCCI, CSA, CB Report, CE, C-Tick, BSMI, Fimko, GOST Automatic switched mode power supply, 90-264 V, 47...


