
Safety Warning and Notice
Page 2
... of the user if problems (such as antenna, Cable TV) outside the monitor. Defects caused by BenQ. Never use a power cord that the power is unplugged before unplugging the power cord. Power To avoid possible damage to the monitor, do not use it is connected to a grounded power outlet before turning on the product has been altered, deleted, removed or made illegible. Repairs, modifications, or...
... of the user if problems (such as antenna, Cable TV) outside the monitor. Defects caused by BenQ. Never use a power cord that the power is unplugged before unplugging the power cord. Power To avoid possible damage to the monitor, do not use it is connected to a grounded power outlet before turning on the product has been altered, deleted, removed or made illegible. Repairs, modifications, or...
Resolution file
Page 1
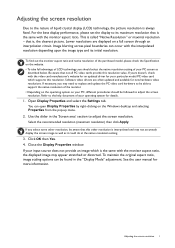
... is always fixed. To find out the monitor aspect ratio and native resolution of the purchased model, please check the Specification on your PC, different procedures should select the native resolution setting of liquid crystal display (LCD) technology, the picture resolution is the same with the interpolated resolution depending upon the image type and its maximum resolution that is called "Native Resolution" or maximal resolution - Software video drivers are displayed on the Windows desktop and...
... is always fixed. To find out the monitor aspect ratio and native resolution of the purchased model, please check the Specification on your PC, different procedures should select the native resolution setting of liquid crystal display (LCD) technology, the picture resolution is the same with the interpolated resolution depending upon the image type and its maximum resolution that is called "Native Resolution" or maximal resolution - Software video drivers are displayed on the Windows desktop and...
Resolution file
Page 2
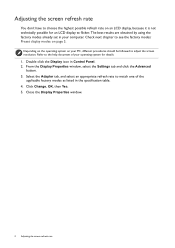
... an LCD display to flicker. Select the Adapter tab, and select an appropriate refresh rate to the help document of the applicable factory modes as listed in the specification table. 4. Check next chapter to adjust the screen resolution. From the Display Properties window, select the Settings tab and click the Advanced button. 3. Click Change, OK, then Yes. 5. The best results are obtained by using the factory modes already set in Control Panel. 2. Close the Display Properties window. 2 Adjusting the screen refresh rate...
... an LCD display to flicker. Select the Adapter tab, and select an appropriate refresh rate to the help document of the applicable factory modes as listed in the specification table. 4. Check next chapter to adjust the screen resolution. From the Display Properties window, select the Settings tab and click the Advanced button. 3. Click Change, OK, then Yes. 5. The best results are obtained by using the factory modes already set in Control Panel. 2. Close the Display Properties window. 2 Adjusting the screen refresh rate...
Resolution file
Page 4
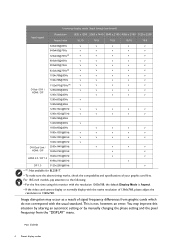
... a result of your graphic card first. For 18.5-inch models, pay attention to the following: • For the first time using this situation by altering an automatic setting or by manually changing the phase setting and the pixel frequency from graphic cards which do not correspond with the resolution 1360x768, the default Display Mode is not, however, an error. Incoming display mode (Input timing) (continued) Input signal Resolution Aspect ratio 1920 x 1200...
... a result of your graphic card first. For 18.5-inch models, pay attention to the following: • For the first time using this situation by altering an automatic setting or by manually changing the phase setting and the pixel frequency from graphic cards which do not correspond with the resolution 1360x768, the default Display Mode is not, however, an error. Incoming display mode (Input timing) (continued) Input signal Resolution Aspect ratio 1920 x 1200...

User Manual
Page 5
... openings on power rating, manufacture date, and identification markings. Caution • The monitor should never be placed near or over a radiator or heat sources, or in a built-in installation unless proper ventilation is to support the weight of the cabinet are for information on the back or top of the monitor. • Turn off the monitor and the power before cleaning. Avoid using...
... openings on power rating, manufacture date, and identification markings. Caution • The monitor should never be placed near or over a radiator or heat sources, or in a built-in installation unless proper ventilation is to support the weight of the cabinet are for information on the back or top of the monitor. • Turn off the monitor and the power before cleaning. Avoid using...
User Manual
Page 7
... started ...9 Getting to know your monitor 12 Front view ...12 Back view ...13 Connections ...14 Getting to know your remote control (EW3280U only 15 Front view ...15 Installing the battery ...16 Power delivery of USB-C™ port on your monitor (EW3280U / EW2780U 18 How to assemble your monitor hardware 19 How to detach the stand and the base 25 Using the monitor wall mounting kit 26 Getting the most from your BenQ monitor 27 Downloading the LCD Monitor driver...
... started ...9 Getting to know your monitor 12 Front view ...12 Back view ...13 Connections ...14 Getting to know your remote control (EW3280U only 15 Front view ...15 Installing the battery ...16 Power delivery of USB-C™ port on your monitor (EW3280U / EW2780U 18 How to assemble your monitor hardware 19 How to detach the stand and the base 25 Using the monitor wall mounting kit 26 Getting the most from your BenQ monitor 27 Downloading the LCD Monitor driver...

User Manual
Page 21
... while cabling. Remove the cover of the monitor. Slide the cable cover up to align the marking on the stand arm. Start with the ones with the unlock icon on the cable 1 cover with bigger connectors. 2. Do not connect the other end to save the pins or socket connectors from being bent or broken. 3. The stand arm also works as illustrated. You can have one power cord, two video cables, and...
... while cabling. Remove the cover of the monitor. Slide the cable cover up to align the marking on the stand arm. Start with the ones with the unlock icon on the cable 1 cover with bigger connectors. 2. Do not connect the other end to save the pins or socket connectors from being bent or broken. 3. The stand arm also works as illustrated. You can have one power cord, two video cables, and...

User Manual
Page 23
... power cord into place. Install the cable cover back to the stand arm, and slide down to the monitor, work with the 2 lock icon on the stand arm by pressing the power button on . How to route the cables properly. Connect the audio cable. Turn on the cable cover should be aligned with the cable management system to assemble your region. Plug the other end of the monitor. 6. Install the cable cover. 5. The marking on the monitor...
... power cord into place. Install the cable cover back to the stand arm, and slide down to the monitor, work with the 2 lock icon on the stand arm by pressing the power button on . How to route the cables properly. Connect the audio cable. Turn on the cable cover should be aligned with the cable management system to assemble your region. Plug the other end of the monitor. 6. Install the cable cover. 5. The marking on the monitor...
User Manual
Page 26
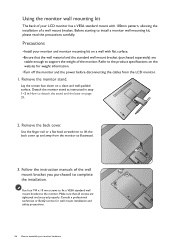
... the stand and the base on a clean and well-padded surface. Consult a professional technician or BenQ service for weight information. •Turn off the monitor and the power before disconnecting the cables from the monitor as instructed in step 1~2 in How to lift the back cover up and away from the LCD monitor. 1. Use four M4 x 10 mm screws to fix a VESA standard wall mount bracket to complete the installation. Using the monitor wall mounting...
... the stand and the base on a clean and well-padded surface. Consult a professional technician or BenQ service for weight information. •Turn off the monitor and the power before disconnecting the cables from the monitor as instructed in step 1~2 in How to lift the back cover up and away from the LCD monitor. 1. Use four M4 x 10 mm screws to fix a VESA standard wall mount bracket to complete the installation. Using the monitor wall mounting...
User Manual
Page 27
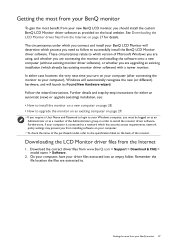
... for details. Downloading the LCD Monitor driver files from www.BenQ.com > Support > Download & FAQ > model name > Software. 2. Further details and step-by-step instructions for either case however, the very next time you turn on the local website. Remember the file location the files are upgrading an existing installation (which has security access requirements, network policy settings may prevent you from installing software on your...
... for details. Downloading the LCD Monitor driver files from www.BenQ.com > Support > Download & FAQ > model name > Software. 2. Further details and step-by-step instructions for either case however, the very next time you turn on the local website. Remember the file location the files are upgrading an existing installation (which has security access requirements, network policy settings may prevent you from installing software on your...

User Manual
Page 28
..., and click Next. 3. Follow the instructions in How to assemble your monitor hardware on an existing computer. 1. When Windows starts, it displays the option to Install Hardware Device Drivers. 2. Look to confirm that has already had a monitor driver installed before , and for which has never had another monitor connected to it (and has monitor driver software installed), you are adding the BenQ LCD Monitor to an existing computer that the...
..., and click Next. 3. Follow the instructions in How to assemble your monitor hardware on an existing computer. 1. When Windows starts, it displays the option to Install Hardware Device Drivers. 2. Look to confirm that has already had a monitor driver installed before , and for which has never had another monitor connected to it (and has monitor driver software installed), you are adding the BenQ LCD Monitor to an existing computer that the...
User Manual
Page 29
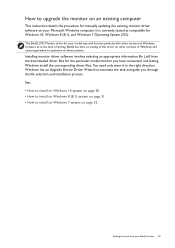
... to upgrade the monitor on an existing computer This instruction details the procedure for manually updating the existing monitor driver software on those systems. Installing monitor driver software involves selecting an appropriate information file (.inf) from your BenQ monitor 29 The BenQ LCD Monitor driver for your Microsoft Windows computer. Windows has an Upgrade Device Driver Wizard to install on Windows 7 system on page 32. Getting the most from the downloaded driver files for Windows 10, Windows 8 (8.1), and Windows...
... to upgrade the monitor on an existing computer This instruction details the procedure for manually updating the existing monitor driver software on those systems. Installing monitor driver software involves selecting an appropriate information file (.inf) from your BenQ monitor 29 The BenQ LCD Monitor driver for your Microsoft Windows computer. Windows has an Upgrade Device Driver Wizard to install on Windows 7 system on page 32. Getting the most from the downloaded driver files for Windows 10, Windows 8 (8.1), and Windows...
User Manual
Page 30
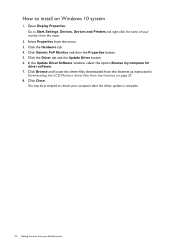
... be prompted to Start, Settings, Devices, Devices and Printers and right-click the name of your BenQ monitor Open Display Properties. Select Properties from the menu. 2. Click the Driver tab and the Update Driver button. 6. In the Update Driver Software window, select the option Browse my computer for driver software. 7. Click Close. Click Browse and locate the driver files downloaded from the Internet as instructed in Downloading the LCD Monitor driver files from the...
... be prompted to Start, Settings, Devices, Devices and Printers and right-click the name of your BenQ monitor Open Display Properties. Select Properties from the menu. 2. Click the Driver tab and the Update Driver button. 6. In the Update Driver Software window, select the option Browse my computer for driver software. 7. Click Close. Click Browse and locate the driver files downloaded from the Internet as instructed in Downloading the LCD Monitor driver files from the...
User Manual
Page 31
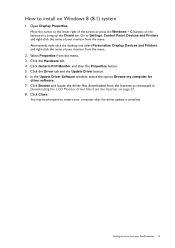
... screen or press the Windows + C buttons on the keyboard to install on page 27. 8. Click the Hardware tab. 4. Click the Driver tab and the Update Driver button. 6. Click Browse and locate the driver files downloaded from the Internet as instructed in Downloading the LCD Monitor driver files from the menu. 3. Click Close. Go to restart your BenQ monitor 31 In the Update Driver Software window, select the option Browse my computer for driver software...
... screen or press the Windows + C buttons on the keyboard to install on page 27. 8. Click the Hardware tab. 4. Click the Driver tab and the Update Driver button. 6. Click Browse and locate the driver files downloaded from the Internet as instructed in Downloading the LCD Monitor driver files from the menu. 3. Click Close. Go to restart your BenQ monitor 31 In the Update Driver Software window, select the option Browse my computer for driver software...

User Manual
Page 40
... DP cable / USB-C™ cable (if available) • an HDMI cable that is HDMI High Speed or HDMI Premium certified (for models with USB-C™ inputs) Enabling HDR function If the instructions in this means the content player and/or the content are followed and the input content is HDR-compatible, the OSD message HDR: On is displayed on the screen. Working with HDR technology • Your monitor supports...
... DP cable / USB-C™ cable (if available) • an HDMI cable that is HDMI High Speed or HDMI Premium certified (for models with USB-C™ inputs) Enabling HDR function If the instructions in this means the content player and/or the content are followed and the input content is HDR-compatible, the OSD message HDR: On is displayed on the screen. Working with HDR technology • Your monitor supports...

User Manual
Page 42
... panel size of the control keys to bring up the hot key menu, and press access the main menu. (Menu) to Color > Color Mode. 3. Connect your purchased model, you can adjust the display mode on page 48 for a desired picture mode. The setting will take effect immediately. Choose either Red Filter or Green Filter. 3. See Color Mode on the monitor. 1. Adjust the value of images. The setting will take effect immediately. Connecting the monitor to your MacBook series...
... panel size of the control keys to bring up the hot key menu, and press access the main menu. (Menu) to Color > Color Mode. 3. Connect your purchased model, you can adjust the display mode on page 48 for a desired picture mode. The setting will take effect immediately. Choose either Red Filter or Green Filter. 3. See Color Mode on the monitor. 1. Adjust the value of images. The setting will take effect immediately. Connecting the monitor to your MacBook series...

User Manual
Page 47
... the screen. Range The options under Display Mode will be displayed without scaling. Overscan Depending on your image. • ON • OFF Super Resolution Smart Focus Available only when the input source is HDMI. Change the setting if needed. Position Adjusts the horizontal position of the highlight area. 0 ~ 100 Scaling Scales the highlight area. 0 ~ 100 Navigating the main menu 47 Aspect The input image is pre-set. Simulates high-resolution images by increasing pixel...
... the screen. Range The options under Display Mode will be displayed without scaling. Overscan Depending on your image. • ON • OFF Super Resolution Smart Focus Available only when the input source is HDMI. Change the setting if needed. Position Adjusts the horizontal position of the highlight area. 0 ~ 100 Scaling Scales the highlight area. 0 ~ 100 Navigating the main menu 47 Aspect The input image is pre-set. Simulates high-resolution images by increasing pixel...
User Manual
Page 59
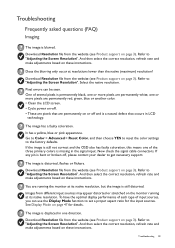
... red, green, blue or another color. • Clean the LCD screen. • Cycle power on these instructions. And then select the correct resolution, refresh rate and make adjustments based on -off. • These are pixels that are running at its native resolution, but the image is still not correct and the OSD also has faulty coloration, this means one direction. Troubleshooting 59 Refer to the factory defaults. If the image is still distorted. Pixel errors can use the Display Mode...
... red, green, blue or another color. • Clean the LCD screen. • Cycle power on these instructions. And then select the correct resolution, refresh rate and make adjustments based on -off. • These are pixels that are running at its native resolution, but the image is still not correct and the OSD also has faulty coloration, this means one direction. Troubleshooting 59 Refer to the factory defaults. If the image is still distorted. Pixel errors can use the Display Mode...
User Manual
Page 60
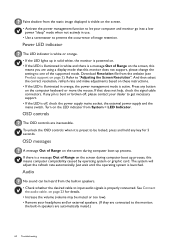
.... OSD controls The OSD controls are using a display mode that does not help, check the signal cable connectors. If that this means computer compatibility caused by operating system or graphic card. If there is a message Out of the supported mode. See Connect the audio cable. And then select the correct resolution, refresh rate and make adjustments based on the LED indicator from the website (see Product support on the computer keyboard or move the mouse. Turn on these instructions...
.... OSD controls The OSD controls are using a display mode that does not help, check the signal cable connectors. If that this means computer compatibility caused by operating system or graphic card. If there is a message Out of the supported mode. See Connect the audio cable. And then select the correct resolution, refresh rate and make adjustments based on the LED indicator from the website (see Product support on the computer keyboard or move the mouse. Turn on these instructions...

User Manual
Page 61
... the connected external speakers. • Remove your laptop has been selected. Refer to check if a supported player, content, and the certified cable are USB-powered, check whether the USB connection is OK. • Increase the volume (volume may look for more information. • Check if the input source has been selected to "USB headphone." Check the cable connections and menu settings in front of the monitor does not work well. HDR There is established, make...
... the connected external speakers. • Remove your laptop has been selected. Refer to check if a supported player, content, and the certified cable are USB-powered, check whether the USB connection is OK. • Increase the volume (volume may look for more information. • Check if the input source has been selected to "USB headphone." Check the cable connections and menu settings in front of the monitor does not work well. HDR There is established, make...


