

Safety Warning and Notice
Page 2
... clean your nearest BenQ service center for warranty services have been altered by unauthorized use or is illegible. The model number or production number on the monitor. Use only the power cord provided by BenQ. Never use a power cord that the power is compatible with a (multi-outlet) extension cord. Always turn off the monitor before cleaning your monitor Use a monitor cleaner and a soft cloth to do not dissemble or repair the monitor. 8. 7. power cable...
... clean your nearest BenQ service center for warranty services have been altered by unauthorized use or is illegible. The model number or production number on the monitor. Use only the power cord provided by BenQ. Never use a power cord that the power is compatible with a (multi-outlet) extension cord. Always turn off the monitor before cleaning your monitor Use a monitor cleaner and a soft cloth to do not dissemble or repair the monitor. 8. 7. power cable...
Resolution file
Page 1
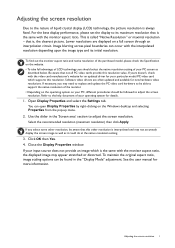
... this other resolution is always fixed. Click OK then Yes. 4. Adjusting the screen resolution 1 Adjusting the screen resolution Due to adjust the screen resolution. Refer to support the native resolution of your input source does not provide an image which supports this resolution value. Close the Display Properties window. If your PC screen as it could do at the native resolution setting. 3. Software video drivers are displayed on your PC, different procedures should select the native resolution setting of the monitor. • Depending...
... this other resolution is always fixed. Click OK then Yes. 4. Adjusting the screen resolution 1 Adjusting the screen resolution Due to adjust the screen resolution. Refer to support the native resolution of your input source does not provide an image which supports this resolution value. Close the Display Properties window. If your PC screen as it could do at the native resolution setting. 3. Software video drivers are displayed on your PC, different procedures should select the native resolution setting of the monitor. • Depending...
Resolution file
Page 2
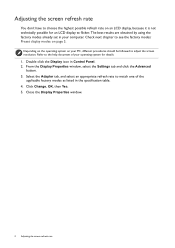
... Advanced button. 3. Depending on the operating system on your operating system for an LCD display to flicker. Select the Adapter tab, and select an appropriate refresh rate to match one of your PC, different procedures should be followed to adjust the screen resolution. Close the Display Properties window. 2 Adjusting the screen refresh rate Refer to the help document of the applicable factory modes as listed in the specification table. 4. Check next...
... Advanced button. 3. Depending on the operating system on your operating system for an LCD display to flicker. Select the Adapter tab, and select an appropriate refresh rate to match one of your PC, different procedures should be followed to adjust the screen resolution. Close the Display Properties window. 2 Adjusting the screen refresh rate Refer to the help document of the applicable factory modes as listed in the specification table. 4. Check next...
Resolution file
Page 4
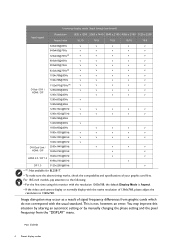
... above timing works, check the compatibility and specifications of 1366x768, please adjust the resolution to the following: • For the first time using this situation by altering an automatic setting or by manually changing the phase setting and the pixel frequency from graphic cards which do not correspond with the native resolution of your graphic card first. This is Aspect. • If the video card cannot display or normally display with...
... above timing works, check the compatibility and specifications of 1366x768, please adjust the resolution to the following: • For the first time using this situation by altering an automatic setting or by manually changing the phase setting and the pixel frequency from graphic cards which do not correspond with the native resolution of your graphic card first. This is Aspect. • If the video card cannot display or normally display with...

User Manual
Page 4
.... • An approved power cord greater or equal to service the power adapter. If you are no service parts inside a carrying case. • Connect the power adapter to a proper power source. • Do not attempt to H03VV-F or H05VV-F, 2G or 3G, 0.75mm2 must be used . • (If a remote control is damaged or exposed to operate the device or charge the battery. Replace the unit if...
.... • An approved power cord greater or equal to service the power adapter. If you are no service parts inside a carrying case. • Connect the power adapter to a proper power source. • Do not attempt to H03VV-F or H05VV-F, 2G or 3G, 0.75mm2 must be used . • (If a remote control is damaged or exposed to operate the device or charge the battery. Replace the unit if...

User Manual
Page 5
... monitor. • Turn off the monitor and the power before disconnecting the cables from the LCD monitor. • Always unplug the product from your monitor and monitor mounting kit on objects far way. • Frequent blinking and eye exercise help keep your place of the above mentioned misuse or other risks. Clean the LCD monitor surface with flat surface. • Ensure that the wall material and the standard wall mount...
... monitor. • Turn off the monitor and the power before disconnecting the cables from the LCD monitor. • Always unplug the product from your monitor and monitor mounting kit on objects far way. • Frequent blinking and eye exercise help keep your place of the above mentioned misuse or other risks. Clean the LCD monitor surface with flat surface. • Ensure that the wall material and the standard wall mount...
User Manual
Page 7
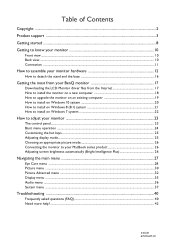
... Windows 8 (8.1) system 21 How to install on Windows 7 system 22 How to adjust your monitor 23 The control panel ...23 Basic menu operation ...24 Customizing the hot keys...25 Adjusting display mode...25 Choosing an appropriate picture mode 26 Connecting the monitor to your MacBook series product 26 Adjusting screen brightness automatically (Bright Intelligence Plus 26 Navigating the main menu ...27 Eye Care menu ...28 Picture menu ...30 Picture Advanced menu ...32 Display menu ...35 Audio menu ...36 System menu ...37 Troubleshooting...
... Windows 8 (8.1) system 21 How to install on Windows 7 system 22 How to adjust your monitor 23 The control panel ...23 Basic menu operation ...24 Customizing the hot keys...25 Adjusting display mode...25 Choosing an appropriate picture mode 26 Connecting the monitor to your MacBook series product 26 Adjusting screen brightness automatically (Bright Intelligence Plus 26 Navigating the main menu ...27 Eye Care menu ...28 Picture menu ...30 Picture Advanced menu ...32 Display menu ...35 Audio menu ...36 System menu ...37 Troubleshooting...

User Manual
Page 13
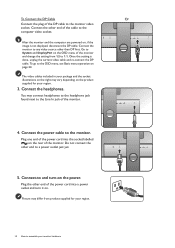
... Connect the HDMI Cable Connect the plug of the HDMI cable to edge monitor and should position the monitor and angle the screen to check that they click and lock into place. Your monitor is prohibited. 2. Either How to the HDMI port of the monitor as illustrated. Connect the other light sources. Excessive force on the display is an edge to the HDMI port on a flat even surface. 2 1 You should be handled with the monitor...
... Connect the HDMI Cable Connect the plug of the HDMI cable to edge monitor and should position the monitor and angle the screen to check that they click and lock into place. Your monitor is prohibited. 2. Either How to the HDMI port of the monitor as illustrated. Connect the other light sources. Excessive force on the display is an edge to the HDMI port on a flat even surface. 2 1 You should be handled with the monitor...
User Manual
Page 14
... to assemble your region. 3. You may vary depending on the OSD menu of the monitor and change the setting from product supplied for your monitor hardware Connect-to 1.1. Plug one end of the power cord into a power outlet and turn -on the rear of the monitor. Once the setting is not displayed, disconnect the DP cable. To go to the monitor. Do not connect the other end of the power cord into...
... to assemble your region. 3. You may vary depending on the OSD menu of the monitor and change the setting from product supplied for your monitor hardware Connect-to 1.1. Plug one end of the power cord into a power outlet and turn -on the rear of the monitor. Once the setting is not displayed, disconnect the DP cable. To go to the monitor. Do not connect the other end of the power cord into...
User Manual
Page 17
... instructions for details. Downloading the LCD Monitor driver files from www.BenQ.com > Support > Download & FAQ > model name > Software. 2. Remember the file location the files are upgrading an existing installation (which you connect and install your Windows computer, you need to follow to . On your computer, have your BenQ monitor 17 See Downloading the LCD Monitor driver files from installing software on your computer. • To check the name of the purchased model, refer to the specification...
... instructions for details. Downloading the LCD Monitor driver files from www.BenQ.com > Support > Download & FAQ > model name > Software. 2. Remember the file location the files are upgrading an existing installation (which you connect and install your Windows computer, you need to follow to . On your computer, have your BenQ monitor 17 See Downloading the LCD Monitor driver files from installing software on your computer. • To check the name of the purchased model, refer to the specification...
User Manual
Page 18
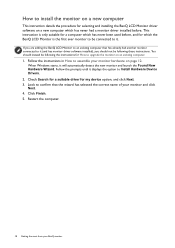
... should instead be connected to it displays the option to Install Hardware Device Drivers. 2. When Windows starts, it (and has monitor driver software installed), you are adding the BenQ LCD Monitor to an existing computer that the wizard has selected the correct name of your monitor and click Next. 4. Click Finish. 5. Follow the prompts until it . Follow the instructions in How to assemble your BenQ monitor Look to...
... should instead be connected to it displays the option to Install Hardware Device Drivers. 2. When Windows starts, it (and has monitor driver software installed), you are adding the BenQ LCD Monitor to an existing computer that the wizard has selected the correct name of your monitor and click Next. 4. Click Finish. 5. Follow the prompts until it . Follow the instructions in How to assemble your BenQ monitor Look to...
User Manual
Page 19
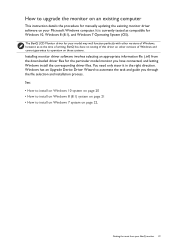
... testing of this driver on other versions of Windows, however, as compatible for Windows 10, Windows 8 (8.1), and Windows 7 Operating System (OS). How to upgrade the monitor on an existing computer This instruction details the procedure for manually updating the existing monitor driver software on those systems. Installing monitor driver software involves selecting an appropriate information file (.inf) from your BenQ monitor 19 See: • How to install on Windows 10 system on...
... testing of this driver on other versions of Windows, however, as compatible for Windows 10, Windows 8 (8.1), and Windows 7 Operating System (OS). How to upgrade the monitor on an existing computer This instruction details the procedure for manually updating the existing monitor driver software on those systems. Installing monitor driver software involves selecting an appropriate information file (.inf) from your BenQ monitor 19 See: • How to install on Windows 10 system on...
User Manual
Page 20
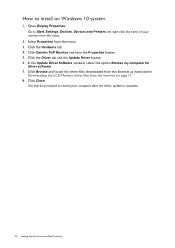
... Properties button. 5. Click Browse and locate the driver files downloaded from the Internet as instructed in Downloading the LCD Monitor driver files from your monitor from the menu. 3. Select Properties from the menu. 2. How to Start, Settings, Devices, Devices and Printers and right-click the name of your BenQ monitor In the Update Driver Software window, select the option Browse my computer for driver software. 7. Go to install on page 17. 8. Open Display Properties...
... Properties button. 5. Click Browse and locate the driver files downloaded from the Internet as instructed in Downloading the LCD Monitor driver files from your monitor from the menu. 3. Select Properties from the menu. 2. How to Start, Settings, Devices, Devices and Printers and right-click the name of your BenQ monitor In the Update Driver Software window, select the option Browse my computer for driver software. 7. Go to install on page 17. 8. Open Display Properties...
User Manual
Page 21
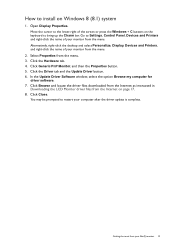
... as instructed in Downloading the LCD Monitor driver files from the menu. Alternatively, right-click the desktop and select Personalize, Display, Devices and Printers, and right-click the name of the screen or press the Windows + C buttons on the keyboard to Settings, Control Panel, Devices and Printers and right-click the name of your BenQ monitor 21 Click Close. You may be prompted to install on...
... as instructed in Downloading the LCD Monitor driver files from the menu. Alternatively, right-click the desktop and select Personalize, Display, Devices and Printers, and right-click the name of the screen or press the Windows + C buttons on the keyboard to Settings, Control Panel, Devices and Printers and right-click the name of your BenQ monitor 21 Click Close. You may be prompted to install on...
User Manual
Page 22
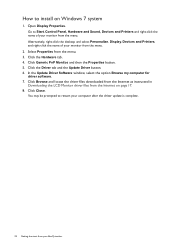
... the menu. In the Update Driver Software window, select the option Browse my computer for driver software. 7. Go to Start, Control Panel, Hardware and Sound, Devices and Printers and right-click the name of your monitor from your monitor from the menu. 3. How to install on page 17. 8. Click the Hardware tab. 4. Click Generic PnP Monitor, and then the Properties button. 5. Click the Driver tab and the Update Driver button. 6. Open Display Properties...
... the menu. In the Update Driver Software window, select the option Browse my computer for driver software. 7. Go to Start, Control Panel, Hardware and Sound, Devices and Printers and right-click the name of your monitor from your monitor from the menu. 3. How to install on page 17. 8. Click the Hardware tab. 4. Click Generic PnP Monitor, and then the Properties button. 5. Click the Driver tab and the Update Driver button. 6. Open Display Properties...

User Manual
Page 24
... particular functions. 3. Basic menu operation All OSD (On Screen Display) menus can use the OSD menu to adjust your monitor. 1 2 B.I.+ Picture Mode Input Menu Exit 4 3 B.I .+) hot key • By default, the key is displayed. OSD in hot key menu OSD icon in main menu Function Bright Intelligence Plus (B.I .+ Picture Mode Input Menu Exit 1. No. Press any of the controls are custom keys and are designated for details on your monitor Select (Menu) to make adjustments or selection. Some of...
... particular functions. 3. Basic menu operation All OSD (On Screen Display) menus can use the OSD menu to adjust your monitor. 1 2 B.I.+ Picture Mode Input Menu Exit 4 3 B.I .+) hot key • By default, the key is displayed. OSD in hot key menu OSD icon in main menu Function Bright Intelligence Plus (B.I .+ Picture Mode Input Menu Exit 1. No. Press any of the controls are custom keys and are designated for details on your monitor Select (Menu) to make adjustments or selection. Some of...

User Manual
Page 25
... the main menu. • Returns to change the default setting and designate different functions for 10 seconds. Select the custom key you can be accessed by this key. Press any key for these keys. 1. Adjusting display mode To display images of aspect ratio other than 16:9 and size other than the panel size of no key activity. • To unlock the OSD controls, press and...
... the main menu. • Returns to change the default setting and designate different functions for 10 seconds. Select the custom key you can be accessed by this key. Press any key for these keys. 1. Adjusting display mode To display images of aspect ratio other than 16:9 and size other than the panel size of no key activity. • To unlock the OSD controls, press and...

User Manual
Page 39
... Off power saving mode. • OFF • 10min. • 20min. • 30min. Resolution Notice Sets whether to the factory default values. • YES • NO Navigating the main menu 39 HDMI Auto Switch When this function is activated, HDMI ports will be sent via the software for data transmission. • 1.1 • 1.2 Reset All Resets all mode, color and geometry settings to display the resolution notice of the recommended resolution when a new input source is...
... Off power saving mode. • OFF • 10min. • 20min. • 30min. Resolution Notice Sets whether to the factory default values. • YES • NO Navigating the main menu 39 HDMI Auto Switch When this function is activated, HDMI ports will be sent via the software for data transmission. • 1.1 • 1.2 Reset All Resets all mode, color and geometry settings to display the resolution notice of the recommended resolution when a new input source is...
User Manual
Page 40
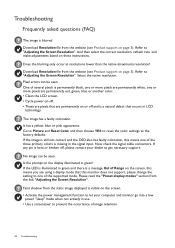
... screen. • Activate the power management function to let your dealer to the factory defaults. Pixel errors can be seen. Is the prompt on the display illuminated in the signal input. Please read the "Preset display modes" section from the static image displayed is blurred. Download Resolution file from the website (see Product support on the screen, this monitor does not support, please change the setting to "Adjusting the Screen Resolution". Go to Picture and Reset Color...
... screen. • Activate the power management function to let your dealer to the factory defaults. Pixel errors can be seen. Is the prompt on the display illuminated in the signal input. Please read the "Preset display modes" section from the static image displayed is blurred. Download Resolution file from the website (see Product support on the screen, this monitor does not support, please change the setting to "Adjusting the Screen Resolution". Go to Picture and Reset Color...

User Manual
Page 41
... cable to input audio signals is distorted, flashes or flickers. Download Resolution file from the website (see Product support on these instructions. The OSD controls are automatically muted.) No sound can use the Display Mode function to get necessary support. on page 14 for details. • Increase the volume (volume may be muted or too low). • Remove your dealer to set a proper aspect ratio for the input sources. Images from the connected external speakers. • Remove...
... cable to input audio signals is distorted, flashes or flickers. Download Resolution file from the website (see Product support on these instructions. The OSD controls are automatically muted.) No sound can use the Display Mode function to get necessary support. on page 14 for details. • Increase the volume (volume may be muted or too low). • Remove your dealer to set a proper aspect ratio for the input sources. Images from the connected external speakers. • Remove...


