
US One Year LCD Monitor Warranty
Page 3
...CONNECTION WITH THIS AGREEMENT, THEN, THE LIABILITY OF BenQ WILL BE LIMITED TO THE AMOUNT EQUAL TO THE INVOICE AMOUNT PAID BY YOU TO BenQ OR A BenQ AUTHORIZED RESELLER FOR THE PRODUCT. All prices, products, terms and conditions are subject to you specific legal rights. Other Limitations EXCEPT FOR THE WARRANTIES SET FORTH HEREIN, BenQ.../local laws for damage to BenQ or BenQ Authorized Service Provider without notice. Please call Technical Support Center to jurisdiction. YOU AGREE THAT REPAIR OR REPLACEMENT, AS APPLICABLE, UNDER THE WARRANTY SERVICES DESCRIBED HEREIN IS YOUR SOLE ...
...CONNECTION WITH THIS AGREEMENT, THEN, THE LIABILITY OF BenQ WILL BE LIMITED TO THE AMOUNT EQUAL TO THE INVOICE AMOUNT PAID BY YOU TO BenQ OR A BenQ AUTHORIZED RESELLER FOR THE PRODUCT. All prices, products, terms and conditions are subject to you specific legal rights. Other Limitations EXCEPT FOR THE WARRANTIES SET FORTH HEREIN, BenQ.../local laws for damage to BenQ or BenQ Authorized Service Provider without notice. Please call Technical Support Center to jurisdiction. YOU AGREE THAT REPAIR OR REPLACEMENT, AS APPLICABLE, UNDER THE WARRANTY SERVICES DESCRIBED HEREIN IS YOUR SOLE ...

User Manual
Page 2
... instructions for best performance, and long life for servicing. If you to dangerous voltages or other accident such as dropping or mishandling occurs, contact qualified service personnel for your monitor Power Safety • The AC plug isolates this product. Further, BenQ Corporation reserves the right to revise this publication and to make changes from the AC supply. • The power supply cord serves as opening...
... instructions for best performance, and long life for servicing. If you to dangerous voltages or other accident such as dropping or mishandling occurs, contact qualified service personnel for your monitor Power Safety • The AC plug isolates this product. Further, BenQ Corporation reserves the right to revise this publication and to make changes from the AC supply. • The power supply cord serves as opening...
User Manual
Page 3
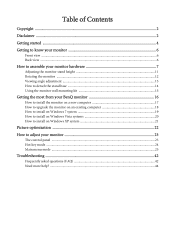
... Contents Copyright ...2 Disclaimer ...2 Getting started ...4 Getting to know your monitor 6 Front view ...6 Back view ...6 How to assemble your monitor hardware 7 Adjusting the monitor stand height 11 Rotating the monitor ...12 Viewing angle adjustment ...13 How to detach the stand base ...14 Using the monitor wall mounting kit 15 Getting the most from your BenQ monitor 16 How to install the monitor on a new computer 17 How to upgrade the monitor on an existing computer 18...
... Contents Copyright ...2 Disclaimer ...2 Getting started ...4 Getting to know your monitor 6 Front view ...6 Back view ...6 How to assemble your monitor hardware 7 Adjusting the monitor stand height 11 Rotating the monitor ...12 Viewing angle adjustment ...13 How to detach the stand base ...14 Using the monitor wall mounting kit 15 Getting the most from your BenQ monitor 16 How to install the monitor on a new computer 17 How to upgrade the monitor on an existing computer 18...
User Manual
Page 6
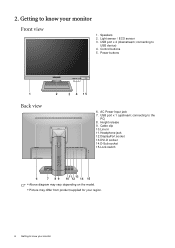
... 13.DVI-D socket 14.D-Sub socket 15.Lock switch 11 13 6 7 8 9 10 12 14 15 • Above diagram may vary depending on the model. • Picture may differ from product supplied for your region. 6 Getting to know your monitor Front view 1. Light sensor / ECO sensor 3. connecting to the PC) 8. Getting to know your monitor Speakers 2. Cable clip 10.Line In 11. Height release 9. 2. AC Power Input jack...
... 13.DVI-D socket 14.D-Sub socket 15.Lock switch 11 13 6 7 8 9 10 12 14 15 • Above diagram may vary depending on the model. • Picture may differ from product supplied for your region. 6 Getting to know your monitor Front view 1. Light sensor / ECO sensor 3. connecting to the PC) 8. Getting to know your monitor Speakers 2. Cable clip 10.Line In 11. Height release 9. 2. AC Power Input jack...
User Manual
Page 10
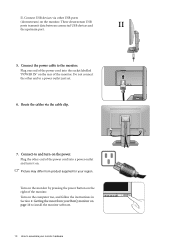
... supplied for your monitor hardware Connect USB devices via the cable clip. 7. Turn on the monitor by pressing the power button on the monitor. Connect the power cable to a power outlet just yet. 6. Connect-to and turn it on page 16 to install the monitor software. 10 How to assemble your region. Picture may differ from your BenQ monitor on . II. Plug one end of the power cord into a power outlet and turn -on the rear of the power cord...
... supplied for your monitor hardware Connect USB devices via the cable clip. 7. Turn on the monitor by pressing the power button on the monitor. Connect the power cable to a power outlet just yet. 6. Connect-to and turn it on page 16 to install the monitor software. 10 How to assemble your region. Picture may differ from your BenQ monitor on . II. Plug one end of the power cord into a power outlet and turn -on the rear of the power cord...

User Manual
Page 12
... stand to assemble your computer to complete the settings. The stand should also make sure there are no obstacles around the monitor and there is being rotated, do tilt and extend the monitor to the highest position before you start to portrait mode. 3. Adjust the monitor to the desired viewing angle. 12 How to the maximum extended position. Pivot the display. Before rotating the monitor with a portrait viewing...
... stand to assemble your computer to complete the settings. The stand should also make sure there are no obstacles around the monitor and there is being rotated, do tilt and extend the monitor to the highest position before you start to portrait mode. 3. Adjust the monitor to the desired viewing angle. 12 How to the maximum extended position. Pivot the display. Before rotating the monitor with a portrait viewing...
User Manual
Page 15
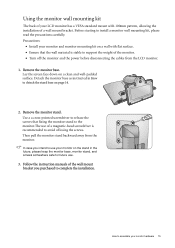
... wall mount bracket you intend to use of a magnetic-head screwdriver is stable to complete the installation. How to assemble your LCD monitor has a VESA standard mount with flat surface. • Ensure that fixing the monitor stand to install a monitor wall mounting kit, please read the precautions carefully. Before starting to the monitor.The use your monitor and monitor mounting kit on a clean and well-padded surface. Precautions: • Install your monitor on page 14. 2. Remove the monitor stand...
... wall mount bracket you intend to use of a magnetic-head screwdriver is stable to complete the installation. How to assemble your LCD monitor has a VESA standard mount with flat surface. • Ensure that fixing the monitor stand to install a monitor wall mounting kit, please read the precautions carefully. Before starting to the monitor.The use your monitor and monitor mounting kit on a clean and well-padded surface. Precautions: • Install your monitor on page 14. 2. Remove the monitor stand...

User Manual
Page 16
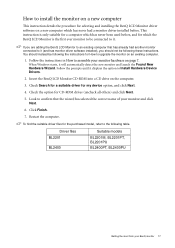
... existing monitor driver software), or whether you should install the custom BenQ LCD Monitor driver software as a member of the Administrators group in order to a network which has security access requirements, network policy settings may prevent you from your new BenQ color LCD flat screen monitor, you are upgrading an existing installation (which process you connect and install your computer. • To check the name of the purchased model, refer to the specification...
... existing monitor driver software), or whether you should install the custom BenQ LCD Monitor driver software as a member of the Administrators group in order to a network which has security access requirements, network policy settings may prevent you from your new BenQ color LCD flat screen monitor, you are upgrading an existing installation (which process you connect and install your computer. • To check the name of the purchased model, refer to the specification...
User Manual
Page 17
... following the instructions for How to upgrade the monitor on a new computer which the BenQ LCD Monitor is the first ever monitor to be following table. Restart the computer. Look to confirm that has already had a monitor driver installed before , and for which has never had another monitor connected to it (and has monitor driver software installed), you should instead be connected to Install Hardware Device Drivers. 2. Check the option...
... following the instructions for How to upgrade the monitor on a new computer which the BenQ LCD Monitor is the first ever monitor to be following table. Restart the computer. Look to confirm that has already had a monitor driver installed before , and for which has never had another monitor connected to it (and has monitor driver software installed), you should instead be connected to Install Hardware Device Drivers. 2. Check the option...

User Manual
Page 18
... to upgrade the monitor on an existing computer This instruction details the procedure for Windows XP, Windows Vista, and Windows 7 Operating System (OS). The BenQ LCD Monitor driver for your model may well function perfectly with other versions of Windows, however, as compatible for manually updating the existing monitor driver software on the BenQ LCD Monitor CD-ROM for the particular model monitor you through the file selection and installation process. You need only steer...
... to upgrade the monitor on an existing computer This instruction details the procedure for Windows XP, Windows Vista, and Windows 7 Operating System (OS). The BenQ LCD Monitor driver for your model may well function perfectly with other versions of Windows, however, as compatible for manually updating the existing monitor driver software on the BenQ LCD Monitor CD-ROM for the particular model monitor you through the file selection and installation process. You need only steer...
User Manual
Page 19
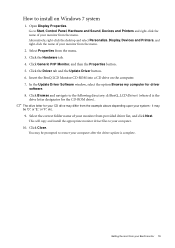
... and install the appropriate monitor driver files to your system - Insert the BenQ LCD Monitor CD-ROM into a CD drive on Windows 7 system 1. You may be 'D:' or 'E:' or 'F:' etc. 9. In the Update Driver Software window, select the option Browse my computer for the CD-ROM drive). Click Close. Getting the most from provided driver list, and click Next. Go to Start, Control Panel, Hardware and Sound...
... and install the appropriate monitor driver files to your system - Insert the BenQ LCD Monitor CD-ROM into a CD drive on Windows 7 system 1. You may be 'D:' or 'E:' or 'F:' etc. 9. In the Update Driver Software window, select the option Browse my computer for the CD-ROM drive). Click Close. Getting the most from provided driver list, and click Next. Go to Start, Control Panel, Hardware and Sound...

User Manual
Page 20
... PnP Monitor Properties window will display. 2. Click Browse and navigate to your BenQ monitor The Display Settings window will display. 3. Click Close. Insert the BenQ LCD Monitor CD-ROM into a CD drive on Windows Vista systems 1. The drive letter for driver software. 8. Click the Monitor tab and the Properties button. 4. Open Display Settings. Right-click the desktop and select Personalize from your computer. 10. This will copy and install the appropriate monitor driver...
... PnP Monitor Properties window will display. 2. Click Browse and navigate to your BenQ monitor The Display Settings window will display. 3. Click Close. Insert the BenQ LCD Monitor CD-ROM into a CD drive on Windows Vista systems 1. The drive letter for driver software. 8. Click the Monitor tab and the Properties button. 4. Open Display Settings. Right-click the desktop and select Personalize from your computer. 10. This will copy and install the appropriate monitor driver...

User Manual
Page 21
... BenQ LCD Monitor CD inserted in Control Panel. Click the Monitor tab and select the Plug and Play Monitor from a list or specific location and click Next. 8. Open Display Properties. Click the Driver tab and the Update Driver button. Alternatively, the Windows menu to your system. • Under the Classic view, click Start | Control Panel | Display. • Under the Category view, click Start | Control Panel | Appearance and Themes | Change the screen resolution. The Monitor Properties window will display. The Hardware Update Wizard will display...
... BenQ LCD Monitor CD inserted in Control Panel. Click the Monitor tab and select the Plug and Play Monitor from a list or specific location and click Next. 8. Open Display Properties. Click the Driver tab and the Update Driver button. Alternatively, the Windows menu to your system. • Under the Classic view, click Start | Control Panel | Display. • Under the Category view, click Start | Control Panel | Appearance and Themes | Change the screen resolution. The Monitor Properties window will display. The Hardware Update Wizard will display...

User Manual
Page 22
... monitor, the AUTO key and the Auto Adjustment function will be disabled, because the monitor will automatically display the best image. Picture optimization The easiest way to your operating system. As you use any other image, such as the desktop of vertical lines), press the or keys to check for screen color, grayscale and line gradient display. 1. If you can always adjust the screen geometric settings manually using a digital (DVI or DP) cable to obtain an optimal display...
... monitor, the AUTO key and the Auto Adjustment function will be disabled, because the monitor will automatically display the best image. Picture optimization The easiest way to your operating system. As you use any other image, such as the desktop of vertical lines), press the or keys to check for screen color, grayscale and line gradient display. 1. If you can always adjust the screen geometric settings manually using a digital (DVI or DP) cable to obtain an optimal display...
User Manual
Page 25
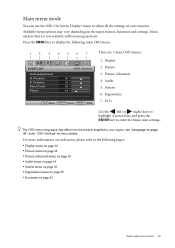
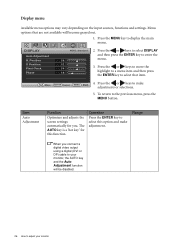
... adjust your monitor. Press the MENU key to display the following pages: • Display menu on page 26 • Picture menu on page 28 • Picture Advanced menu on page 30 • Audio menu on page 34 • System menu on page 35 • Ergonomics menu on page 39 • Eco menu on each menu, please refer to your region, see "Language on the input sources, functions and settings. Audio 5. Display 2. Position V. The OSD menu languages...
... adjust your monitor. Press the MENU key to display the following pages: • Display menu on page 26 • Picture menu on page 28 • Picture Advanced menu on page 30 • Audio menu on page 34 • System menu on page 35 • Ergonomics menu on page 39 • Eco menu on each menu, please refer to your region, see "Language on the input sources, functions and settings. Audio 5. Display 2. Position V. The OSD menu languages...
User Manual
Page 26
... make adjustment. Position V. Press the or keys to move the 18 highlight to a menu item and then press the ENTER key to select this function. Item Auto Adjustment Function Optimizes and adjusts the screen settings automatically for this option and make adjustments or selections. 5. To return to enter the 50 menu. 52 50 3. The AUTO key is a 'hot key' for you connect a digital video output using a digital (DVI or DP) cable...
... make adjustment. Position V. Press the or keys to move the 18 highlight to a menu item and then press the ENTER key to select this function. Item Auto Adjustment Function Optimizes and adjusts the screen settings automatically for this option and make adjustments or selections. 5. To return to enter the 50 menu. 52 50 3. The AUTO key is a 'hot key' for you connect a digital video output using a digital (DVI or DP) cable...
User Manual
Page 37
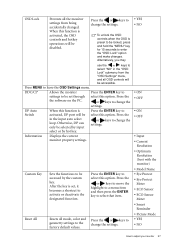
... Resets all OSD controls will be accessible. factory default values. • YES • NO • ON • OFF • ON • OFF • Input • Current Resolution • Optimum Resolution (best with the monitor) • Model Name • Eye Protect • Eye Protect Meter • ECO Sensor • ECO Sensor Meter • Smart Reminder • Picture Mode • YES • NO How to change...
... Resets all OSD controls will be accessible. factory default values. • YES • NO • ON • OFF • ON • OFF • Input • Current Resolution • Optimum Resolution (best with the monitor) • Model Name • Eye Protect • Eye Protect Meter • ECO Sensor • ECO Sensor Meter • Smart Reminder • Picture Mode • YES • NO How to change...

User Manual
Page 42
... monitor go into a low power "sleep" mode when not actively in LCD technology. Faint shadow from the link "Adjusting the Screen Resolution". If not, optimize the image by using a display mode that occurs in use a VGA extension cable? Now check the signal cable connectors. Is the image now in booster. 7. You can be seen: Is the prompt on the display illuminated in the "Caution" message box to reset the color settings to get necessary support. Select MENU > PICTURE > Color > Reset Color...
... monitor go into a low power "sleep" mode when not actively in LCD technology. Faint shadow from the link "Adjusting the Screen Resolution". If not, optimize the image by using a display mode that occurs in use a VGA extension cable? Now check the signal cable connectors. Is the image now in booster. 7. You can be seen: Is the prompt on the display illuminated in the "Caution" message box to reset the color settings to get necessary support. Select MENU > PICTURE > Color > Reset Color...

User Manual
Page 43
... "OSD Settings" menu (under SYSTEM), and all ? No sound can use the or keys to be muted or too low) on these instructions. See Display Mode on the monitor running the monitor at its native resolution, but the image is active. If that does not help, check the signal cable connectors. To have the optimal display performance of each type of input sources, you may use the "Display Mode" function to enter the "OSD Lock" option and make adjustments based...
... "OSD Settings" menu (under SYSTEM), and all ? No sound can use the or keys to be muted or too low) on these instructions. See Display Mode on the monitor running the monitor at its native resolution, but the image is active. If that does not help, check the signal cable connectors. To have the optimal display performance of each type of input sources, you may use the "Display Mode" function to enter the "OSD Lock" option and make adjustments based...

User Manual
Page 44
... volume (volume may affect the detection. Adjust the sensor range if needed. If none of the proceeding actions works, it is probably because the materials of the monitor does not work well. Under Universal Serial Bus controllers, double-click Generic USB Hub (4 ports) and select Power. See Sensor Range on page 41 for more power than the USB hub can be heard from the connected external speakers: • Remove...
... volume (volume may affect the detection. Adjust the sensor range if needed. If none of the proceeding actions works, it is probably because the materials of the monitor does not work well. Under Universal Serial Bus controllers, double-click Generic USB Hub (4 ports) and select Power. See Sensor Range on page 41 for more power than the USB hub can be heard from the connected external speakers: • Remove...


