
User Manual
Page 2
... BenQ Corporation to dangerous voltages or other accident such as dropping or mishandling occurs, contact qualified service personnel for your monitor from the AC supply. • The power supply cord serves as opening or removing covers may be blocked or covered. Clean the LCD monitor surface with respect to service this equipment from the wall outlet before cleaning. Servicing • Do not attempt to the contents hereof and specifically...
... BenQ Corporation to dangerous voltages or other accident such as dropping or mishandling occurs, contact qualified service personnel for your monitor from the AC supply. • The power supply cord serves as opening or removing covers may be blocked or covered. Clean the LCD monitor surface with respect to service this equipment from the wall outlet before cleaning. Servicing • Do not attempt to the contents hereof and specifically...
User Manual
Page 3
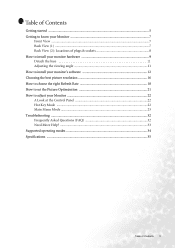
... to install your monitor hardware 9 Detach the base 11 Adjusting the viewing angle 11 How to install your monitor's software 12 Choosing the best picture resolution 16 How to choose the right Refresh Rate 18 How to set the Picture Optimization 21 How to adjust your Monitor 22 A Look at the Control Panel 22 Hot Key Mode ...22 Main Menu Mode ...23 Troubleshooting ...32 Frequently Asked Questions (FAQ 32 Need More Help? ...33 Supported operating modes 34 Specifications ...35...
... to install your monitor hardware 9 Detach the base 11 Adjusting the viewing angle 11 How to install your monitor's software 12 Choosing the best picture resolution 16 How to choose the right Refresh Rate 18 How to set the Picture Optimization 21 How to adjust your Monitor 22 A Look at the Control Panel 22 Hot Key Mode ...22 Main Menu Mode ...23 Troubleshooting ...32 Frequently Asked Questions (FAQ 32 Need More Help? ...33 Supported operating modes 34 Specifications ...35...
User Manual
Page 9
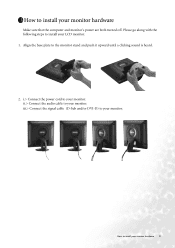
Align the base plate to your monitor. i.> Connect the power cord to the monitor stand and push it upward until a clicking sound is heard. 2. ii.> Connect the audio cable to install your monitor hardware Make sure that the computer and monitor's power are both turned off. 3 How to your monitor. How to install your LCD monitor. 1. Please go along with the following steps to install your monitor. iii.> Connect the signal cable (D-Sub and/or DVI-D) to your monitor hardware 9
Align the base plate to your monitor. i.> Connect the power cord to the monitor stand and push it upward until a clicking sound is heard. 2. ii.> Connect the audio cable to install your monitor hardware Make sure that the computer and monitor's power are both turned off. 3 How to your monitor. How to install your LCD monitor. 1. Please go along with the following steps to install your monitor. iii.> Connect the signal cable (D-Sub and/or DVI-D) to your monitor hardware 9
User Manual
Page 10
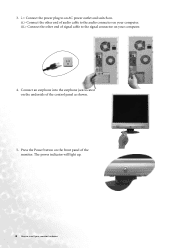
Connect an earphone into the earphone jack located on the front panel of the control panel as shown. 5. Press the Power button on the underside of the monitor. iii.> Connect the other end of signal cable to an AC power outlet and switch on your computer. 4. i.> Connect the power plug to the signal connector on . The power indicator will light up. 10 How to the audio connector on your monitor hardware ii.> Connect the other end of audio cable to install your computer. 3.
Connect an earphone into the earphone jack located on the front panel of the control panel as shown. 5. Press the Power button on the underside of the monitor. iii.> Connect the other end of signal cable to an AC power outlet and switch on your computer. 4. i.> Connect the power plug to the signal connector on . The power indicator will light up. 10 How to the audio connector on your monitor hardware ii.> Connect the other end of audio cable to install your computer. 3.
User Manual
Page 11
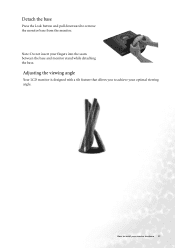
How to install your optimal viewing angle. Adjusting the viewing angle Your LCD monitor is designed with a tilt feature that allows you to remove the monitor base from the monitor. Detach the base Press the Lock button and pull downward to achieve your monitor hardware 11 Note: Do not insert your fingers into the seam between the base and monitor stand while detaching the base.
How to install your optimal viewing angle. Adjusting the viewing angle Your LCD monitor is designed with a tilt feature that allows you to remove the monitor base from the monitor. Detach the base Press the Lock button and pull downward to achieve your monitor hardware 11 Note: Do not insert your fingers into the seam between the base and monitor stand while detaching the base.
User Manual
Page 12
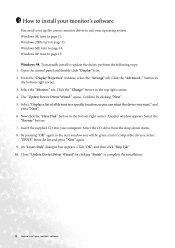
Windows 2000, turn to page 13. To manually install or update the driver, perform the following steps: 1. From the "Display Properties" window, select the "Settings" tab. Insert the supplied CD into your computer. An "Insert Disk" dialogue box appears. Windows 98, turn to page 12. Windows XP turn to install your monitor's software The "Update Device Driver Wizard" opens. Now click the "Have Disk" button in the bottom right corner. 3. Select the...
Windows 2000, turn to page 13. To manually install or update the driver, perform the following steps: 1. From the "Display Properties" window, select the "Settings" tab. Insert the supplied CD into your computer. An "Insert Disk" dialogue box appears. Windows 98, turn to page 12. Windows XP turn to install your monitor's software The "Update Device Driver Wizard" opens. Now click the "Have Disk" button in the bottom right corner. 3. Select the...

User Manual
Page 13
... . Insert "BenQ LCD Monitor" CD-ROM into your CD ROM Driver, then click "Next" . 11. Select "Driver" tab then click "Update Driver". 7. Select your LCD Model (FP71E) from the list in the bottom right corner. 5. How to install your computer. The first time you start Windows with a new monitor, the system will pop up . Open the Control Panel and double click on your monitor's software 13 Select "Monitor" then...
... . Insert "BenQ LCD Monitor" CD-ROM into your CD ROM Driver, then click "Next" . 11. Select "Driver" tab then click "Update Driver". 7. Select your LCD Model (FP71E) from the list in the bottom right corner. 5. How to install your computer. The first time you start Windows with a new monitor, the system will pop up . Open the Control Panel and double click on your monitor's software 13 Select "Monitor" then...

User Manual
Page 14
... "Start", "Settings", "Control Panel" and then double-click "Display". 2. In the Display Properties window, click the "Settings" tab and click "Advanced...". 3. Choose "Display a list of all the drivers in a specific location, so you can select the driver you want .". 8. Choose "Display a list of the driver (Advanced)" and then click "Next". 5. Insert "BenQ LCD Monitor's CD" into your CD-ROM and type d:\ (change the driver letter to match your monitor's software Click...
... "Start", "Settings", "Control Panel" and then double-click "Display". 2. In the Display Properties window, click the "Settings" tab and click "Advanced...". 3. Choose "Display a list of all the drivers in a specific location, so you can select the driver you want .". 8. Choose "Display a list of the driver (Advanced)" and then click "Next". 5. Insert "BenQ LCD Monitor's CD" into your CD-ROM and type d:\ (change the driver letter to match your monitor's software Click...

User Manual
Page 15
..." to install" and then click "Next". 5. Select "Settings" tab and click the "Advanced" button. A small window will pop up . The new drivers are now installed to install your computer. Select "Don't search. Click "Browse". How to your monitor's software 15 The "Hardware Update Wizard" will pop up . In the next window, click "Have Disk...", an "Install From Disk" window will pop up . Windows XP...
..." to install" and then click "Next". 5. Select "Settings" tab and click the "Advanced" button. A small window will pop up . The new drivers are now installed to install your computer. Select "Don't search. Click "Browse". How to your monitor's software 15 The "Hardware Update Wizard" will pop up . In the next window, click "Have Disk...", an "Install From Disk" window will pop up . Windows XP...

User Manual
Page 16
... "Native Resolution" or maximal resolution - So if you want to the nature of LCD display technology, the picture resolution is , the clearest picture. Double-click the "Display" icon in the Control Panel. 2. If you are displayed on the right-hand side. 16 Choosing the best picture resolution that is always fixed. 5 Choosing the best picture resolution Due to have all the advantages of LCD technology you can alter the resolution by using Windows...
... "Native Resolution" or maximal resolution - So if you want to the nature of LCD display technology, the picture resolution is , the clearest picture. Double-click the "Display" icon in the Control Panel. 2. If you are displayed on the right-hand side. 16 Choosing the best picture resolution that is always fixed. 5 Choosing the best picture resolution Due to have all the advantages of LCD technology you can alter the resolution by using Windows...
User Manual
Page 18
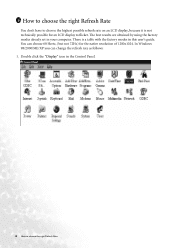
... this user's guide. There is not technically possible for the native resolution of 1280x1024. In Windows 98/2000/ME/XP you can choose 60 Hertz, (but not 72Hz) for an LCD display to choose the right Refresh Rate You can change the refresh rate as follows: 1. Double click the "Display" icon in your computer. The best results are obtained by using the factory modes already set in the Control Panel...
... this user's guide. There is not technically possible for the native resolution of 1280x1024. In Windows 98/2000/ME/XP you can choose 60 Hertz, (but not 72Hz) for an LCD display to choose the right Refresh Rate You can change the refresh rate as follows: 1. Double click the "Display" icon in your computer. The best results are obtained by using the factory modes already set in the Control Panel...
User Manual
Page 19
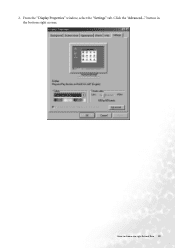
2. Click the "Advanced..." button in the bottom right corner. How to choose the right Refresh Rate 19 From the "Display Properties" window, select the "Settings" tab.
2. Click the "Advanced..." button in the bottom right corner. How to choose the right Refresh Rate 19 From the "Display Properties" window, select the "Settings" tab.
User Manual
Page 21
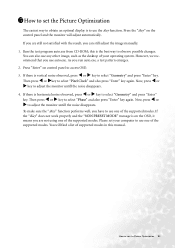
... can also use any other image, such as the desktop of your computer to use auto.exe. If there is the best way to observe possible changes. 7 How to set the Picture Optimization The easiest way to obtain an optimal display is to use one of the supported modes. However, we recommend that you are not using one of the supported modes. If there is vertical noise observed...
... can also use any other image, such as the desktop of your computer to use auto.exe. If there is the best way to observe possible changes. 7 How to set the Picture Optimization The easiest way to obtain an optimal display is to use one of the supported modes. However, we recommend that you are not using one of the supported modes. If there is vertical noise observed...
User Manual
Page 22
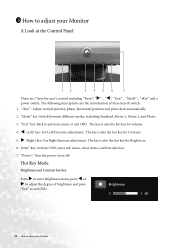
... Left/Decrease adjustment. "Exit" key: Back to adjust your Monitor A Look at the Control Panel 1 2 3 4 5 6 7 There are the introduction of brightness and press "Exit" to exit OSD. 22 How to previous menu or exit OSD. The key is also the hot key for user's control including "Enter", "X" , "W", "Exit" , "Mode" , "iKey" and a power switch. "Power": Turn the power on or off. 8 How to adjust your Monitor "iKey" : Adjust vertical position, phase, horizontal position and pixel clock...
... Left/Decrease adjustment. "Exit" key: Back to adjust your Monitor A Look at the Control Panel 1 2 3 4 5 6 7 There are the introduction of brightness and press "Exit" to exit OSD. 22 How to previous menu or exit OSD. The key is also the hot key for user's control including "Enter", "X" , "W", "Exit" , "Mode" , "iKey" and a power switch. "Power": Turn the power on or off. 8 How to adjust your Monitor "iKey" : Adjust vertical position, phase, horizontal position and pixel clock...
User Manual
Page 23
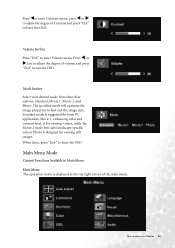
...: Standard, Movie 1, Movie 2, and Photo. Press W or X key to adjust the degree of Contrast and press "Exit" to leave the OSD. Standard mode is for basic PC application; The specified mode will optimize the image properties to enter Volume menu. When done, press "Exit" to leave the OSD. Movie 1, enhancing color and contrast level, is suggested for viewing videos, while the Movie 2 mode best suits landscape-specific videos;
...: Standard, Movie 1, Movie 2, and Photo. Press W or X key to adjust the degree of Contrast and press "Exit" to leave the OSD. Standard mode is for basic PC application; The specified mode will optimize the image properties to enter Volume menu. When done, press "Exit" to leave the OSD. Movie 1, enhancing color and contrast level, is suggested for viewing videos, while the Movie 2 mode best suits landscape-specific videos;
User Manual
Page 29
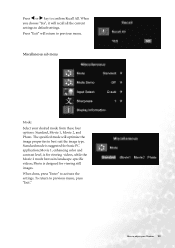
..., press "Enter" to previous menu. Movie 1, enhancing color and contrast level, is suggested for basic PC application; Standard mode is for viewing still images. Photo is designed for viewing videos, while the Movie 2 mode best suits landscape-specific videos; The specified mode will recall all the current settings to default settings. To return to best suit the image type. Miscellaneous sub menu Mode: Select your Monitor 29 How to confirm Recall...
..., press "Enter" to previous menu. Movie 1, enhancing color and contrast level, is suggested for basic PC application; Standard mode is for viewing still images. Photo is designed for viewing videos, while the Movie 2 mode best suits landscape-specific videos; The specified mode will recall all the current settings to default settings. To return to best suit the image type. Miscellaneous sub menu Mode: Select your Monitor 29 How to confirm Recall...
User Manual
Page 32
... more pixels are permanently red, green, blue or another color. • Clean the LCD screen. • Cycle power on the computer keyboard or move to the "Recall" icon and press "Enter" key to choose the right Refresh Rate section. Is the prompt on the display not illuminated at resolutions lower than the native (maximum) resolution? Now check the signal cable connectors. If not, optimize the image by using a display mode that does not help, check the signal cable connectors...
... more pixels are permanently red, green, blue or another color. • Clean the LCD screen. • Cycle power on the computer keyboard or move to the "Recall" icon and press "Enter" key to choose the right Refresh Rate section. Is the prompt on the display not illuminated at resolutions lower than the native (maximum) resolution? Now check the signal cable connectors. If not, optimize the image by using a display mode that does not help, check the signal cable connectors...

User Manual
Page 33
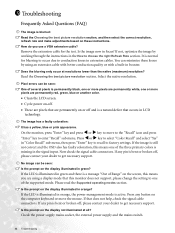
The image is distorted, flashes or flickers: Read the Choosing the best picture resolution section and then select the correct resolution, refresh rate and make adjustments based on these instructions. The image is displaced in one direction: Read the Choosing the best picture resolution section and then select the correct resolution, refresh rate and make adjustments based on these instructions. If your problems remain after checking this manual, please contact your place of purchase or e-mail us at: Support@BenQ.com Troubleshooting 33 Need More Help?
The image is distorted, flashes or flickers: Read the Choosing the best picture resolution section and then select the correct resolution, refresh rate and make adjustments based on these instructions. The image is displaced in one direction: Read the Choosing the best picture resolution section and then select the correct resolution, refresh rate and make adjustments based on these instructions. If your problems remain after checking this manual, please contact your place of purchase or e-mail us at: Support@BenQ.com Troubleshooting 33 Need More Help?
User Manual
Page 34
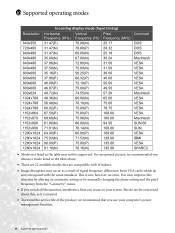
... not be concerned about this situation by altering an automatic setting or by manually changing the phase setting and the pixel frequency from VGA cards which do not be supported. This is normal. • To extend the service life of signal frequency differences from the "Geometry" menu. • If you switch off the monitor, interference lines can occur on your computer's power management function. 34 Supported operating modes
... not be concerned about this situation by altering an automatic setting or by manually changing the phase setting and the pixel frequency from VGA cards which do not be supported. This is normal. • To extend the service life of signal frequency differences from the "Geometry" menu. • If you switch off the monitor, interference lines can occur on your computer's power management function. 34 Supported operating modes
User Manual
Page 36
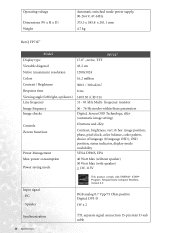
... frequency monitor Image frequency Image checks 56 - 76 Hz modes within these parameters Digital, Screen OSD Technology, iKey (automatic image setting) Controls iScreen functions Power Management 6 buttons and iKey. Contrast, brightness, vert. & hor. power consumption Power saving mode 40 Watt Max (without speaker) 50 Watt Max (with speaker) < 1W, 115V Input signal PC Speaker Synchronization 36 Specifications RGB analog 0.7 Vpp/75 Ohm positive Digital: DVI-D 1W x 2 TTL separate signal connection 15-pin mini D-sub cable image position, phase, pixel clock, color balance, color palette...
... frequency monitor Image frequency Image checks 56 - 76 Hz modes within these parameters Digital, Screen OSD Technology, iKey (automatic image setting) Controls iScreen functions Power Management 6 buttons and iKey. Contrast, brightness, vert. & hor. power consumption Power saving mode 40 Watt Max (without speaker) 50 Watt Max (with speaker) < 1W, 115V Input signal PC Speaker Synchronization 36 Specifications RGB analog 0.7 Vpp/75 Ohm positive Digital: DVI-D 1W x 2 TTL separate signal connection 15-pin mini D-sub cable image position, phase, pixel clock, color balance, color palette...


