
User Manual
Page 3
... 1 System Requirements 1 Package Contents 1 Overview 2 Features 2 Applications and Advantages 2 Product Specifications 3 Knowing your Wireless Ethernet Bridge 4 Connecting the Hardware 5 Connecting the Bridge Using the Setup Wizard 6 Setting Up your Computer to Use Web-Based Setup Interface 13 Connecting the Bridge Using Web-Based Setup Interface 14 Status 14 Bridge Settings 16 Site Survey 19 Restart the Wireless Bridge 19 Restore Factory Default 20 Save Current Settings 20 Restore Previous Settings 20 Firmware Update 21 Password 22 Troubleshooting 23 Information 26
... 1 System Requirements 1 Package Contents 1 Overview 2 Features 2 Applications and Advantages 2 Product Specifications 3 Knowing your Wireless Ethernet Bridge 4 Connecting the Hardware 5 Connecting the Bridge Using the Setup Wizard 6 Setting Up your Computer to Use Web-Based Setup Interface 13 Connecting the Bridge Using Web-Based Setup Interface 14 Status 14 Bridge Settings 16 Site Survey 19 Restart the Wireless Bridge 19 Restore Factory Default 20 Save Current Settings 20 Restore Previous Settings 20 Firmware Update 21 Password 22 Troubleshooting 23 Information 26
User Manual
Page 4
... that you networking wirelessly in minutes. Now you can take advantage of your Wireless Ethernet Bridge. System Requirements • Computing device, such as a computer (PC and Mac®), or any device with an available Ethernet port • (Installation Wizard) Windows® 98SE, Me, 2000, XP Package Contents • Belkin 802.11g Wireless Ethernet Bridge • Ethernet cable • Installation Software CD • User Manual • Quick Installation Guide • Registration Card 1 INTRODUCTION Thank you need around the home or...
... that you networking wirelessly in minutes. Now you can take advantage of your Wireless Ethernet Bridge. System Requirements • Computing device, such as a computer (PC and Mac®), or any device with an available Ethernet port • (Installation Wizard) Windows® 98SE, Me, 2000, XP Package Contents • Belkin 802.11g Wireless Ethernet Bridge • Ethernet cable • Installation Software CD • User Manual • Quick Installation Guide • Registration Card 1 INTRODUCTION Thank you need around the home or...
User Manual
Page 5
...-use Wireless Ethernet Bridge Wizard • Wireless interface compliance with the IEEE 802.11g standard products • Ethernet interface, for both Infrastructure and Ad-Hoc (peer-to-peer) networking modes • Data rate of up to 54Mbps • Supports 11, 5.5, 2, or 1Mbps rates (802.11b) • Supports 54, 48, 36, 24, 18, 12, 9, or 6Mbps rates (54g) • Easy installation and use • External antenna • LED power, network link, and wireless...
...-use Wireless Ethernet Bridge Wizard • Wireless interface compliance with the IEEE 802.11g standard products • Ethernet interface, for both Infrastructure and Ad-Hoc (peer-to-peer) networking modes • Data rate of up to 54Mbps • Supports 11, 5.5, 2, or 1Mbps rates (802.11b) • Supports 54, 48, 36, 24, 18, 12, 9, or 6Mbps rates (54g) • Easy installation and use • External antenna • LED power, network link, and wireless...
User Manual
Page 6
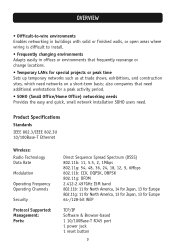
also companies that frequently rearrange or change locations. • Temporary LANs for special projects or peak time Sets up temporary networks such as at trade shows, exhibitions, and construction sites, which need . Product Specifications Standards IEEE 802.3/IEEE 802.3U 10/100Base-T Ethernet Wireless: Radio Technology Data Rate Modulation Operating Frequency Operating Channels Security Protocol Supported: Management: Ports: Direct Sequence Spread Spectrum (DSSS) 802.11b: 11...
also companies that frequently rearrange or change locations. • Temporary LANs for special projects or peak time Sets up temporary networks such as at trade shows, exhibitions, and construction sites, which need . Product Specifications Standards IEEE 802.3/IEEE 802.3U 10/100Base-T Ethernet Wireless: Radio Technology Data Rate Modulation Operating Frequency Operating Channels Security Protocol Supported: Management: Ports: Direct Sequence Spread Spectrum (DSSS) 802.11b: 11...
User Manual
Page 7
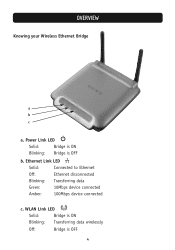
WLAN Link LED Solid: Bridge is ON Blinking: Transferring data wirelessly Off: Bridge is OFF b. OVERVIEW Knowing your Wireless Ethernet Bridge a b c a. Power Link LED Solid: Bridge is ON Blinking: Bridge is OFF 4 Ethernet Link LED Solid: Connected to Ethernet Off: Ethernet disconnected Blinking: Transferring data Green: 10Mbps device connected Amber: 100Mbps device connected c.
WLAN Link LED Solid: Bridge is ON Blinking: Transferring data wirelessly Off: Bridge is OFF b. OVERVIEW Knowing your Wireless Ethernet Bridge a b c a. Power Link LED Solid: Bridge is ON Blinking: Bridge is OFF 4 Ethernet Link LED Solid: Connected to Ethernet Off: Ethernet disconnected Blinking: Transferring data Green: 10Mbps device connected Amber: 100Mbps device connected c.

User Manual
Page 8
... the cable to run the setup wizard from a PC or configure it using a web-based setup. Then plug the other end into the LAN port on your computer or any other Ethernet-enabled device. 2. CONNECTING THE HARDWARE 1. In most instances, the Bridge will work out-of your Bridge by connecting the power supply cable to Use Web-Based Setup" section in this manual for special settings, you need to set up the Bridge for advanced setup. 5 In cases where you need to...
... the cable to run the setup wizard from a PC or configure it using a web-based setup. Then plug the other end into the LAN port on your computer or any other Ethernet-enabled device. 2. CONNECTING THE HARDWARE 1. In most instances, the Bridge will work out-of your Bridge by connecting the power supply cable to Use Web-Based Setup" section in this manual for special settings, you need to set up the Bridge for advanced setup. 5 In cases where you need to...
User Manual
Page 10
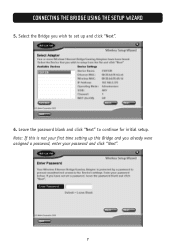
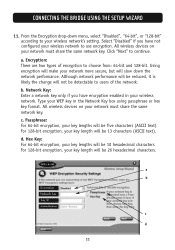
Leave the password blank and click "Next" to set up this Bridge and you wish to continue for initial setup. Select the Bridge you already were assigned a password, enter your first time setting up and click "Next". 6. CONNECTING THE BRIDGE USING THE SETUP WIZARD 5. Note: If this is not your password and click "Next". 7
Leave the password blank and click "Next" to set up this Bridge and you wish to continue for initial setup. Select the Bridge you already were assigned a password, enter your first time setting up and click "Next". 6. CONNECTING THE BRIDGE USING THE SETUP WIZARD 5. Note: If this is not your password and click "Next". 7

User Manual
Page 11
... option is selected. CONNECTING THE BRIDGE USING THE SETUP WIZARD 7. Ad-Hoc (Computer-to an available computer or device in the area. a b 8 b. Your Bridge ships with no changes to the password field to an available network (access point) in the area that's also using (Ad-Hoc). a. Access points will attempt to connect to keep your password blank. Click "Next" to continue. You can set the password now or make no password entered.
... option is selected. CONNECTING THE BRIDGE USING THE SETUP WIZARD 7. Ad-Hoc (Computer-to an available computer or device in the area. a b 8 b. Your Bridge ships with no changes to the password field to an available network (access point) in the area that's also using (Ad-Hoc). a. Access points will attempt to connect to keep your password blank. Click "Next" to continue. You can set the password now or make no password entered.
User Manual
Page 12
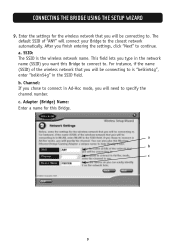
a. Adapter (Bridge) Name: Enter a name for the wireless network that you will connect your Bridge to specify the channel number. The default SSID of the wireless network that you will need to the closest network automatically. Enter the settings for this Bridge to connect to continue. Channel: If you chose to connect in Ad-Hoc mode, you finish entering the settings, click "Next" to . a b c 9 c. After you will be connecting to is the wireless network name. SSID: The SSID is "belkin54g...
a. Adapter (Bridge) Name: Enter a name for the wireless network that you will connect your Bridge to specify the channel number. The default SSID of the wireless network that you will need to the closest network automatically. Enter the settings for this Bridge to connect to continue. Channel: If you chose to connect in Ad-Hoc mode, you finish entering the settings, click "Next" to . a b c 9 c. After you will be connecting to is the wireless network name. SSID: The SSID is "belkin54g...
User Manual
Page 13
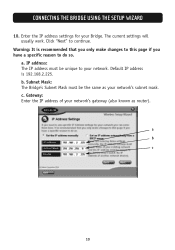
Default IP address is recommended that you only make changes to this page if you have a specific reason to your network. b. Warning: It is 192.168.2.225. Gateway: Enter the IP address of your network's gateway (also known as your Bridge. a b c 10 The current settings will usually work. IP address: The IP address must be unique to do so. Enter the IP address settings for your network's subnet mask. c. CONNECTING THE BRIDGE USING THE SETUP WIZARD 10. Subnet Mask: The Bridge's Subnet Mask must be the same as router). Click "Next" to continue. a.
Default IP address is recommended that you only make changes to this page if you have a specific reason to your network. b. Warning: It is 192.168.2.225. Gateway: Enter the IP address of your network's gateway (also known as your Bridge. a b c 10 The current settings will usually work. IP address: The IP address must be unique to do so. Enter the IP address settings for your network's subnet mask. c. CONNECTING THE BRIDGE USING THE SETUP WIZARD 10. Subnet Mask: The Bridge's Subnet Mask must be the same as router). Click "Next" to continue. a.
User Manual
Page 14
... All wireless devices on your network more secure, but will make your network must share the same network key. Using encryption will slow down menu, select "Disabled", "64-bit", or "128-bit" according to choose from: 64-bit and 128-bit. Network Key: Enter a network key only if you have encryption enabled in the Network Key box using passphrase or hex key format. Passphrase: For 64-bit encryption, your wireless network to continue. Encryption: There are two types...
... All wireless devices on your network more secure, but will make your network must share the same network key. Using encryption will slow down menu, select "Disabled", "64-bit", or "128-bit" according to choose from: 64-bit and 128-bit. Network Key: Enter a network key only if you have encryption enabled in the Network Key box using passphrase or hex key format. Passphrase: For 64-bit encryption, your wireless network to continue. Encryption: There are two types...
User Manual
Page 16
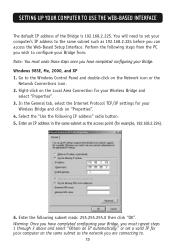
... the Network Connections icon. 2. Windows 98SE, Me, 2000, and XP 1. Go to configure your Bridge from the PC you wish to the Windows Control Panel and double-click on "Properties". 4. Enter an IP address in the same subnet as 192.168.2.224 before you must undo these steps once you have completed configuring your Bridge, you can access the Web-Based Setup Interface. Enter the following IP address" radio button...
... the Network Connections icon. 2. Windows 98SE, Me, 2000, and XP 1. Go to configure your Bridge from the PC you wish to the Windows Control Panel and double-click on "Properties". 4. Enter an IP address in the same subnet as 192.168.2.224 before you must undo these steps once you have completed configuring your Bridge, you can access the Web-Based Setup Interface. Enter the following IP address" radio button...
User Manual
Page 17
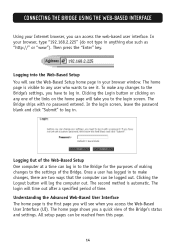
To make changes, there are two ways that the computer can access the web-based user interface. In the login screen, leave the password blank and click "Submit" to log in to the settings of the Bridge. Once a user has logged in . Understanding the Advanced Web-Based User Interface The home page is automatic. Clicking the Logout button will time out after a specified period of the Bridge's status and settings. All setup pages can log in...
To make changes, there are two ways that the computer can access the web-based user interface. In the login screen, leave the password blank and click "Submit" to log in to the settings of the Bridge. Once a user has logged in . Understanding the Advanced Web-Based User Interface The home page is automatic. Clicking the Logout button will time out after a specified period of the Bridge's status and settings. All setup pages can log in...
User Manual
Page 18
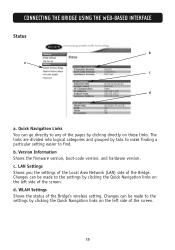
... into logical categories and grouped by tabs to make finding a particular setting easier to any of the pages by clicking the Quick Navigation links on these links. Version Information Shows the firmware version, boot-code version, and hardware version. Changes can be made to the settings by clicking directly on the left side of the screen. 15 WLAN Settings Shows the status of the Bridge. CONNECTING THE BRIDGE USING THE WEB-BASED INTERFACE Status b a c d a.
... into logical categories and grouped by tabs to make finding a particular setting easier to any of the pages by clicking the Quick Navigation links on these links. Version Information Shows the firmware version, boot-code version, and hardware version. Changes can be made to the settings by clicking directly on the left side of the screen. 15 WLAN Settings Shows the status of the Bridge. CONNECTING THE BRIDGE USING THE WEB-BASED INTERFACE Status b a c d a.
User Manual
Page 19
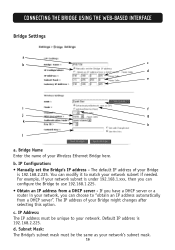
... your network subnet is under 192.168.1.xxx, then you can configure the Bridge to "obtain an IP address automatically from a DHCP server - b. For example, if your network. Subnet Mask: The Bridge's subnet mask must be the same as your Bridge is 192.168.2.225. d. The IP address of your network's subnet mask. 16 CONNECTING THE BRIDGE USING THE WEB-BASED INTERFACE Bridge Settings a b c d e i f j g k h l a. Bridge Name Enter the name of your network subnet if needed. Default IP address is...
... your network subnet is under 192.168.1.xxx, then you can configure the Bridge to "obtain an IP address automatically from a DHCP server - b. For example, if your network. Subnet Mask: The Bridge's subnet mask must be the same as your Bridge is 192.168.2.225. d. The IP address of your network's subnet mask. 16 CONNECTING THE BRIDGE USING THE WEB-BASED INTERFACE Bridge Settings a b c d e i f j g k h l a. Bridge Name Enter the name of your network subnet if needed. Default IP address is...
User Manual
Page 20
... connect to an available network (access point) in the area that all wireless devices must share the same network key. g. Mode • Infrastructure - There are two types of encryption to choose from the list of your wireless network is "belkin54g", enter "belkin54g" in the network name (SSID) you . Authentication Mode: This setting allows the Bridge to use the same channel. CONNECTING THE BRIDGE USING THE WEB-BASED INTERFACE e. f. You can authenticate each other and start transmitting data. Access points will slow down menu...
... connect to an available network (access point) in the area that all wireless devices must share the same network key. g. Mode • Infrastructure - There are two types of encryption to choose from the list of your wireless network is "belkin54g", enter "belkin54g" in the network name (SSID) you . Authentication Mode: This setting allows the Bridge to use the same channel. CONNECTING THE BRIDGE USING THE WEB-BASED INTERFACE e. f. You can authenticate each other and start transmitting data. Access points will slow down menu...
User Manual
Page 23
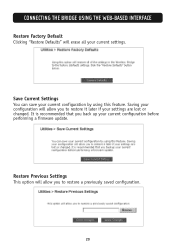
Save Current Settings You can save your current configuration before performing a firmware update. Saving your configuration will allow you to restore it later if your settings are lost or changed. It is recommended that you back up your current configuration by using this feature. Restore Previous Settings This option will erase all your current settings. CONNECTING THE BRIDGE USING THE WEB-BASED INTERFACE Restore Factory Default Clicking "Restore Defaults" will allow you to restore a previously saved configuration. 20
Save Current Settings You can save your current configuration before performing a firmware update. Saving your configuration will allow you to restore it later if your settings are lost or changed. It is recommended that you back up your current configuration by using this feature. Restore Previous Settings This option will erase all your current settings. CONNECTING THE BRIDGE USING THE WEB-BASED INTERFACE Restore Factory Default Clicking "Restore Defaults" will allow you to restore a previously saved configuration. 20
User Manual
Page 25
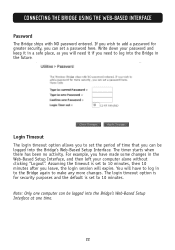
For example, you leave, the login session will expire. Note: Only one computer can be logged into the Bridge's Web-Based Setup Interface at one time. 22 CONNECTING THE BRIDGE USING THE WEB-BASED INTERFACE Password The Bridge ships with NO password entered. If you can be logged into the Bridge's Web-Based Setup Interface. Assuming the timeout is set the period of time that you need it if you can set to 10 minutes, then...
For example, you leave, the login session will expire. Note: Only one computer can be logged into the Bridge's Web-Based Setup Interface at one time. 22 CONNECTING THE BRIDGE USING THE WEB-BASED INTERFACE Password The Bridge ships with NO password entered. If you can be logged into the Bridge's Web-Based Setup Interface. Assuming the timeout is set the period of time that you need it if you can set to 10 minutes, then...
User Manual
Page 26
... "LAN or High-Speed Internet" area, right-click "Wireless Network Connection" and click "Properties". If the check box is enabled on all the computers on top, click the "General" tab. 23 Close the "Local Area Connection Status" box. Windows XP Environment Verify that there is a mismatch between the "Network name (SSID)" and "Wireless network key (WEP)" settings in the "My Network Places" window. If your Bridge appears to . In Control Panel...
... "LAN or High-Speed Internet" area, right-click "Wireless Network Connection" and click "Properties". If the check box is enabled on all the computers on top, click the "General" tab. 23 Close the "Local Area Connection Status" box. Windows XP Environment Verify that there is a mismatch between the "Network name (SSID)" and "Wireless network key (WEP)" settings in the "My Network Places" window. If your Bridge appears to . In Control Panel...
User Manual
Page 27
... present, click "Install". Computers are not communicating with the wireless network. In Windows 2000, I get the following items" list, verify that the "File and Printer Sharing for Microsoft Networks" and click "OK". Microwave ovens and some cordless phones operate at a frequency of the wireless network properties settings are steel-framed structures. TROUBLESHOOTING In the "This connection uses the following error message: "Medium cable disconnected". If this...
... present, click "Install". Computers are not communicating with the wireless network. In Windows 2000, I get the following items" list, verify that the "File and Printer Sharing for Microsoft Networks" and click "OK". Microwave ovens and some cordless phones operate at a frequency of the wireless network properties settings are steel-framed structures. TROUBLESHOOTING In the "This connection uses the following error message: "Medium cable disconnected". If this...


