Operation Manual
Page 2
..., be installed so that operates when the vehicle is in "park" or when the vehicle's parking brake is used for television reception, video or DVD play , the LCD panel or video monitor must be snowy, or cause some areas will only function when the vehicle is in gear or when the parking... brake is dirty. If the LCD panel or video monitor is applied. Warnings Do not use any abrasive cleaners, they may ...
..., be installed so that operates when the vehicle is in "park" or when the vehicle's parking brake is used for television reception, video or DVD play , the LCD panel or video monitor must be snowy, or cause some areas will only function when the vehicle is in gear or when the parking... brake is dirty. If the LCD panel or video monitor is applied. Warnings Do not use any abrasive cleaners, they may ...
Operation Manual
Page 3
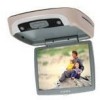
... DVD Player with 3-Position Switch • Backlit Controls for Low Light Operation • Last Position Memory for DVD Options * Audiovox P/N PODTVT ** Audiovox P/N SIRSWB -3- 128-7256A 3 of 35 Enjoy your equipment. Congratulations on your family many years of video entertainment in the mobile environment. Features • 8.5 Inch TFT (Thin Film Transistor) Active Matrix LCD (Liquid Crystal Display) Monitor...
... DVD Player with 3-Position Switch • Backlit Controls for Low Light Operation • Last Position Memory for DVD Options * Audiovox P/N PODTVT ** Audiovox P/N SIRSWB -3- 128-7256A 3 of 35 Enjoy your equipment. Congratulations on your family many years of video entertainment in the mobile environment. Features • 8.5 Inch TFT (Thin Film Transistor) Active Matrix LCD (Liquid Crystal Display) Monitor...
Operation Manual
Page 5
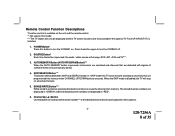
... instructions. -5- 128-7256A 5 of the three sources (DVD, AV1, AUX, *TV Optional). 10. ( - ) Button - POWER Button - Used to the video program audio. 19. Side Remote Sensor Eye - Auxiliary Video Input. 16. Use this button to control other accessories. 17. For loading ...Disc. 2. EJECT ( ) Button - To stop playback. 6. Drop Down LCD Panel. 18. STOP ( ) Button - PLAY...
... instructions. -5- 128-7256A 5 of the three sources (DVD, AV1, AUX, *TV Optional). 10. ( - ) Button - POWER Button - Used to the video program audio. 19. Side Remote Sensor Eye - Auxiliary Video Input. 16. Use this button to control other accessories. 17. For loading ...Disc. 2. EJECT ( ) Button - To stop playback. 6. Drop Down LCD Panel. 18. STOP ( ) Button - PLAY...
Operation Manual
Page 6
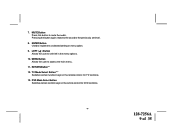
...88.3MHz; Note:These buttons will not turn on the dome lights in this button to decrease the volume level of the Audiovox HP275 Headphones when using these devices the volume must be adjusted with the wireless headphone volume control or with the vehicle's interior illumination. • ...Off - Note : Audiovox recommends the use of the headphone jacks. Channel 3, 89.1MHz; VOLUME ( ) Button - Three position Dome Light Switch • Auto - Turns on in...
...88.3MHz; Note:These buttons will not turn on the dome lights in this button to decrease the volume level of the Audiovox HP275 Headphones when using these devices the volume must be adjusted with the wireless headphone volume control or with the vehicle's interior illumination. • ...Off - Note : Audiovox recommends the use of the headphone jacks. Channel 3, 89.1MHz; VOLUME ( ) Button - Three position Dome Light Switch • Auto - Turns on in...
Operation Manual
Page 7
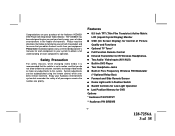
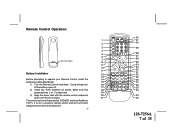
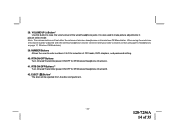
Make sure that 18 proper polarity (+ or -) is not a universal remote control and will operate the VOD8521 and most Audiovox VCP's. It is observed. 19 3) Align the cover tabs with the remote control and press 20 down . IRTA IRTB 42 41 40 ... Operation 1 2 3 4 5 6 7 BATTERY COVER 8 9 10 11 Battery Installation 12 13 Before attempting to operate your Remote Control, install the 14 batteries as shown. Using a fingernail, 16 lift the battery cover off. 17 2) Install two "AAA" batteries as described below. 15 1) Turn the Remote Control face down until the cover...
Make sure that 18 proper polarity (+ or -) is not a universal remote control and will operate the VOD8521 and most Audiovox VCP's. It is observed. 19 3) Align the cover tabs with the remote control and press 20 down . IRTA IRTB 42 41 40 ... Operation 1 2 3 4 5 6 7 BATTERY COVER 8 9 10 11 Battery Installation 12 13 Before attempting to operate your Remote Control, install the 14 batteries as shown. Using a fingernail, 16 lift the battery cover off. 17 2) Install two "AAA" batteries as described below. 15 1) Turn the Remote Control face down until the cover...
Operation Manual
Page 8
... The TV Option will store or erase the channel from memory. SKIP/SEARCH Button*** This button selects betweeen SKIP and SEARCH mode. Channel Up ( ) Button Use this button will only be displayed and the TV control functions are detected with signals of 35 In "SKIP mode" the TV tuner will change...: DVD, AV1, AUX and TV***. 3. SOURCE Button* Each time the button is installed. 1. The stored channel numbers are displayed in "GREEN" and the erased channel...
... The TV Option will store or erase the channel from memory. SKIP/SEARCH Button*** This button selects betweeen SKIP and SEARCH mode. Channel Up ( ) Button Use this button will only be displayed and the TV control functions are detected with signals of 35 In "SKIP mode" the TV tuner will change...: DVD, AV1, AUX and TV***. 3. SOURCE Button* Each time the button is installed. 1. The stored channel numbers are displayed in "GREEN" and the erased channel...
Operation Manual
Page 9
7. LEFT ( ) Button Allows the user to access the main menu. 11. TV Mode Select Button*** Switches certain function keys on the remote control for TV functions. 13. MENU Button Allows the user to shift left in the menu options. 10. Pressing the button again restores the sound to mute the audio. DVD Mode Select button Switches certain function keys on the remote control for DVD functions. -9- 128-7256A 9 of 35 MUTE Button Press this button to the previously set level. 8. RETURN Button** 12. ENTER Button Used to implement a selected setting or menu option. 9.
7. LEFT ( ) Button Allows the user to access the main menu. 11. TV Mode Select Button*** Switches certain function keys on the remote control for TV functions. 13. MENU Button Allows the user to shift left in the menu options. 10. Pressing the button again restores the sound to mute the audio. DVD Mode Select button Switches certain function keys on the remote control for DVD functions. -9- 128-7256A 9 of 35 MUTE Button Press this button to the previously set level. 8. RETURN Button** 12. ENTER Button Used to implement a selected setting or menu option. 9.
Operation Manual
Page 12
...The type & number of angles vary from disc to change . Screen Mode Button Allows the user to disc. 27. SOURCE SELECT Button** With FM ON, used to display and select the available camera angles. FWD ( ) Button Allows the user to the FM Modulator, POD audio or SAT Audio (Second IR input...). With FM OFF, used to select the Audio source to search in DVD. Each time the button is loaded into the disc compartment. 25. VCP Mode Select button Switches certain function keys on the...
...The type & number of angles vary from disc to change . Screen Mode Button Allows the user to disc. 27. SOURCE SELECT Button** With FM ON, used to display and select the available camera angles. FWD ( ) Button Allows the user to the FM Modulator, POD audio or SAT Audio (Second IR input...). With FM OFF, used to select the Audio source to search in DVD. Each time the button is loaded into the disc compartment. 25. VCP Mode Select button Switches certain function keys on the...
Operation Manual
Page 13
...Allows the user to adjust the setting. Once the desired adjustment bar is displayed, use the VOLUME UP/DOWN buttons to repeat a chapter, title, track, or all of a DVD, CD or MP3. 33. VOLUME DOWN (-) Button* Use this button is pressed, the OSD will automatically turn off if no adjustments are... made within 6 seconds, or if any other button is also used to decrease the volume level of 35 PIX Button (PICTURE...
...Allows the user to adjust the setting. Once the desired adjustment bar is displayed, use the VOLUME UP/DOWN buttons to repeat a chapter, title, track, or all of a DVD, CD or MP3. 33. VOLUME DOWN (-) Button* Use this button is pressed, the OSD will automatically turn off if no adjustments are... made within 6 seconds, or if any other button is also used to decrease the volume level of 35 PIX Button (PICTURE...
Operation Manual
Page 14
... raise the volume level of CD tracks, DVD chapters, and password setting. 40. IRTA ON/OFF Buttons Turn Infrared Transmitter power ON/OFF for IR Wireless Headphone Channel B. 42. EJECT ( )Button* The disc will not affect the volume of 35 When using these devices the volume must be ejected from the disc... page 17, Wireless FM Modulator). 39. NUMBER Buttons Allows the user to enter numbers 0 to 9 for selection of the wired headphone jacks. VOLUME UP (+) Button* Use this button to make picture adjustments in picture select mode. 38.
... raise the volume level of CD tracks, DVD chapters, and password setting. 40. IRTA ON/OFF Buttons Turn Infrared Transmitter power ON/OFF for IR Wireless Headphone Channel B. 42. EJECT ( )Button* The disc will not affect the volume of 35 When using these devices the volume must be ejected from the disc... page 17, Wireless FM Modulator). 39. NUMBER Buttons Allows the user to enter numbers 0 to 9 for selection of the wired headphone jacks. VOLUME UP (+) Button* Use this button to make picture adjustments in picture select mode. 38.
Operation Manual
Page 15
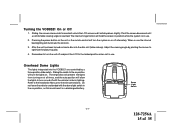
Sliding the screen release lock forward will unlock the LCD screen and it will illuminate the controls. 3. Pivot the screen downward until a comfortable viewing angle ...the system is reached. After the unit has been turned on . Turning the VOD8521 On or Off 1. When in use. Dome Light Switch -15- 128-7256A 15 of 35 Remember to turn the lights on load a disc into the... quality. 4. The internal hinge friction will turn the unit off and pivot the LCD to turn the system on and off alternately. Do not leave the vehicle unattended with the vehicle's interior lighting.
Sliding the screen release lock forward will unlock the LCD screen and it will illuminate the controls. 3. Pivot the screen downward until a comfortable viewing angle ...the system is reached. After the unit has been turned on . Turning the VOD8521 On or Off 1. When in use. Dome Light Switch -15- 128-7256A 15 of 35 Remember to turn the lights on load a disc into the... quality. 4. The internal hinge friction will turn the unit off and pivot the LCD to turn the system on and off alternately. Do not leave the vehicle unattended with the vehicle's interior lighting.
Operation Manual
Page 16
... in infrared transmitter for use the remote control supplied with Audiovox wireless headphones (Part Number MVIRHS). See the documentation accompanying your Audiovox wireless headphones. -16...- 128-7256A 16 of sight from the remote control to allow the unit to the AV 1 input. The infrared sensor can then be controlled simply by pointing its respective component connected to be adjusted using...Any number of wireless headphones may be used but they must use with the component. In this case you must be used within a line of 35 Remote Sensor...
... in infrared transmitter for use the remote control supplied with Audiovox wireless headphones (Part Number MVIRHS). See the documentation accompanying your Audiovox wireless headphones. -16...- 128-7256A 16 of sight from the remote control to allow the unit to the AV 1 input. The infrared sensor can then be controlled simply by pointing its respective component connected to be adjusted using...Any number of wireless headphones may be used but they must use with the component. In this case you must be used within a line of 35 Remote Sensor...
Operation Manual
Page 17
.... AV1 Input The AV1 video input may not be connected to a Video cassette Player (VCP), video game system, or other audio / video devices. The VOD8521 is unsatisfactory, an optional wired relay box (Audiovox P/N SIRSWB) can be used with your overhead pod. The AV1 input requires a 8010730 cable. *NOTE: In..., (88.3, 88.7, 89.1, 89.5, 89.9MHz). This feature is the case with any standard wired stereo headphones. These jacks are controlled by using either the FM transmitter buttons on the remote (On/Off, Channel Select) or the FM Select button on the screen. If wireless reception is...
.... AV1 Input The AV1 video input may not be connected to a Video cassette Player (VCP), video game system, or other audio / video devices. The VOD8521 is unsatisfactory, an optional wired relay box (Audiovox P/N SIRSWB) can be used with your overhead pod. The AV1 input requires a 8010730 cable. *NOTE: In..., (88.3, 88.7, 89.1, 89.5, 89.9MHz). This feature is the case with any standard wired stereo headphones. These jacks are controlled by using either the FM transmitter buttons on the remote (On/Off, Channel Select) or the FM Select button on the screen. If wireless reception is...
Operation Manual
Page 18
... feed an AUX input on the side of the DVD player, make sure you read this unit. These regional codes must match in this section completely. The audio / video device could be used to an additional monitor or video display. DVD Basics To get the optimum use out of the unit. This unit's code is region...
... feed an AUX input on the side of the DVD player, make sure you read this unit. These regional codes must match in this section completely. The audio / video device could be used to an additional monitor or video display. DVD Basics To get the optimum use out of the unit. This unit's code is region...
Operation Manual
Page 19
...source selected. A disc that contains audio files (for example, a CD-R/CD-RW with the player. DVDs discs which contain video. • Audio discs - Note : This function is half way in and play • DVD discs - Note: the following Discs CANNOT be automatically pulled in it is not removed from ... and insert the disc (Label Up) into the disc compartment. Audio CDs that it will be used with this player : • MiniDisc • Laserdisc • CD-I, CD-ROM, DVD-ROM To load and Play a Disc When you load a disc, make sure that contain music or sound content only. • MP3 ...
...source selected. A disc that contains audio files (for example, a CD-R/CD-RW with the player. DVDs discs which contain video. • Audio discs - Note : This function is half way in and play • DVD discs - Note: the following Discs CANNOT be automatically pulled in it is not removed from ... and insert the disc (Label Up) into the disc compartment. Audio CDs that it will be used with this player : • MiniDisc • Laserdisc • CD-I, CD-ROM, DVD-ROM To load and Play a Disc When you load a disc, make sure that contain music or sound content only. • MP3 ...
Operation Manual
Page 20
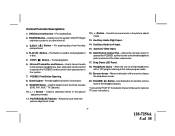
For example, you customize your DVD player. Press or to select the desired options, and then press ENTER to the desired page, move the highlight using the or cursor button and press enter. 4. Exiting the Setup Menu Press the SETUP button again or Move the highlight to the icon...of the Setup Menu. The Setup Menu appears on the remote. Each icon represents a page. After entering the desired page, highlight the desired item using the cursor button or to the right. Main Page Audio Setup Password Setup Preference Setup Exit Setup 2. There are 5 icons on -screen display, ...
For example, you customize your DVD player. Press or to select the desired options, and then press ENTER to the desired page, move the highlight using the or cursor button and press enter. 4. Exiting the Setup Menu Press the SETUP button again or Move the highlight to the icon...of the Setup Menu. The Setup Menu appears on the remote. Each icon represents a page. After entering the desired page, highlight the desired item using the cursor button or to the right. Main Page Audio Setup Password Setup Preference Setup Exit Setup 2. There are 5 icons on -screen display, ...

Operation Manual
Page 24
..., the figure below is shown: OLD PASSWORD Input the old password or the default password ( 4 digits ) NEW PASSWORD Input a new password ( 4 digits ) using the default password to set the parental level and change the passord. To avoid the possibility of 35 Then press ENTER to change the password..., you can be limited depending on the age of users while some discs cannot. -24- 128-7256A 24 of others using the numbers buttons (0~9) CONFIRM PWD Confirm the new password by entering the same password again. This password is 3308. NOTE: The Default Password ...
..., the figure below is shown: OLD PASSWORD Input the old password or the default password ( 4 digits ) NEW PASSWORD Input a new password ( 4 digits ) using the default password to set the parental level and change the passord. To avoid the possibility of 35 Then press ENTER to change the password..., you can be limited depending on the age of users while some discs cannot. -24- 128-7256A 24 of others using the numbers buttons (0~9) CONFIRM PWD Confirm the new password by entering the same password again. This password is 3308. NOTE: The Default Password ...
Operation Manual
Page 26
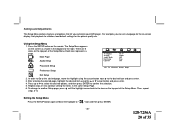
... ALL - repeat the entire disc Note : Repeat Off mode has no OSD display. -26- 128-7256A 26 of 35 Playing DVDs Press the DISPLAY button on the screen Current title, chapter and elasped time Current subtitle information Current audio language and audio channel Current ...surround sound setting Current angle setting Current A-B setting Current repeat status Display off Selecting a Chapter You can skip to a specific chapter by using the numbers keys. Press DISPLAY button Once Twice 3 times 4 times 5 times 6 times 7 times 8 times Information display on the remote control...
... ALL - repeat the entire disc Note : Repeat Off mode has no OSD display. -26- 128-7256A 26 of 35 Playing DVDs Press the DISPLAY button on the screen Current title, chapter and elasped time Current subtitle information Current audio language and audio channel Current ...surround sound setting Current angle setting Current A-B setting Current repeat status Display off Selecting a Chapter You can skip to a specific chapter by using the numbers keys. Press DISPLAY button Once Twice 3 times 4 times 5 times 6 times 7 times 8 times Information display on the remote control...

Operation Manual
Page 27
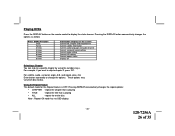
...Mode In CD playback, the play the songs on the disc in random order • PROGRAM - play mode can skip to track7, press "07" Using the REPEAT feature The default mode for Repeat feature is playing • ALL - Playing Audio CDs When playing an audio CD, the DISPLAY banner appears...options of tracks and the elapsed time for example, repeats once that is OFF. Turn off . Selecting a Track You can be changed by using the numbers keys. repeat the track that track has ended. play the songs in random order • SHUFFLE -play mode options: • RANDOM -...
...Mode In CD playback, the play the songs on the disc in random order • PROGRAM - play mode can skip to track7, press "07" Using the REPEAT feature The default mode for Repeat feature is playing • ALL - Playing Audio CDs When playing an audio CD, the DISPLAY banner appears...options of tracks and the elapsed time for example, repeats once that is OFF. Turn off . Selecting a Track You can be changed by using the numbers keys. repeat the track that track has ended. play the songs in random order • SHUFFLE -play mode options: • RANDOM -...
Operation Manual
Page 28
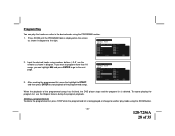
... and press ENTER to go to another play the tracks on a disc in the desired order using numbers buttons ( 0~9 ) on the screen as shown in diagram to start playback of the programmed songs has finished, the DVD player stops and the program list is being played or change to the next page. 3. Press... ZOOM until the PROGRAM table is displayed on the remote as shown in diagram. If you want to program more than 10 songs, you can play mode using the ZOOM button. -28...
... and press ENTER to go to another play the tracks on a disc in the desired order using numbers buttons ( 0~9 ) on the screen as shown in diagram to start playback of the programmed songs has finished, the DVD player stops and the program list is being played or change to the next page. 3. Press... ZOOM until the PROGRAM table is displayed on the remote as shown in diagram. If you want to program more than 10 songs, you can play mode using the ZOOM button. -28...
