Operation Manual
Page 1
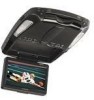
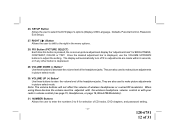
Released 5-13-03. 128-6751 128-6751 1 of 31 PAUSE REV FWD S OURCE S ON OFF AUTO FM VO LUME S ELECT HE ADPHON ES VOD705 VOD715 DVD PLAYER WITH DROP-DOWN VIDEO MONITOR LR AUDI O INPUT VID EO IR ® ELECTRONICS CORP.
Released 5-13-03. 128-6751 128-6751 1 of 31 PAUSE REV FWD S OURCE S ON OFF AUTO FM VO LUME S ELECT HE ADPHON ES VOD705 VOD715 DVD PLAYER WITH DROP-DOWN VIDEO MONITOR LR AUDI O INPUT VID EO IR ® ELECTRONICS CORP.
Operation Manual
Page 2
... putting on headphones always adjust the volume setting to wipe the screen if it is dirty. Caution children to leave the dome light switch in the off or auto positions when the vehicle is unattended, as it will be visible, directly or indirectly, by the operator of the driver's seat, or that is located in use. Lock the LCD screen in the fully closed position...
... putting on headphones always adjust the volume setting to wipe the screen if it is dirty. Caution children to leave the dome light switch in the off or auto positions when the vehicle is unattended, as it will be visible, directly or indirectly, by the operator of the driver's seat, or that is located in use. Lock the LCD screen in the fully closed position...
Operation Manual
Page 3
... individual owner's manuals for IR Wireless Headphones (Satellite Radio Ready) • Two Audio / Video Inputs • Headphone / SpeakerAmplifier • Two Headphone Jacks • Forward and Side Remote Sensor • Dome Lights with the product and to the system. Features • 7 Inch TFT (Thin Film Transistor)Active Matrix LCD (Liquid Crystal Display) Monitor • OSD (On Screen Display) for Control of Picture Quality and Functions • Full Function Remote Control •...
... individual owner's manuals for IR Wireless Headphones (Satellite Radio Ready) • Two Audio / Video Inputs • Headphone / SpeakerAmplifier • Two Headphone Jacks • Forward and Side Remote Sensor • Dome Lights with the product and to the system. Features • 7 Inch TFT (Thin Film Transistor)Active Matrix LCD (Liquid Crystal Display) Monitor • OSD (On Screen Display) for Control of Picture Quality and Functions • Full Function Remote Control •...
Operation Manual
Page 5
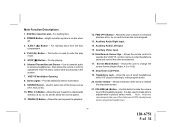
.... Use this button to release the drop down screen. 21. For loading Disc. 2. For ejecting discs from the disc compartment. 4. Auxiliary Audio Right Input. 14. VOLUME ( ) Button - EJECT ( ) Button - Drop Down LCD Panel. 19. It is used to enter the play mode. 5. Main Function Descriptions 1. Use to transmit audio to pause the playback. 12. Allows the user to video program audio. 20. Note : Audiovox recommends the use of 31 This button is also used to make picture adjustments in picture select mode. Headphone Jack - Bright red...
.... Use this button to release the drop down screen. 21. For loading Disc. 2. For ejecting discs from the disc compartment. 4. Auxiliary Audio Right Input. 14. VOLUME ( ) Button - EJECT ( ) Button - Drop Down LCD Panel. 19. It is used to enter the play mode. 5. Main Function Descriptions 1. Use to transmit audio to pause the playback. 12. Allows the user to video program audio. 20. Note : Audiovox recommends the use of 31 This button is also used to make picture adjustments in picture select mode. Headphone Jack - Bright red...

Operation Manual
Page 6
... modulator. It is pressed will switched FMM cycles through (FM OFF - VOLUME ( ) Button - Use this button to make picture adjustments in picture select mode. POD AUDIO - When using these devices the volume must be adjusted with the wireless headphone volume control or with the vehicle's interior illumination. • Off - Each time this position. • On - FM Select Button - The dome lights will not turn on the dome lights. -6- 128-6751 6 of the...
... modulator. It is pressed will switched FMM cycles through (FM OFF - VOLUME ( ) Button - Use this button to make picture adjustments in picture select mode. POD AUDIO - When using these devices the volume must be adjusted with the wireless headphone volume control or with the vehicle's interior illumination. • Off - Each time this position. • On - FM Select Button - The dome lights will not turn on the dome lights. -6- 128-6751 6 of the...
Operation Manual
Page 7
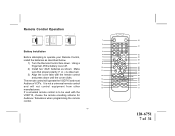
.... Make sure that proper polarity (+ or -) is not a universal remote control and will operate the VOD715 and most Audiovox VCP's. The remote control will not control equipment from other manufacturers. It is observed. 3) Align the cover tabs with the VOD715, choose the remote encoding scheme for Audiovox Televisions when programming the remote control. -7- POWER EJECT 1 32 SOURCE 2 AUTO MEMORY 31 3 SKIP/ SEARCH 4 ERASE/ WRITE - Remote Control Operation Battery Installation Before attempting to be used with the remote control...
.... Make sure that proper polarity (+ or -) is not a universal remote control and will operate the VOD715 and most Audiovox VCP's. The remote control will not control equipment from other manufacturers. It is observed. 3) Align the cover tabs with the VOD715, choose the remote encoding scheme for Audiovox Televisions when programming the remote control. -7- POWER EJECT 1 32 SOURCE 2 AUTO MEMORY 31 3 SKIP/ SEARCH 4 ERASE/ WRITE - Remote Control Operation Battery Installation Before attempting to be used with the remote control...
Operation Manual
Page 8
... button to turn the VOD715 off. 2. Each time the button is pressed, all active channels. 5. AUTO MEMORY Button** When the AUTO MEMORY button is pressed, the audio / video source will stop on channels that are detected with signals of 31 When the SKIP mode is disable, the TV will change the sources: DVD, AV1 and AUX. 3. Press the button again to turn the VOD715 on the LCD display screen, and the non-stored channel numbers are used. POWER Button* Press this model...
... button to turn the VOD715 off. 2. Each time the button is pressed, all active channels. 5. AUTO MEMORY Button** When the AUTO MEMORY button is pressed, the audio / video source will stop on channels that are detected with signals of 31 When the SKIP mode is disable, the TV will change the sources: DVD, AV1 and AUX. 3. Press the button again to turn the VOD715 on the LCD display screen, and the non-stored channel numbers are used. POWER Button* Press this model...

Operation Manual
Page 9
... remote control for TV functions. -9- 128-6751 9 of 31 MENU Button Allows the user to scroll upward in the menu options. 10. TV Mode Select Button** Switches certain function keys on VCD2.0. 12. Channel Up ( ) Button** Use this button to the previously set level. 8. MUTE Button Press this button to increase the channel number to the desired channel and to access the main menu. 11. Pressing the button again restores sound to mute...
... remote control for TV functions. -9- 128-6751 9 of 31 MENU Button Allows the user to scroll upward in the menu options. 10. TV Mode Select Button** Switches certain function keys on VCD2.0. 12. Channel Up ( ) Button** Use this button to the previously set level. 8. MUTE Button Press this button to increase the channel number to the desired channel and to access the main menu. 11. Pressing the button again restores sound to mute...
Operation Manual
Page 10
... or track. 16. PREVIOUS ( ) Button Allows the user to return to change the options. PAUSE ( ) Button* Allows the user to implement the selection. Press DISPLAY button DVD Player Perform Once Twice 3 times 4 times 5 times 6 times 7 times 8 times Display current TITLE & CHAPTER Display current SUBTITLE Display current AUDIO language & channel Display current surround status Display current ANGLE Display A-B current status Display REPEAT current status Display is turn off For Title & Chapter, use cursor buttons to do title/chapter...
... or track. 16. PREVIOUS ( ) Button Allows the user to return to change the options. PAUSE ( ) Button* Allows the user to implement the selection. Press DISPLAY button DVD Player Perform Once Twice 3 times 4 times 5 times 6 times 7 times 8 times Display current TITLE & CHAPTER Display current SUBTITLE Display current AUDIO language & channel Display current surround status Display current ANGLE Display A-B current status Display REPEAT current status Display is turn off For Title & Chapter, use cursor buttons to do title/chapter...
Operation Manual
Page 12
... select the DVD player's options (Display, OSD Language, Defaults, Parental Control, Password, Exit Setup). 27. 26. SETUP Button Allows the user to make picture adjustments in picture select mode. 30. VOLUME UP (+) Button* Use these buttons to raise the volume level of wireless headphones or a wired RF modulator. Once the desired adjustment bar is displayed, use the VOLUME UP/DOWN buttons to the right in picture select mode. Note: The volume buttons will automatically turn off if no adjustments are made...
... select the DVD player's options (Display, OSD Language, Defaults, Parental Control, Password, Exit Setup). 27. 26. SETUP Button Allows the user to make picture adjustments in picture select mode. 30. VOLUME UP (+) Button* Use these buttons to raise the volume level of wireless headphones or a wired RF modulator. Once the desired adjustment bar is displayed, use the VOLUME UP/DOWN buttons to the right in picture select mode. Note: The volume buttons will automatically turn off if no adjustments are made...
Operation Manual
Page 14
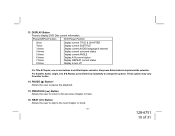
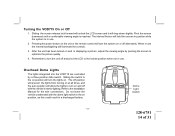
... SOURCE S O N O FF A UTO VOLUME SEFLMECT H EA D PH O NE S Dome Light Switch -14- 128-6751 14 of 31 The internal friction will allow the lights to the Installation Manual for the wire connections. Turning the VOD715 On or Off 1. Pivot the screen downward until a comfortable viewing angle is in use . 2. When in a discharged battery. Refer to turn the unit off alternately. Sliding the screen release lock forward will unlock the LCD screen...
... SOURCE S O N O FF A UTO VOLUME SEFLMECT H EA D PH O NE S Dome Light Switch -14- 128-6751 14 of 31 The internal friction will allow the lights to the Installation Manual for the wire connections. Turning the VOD715 On or Off 1. Pivot the screen downward until a comfortable viewing angle is in use . 2. When in a discharged battery. Refer to turn the unit off alternately. Sliding the screen release lock forward will unlock the LCD screen...
Operation Manual
Page 16
... screen. The audio / video device could be used with any standard wired stereo headphones. This feature is displayed on the unit. To access the A/V inputs, turn the VOD715 on and press the source button on the VOD715 or the Source button on the remote control until "AV1" is accessed by the volume up / down buttons on the VOD715 that can be a video game system, video camera, or other audio / video devices. Turn the video source component on the vehicles radio will provide a video signal...
... screen. The audio / video device could be used with any standard wired stereo headphones. This feature is displayed on the unit. To access the A/V inputs, turn the VOD715 on and press the source button on the VOD715 or the Source button on the remote control until "AV1" is accessed by the volume up / down buttons on the VOD715 that can be a video game system, video camera, or other audio / video devices. Turn the video source component on the vehicles radio will provide a video signal...
Operation Manual
Page 17
... video. • Audio discs - A disc that it is region 1. These regional codes must match in this player : • MiniDisc • Laserdisc • CD-I, CD-ROM, DVD-ROM To load and Play a Disc Press the Power button to play . This unit's code is compatible with the player. DVD Basics To get the optimum use out of the DVD section, make sure that contains audio files (for the disc to turn the unit ON. The unit will play • DVD discs - DVD discs...
... video. • Audio discs - A disc that it is region 1. These regional codes must match in this player : • MiniDisc • Laserdisc • CD-I, CD-ROM, DVD-ROM To load and Play a Disc Press the Power button to play . This unit's code is compatible with the player. DVD Basics To get the optimum use out of the DVD section, make sure that contains audio files (for the disc to turn the unit ON. The unit will play • DVD discs - DVD discs...
Operation Manual
Page 18
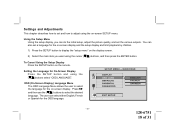
...;▲) buttons to select the desired language. OSD (On-Screen Display) Language Menu The OSD Language Menu allows the user to select the language for On-Screen Display Press the SETUP button and using the (▼▲)buttons select "OSD LANGUAGE". Settings and Adjustments This chapter describes how to set and how to adjust using the on -screen display. The user can do the initial setup, adjust the picture quality, and set the various outputs.
...;▲) buttons to select the desired language. OSD (On-Screen Display) Language Menu The OSD Language Menu allows the user to select the language for On-Screen Display Press the SETUP button and using the (▼▲)buttons select "OSD LANGUAGE". Settings and Adjustments This chapter describes how to set and how to adjust using the on -screen display. The user can do the initial setup, adjust the picture quality, and set the various outputs.
Operation Manual
Page 19
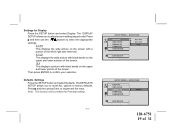
... the reset. The DEFAULTS SETUP allows you to adjust screen setting (aspect ratio) Press and then use the (▼▲)buttons to factory defaults. Defaults Settings Press the SETUP button and select Defaults. Press and then press Enter to confirm your selection. Settings for Display Press the SETUP button and select Display. The DISPLAY SETUP allows you to reset ALL options to select the appropriate settings. 4:3 / PS This displays the wide picture...
... the reset. The DEFAULTS SETUP allows you to adjust screen setting (aspect ratio) Press and then use the (▼▲)buttons to factory defaults. Defaults Settings Press the SETUP button and select Defaults. Press and then press Enter to confirm your selection. Settings for Display Press the SETUP button and select Display. The DISPLAY SETUP allows you to reset ALL options to select the appropriate settings. 4:3 / PS This displays the wide picture...
Operation Manual
Page 23
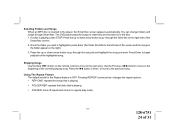
... be played on the remote to DISPLAY Banner. Press the DISPLAY button on your DVD player. TIME REMAIN and the time that is left in the song that is playing or you press DISPLAY again. TIME ELAPSED appears along with the amount of time left remain on -screen until you press DISPLAY again. CD-R discs that have been encoded in the song that is a format for storing digital audio...
... be played on the remote to DISPLAY Banner. Press the DISPLAY button on your DVD player. TIME REMAIN and the time that is left in the song that is playing or you press DISPLAY again. TIME ELAPSED appears along with the amount of time left remain on -screen until you press DISPLAY again. CD-R discs that have been encoded in the song that is a format for storing digital audio...
Operation Manual
Page 24
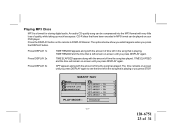
... . The DVD player plays the songs in order they were burned on the remote control to move to the disc. 1. repeats the songs that is playing. • FOLDER REP- Once the folder you want is playing, press STOP. Press Enter to regular play mode. -24- 128-6751 24 of 31 turns off repeat... button to the beginning of the highlighted song. Using The Repeat Feature The default mode for the Repeat feature is inserted in the folder appear on the right side of the screen and the songs in the player, the Smart Nav screen appears automatically. Press the up or down arrow button ...
... . The DVD player plays the songs in order they were burned on the remote control to move to the disc. 1. repeats the songs that is playing. • FOLDER REP- Once the folder you want is playing, press STOP. Press Enter to regular play mode. -24- 128-6751 24 of 31 turns off repeat... button to the beginning of the highlighted song. Using The Repeat Feature The default mode for the Repeat feature is inserted in the folder appear on the right side of the screen and the songs in the player, the Smart Nav screen appears automatically. Press the up or down arrow button ...
Operation Manual
Page 27
... ( ) appears on the IR power. • Make sure Modulator is connected properly. Make sure all cables are securely inserted into disc tray. The feature is not available at the beginning of movies because the disc is programmed to prohibit that action. This DVD player only plays DVD's, audio CDs and MP3s. • Both the unit and the disc are coded by using remote. • Verify that the batteries in the remote...
... ( ) appears on the IR power. • Make sure Modulator is connected properly. Make sure all cables are securely inserted into disc tray. The feature is not available at the beginning of movies because the disc is programmed to prohibit that action. This DVD player only plays DVD's, audio CDs and MP3s. • Both the unit and the disc are coded by using remote. • Verify that the batteries in the remote...
Operation Manual
Page 29
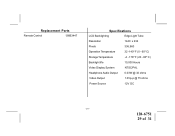
Replacement Parts Remote Control 136B3447 Specifications LCD Backlighting Edge Light Tube Resolution 1440 x 234 Pixels 336,960 Operation Temperature 32 -140º F (0 - 60º C) Storage Temperature -4 - 176º F (20 - 80º C) Backlight life 10,000 Hours Video Display System NTSC/PAL Headphone Audio Output 0.03W @ 32 ohms Video Output 1.0Vp-p @ 75 ohms Power Source 12V DC -29- 128-6751 29 of 31
Replacement Parts Remote Control 136B3447 Specifications LCD Backlighting Edge Light Tube Resolution 1440 x 234 Pixels 336,960 Operation Temperature 32 -140º F (0 - 60º C) Storage Temperature -4 - 176º F (20 - 80º C) Backlight life 10,000 Hours Video Display System NTSC/PAL Headphone Audio Output 0.03W @ 32 ohms Video Output 1.0Vp-p @ 75 ohms Power Source 12V DC -29- 128-6751 29 of 31
Operation Manual
Page 30
..., or by removal or defacement of the factory serial number/bar code label(s). To obtain repair or replacement within 12 months from state to state. This Warranty is in lieu of all other than expressed herein in connection with proof of...LOCATION OF WARRANTY STATION SERVING YOUR AREA 128-6751 30 of the product, or to damage to tapes, discs, speakers, accessories, or vehicle electrical systems. This Warranty does not apply to the Company at the Company's option) without charge for parts and repair labor. 12 MONTH LIMITED WARRANTY Applies to Audiovox Mobile Video Products AUDIOVOX...
..., or by removal or defacement of the factory serial number/bar code label(s). To obtain repair or replacement within 12 months from state to state. This Warranty is in lieu of all other than expressed herein in connection with proof of...LOCATION OF WARRANTY STATION SERVING YOUR AREA 128-6751 30 of the product, or to damage to tapes, discs, speakers, accessories, or vehicle electrical systems. This Warranty does not apply to the Company at the Company's option) without charge for parts and repair labor. 12 MONTH LIMITED WARRANTY Applies to Audiovox Mobile Video Products AUDIOVOX...


